Programming for 3CX in C #: using the 3CX Call Control API in the Call Flow Designer development environment
- Tutorial
- Recovery mode
Introduction
Writing programs for the 3CX system in C # can be a bit of an unusual activity for a novice IT professional or someone who has not previously encountered writing code. However, this skill will prove to be very useful and in demand if you are faced with the task of creating truly complex, functional or custom voice applications.
There are a number of powerful rapid development environments, but they all require professional pre-configuration and take up a fair amount of disk space. Therefore, I tried to limit myself to some compact solution, but with support for the IntelliSense function. Microsoft IntelliSense identifies errors in code well and automatically completes expressions. Of course, if you are already a C # guru, this article may not be as interesting to you. Notepad is enough for a professional!
Preparing a C # Development Environment Based on Visual Studio Code
1. Install .NET through the Turn Windows features on or off applet or Windows Update.
2. Install 3CX Call Flow Designer .
3. Download the 3CX API Documentation Package . You will need the 3CXObjectModel.2.0.0.0_v15.chm file from the archive, which contains the description of the classes, methods and properties of 3CX objects.
4. Download Visual Studio Code . This is a small, intelligent code editor. During installation, you can install the marked options to simplify further work.

5. Install the .NET Core SDK and .NET 4.6.1 SDK
6. Download the ZIP archive with the C # demo script from this link. The archive contains the project file Project1.csproj, which is basically similar to the OMSamples.csproj file from the previously downloaded 3CX API documentation archive. Unzip and click on the file Project1.csproj, which will open in the VS Code application.
7. In the VS Code environment, install the extension for C #. To do this, click Show Recommendation.

Then install all recommended extensions. After installation, do not forget to click the blue Reload button.

8. At the last stage, you need to install some C # dependencies. Go to Explorer> Libraries> Project1.cs and they will install automatically.
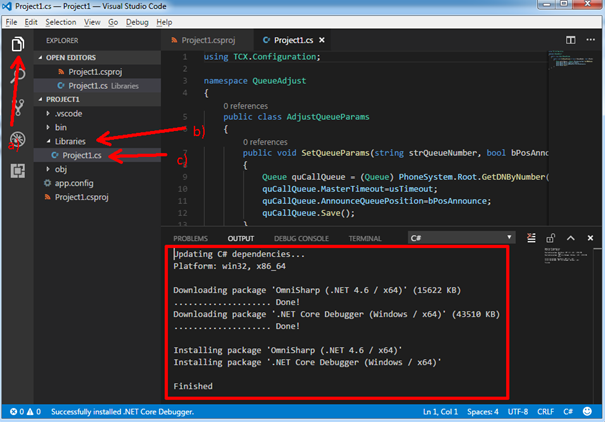
And now you can start programming. During the creation of the application, the development environment will automatically correct your mistakes, supplement operators, etc.

If you have never done programming, and, in particular, in C #, I can recommend this tutorial .
Project1 demo application makes custom settings for Call Queues parameters. Function
public void SetQueueParams(string strQueueNumber, bool bPosAnnounce, ushort usTimeout)uses three parameters
strQueueNumber - the extension of the Call Queue, with the parameters of which we are working.
bPosAnnounce - enable or disable the message to subscribers about their place in the Queue.
usTimeout - wait timeout in the Queue.
Classes are described in the 3CX Call Control API documentation that we downloaded earlier. The program performs the following actions with the Queue parameters (extension 801):
- From 00:00 to 11:59, the subscriber’s number is spoken in the Queue, and the subscriber’s waiting timeout is 5 minutes.
- From 12:00 to 23:59, the subscriber’s number is not spoken, and the wait timeout is 2 minutes.
If nothing is highlighted in red in the VS Code editor, there are no formal errors, and the program can be used in 3CX Call Flow Designer.
Using C # Script in 3CX Call Flow Designer
For general information on using 3CX Call Flow Designed , see the user guide and article on this blog .
1. Make a copy of the folder of the CFD DateTimeRouting demo project, which is located in the Documents \ 3CX Call Flow Designer Demos folder, to experiment on copies of the original application that comes with the distribution kit.
2. Copy the C # script (in our case Project1.cs) into the Libraries CFD folder of the project and give it a recognizable name, for example, QueueAdjust.cs.
3. Modify the original project by leaving two branches and adding the LaunchExternalScript component to each of them.
4. In the first component of LaunchExternalScript1, set the properties in accordance with our task and the semantics of the C # script.
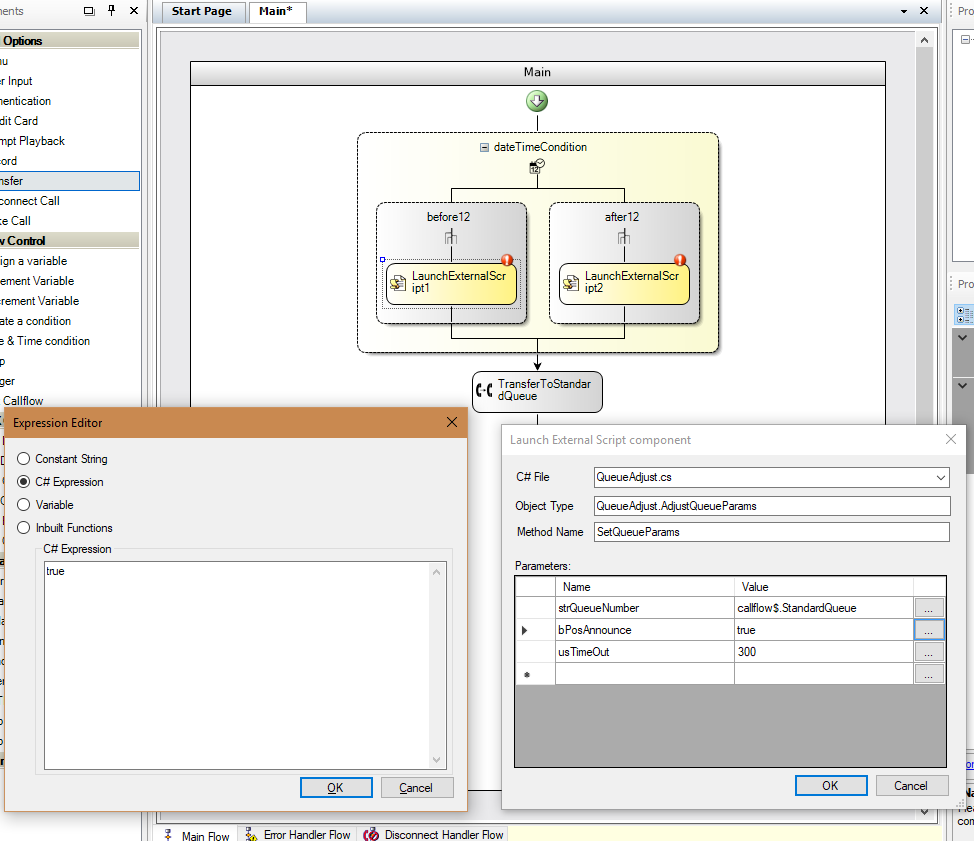
5. In the second component of LaunchExternalScript2, also set the properties for the second branch (time range).

6. Compile and place the application in the service Call Queue, as described in the last section of the previous article .
Conclusion
The 3CX Call Control API, for which development is underway, is a powerful call management tool in the PBX and the PBX itself. For example, the API allows you to programmatically manage current calls (make, disconnect, transfer, record, etc.), create and modify users (extension numbers), manage call forwarding rules and user statuses, create conferences, administer IP phones and much more. Learn more about it here . However, please note that to integrate 3CX V15.5 with a CRM system, a separate server REST API is now used. For example, here is an example of server-side CRM integration with Bitrix24.