Working with an Arduino COM Port from a Java Application
Sap, Habr. Perhaps people starting to learn arduino will be interested in how to easily and quickly organize the transfer of information between the microcontroller and the Java application. This bundle opens up a bunch of interesting opportunities for collecting and processing data from sensors, managing various whistle-farts, and also creating your first IoT projects.
Recently, on the Internet, I came across a very simple Java-Arduino Communication Library. Not finding publications on this topic here, I decided to share with you the experience of use. To work, we need the installed Arduino IDE , IntelliJ IDEA , Java SE Development Kit and, in fact, the microcontroller itself (I tested on the Chinese Arduino Nano andStrela based on Leonardo from Amperka, everything worked fine on both).
The task is simple - we will create a console application that, when launched, establishes a Serial connection with the microcontroller and waits for an input line from the user in an endless loop. Depending on the entered line, the following options are possible:
We’ll start building the system by writing and loading the sketch into the Arduino Nano. Nothing too complicated. In the "setup" block, configure the pin with the LED and the Serial port, and in the "loop" block, listen to the Serial port for incoming bytes. Depending on the received value, we perform this or that operation.
A little explanation and care requires only checking the conditions (b == 49) and (b == 48). If you don’t understand why, then welcome to the spoiler:
To check at this stage, you can send 1 and 0 from the port's built-in Arduino IDE monitor. If the LED on the board does not turn on / off, look for an error in your sketch.
Now run IntelliJ IDEA and create a new Java project. To work, you need to connect two additional libraries: jSerialComm-1.3.11.jar and arduino.jar . How to add downloaded jar-archives can be read here .
The entire application will consist of one single class:
To work with a COM port, an Arduino class object is created. The constructor takes two parameters:
It is better to specify these parameters immediately in the constructor, but you can also set them separately using setters. The name of the COM port can be viewed in the Arduino IDE, or in the device manager. The baud rate must match the one specified in the “setup” block of the sketch for the microcontroller, in this case 9600 bps / s:
Next, you need to establish a connection using the openConnection () method. The method returns true if the connection is successful. We print this value to the console to make sure that the actions performed are correct.
Important: after opening the connection, you need to pause using the Thread.sleep () method, in this case 2000 milliseconds. Arduino Nano turned out to be a real slowdown compared to Strela, which could be sent immediately after the connection was established. It is possible that your controller will need even more time. Therefore, if a connection is established, data is sent but not received, then first of all, increase the pause value.
Now we enter an infinite loop and begin to wait for input from the user:
When you enter the next line and press "enter", it is read and stored in the String s variable. Depending on the value of this line, the switch statement sends the character '1' or '0' to the microcontroller using the serialWrite (char c) method. Do not forget that when the microcontroller receives these characters and stores them in an integer variable, you will get 49, or 48).
In general, the following overloaded methods of the Arduino class can be used to transfer data:
As you can see, you can send the entire string, the character and part of the string characters (noOfChars). Moreover, in the last two methods, you can specify a pause after sending the next character. However, a string will still be sent character by character (or, to be more precise, bit by bit). Therefore, if you do not transmit any specific value (for example, the angle at which you need to install the connected servo drive), then it is easier to send just one character.
At the end of the program, it is advisable to close the COM-port using the close.connection () method, so that when you restart the program you will not receive an error related to the fact that the COM port is still busy, and use the statement to exit the infinite loop waiting for a line input break with label_1, which allows you to exit the loop that is preceded by the corresponding label:
That’s all for today. I hope this article is useful for you. Soon I will try to write the following, which will consider the possibility of not only sending, but also receiving data from the microcontroller using an example of a more applied and functional application.
Recently, on the Internet, I came across a very simple Java-Arduino Communication Library. Not finding publications on this topic here, I decided to share with you the experience of use. To work, we need the installed Arduino IDE , IntelliJ IDEA , Java SE Development Kit and, in fact, the microcontroller itself (I tested on the Chinese Arduino Nano andStrela based on Leonardo from Amperka, everything worked fine on both).
The task is simple - we will create a console application that, when launched, establishes a Serial connection with the microcontroller and waits for an input line from the user in an endless loop. Depending on the entered line, the following options are possible:
- “On” - the microcontroller includes an integrated LED;
- “Off” - the microcontroller turns off the built-in LED;
- “Exit” - the microcontroller turns off the built-in LED, and the application terminates.
Microcontroller Sketch
We’ll start building the system by writing and loading the sketch into the Arduino Nano. Nothing too complicated. In the "setup" block, configure the pin with the LED and the Serial port, and in the "loop" block, listen to the Serial port for incoming bytes. Depending on the received value, we perform this or that operation.
Sketch source code
/*пин №13 связан со встроенным светодиодом на платах Uno,
* Mega, Nano, Leonardo, Mini и др.
*/
#define LED_PIN = 13
void setup() {
//открытие Serial-порта со скоростью 9600 бод/c
Serial.begin(9600);
//настройка пина со светодиодом в режим выхода
pinMode(LED_PIN, OUTPUT);
}
void loop() {
//если в буфере Serial-порта пришли байты (символы) и ожидают считывания
if (Serial.available() != 0) {
//то считываем один полученный байт (символ)
byte b = Serial.read();
//если получен символ '1', то светодиод включается
if (b == 49) digitalWrite(LED_PIN, HIGH);
//если получен символ '0', то светодиод выключается
if (b == 48) digitalWrite(LED_PIN, LOW);
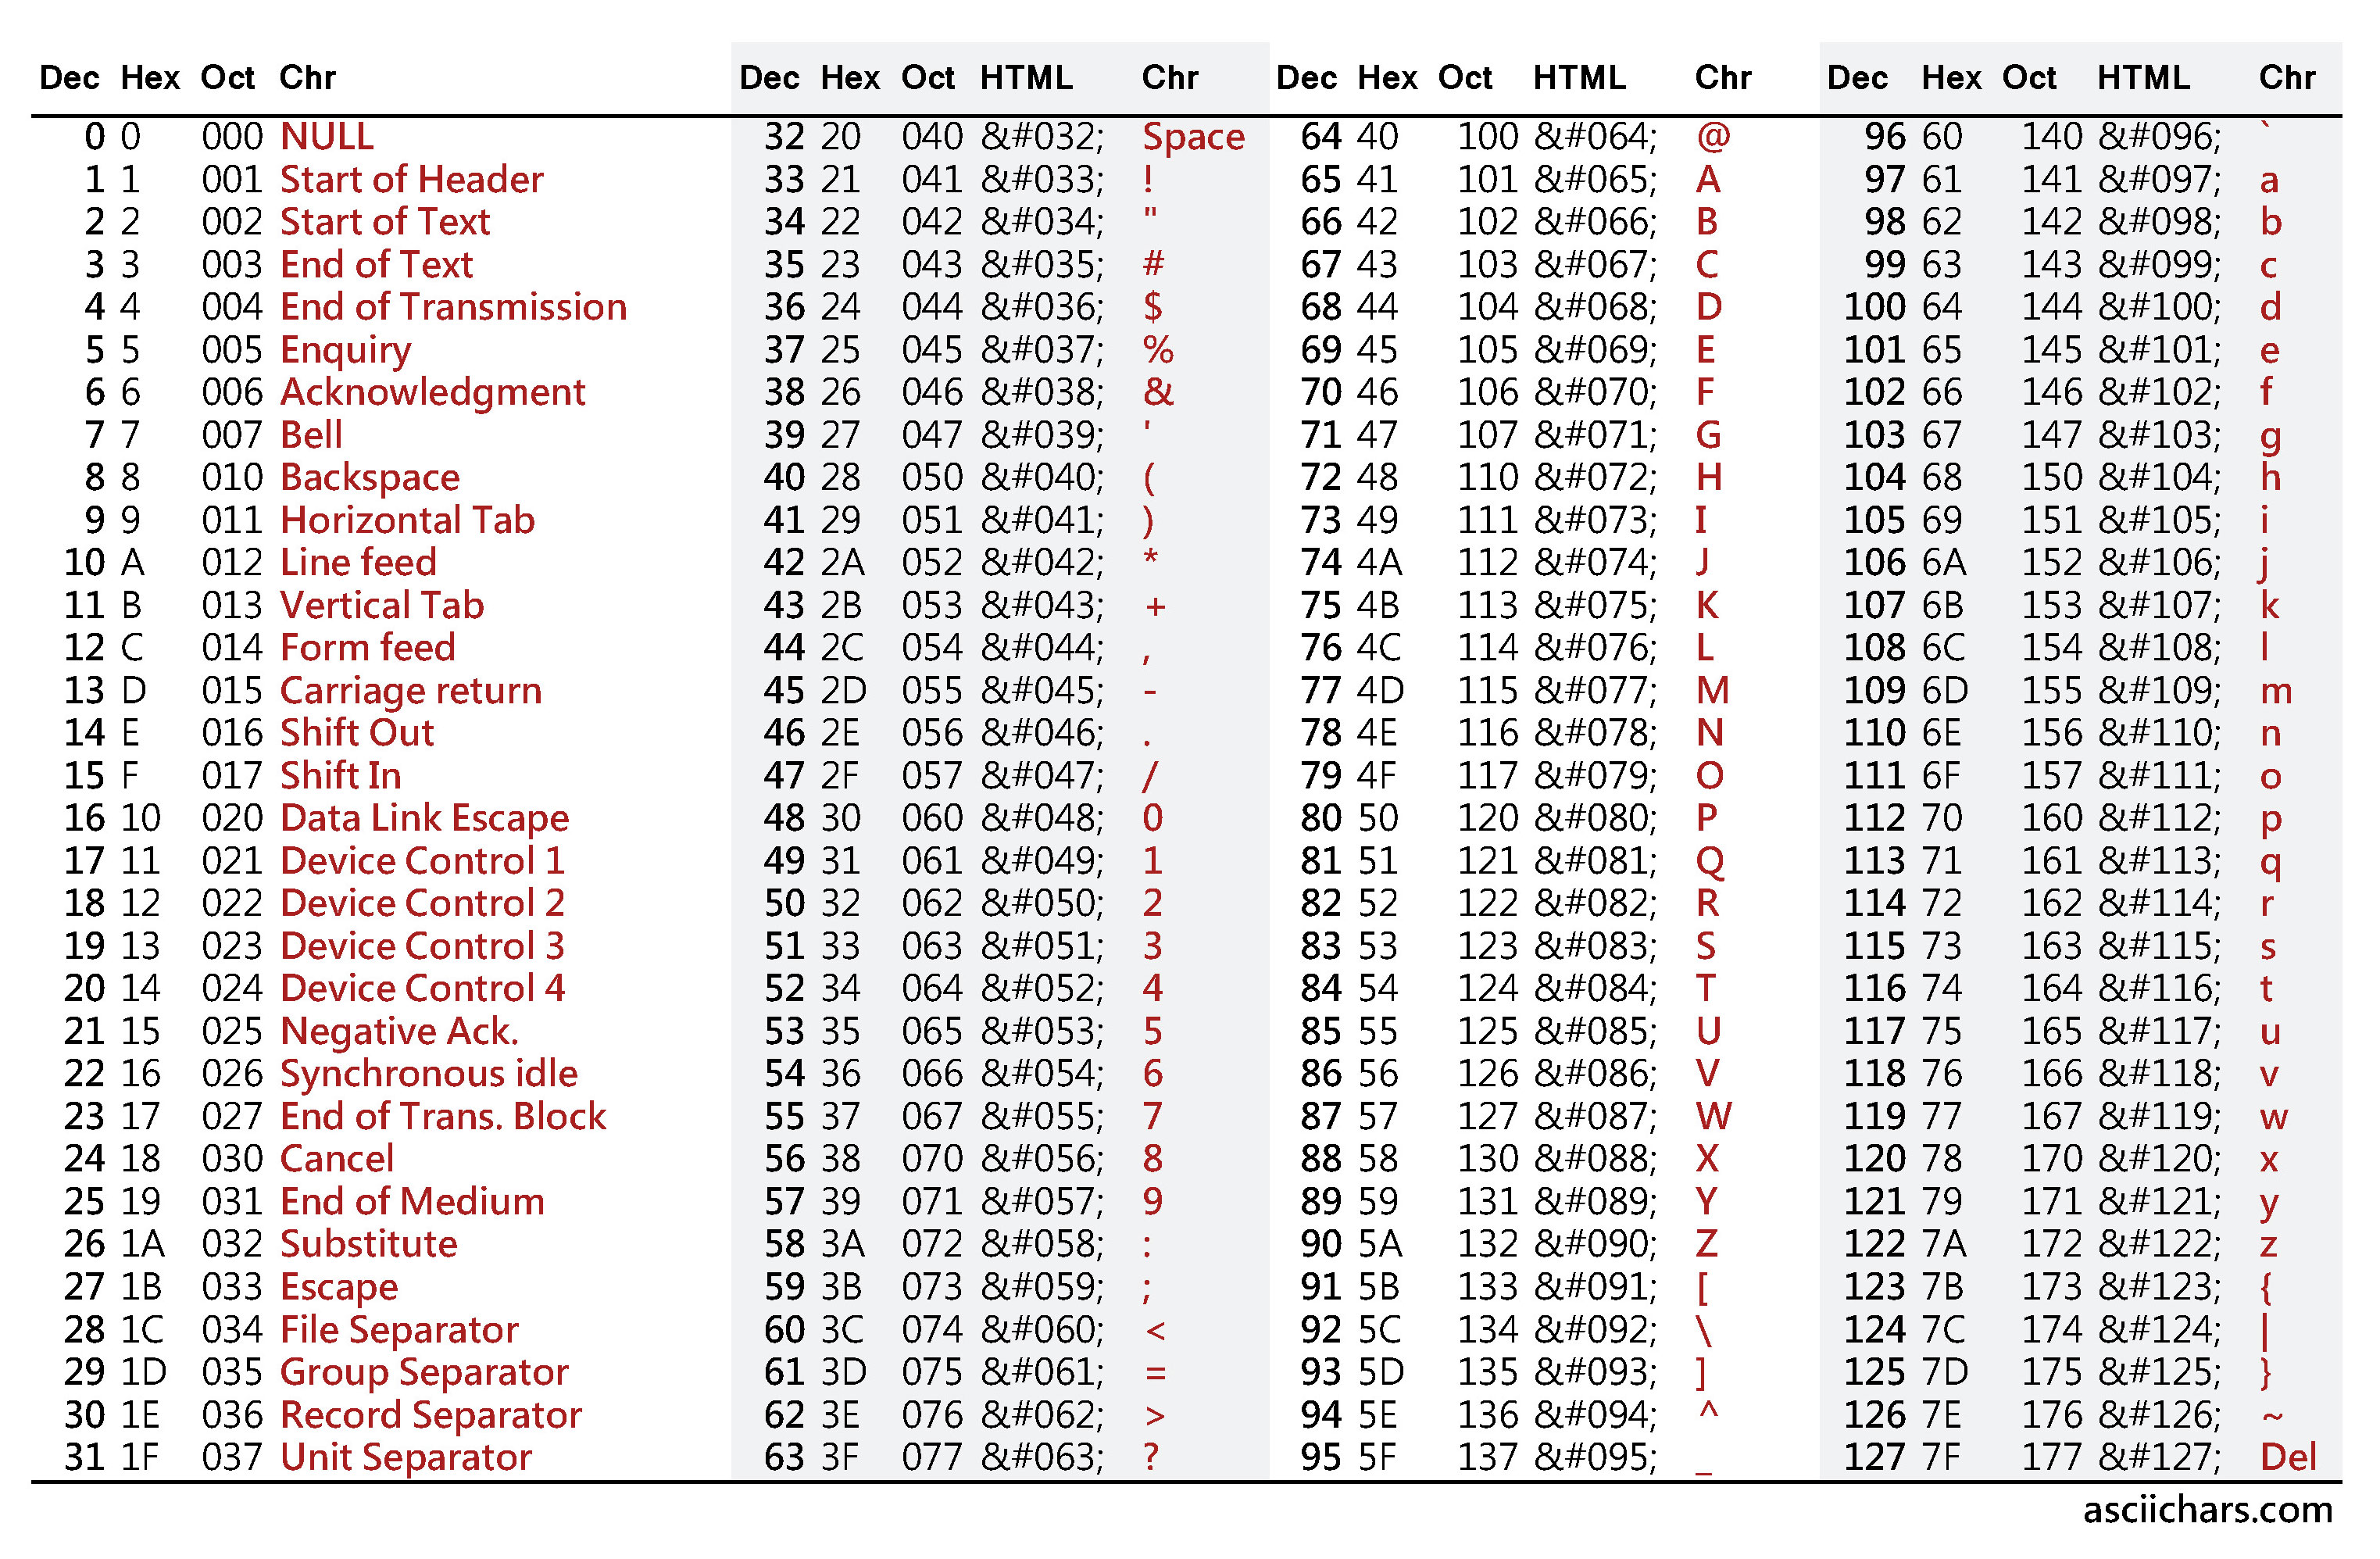
}A little explanation and care requires only checking the conditions (b == 49) and (b == 48). If you don’t understand why, then welcome to the spoiler:
The answer to the main question of life, the universe and all that
The thing is that when sending the character (Chr) '1' to the microcontroller via the Serial connection , the ASCII encoding is used , in which the character '1' is encoded with an integer decimal value (Dec) 49. When the character is read by the microcontroller, the character value is '1' assigned byte by b integer variable. That is, in fact, the value of the variable b is 49.
To check at this stage, you can send 1 and 0 from the port's built-in Arduino IDE monitor. If the LED on the board does not turn on / off, look for an error in your sketch.
Java application
Now run IntelliJ IDEA and create a new Java project. To work, you need to connect two additional libraries: jSerialComm-1.3.11.jar and arduino.jar . How to add downloaded jar-archives can be read here .
The entire application will consist of one single class:
Java source code
import arduino.Arduino;
import java.util.Scanner;
public class AppMain {
    public static void main(String[] args) throws InterruptedException {
        Scanner scanner = new Scanner(System.in);
        Arduino arduino = new Arduino("COM52", 9600);
        boolean connected = arduino.openConnection();
        System.out.println("Соединение установлено: " + connected);
        Thread.sleep(2000);
        label_1:
        while (scanner.hasNext()) {
            String s = scanner.nextLine();
            switch (s) {
                case "on":
                    arduino.serialWrite('1');
                    break;
                case "off":
                    arduino.serialWrite('0');
                    break;
                case "exit":
                    arduino.serialWrite('0');
                    arduino.closeConnection();
                    break label_1;
                default:
                    System.out.println(s + " - не является командой");
                    break;
            }
        }
    }
}
To work with a COM port, an Arduino class object is created. The constructor takes two parameters:
- String portDescrition - name of the COM port
- int baud_rate - baud rate
It is better to specify these parameters immediately in the constructor, but you can also set them separately using setters. The name of the COM port can be viewed in the Arduino IDE, or in the device manager. The baud rate must match the one specified in the “setup” block of the sketch for the microcontroller, in this case 9600 bps / s:
void setup() {
  //открытие Serial-порта со скоростью 9600 бод/c
  Serial.begin(9600);
  //настройка пина со светодиодом в режим выхода
  pinMode(LED_PIN, OUTPUT);
}
}
Next, you need to establish a connection using the openConnection () method. The method returns true if the connection is successful. We print this value to the console to make sure that the actions performed are correct.
Important: after opening the connection, you need to pause using the Thread.sleep () method, in this case 2000 milliseconds. Arduino Nano turned out to be a real slowdown compared to Strela, which could be sent immediately after the connection was established. It is possible that your controller will need even more time. Therefore, if a connection is established, data is sent but not received, then first of all, increase the pause value.
Now we enter an infinite loop and begin to wait for input from the user:
        label_1:
        while (scanner.hasNext()) {
            String s = scanner.nextLine();
            switch (s) {
                case "on":
                    arduino.serialWrite('1');
                    break;
                case "off":
                    arduino.serialWrite('0');
                    break;
                case "exit":
                    arduino.serialWrite('0');
                    arduino.closeConnection();
                    break label_1;
                default:
                    System.out.println(s + " - не является командой");
                    break;
            }
        }
When you enter the next line and press "enter", it is read and stored in the String s variable. Depending on the value of this line, the switch statement sends the character '1' or '0' to the microcontroller using the serialWrite (char c) method. Do not forget that when the microcontroller receives these characters and stores them in an integer variable, you will get 49, or 48).
In general, the following overloaded methods of the Arduino class can be used to transfer data:
- public void serialWrite (String s);
- public void serialWrite (char c);
- public void serialWrite (String s, int noOfChars, int delay);
- public void serialWrite (char c, int delay);
As you can see, you can send the entire string, the character and part of the string characters (noOfChars). Moreover, in the last two methods, you can specify a pause after sending the next character. However, a string will still be sent character by character (or, to be more precise, bit by bit). Therefore, if you do not transmit any specific value (for example, the angle at which you need to install the connected servo drive), then it is easier to send just one character.
At the end of the program, it is advisable to close the COM-port using the close.connection () method, so that when you restart the program you will not receive an error related to the fact that the COM port is still busy, and use the statement to exit the infinite loop waiting for a line input break with label_1, which allows you to exit the loop that is preceded by the corresponding label:
case "exit":
     arduino.serialWrite('0');
     arduino.closeConnection();
     break label_1;
That’s all for today. I hope this article is useful for you. Soon I will try to write the following, which will consider the possibility of not only sending, but also receiving data from the microcontroller using an example of a more applied and functional application.