 October 5, 2017 at 09:51
Learning blockchain in practice
- Transfer
- Tutorial
You read this article because, like me, with keen interest watching the growing popularity of cryptocurrencies. And you want to understand how blockchain works - the technology that lies at its core.
But understanding the blockchain is not so easy, at least in my experience. I pored over abstruse videos, wade through tutorials and with growing annoyance noted a lack of illustrative examples.
I prefer to learn in the process of work. In this situation, I have to practice the topic right away at the code level, which helps to consolidate the skill. If you follow my example, then by the end of the article you will have a functioning blockchain and a clear understanding of how it all works.

Let me remind you: blockchain is an unchangeable, sequential chain of records called blocks. They can contain transactions, files, and, in principle, any other types of data. The main thing here is that they are connected to each other through hashes.
If you do not quite understand what a hash is, here you are .
Who is this guide for? For those who can read and write simple Python code without any problems and in general outline how HTTP requests work, we will communicate with our blockchain via HTTP.
What will be needed for work? Check that you have Python 3.6+ installed (along with pip). You will also need to install Flask and the excellent Requests library:
Oh yes, you also need an HTTP client, for example, Postman or cURL. Anyone will do here.
Where can I see what will be the result? Source code is available here .
Open your favorite text or image editor, for example, I like PyCharm . Create a new file called blockchain.py. We will work only in this file, and if you get confused, you can always peek into the source code .
Blockchain Representation
First we create a new class, the constructor of which will create the original empty list (where our blockchain will be stored) and one more for transactions. Here's what the class structure looks like:
The Blockchain class is responsible for managing the chain. This will store transactions, as well as some helper methods for adding new blocks to the chain. Let's write these methods.
What does the block look like?
Each block contains an index, a timestamp (on Unix), a list of transactions, a proof, and a hash of the previous block.
Here is an example of how a single block might look:
Now the idea of the chain should be obvious - each block includes a hash of the previous one. This is very important: this is how the chain remains unchanged: if a hacker damages any block, then absolutely all subsequent ones will contain invalid hashes.
Clear? If not, stop and give yourself time to absorb this information - it is in it that the basic principle of the blockchain consists.
Adding Transactions to the Block
We need to somehow add new transactions to the block. The new_transaction () method is responsible for this , it works quite simply:
When new_transaction () adds a new transaction to the list, it returns the index of the block where it was written to the next one with which mining will be performed. This will come in handy later on to the next user adding the transaction.
In addition to creating the genesis block in the constructor, we will also write the new_block () , new_transaction (), and hash () methods :
The above code probably doesn’t need any explanation - I added some comments and dockstring here to make it clearer. With the introduction of the blockchain, we are almost done. But now you must be wondering how the process of creating, embedding and mining blocks is going on.
Understanding the proof of work
The proof of work algorithm is used to create new blocks in the blockchain (this process is also called mining). The purpose of the proof of work is to calculate the desired value to solve the equation. This value should be difficult to calculate (from a mathematical point of view), but it is easy to check for any participant in the system. This is the main idea of proof of work.
To make it clearer, let's look at a very simple example.
Suppose a hash of a certain number X multiplied by another Y should end with 0. Accordingly, hash (x * y) = ac23dc ... 0. For this simplified example, set x = 5. We write all this in Python:
The correct answer is: y = 21; it is with this value that a hash is obtained with 0 at the end:
In Bitcoin, the proof-of-work algorithm is called HashCash and is not particularly different from the simple example above. This is an equation that race miners are trying to solve in order to create a new block. In general, complexity is determined by how many characters need to be calculated in a given sequence. For the correct answer, miners receive a reward in the form of one coin - during the transaction.
Checking their solution for the system is not difficult.
We are writing a simple proof of work
Now let's write a similar algorithm for our blockchain. We take the conditions in the spirit of the above example:
Find the number p, which, being hashed with the proof of the previous block, gives a hash with four zeros at the beginning.
We can vary the complexity of this task by changing the number of zeros at the beginning. But four is enough. You can see for yourself that a single additional zero will significantly slow down the process of finding a solution.
The work on the class is almost complete and now we are ready to start interacting with it using HTTP requests.
Here we will use Python Flask - a microframework that facilitates the process of correlating endpoints with Python functions, which allows us to carry out a dialogue with the blockchain over the Web using HTTP requests.
We create three methods:
Configure Flask
Our “server” will generate a single network node in the blockchain system. Let's write some boilerplate code:
Brief explanations of what we added:
Line 15: Instructs the node. Read more about Flask here .
Line 18: Creates an arbitrary name for the node.
Line 21: Instances the Blockchain class .
Lines 24-26: Creates a / mine endpoint , i.e. a GET request.
Lines 28-30: Creates the endpoint / transactions / new , that is, a POST request, since this is where we will send the data.
Lines 32-38: Creates an endpoint / chain that returns the entire blockchain.
Lines 40-41: Starts the server on port 5000.
Endpoint for transactions
This is what the transaction request will look like. This is what the user sends to the server:
We already have a class method for adding a transaction to a block, so everything is easy next. Let's write a function to add a transaction:
The final point for mining.
It is at this final point that all magic is happening, but there is nothing particularly complicated in it. She has to do three things:
Please note that the node address is specified as the recipient of the created block. Most of what we do here comes down to interacting with the methods of our Blockchain class . Upon completion of this step, the main work is completed, you can start a dialogue.
To interact with the API within the system, you can use the good old cURL or Postman.
We start the server:
Let's try to create a block by sending a GET request to localhost: 5000 / mine:
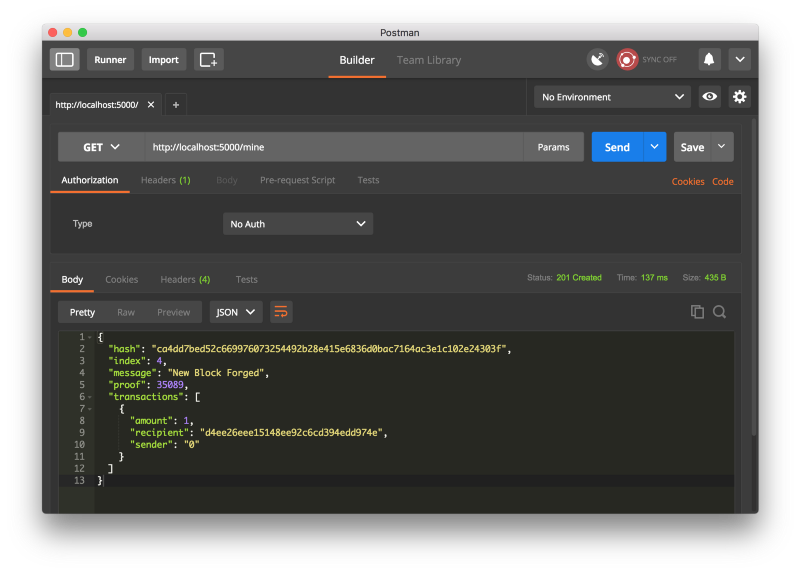
Now create a new transaction by sending a POST request containing its structure to localhost : 5000 / transactions / new:
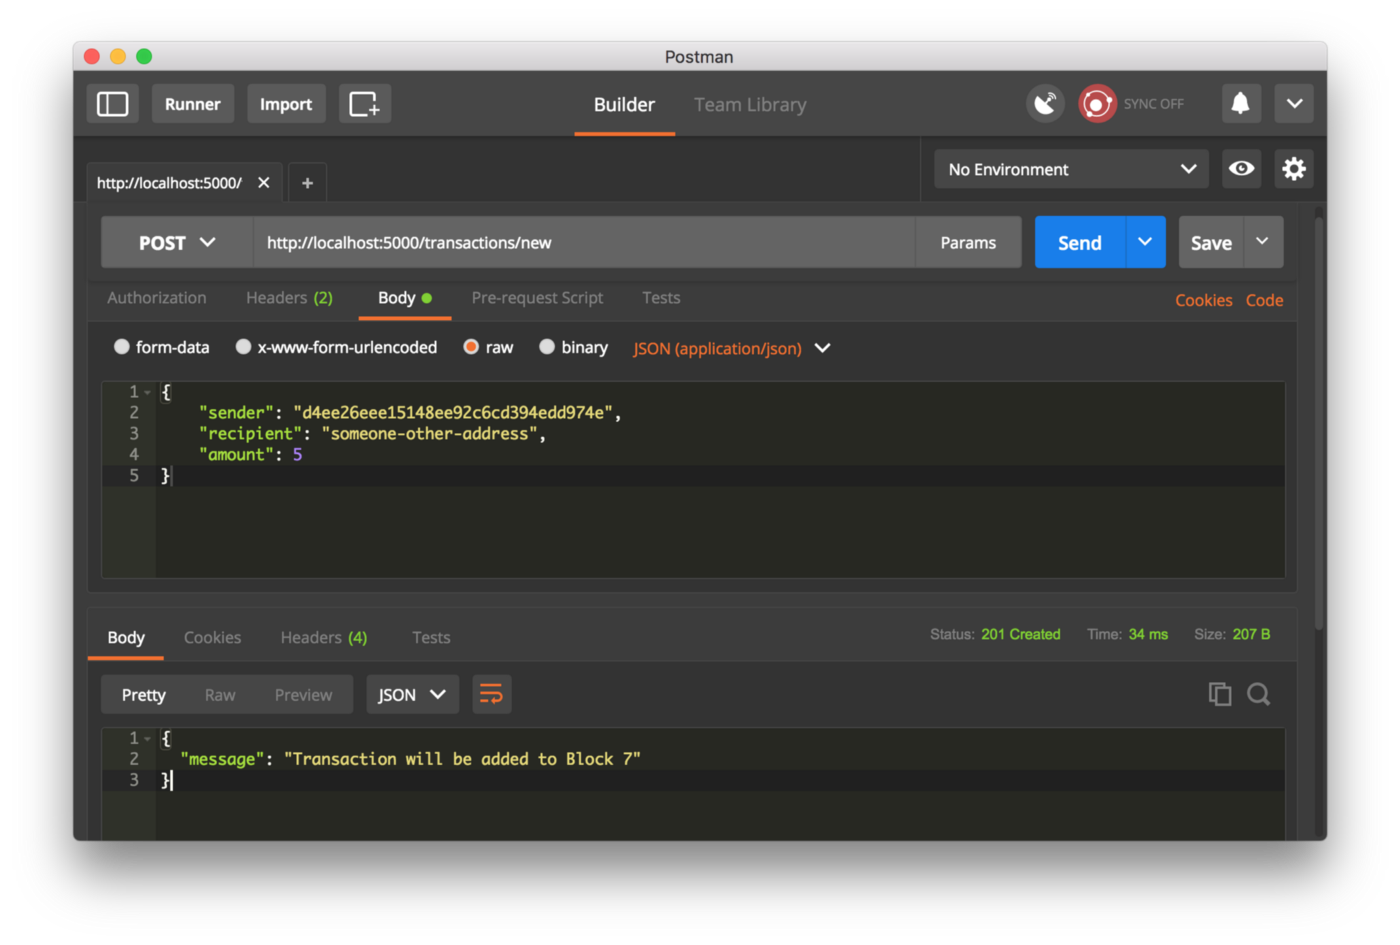
If you are not working with Postman, here's how to formulate a similar query in cURL:
I restarted the server and created two more blocks to get three in the end. Let's examine the resulting chain through a localhost: 5000 / chain request:
All this is very cool. We have a simple blockchain that allows you to carry out transactions and create new blocks. But blockchain only makes sense if it is decentralized. And if we make it decentralized, how can we guarantee that the same chain will be displayed everywhere? This is called a consensus issue. If we want the system to have more than one node, we will have to introduce a consensus algorithm.
We recognize new nodes
Before introducing a consensus algorithm, we need to do something so that each node in the system knows about the existence of neighbors. Each node in the system must have a registry of all other nodes. So, you need additional endpoints:
We need to adjust the blockchain constructor and provide a method for registering nodes:
Note: we used set () to store the list of nodes. This is a simple way to ensure that when adding new nodes, indempotency will be observed - that is, no matter how many times we add a particular node, it will be counted only once.
We implement the consensus algorithm
As I already mentioned, a conflict occurs when the chain of one node differs from the chain of another. To eliminate it, we introduce the following rule: the chain of prerogative is always longer. In other words, the longest chain in the system is considered as actual. Using such an algorithm, we achieve consensus among all nodes of the system:
The first valid_chain () method is responsible for checking the chains for validity, passing through each block and verifying both the hash and the proof.
resolve_conflicts () is a method that works on all neighboring nodes: downloads their chains and checks them in the manner described above. If at the same time a valid chain is found longer than ours, a replacement is made.
Let's introduce two endpoints into our API, one for adding neighboring nodes, the other for resolving conflicts:
At this stage, if you want, you can attract other machines and create different nodes for your system. Or achieve the same using different ports on the same machine. I created a new node on another port of the same machine, and allowed the source node to recognize it. Thus, two nodes turned out: localhost: 5000 and localhost: 5001.

In node number two, I added more blocks to make the chain uniquely longer. Then it called GET / nodes / resolve in the first node - and the consensus algorithm replaced its chain with the chain of the second.
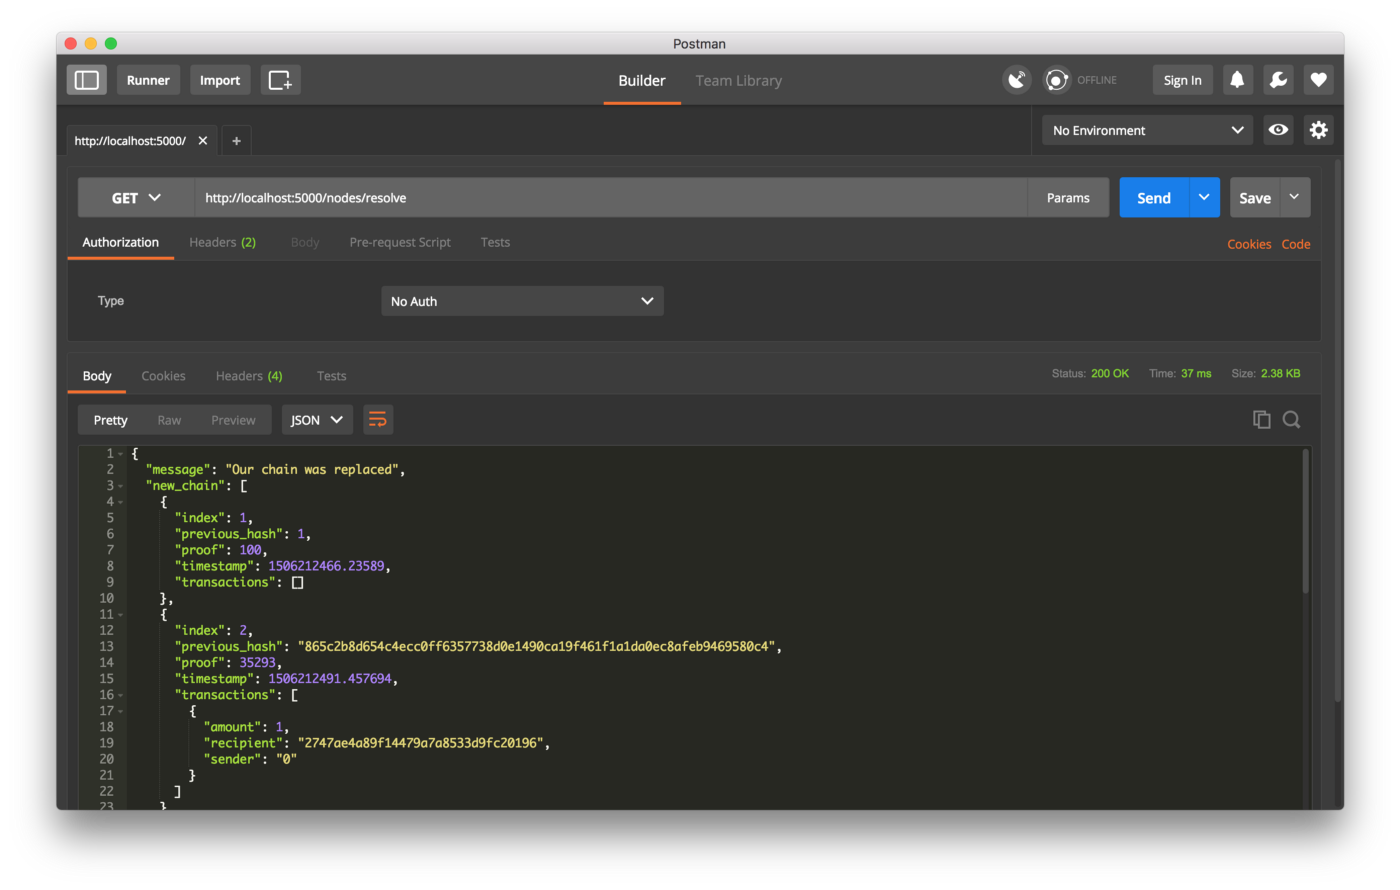
That's it. Now make friends and test your blockchain together.
I hope this material inspires you to new ideas. Personally, I am very enthusiastic about the development of cryptocurrencies: I am sure that the blockchain will revolutionize our ideas about the economy, government, and the storage of information.
In the future, I plan to release the second part of the article, where we will add a transaction validation mechanism to the blockchain and talk about how all this can be used in products.
But understanding the blockchain is not so easy, at least in my experience. I pored over abstruse videos, wade through tutorials and with growing annoyance noted a lack of illustrative examples.
I prefer to learn in the process of work. In this situation, I have to practice the topic right away at the code level, which helps to consolidate the skill. If you follow my example, then by the end of the article you will have a functioning blockchain and a clear understanding of how it all works.
But for starters ...
Let me remind you: blockchain is an unchangeable, sequential chain of records called blocks. They can contain transactions, files, and, in principle, any other types of data. The main thing here is that they are connected to each other through hashes.
If you do not quite understand what a hash is, here you are .
Who is this guide for? For those who can read and write simple Python code without any problems and in general outline how HTTP requests work, we will communicate with our blockchain via HTTP.
What will be needed for work? Check that you have Python 3.6+ installed (along with pip). You will also need to install Flask and the excellent Requests library:
pip install Flask==0.12.2 requests==2.18.4 Oh yes, you also need an HTTP client, for example, Postman or cURL. Anyone will do here.
Where can I see what will be the result? Source code is available here .
Step One: Making a Blockchain
Open your favorite text or image editor, for example, I like PyCharm . Create a new file called blockchain.py. We will work only in this file, and if you get confused, you can always peek into the source code .
Blockchain Representation
First we create a new class, the constructor of which will create the original empty list (where our blockchain will be stored) and one more for transactions. Here's what the class structure looks like:
class Blockchain(object):
    def __init__(self):
        self.chain = []
        self.current_transactions = []
    def new_block(self):
        # Creates a new Block and adds it to the chain
        pass
    def new_transaction(self):
        # Adds a new transaction to the list of transactions
        pass
    @staticmethod
    def hash(block):
        # Hashes a Block
        pass
    @property
    def last_block(self):
        # Returns the last Block in the chain
        pass
The Blockchain class is responsible for managing the chain. This will store transactions, as well as some helper methods for adding new blocks to the chain. Let's write these methods.
What does the block look like?
Each block contains an index, a timestamp (on Unix), a list of transactions, a proof, and a hash of the previous block.
Here is an example of how a single block might look:
block = {
    'index': 1,
    'timestamp': 1506057125.900785,
    'transactions': [
        {
            'sender': "8527147fe1f5426f9dd545de4b27ee00",
            'recipient': "a77f5cdfa2934df3954a5c7c7da5df1f",
            'amount': 5,
        }
    ],
    'proof': 324984774000,
    'previous_hash': "2cf24dba5fb0a30e26e83b2ac5b9e29e1b161e5c1fa7425e73043362938b9824"
}
Now the idea of the chain should be obvious - each block includes a hash of the previous one. This is very important: this is how the chain remains unchanged: if a hacker damages any block, then absolutely all subsequent ones will contain invalid hashes.
Clear? If not, stop and give yourself time to absorb this information - it is in it that the basic principle of the blockchain consists.
Adding Transactions to the Block
We need to somehow add new transactions to the block. The new_transaction () method is responsible for this , it works quite simply:
class Blockchain(object):
    ...
    def new_transaction(self, sender, recipient, amount):
        """
        Creates a new transaction to go into the next mined Block
        :param sender:  Address of the Sender
        :param recipient:  Address of the Recipient
        :param amount:  Amount
        :return:  The index of the Block that will hold this transaction
        """
        self.current_transactions.append({
            'sender': sender,
            'recipient': recipient,
            'amount': amount,
        })
        return self.last_block['index'] + 1
When new_transaction () adds a new transaction to the list, it returns the index of the block where it was written to the next one with which mining will be performed. This will come in handy later on to the next user adding the transaction.
In addition to creating the genesis block in the constructor, we will also write the new_block () , new_transaction (), and hash () methods :
import hashlib
import json
from time import time
class Blockchain(object):
    def __init__(self):
        self.current_transactions = []
        self.chain = []
        # Create the genesis block
        self.new_block(previous_hash=1, proof=100)
    def new_block(self, proof, previous_hash=None):
        """
        Create a new Block in the Blockchain
        :param proof:  The proof given by the Proof of Work algorithm
        :param previous_hash: (Optional)  Hash of previous Block
        :return:  New Block
        """
        block = {
            'index': len(self.chain) + 1,
            'timestamp': time(),
            'transactions': self.current_transactions,
            'proof': proof,
            'previous_hash': previous_hash or self.hash(self.chain[-1]),
        }
        # Reset the current list of transactions
        self.current_transactions = []
        self.chain.append(block)
        return block
    def new_transaction(self, sender, recipient, amount):
        """
        Creates a new transaction to go into the next mined Block
        :param sender:  Address of the Sender
        :param recipient:  Address of the Recipient
        :param amount:  Amount
        :return:  The index of the Block that will hold this transaction
        """
        self.current_transactions.append({
            'sender': sender,
            'recipient': recipient,
            'amount': amount,
        })
        return self.last_block['index'] + 1
    @property
    def last_block(self):
        return self.chain[-1]
    @staticmethod
    def hash(block):
        """
        Creates a SHA-256 hash of a Block
        :param block:  Block
        :return:
        """
        # We must make sure that the Dictionary is Ordered, or we'll have inconsistent hashes
        block_string = json.dumps(block, sort_keys=True).encode()
        return hashlib.sha256(block_string).hexdigest()
The above code probably doesn’t need any explanation - I added some comments and dockstring here to make it clearer. With the introduction of the blockchain, we are almost done. But now you must be wondering how the process of creating, embedding and mining blocks is going on.
Understanding the proof of work
The proof of work algorithm is used to create new blocks in the blockchain (this process is also called mining). The purpose of the proof of work is to calculate the desired value to solve the equation. This value should be difficult to calculate (from a mathematical point of view), but it is easy to check for any participant in the system. This is the main idea of proof of work.
To make it clearer, let's look at a very simple example.
Suppose a hash of a certain number X multiplied by another Y should end with 0. Accordingly, hash (x * y) = ac23dc ... 0. For this simplified example, set x = 5. We write all this in Python:
from hashlib import sha256
x = 5
y = 0  # We don't know what y should be yet...
while sha256(f'{x*y}'.encode()).hexdigest()[-1] != "0":
    y += 1
print(f'The solution is y = {y}')
The correct answer is: y = 21; it is with this value that a hash is obtained with 0 at the end:
hash(5 * 21) = 1253e9373e...5e3600155e860In Bitcoin, the proof-of-work algorithm is called HashCash and is not particularly different from the simple example above. This is an equation that race miners are trying to solve in order to create a new block. In general, complexity is determined by how many characters need to be calculated in a given sequence. For the correct answer, miners receive a reward in the form of one coin - during the transaction.
Checking their solution for the system is not difficult.
We are writing a simple proof of work
Now let's write a similar algorithm for our blockchain. We take the conditions in the spirit of the above example:
Find the number p, which, being hashed with the proof of the previous block, gives a hash with four zeros at the beginning.
import hashlib
import json
from time import time
from uuid import uuid4
class Blockchain(object):
    ...
    def proof_of_work(self, last_proof):
        """
        Simple Proof of Work Algorithm:
         - Find a number p' such that hash(pp') contains leading 4 zeroes, where p is the previous p'
         - p is the previous proof, and p' is the new proof
        :param last_proof:
        :return:
        """
        proof = 0
        while self.valid_proof(last_proof, proof) is False:
            proof += 1
        return proof
    @staticmethod
    def valid_proof(last_proof, proof):
        """
        Validates the Proof: Does hash(last_proof, proof) contain 4 leading zeroes?
        :param last_proof:  Previous Proof
        :param proof:  Current Proof
        :return:  True if correct, False if not.
        """
        guess = f'{last_proof}{proof}'.encode()
        guess_hash = hashlib.sha256(guess).hexdigest()
        return guess_hash[:4] == "0000"
We can vary the complexity of this task by changing the number of zeros at the beginning. But four is enough. You can see for yourself that a single additional zero will significantly slow down the process of finding a solution.
The work on the class is almost complete and now we are ready to start interacting with it using HTTP requests.
Step Two: Blockchain as an API
Here we will use Python Flask - a microframework that facilitates the process of correlating endpoints with Python functions, which allows us to carry out a dialogue with the blockchain over the Web using HTTP requests.
We create three methods:
- / transactions / new to create a new transaction in the block
- / mine for mining a new block on the server
- / chain to return the complete blockchain chain.
Configure Flask
Our “server” will generate a single network node in the blockchain system. Let's write some boilerplate code:
import hashlib
import json
from textwrap import dedent
from time import time
from uuid import uuid4
from flask import Flask
class Blockchain(object):
    ...
# Instantiate our Node
app = Flask(__name__)
# Generate a globally unique address for this node
node_identifier = str(uuid4()).replace('-', '')
# Instantiate the Blockchain
blockchain = Blockchain()
@app.route('/mine', methods=['GET'])
def mine():
    return "We'll mine a new Block"
@app.route('/transactions/new', methods=['POST'])
def new_transaction():
    return "We'll add a new transaction"
@app.route('/chain', methods=['GET'])
def full_chain():
    response = {
        'chain': blockchain.chain,
        'length': len(blockchain.chain),
    }
    return jsonify(response), 200
if __name__ == '__main__':
    app.run(host='0.0.0.0', port=5000)
Brief explanations of what we added:
Line 15: Instructs the node. Read more about Flask here .
Line 18: Creates an arbitrary name for the node.
Line 21: Instances the Blockchain class .
Lines 24-26: Creates a / mine endpoint , i.e. a GET request.
Lines 28-30: Creates the endpoint / transactions / new , that is, a POST request, since this is where we will send the data.
Lines 32-38: Creates an endpoint / chain that returns the entire blockchain.
Lines 40-41: Starts the server on port 5000.
Endpoint for transactions
This is what the transaction request will look like. This is what the user sends to the server:
{
 "sender": "my address",
 "recipient": "someone else's address",
 "amount": 5
}
We already have a class method for adding a transaction to a block, so everything is easy next. Let's write a function to add a transaction:
import hashlib
import json
from textwrap import dedent
from time import time
from uuid import uuid4
from flask import Flask, jsonify, request
...
@app.route('/transactions/new', methods=['POST'])
def new_transaction():
    values = request.get_json()
    # Check that the required fields are in the POST'ed data
    required = ['sender', 'recipient', 'amount']
    if not all(k in values for k in required):
        return 'Missing values', 400
    # Create a new Transaction
    index = blockchain.new_transaction(values['sender'], values['recipient'], values['amount'])
    response = {'message': f'Transaction will be added to Block {index}'}
    return jsonify(response), 201
The final point for mining.
It is at this final point that all magic is happening, but there is nothing particularly complicated in it. She has to do three things:
- Calculate proof of work
- Give the miner (i.e. us) a reward by adding a transaction, during which we get one coin
- Embed a new block in a chain
import hashlib
import json
from time import time
from uuid import uuid4
from flask import Flask, jsonify, request
...
@app.route('/mine', methods=['GET'])
def mine():
    # We run the proof of work algorithm to get the next proof...
    last_block = blockchain.last_block
    last_proof = last_block['proof']
    proof = blockchain.proof_of_work(last_proof)
    # We must receive a reward for finding the proof.
    # The sender is "0" to signify that this node has mined a new coin.
    blockchain.new_transaction(
        sender="0",
        recipient=node_identifier,
        amount=1,
    )
    # Forge the new Block by adding it to the chain
    block = blockchain.new_block(proof)
    response = {
        'message': "New Block Forged",
        'index': block['index'],
        'transactions': block['transactions'],
        'proof': block['proof'],
        'previous_hash': block['previous_hash'],
    }
    return jsonify(response), 200
Please note that the node address is specified as the recipient of the created block. Most of what we do here comes down to interacting with the methods of our Blockchain class . Upon completion of this step, the main work is completed, you can start a dialogue.
Step Three: Blockchain Dialogue
To interact with the API within the system, you can use the good old cURL or Postman.
We start the server:
$ python blockchain.py
* Running on http://127.0.0.1:5000/ (Press CTRL+C to quit)
Let's try to create a block by sending a GET request to localhost: 5000 / mine:
Now create a new transaction by sending a POST request containing its structure to localhost : 5000 / transactions / new:
If you are not working with Postman, here's how to formulate a similar query in cURL:
$ curl -X POST -H "Content-Type: application/json" -d '{
 "sender": "d4ee26eee15148ee92c6cd394edd974e",
 "recipient": "someone-other-address",
 "amount": 5
}' "http://localhost:5000/transactions/new"
I restarted the server and created two more blocks to get three in the end. Let's examine the resulting chain through a localhost: 5000 / chain request:
{
  "chain": [
    {
      "index": 1,
      "previous_hash": 1,
      "proof": 100,
      "timestamp": 1506280650.770839,
      "transactions": []
    },
    {
      "index": 2,
      "previous_hash": "c099bc...bfb7",
      "proof": 35293,
      "timestamp": 1506280664.717925,
      "transactions": [
        {
          "amount": 1,
          "recipient": "8bbcb347e0634905b0cac7955bae152b",
          "sender": "0"
        }
      ]
    },
    {
      "index": 3,
      "previous_hash": "eff91a...10f2",
      "proof": 35089,
      "timestamp": 1506280666.1086972,
      "transactions": [
        {
          "amount": 1,
          "recipient": "8bbcb347e0634905b0cac7955bae152b",
          "sender": "0"
        }
      ]
    }
  ],
  "length": 3
}
Step Four: Consensus
All this is very cool. We have a simple blockchain that allows you to carry out transactions and create new blocks. But blockchain only makes sense if it is decentralized. And if we make it decentralized, how can we guarantee that the same chain will be displayed everywhere? This is called a consensus issue. If we want the system to have more than one node, we will have to introduce a consensus algorithm.
We recognize new nodes
Before introducing a consensus algorithm, we need to do something so that each node in the system knows about the existence of neighbors. Each node in the system must have a registry of all other nodes. So, you need additional endpoints:
- / nodes / register , which will accept a list of new nodes in URL format
- / nodes / resolve to implement a consensus algorithm that will resolve conflicts that occur and track the correct chain in the node.
We need to adjust the blockchain constructor and provide a method for registering nodes:
...
from urllib.parse import urlparse
...
class Blockchain(object):
    def __init__(self):
        ...
        self.nodes = set()
        ...
    def register_node(self, address):
        """
        Add a new node to the list of nodes
        :param address:  Address of node. Eg. 'http://192.168.0.5:5000'
        :return: None
        """
        parsed_url = urlparse(address)
        self.nodes.add(parsed_url.netloc)
Note: we used set () to store the list of nodes. This is a simple way to ensure that when adding new nodes, indempotency will be observed - that is, no matter how many times we add a particular node, it will be counted only once.
We implement the consensus algorithm
As I already mentioned, a conflict occurs when the chain of one node differs from the chain of another. To eliminate it, we introduce the following rule: the chain of prerogative is always longer. In other words, the longest chain in the system is considered as actual. Using such an algorithm, we achieve consensus among all nodes of the system:
...
import requests
class Blockchain(object)
    ...
    def valid_chain(self, chain):
        """
        Determine if a given blockchain is valid
        :param chain:  A blockchain
        :return:  True if valid, False if not
        """
        last_block = chain[0]
        current_index = 1
        while current_index < len(chain):
            block = chain[current_index]
            print(f'{last_block}')
            print(f'{block}')
            print("\n-----------\n")
            # Check that the hash of the block is correct
            if block['previous_hash'] != self.hash(last_block):
                return False
            # Check that the Proof of Work is correct
            if not self.valid_proof(last_block['proof'], block['proof']):
                return False
            last_block = block
            current_index += 1
        return True
    def resolve_conflicts(self):
        """
        This is our Consensus Algorithm, it resolves conflicts
        by replacing our chain with the longest one in the network.
        :return:  True if our chain was replaced, False if not
        """
        neighbours = self.nodes
        new_chain = None
        # We're only looking for chains longer than ours
        max_length = len(self.chain)
        # Grab and verify the chains from all the nodes in our network
        for node in neighbours:
            response = requests.get(f'http://{node}/chain')
            if response.status_code == 200:
                length = response.json()['length']
                chain = response.json()['chain']
                # Check if the length is longer and the chain is valid
                if length > max_length and self.valid_chain(chain):
                    max_length = length
                    new_chain = chain
        # Replace our chain if we discovered a new, valid chain longer than ours
        if new_chain:
            self.chain = new_chain
            return True
        return False
The first valid_chain () method is responsible for checking the chains for validity, passing through each block and verifying both the hash and the proof.
resolve_conflicts () is a method that works on all neighboring nodes: downloads their chains and checks them in the manner described above. If at the same time a valid chain is found longer than ours, a replacement is made.
Let's introduce two endpoints into our API, one for adding neighboring nodes, the other for resolving conflicts:
@app.route('/nodes/register', methods=['POST'])
def register_nodes():
    values = request.get_json()
    nodes = values.get('nodes')
    if nodes is None:
        return "Error: Please supply a valid list of nodes", 400
    for node in nodes:
        blockchain.register_node(node)
    response = {
        'message': 'New nodes have been added',
        'total_nodes': list(blockchain.nodes),
    }
    return jsonify(response), 201
@app.route('/nodes/resolve', methods=['GET'])
def consensus():
    replaced = blockchain.resolve_conflicts()
    if replaced:
        response = {
            'message': 'Our chain was replaced',
            'new_chain': blockchain.chain
        }
    else:
        response = {
            'message': 'Our chain is authoritative',
            'chain': blockchain.chain
        }
    return jsonify(response), 200
At this stage, if you want, you can attract other machines and create different nodes for your system. Or achieve the same using different ports on the same machine. I created a new node on another port of the same machine, and allowed the source node to recognize it. Thus, two nodes turned out: localhost: 5000 and localhost: 5001.
In node number two, I added more blocks to make the chain uniquely longer. Then it called GET / nodes / resolve in the first node - and the consensus algorithm replaced its chain with the chain of the second.
That's it. Now make friends and test your blockchain together.
I hope this material inspires you to new ideas. Personally, I am very enthusiastic about the development of cryptocurrencies: I am sure that the blockchain will revolutionize our ideas about the economy, government, and the storage of information.
In the future, I plan to release the second part of the article, where we will add a transaction validation mechanism to the blockchain and talk about how all this can be used in products.









