Web Server - Your First Arduino Network Software
- Tutorial
Introduction
In my publications [1,2,3], the sensor chain is described in detail - the Python Arduino interface. In real conditions of industrial production, the sensors are located at a considerable distance not only from each other but also from the place where the centralized processing of measurement information is carried out. It is logical to transmit information from sensors over a computer LAN using well-developed network technologies. This publication is written in the styles of an exercise to build and configure a network application with Arduino at home.
Formulation of the problem
- Use the Arduino Ethernet library with the Arduino Ethernet Shield extension to create a web server.
- Create remote access to Arduino using your home computer network.
- Use the standard Arduino example to provide humidity and motion sensors using a web server.
- Develop web applications using Python.
Stages of solving the task
- Design and build hardware for using Arduino and Ethernet Shield.
- Running the default example from the Arduino development environment as the starting point for creating the server.
- Modified example to host your hardware and redeploy code.
- Web application development using Python.
Ethernet Shield Connection Over Arduino Uno
Arduino Ethernet Shield is an officially supported open source network extension designed to work with Arduino Uno. The Ethernet Shield is equipped with an RJ45 connector for connecting to an Ethernet network. The Ethernet Shield is designed to be installed on an Arduino Uno, and it expands the pins of the Arduino Uno at the top of the board. The Ethernet Shield also has a microSD card slot for storing important files over the network. Like most extensions, the Ethernet Shield is powered by the Arduino board to which it is attached.

Each Ethernet Shield is equipped with a unique hardware (MAC) address. You can see it on the back of the board. You can write down this hardware address, as it will often be required in upcoming exercises. Also make sure that you are familiar with the installation of the Arduino Ethernet Shield for the following exercises.
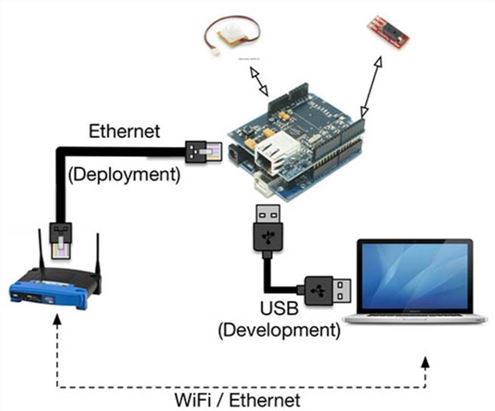
The following is a diagram of the Fritzing Scheme required for this exercise. The first thing you need to do is plug in an Ethernet Shield on top of your Arduino Uno.
Arduino uno

When deploying Arduino hardware for a remote connection without USB, you will need to provide external power to the board because you no longer have a USB connection to power the board.
Now connect your Arduino Uno to your computer using the USB cable. You also need to connect the Arduino to your local home network using an Ethernet cable. To do this, use a straight CAT5 or CAT6 cable and connect one end of the cable to your home router.
This router must be the same device that provides network access to the computer you are using. Connect the other end of the Ethernet cable to the Ethernet port of the Arduino Ethernet Shield. If the physical layer connection is established correctly, you should see a green light on the port.
Now it's time to start encoding your first Ethernet example. In the code, you will need to change the MAC and IP addresses so that it works for your configuration. Although you can get the Ethernet Shield MAC address from the back of the board, you will have to choose the IP address according to the configuration of your home network.
When you have already received the IP address of the computer you are working with, select a different address in the range. Ensure that no other network node is using this IP address. Use these MAC and IP addresses to update the following values in the code.
byte mac [] = {0x00, 0xAA, 0xBB, 0xCC, 0xDE, 0x02};
IPAddress ip (192, 168, 0, 102);  //  автоматически присвоен в домашней сети с помощью File --> Examples --> Ethernet --> DhcpAddressPrinter
On an IP network, the visible range of IP addresses for your network is a function of another address called subnetwork or subnet. The subnet of your LAN IP network can help you select the appropriate IP address for the Ethernet Shield in the range of IP addresses of your computer. You can learn about the basics of the subnet at [4].
Before delving into the code, compile the code with these changes and upload it to Arduino. After the download process is successfully completed, open a web browser and enter the IP address specified in the Arduino sketch. If all goes well, you should see text showing the values of the analog contacts.
To better understand what happened here, let's go back to the code. As you can see, at the beginning of the code, we initialize the Ethernet server library on port 80 using the methodEthernetServer from the Ethernet library:
EthernetServer server(80);At run time, setup () routine initializes the Ethernet-connection via Ethernet Shield using the method Ethernet.being () with variable mac and the ip , you identified earlier. The server.begin () method will start the server from here. Both of these steps are required to start the server if you use the Ethernet library for the server code:
Ethernet.begin (mac, ip);
server.begin ();
In the loop () function, we initialize the client object to listen for incoming client requests using the EthernetClient method . This object will respond to any request coming from connected clients that are trying to access the Ethernet server through port 80:
EthernetClient client = server.available ();After receiving the request, the program will wait for the request to finish loading. Then it will respond to the client with formatted HTML data using the method:
client.print ():
while (client.connected()) {
      if (client.available()) {
        char c = client.read();
        Serial.write(c);
       # Response code  }
If you try to access the Arduino server from a browser, you will see that the web server is responding to clients using the data on the analog contacts. Now, in order to get the correct values of the humidity and PIR sensors that we have connected in the hardware design, you will have to perform the following code modification.
Here you will notice that we respond to customers with calculated relative humidity values instead of raw readings from all analog outputs. We also changed the text to be printed in the web browser to match the correct sensor name:
if (c == '\n' && currentLineIsBlank) {
          // send a standard http response header
          client.println("HTTP/1.1 200 OK");
          client.println("Content-Type: text/html");
          client.println("Connection: close");
          client.println("Refresh: 5");
          client.println();
          client.println("");
          client.println("");
          float sensorReading = getHumidity(analogChannel, temperature);
          client.print("Relative Humidity from HIH4030 is ");
          client.print(sensorReading);
          client.println(" %
");
          client.println("");
          break; }
In this process, we also added the Arduino function, getHumidity (), which will calculate the relative humidity from the values observed from the analog pins.
float getHumidity(int analogChannel, float temperature){
  float supplyVolt = 5.0;
  int HIH4030_Value = analogRead(analogChannel);
  float analogReading = HIH4030_Value/1023.0 * supplyVolt;
  float sensorReading = 161.0 * analogReading / supplyVolt - 25.8;
  float humidityReading = sensorReading / (1.0546 - 0.0026 * temperature);
  return humidityReading; }
These changes can be applied to, for example, WebServer Arduino for the testing phase or simply open the sketch WebServer_Custom.ino from the Exercise 1 - Web Server folder in your code directory. As you can see in the open sketch file, we have already modified the code to reflect the changes, but you still have to change the MAC and IP addresses to the corresponding addresses.
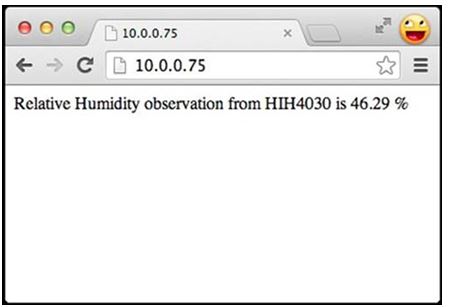
After you are done with these minor changes, compile and upload the sketch to Arduino. If everything goes according to plan, you must have access to the web server using a web browser. Open the IP address of the recently prepared Arduino in a web browser.
You should get the same answer as shown in the following screenshot. Although we only display humidity values through this sketch, you can easily attach motion sensor values using additional client.print () methods . Similar to the mechanism we implemented in this exercise, the web server responds to a request made by the web browser and provides the web pages you are looking for. Although this method is very popular and versatile for delivering web pages, the payload contains a lot of additional metadata (data about data) compared to the actual size of the sensor information.
In addition, implementing a server using the Ethernet server library takes up a lot of Arduino resources. Arduino, being a device with limited resources, is not suitable for starting a server application, since Arduino resources must be a priority for processing sensors, not communications.
A web server created using the Ethernet library supports a very limited number of connections , making it unsuitable for large-scale applications and multi-user systems.
The best approach to solving this problem is to use Arduino as a client device or use lightweight communication protocols designed to work with hardware devices with limited resources. In the next few sections, you will learn and implement these approaches for communicating Arduino over Ethernet.
Web Application Development Using Python
By implementing the previous program, you have enabled networking on the Arduino. In the previous example, we created an HTTP web server using methods available from the Ethernet library. Having created the Arduino web server, we made available Arduino resources on the network. Similarly, Python also provides extensibility through various libraries for creating web server interfaces.
By running a Python-based web server on your computer or other devices such as the Raspberry Pi, you can avoid using Arduino to host the web server. Web applications built using high-level languages such as Python can also provide additional features and extensibility compared to Arduino.
We will use the Python library, web.py, to create the Python web server. We will also use this library to create interactive web applications that will transfer data between the Arduino client and the web browser.
After you learn the basics of web.py, we will interact with Arduino with web.py using serial ports to make Arduino accessible through the Python web server. Then we will upgrade the Arduino communication method from the serial interface to the HTTP-based messaging.
Python web framework - web.py
The web server can be developed in Python using the various web frameworks such as Django, bottle, Pylon and web.py . We have chosen web.py as the preferred web structure due to its simple but powerful features.
The web.py library was originally developed by the late Aaron Swartz with the goal of developing a simple approach for building web applications using Python. This library provides two main methods, GET and POST , to support the HTTP Representation State Transfer (REST) architecture .
This architecture is designed to support the HTTP protocol by sending and receiving data between clients and the server. Today, the REST architecture is implemented by a huge number of websites for transmitting data over HTTP.
Install web.py
To get started with web.py, you need to install the web.py library using Setuptools. On Linux and Mac OS X, run one of these commands on a terminal to install web.py:
$ sudo easy_install web.py
$ sudo pip install web.py
On Windows, open a command prompt and run the following command:
> easy_install.exe web.pyFor pythn 3.61, type in the command line:
> easy_install-3.61.exe web.pyIf Setuptools is configured correctly, you can install the library without any difficulty. To verify the installation of the library, open the Python online help and run this command to make sure that you imported the library without any errors:
>>> import webThe first Python web application
Implementing a web server using web.py is a very simple and straightforward process. The web.py library requires the declaration of a required GET method to successfully start the web server.
When a client tries to access the server using a web browser or another client, web.py receives a GET request and returns the data specified in this method. To create a simple web application using the web.py library , create a Python file using the following lines of code and execute the file using Python.
import web
urls = ( '/', 'index')
class index:
    def GET(self):
        return "Hello, world!"
if __name__ == "__main__":
    app = web.application(urls, globals())
    app.run()
When executed, you will see that the server is now running and accessible through the address 0.0.0.0 : 8080. Since the server program is running on the IP address 0.0.0.0, you can access it using the same computer, local host, or any other computer from the same network.
To check the server, open a web browser and go to 0.0.0.0 : 8080. When you try to access the server from the same computer, you can also use 127.0.0.1 : 8080 or localhost : 8080. 127.0.0.1 The IP address actually means localhost, that is, the network address of the same computer on which the program is running. You can see the response of the server displayed in the browser, as shown in the following screenshot:
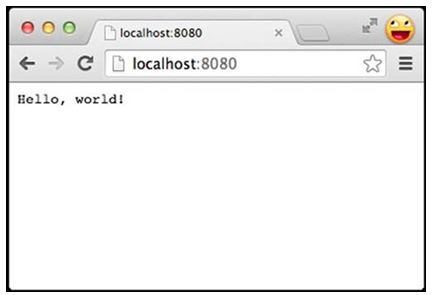
To understand how this simple code works, check out the GET method in the previous code snippet. As you can see, when the web browser requests the URL, the GET method returns Hello, world! to the browser.
Meanwhile, you can also watch two mandatory component web.py in your code: methods urls and web.application () . The web.py library requires initialization of the response location in the urls variable declaration.
For every web.py -based web application , the application (urls, global ()) method is requiredCalled to initialize the web server. By default, web.py applications run on port 8080 , which can be changed to a different port number by specifying it at run time. For example, if you want to run the web.py application on port 8888 , run the following command:
$ python webPyBasicExample.py 8888Although this only returns plain text, you have successfully created your first web application using Python. We will move from here and create more complex web applications in the following chapters using the web.py library .
To develop these complex applications, we need more than just the GET method . Let's start exploring preliminary concepts to further enhance your familiarity with the web.py library .
Web.py core concepts for developing complex web applications
The web.py library was designed to provide convenient and simple methods for developing dynamic websites and web applications using Python. Using web.py , it’s very easy to create complex websites using just a few additional Python concepts.
With this limited training course and easy-to-use methods, web.py is one of the fastest ways to create web applications from programming languages. Let's start by understanding these web.py concepts in detail.
URL handling
You might notice that in our first web.py program, we defined a urls variable that points to the root folder (/) of the Index class:
urls = (
    '/', 'index'
)
In the previous declaration, the first part, '/', is a regular expression used to match actual URL requests. You can use expressions to handle complex requests made to your server web.py , and point them to the appropriate class.
In web.py, you can link different places of the landing pages with the corresponding classes. For example, if you want to redirect the location of the data / data to the data class in addition to the Index class, you can change the urls variable as follows:
urls = (
    '/', 'index',
    '/data', 'data',
)
Under this condition, when the client sends a request for access to the address http: //
GET and POST Methods
We created an Arduino-based web server running on port 80, we used a web browser to access the web server. Web browsers are one of the most popular types of web clients used to access a web server; Other types are URLs, Wget and web crawlers.
The web browser uses HTTP to communicate with any web servers, including the Arduino web server that we used. GET and POST are the two main methods supported by the HTTP protocol for addressing server requests coming from a web browser.
Whenever you try to open a website in your browser or any other HTTP client, you are actually requesting the GET function from the web server; For example, when you open the URL of a website [5], you request that the web server hosting this website will give you a GET request for the location '/'.
In the URL Handling section, we learned how to associate web.py classes with URL placements. Using the GET method provided by the web.py library , you can associate a GET request with individual classes. After you receive a GET request, you need to return the appropriate values as a response to the client. The following code snippet shows how the GET () function will be called when someone makes a GET request to the “/” location:
def GET(self):
  f = self.submit_form()
  f.validates()
  t = 75
  return render.test(f,t);
The HTTP POST function is mainly used to send a form or any other data to a web server. In most cases, POST is embedded in the web page, and a server request is generated when the user sends a component that carries the POST function. The web.py library also provides the POST () function, which is called when the web client tries to contact the web.py server using the POST method. In most implementations of the POST () function, the request includes some data submitted through forms. You can extract individual form elements using the value f ['Celsius' ...], which will give you the value associated with the Celsius form element. When the POST () function has completed the provided actions, you can return the relevant information to the client in response to the POST request:
    def POST(self):
        f = self.submit_form()
        f.validates()
        c = f['Celsius'].value
        t = c*(9.0/5.0) + 32
        return render.test(f,t)
Patterns
Now you know how to redirect the HTTP request to the corresponding URL, and also how to implement methods to respond to these HTTP requests (i.e. GET and POST). But what about the web page that should be displayed after receiving the request? To understand the rendering process, let's start by creating a folder called templates in the same directory where our web.py program will be located. This folder will store templates that will be used to render web pages on demand. You must specify the location of this template folder in the program using the template.render () function , as shown in the following line of code:
render = web.template.render ('templates')After you create an instance of the rendering folder, it's time to create the template files for your program. According to the requirements of your program, you can create as many template files as you want. Web.py uses a language called Templetor to create these template files. You can learn more about this at [5]. Each template file created using Templetor must be stored in HTML format with the extension .html.
Let's create a test.html file in the templates folder using a text editor and paste the following code into the file:
$def with(form, i)
Value is: $:i
As you can see in the previous code snippet, the template file starts with the expression $ def with () , where you need to specify the input arguments as variables in brackets.
After rendering the template, they will be the only variables you can use for the web page; For example, in the preceding code snippet, we passed two variables ( The form and i ) as input variables. We used the form object using $: form.render ()to display it inside the web page. When you need to display a form object, you can directly pass another variable by simply declaring it (i.e., $: i). Templetor will display the HTML of the template file as it is when using variables when they are used.
You now have a test.html template file ready for use in your web.py program. Whenever the GET () or POST () function is executed, you need to return the value to the requesting client. Although you can return any variable for these requests, including None, you will have to display a template file where the answer is related to loading the web page. You can return the template file using the render () function, followed by the name of the template file and input arguments:
return render.test (f, i);As you can see from the previous line of code, we return the rendered test.html page by specifying the render.test () function , where test () is just the name of the file without the .html extension. The function also includes the form object, f, and the variable i, which will be passed as input arguments.
Forms
The web.py library provides easy ways to create form elements using the Form module. This module includes the ability to create HTML form elements, receive input from users, and validate these inputs before using them in a Python program. In the following code fragment, we create two form elements: Textbox and Button , using the Form library :
submit_form = form.Form(
      form.Textbox('Celsius', description = 'Celsius'),
      form.Button('submit', type="submit", description='submit'))
In addition to Textbox (which receives text input from users) and Button (which submits form), the Form module also provides several other form elements, such as Password for receiving hidden text input, Dropbox for receiving a mutually exclusive drop-down list, Radioto receives mutually exclusive inputs from several options , and Checkbox - the choice of binary input from the given options. Although all of these elements are very easy to implement, you should select form elements only according to your program requirements.
In implementing the form through web.py, the web page must execute the POST method each time the form is submitted. As you can see in the following implementation of the form in the template file, we explicitly declare the form submission method as POST:
$def with(form, i)
Conclusion
The publication contains all the necessary data for assembling at home a network application for remote control of humidity temperature and movement.