Multitasking Arduin: painless timers
- Tutorial
Not every arduino driver knows that in addition to the start code in setup and the endless loop in loop, pieces of code can be added to the robot firmware that will stop the main loop at a strictly predetermined time, carry out their tasks, and then carefully transfer control to the main program so that it does not notice anything at all. This feature is provided by a timer interrupt mechanism (a common occurrence for any microcontroller); with its help, real-time and multitasking elements can be added to the firmware.
Even less use this opportunity in practice, because in the standard not too rich Arduino API it is not provided. And, although access to all the riches of the internal capabilities of the microcontroller lies at arm's length by connecting one or two system header files, not everyone will want to add a couple of screens of a rather specific configuration code to their neat little sketch (along with losing the rest of portability between it different boards). Only a few (especially among the audience of Arduino) will decide and will be able to figure it out.
Today I will relieve you of suffering.
and I’ll tell you how to get real multitasking and real time in the firmware of your arduino robot by adding exactly 3 lines of code to it (including #include in the header). I promise that you will succeed, even if you just started Blink for the first time.
arduino-timer-api / examples / timer-api / timer-api.ino
Connect the timer-api.h library ( times )
We start the timer with the desired frequency with timer_init_ISR_XYHz : here XYHz = 1Hz - 1 Hertz - one interrupt call per second ( two )
( ISR - interrupt service routine, interrupt handler procedure )
Add any blocking or non-blocking nonsense to the main loop : print the message, wait 5 seconds ( everything is as usual here, so we don’t count )
The procedure called by interrupting a timer event with a specified period is an implementation for a function called timer_handle_interrupts : we print a message, blink a light ( three )
The same thing, just add time measurement between two calls for clarity and debugging:
We sew a board, open Tools> Port Monitor , observe the result:

As you can see, the timer_handle_interrupts handler prints a message every 1000000 (1 million) microseconds, i.e. exactly once a second. And (oh miracle!), A constant blocking delay of 5 seconds delay (5000) in the main loop does not interfere with it in this way.
Here you have real time and multitasking in one sketch in 3 lines, I promised.
( there is also a timer_init_ISR_1MHz call, but it does not give a working result on any of the test controllers )
The interrupt code, obviously, must be executed fast enough to have time to complete before the next interrupt call and, preferably, still have some processor time to execute the main cycle.
I suppose it is unnecessary to explain that the higher the frequency of the timer, the shorter the interrupt call period, the faster the handler code should execute. I would not recommend putting it calls blocking delay delay The , cycles with an unknown number of iterations in advance, any other challenges with poorly predictable execution time (including Serial.print ).
In the event that the standard frequencies from the proposed ones do not suit you, you can enter an additional counter in the interrupt code, which will execute the useful code only after a certain number of missed calls. The target period will be equal to the sum of skipped base periods. Or you can make it generally variable.
arduino-timer-api / examples / timer-api-counter / timer-api-counter.ino
There is another option to set an almost arbitrary (within certain limits) value of the frequency of the timer by calling timer_init_ISR (timer, prescaler, adjustment) with parameters - the system clock divider of the processor prescaler and an arbitrary adjustment value to place the timer counter in the register.
Without going into details so as not to overload the post, I will give a link to an example with detailed comments:
arduino-timer-api / examples / timer-api-custom-clock / timer-api-custom-clock.ino
And I just note that using this approach can lead to a loss of code portability between controllers with different clock speeds, because The parameters for obtaining the target frequency of the timer are selected in direct proportion to the frequency of the system signal generator on the chip, the bit depth of the timer, and the available options for prescaler system dividers .
To stop the timer, use the timer_stop_ISR call , to restart it, use any version of timer_init_ISR_XYHz , as before.
arduino-timer-api / examples / timer-api-start-stop / timer-api-start-stop.ino
Clone the repository directly into the library directory
and restart the Arduino environment.
Or, on the arduino-timer-api project page, download the snapshot of the Clone or download> Download ZIP repository or one of the releases as an archive, then install the arduino-timer-api-master.zip archive through the library setup menu in the Arduino environment ( Sketch> Connect library > Add .ZIP library ... ).
Examples should appear in the menu File> Examples> arduino-timer-api
- Atmega / AVR 16 bit 16 MHz on Arduino
- SAM / ARM 32 bit 84 MHz on Arduino Due
- PIC32MX / MIPS 32 bit 80 MHz on the ChipKIT family (PIC32MZ / MIPS 200 MHz - partially, in operation)
Rotation by a stepping motor via the step-dir interface:
- in the background by the timer we generate a constant rectangular signal for a step along the HIGH-> LOW edge on the STEP leg
- in the main loop we receive commands from the user to select the direction of rotation (DIR leg) or stop the motor (leg EN) via the serial port
arduino-timer-api / examples / timer-api-stepper / timer-api-stepper.ino
Even less use this opportunity in practice, because in the standard not too rich Arduino API it is not provided. And, although access to all the riches of the internal capabilities of the microcontroller lies at arm's length by connecting one or two system header files, not everyone will want to add a couple of screens of a rather specific configuration code to their neat little sketch (along with losing the rest of portability between it different boards). Only a few (especially among the audience of Arduino) will decide and will be able to figure it out.
Today I will relieve you of suffering.
and I’ll tell you how to get real multitasking and real time in the firmware of your arduino robot by adding exactly 3 lines of code to it (including #include in the header). I promise that you will succeed, even if you just started Blink for the first time.
Let's start right away with the code
arduino-timer-api / examples / timer-api / timer-api.ino
Connect the timer-api.h library ( times )
#include "timer-api.h"
We start the timer with the desired frequency with timer_init_ISR_XYHz : here XYHz = 1Hz - 1 Hertz - one interrupt call per second ( two )
void setup() {
    Serial.begin(9600);
    // частота=1Гц, период=1с
    timer_init_ISR_1Hz(TIMER_DEFAULT);
    pinMode(13, OUTPUT);
}
( ISR - interrupt service routine, interrupt handler procedure )
Add any blocking or non-blocking nonsense to the main loop : print the message, wait 5 seconds ( everything is as usual here, so we don’t count )
void loop() {
    Serial.println("Hello from loop!");
    delay(5000);
    // здесь любой код: блокирующий или неблокирующий
}
The procedure called by interrupting a timer event with a specified period is an implementation for a function called timer_handle_interrupts : we print a message, blink a light ( three )
void timer_handle_interrupts(int timer) {
    Serial.println("goodbye from timer");
    // мигаем лампочкой
    digitalWrite(13, !digitalRead(13));
}
The same thing, just add time measurement between two calls for clarity and debugging:
void timer_handle_interrupts(int timer) {
    static unsigned long prev_time = 0;
    unsigned long _time = micros();
    unsigned long _period = _time - prev_time;
    prev_time = _time;
    Serial.print("goodbye from timer: ");
    Serial.println(_period, DEC);
    // мигаем лампочкой
    digitalWrite(13, !digitalRead(13));
}
We sew a board, open Tools> Port Monitor , observe the result:
As you can see, the timer_handle_interrupts handler prints a message every 1000000 (1 million) microseconds, i.e. exactly once a second. And (oh miracle!), A constant blocking delay of 5 seconds delay (5000) in the main loop does not interfere with it in this way.
Here you have real time and multitasking in one sketch in 3 lines, I promised.
Frequency options for timer_init_ISR_XYHz
    //timer_init_ISR_500KHz(TIMER_DEFAULT);
    //timer_init_ISR_200KHz(TIMER_DEFAULT);
    //timer_init_ISR_100KHz(TIMER_DEFAULT);
    //timer_init_ISR_50KHz(TIMER_DEFAULT);
    //timer_init_ISR_20KHz(TIMER_DEFAULT);
    //timer_init_ISR_10KHz(TIMER_DEFAULT);
    //timer_init_ISR_5KHz(TIMER_DEFAULT);
    //timer_init_ISR_2KHz(TIMER_DEFAULT);
    //timer_init_ISR_1KHz(TIMER_DEFAULT);
    //timer_init_ISR_500Hz(TIMER_DEFAULT);
    //timer_init_ISR_200Hz(TIMER_DEFAULT);
    //timer_init_ISR_100Hz(TIMER_DEFAULT);
    //timer_init_ISR_50Hz(TIMER_DEFAULT);
    //timer_init_ISR_20Hz(TIMER_DEFAULT);
    //timer_init_ISR_10Hz(TIMER_DEFAULT);
    //timer_init_ISR_5Hz(TIMER_DEFAULT);
    //timer_init_ISR_2Hz(TIMER_DEFAULT);
    //timer_init_ISR_1Hz(TIMER_DEFAULT);
( there is also a timer_init_ISR_1MHz call, but it does not give a working result on any of the test controllers )
The interrupt code, obviously, must be executed fast enough to have time to complete before the next interrupt call and, preferably, still have some processor time to execute the main cycle.
I suppose it is unnecessary to explain that the higher the frequency of the timer, the shorter the interrupt call period, the faster the handler code should execute. I would not recommend putting it calls blocking delay delay The , cycles with an unknown number of iterations in advance, any other challenges with poorly predictable execution time (including Serial.print ).
Summing periods (frequency division)
In the event that the standard frequencies from the proposed ones do not suit you, you can enter an additional counter in the interrupt code, which will execute the useful code only after a certain number of missed calls. The target period will be equal to the sum of skipped base periods. Or you can make it generally variable.
arduino-timer-api / examples / timer-api-counter / timer-api-counter.ino
#include"timer-api.h"
void setup() {
Serial.begin(9600);
while(!Serial);
// частота=10Гц, период=100мс
timer_init_ISR_10Hz(TIMER_DEFAULT);
pinMode(13, OUTPUT);
}
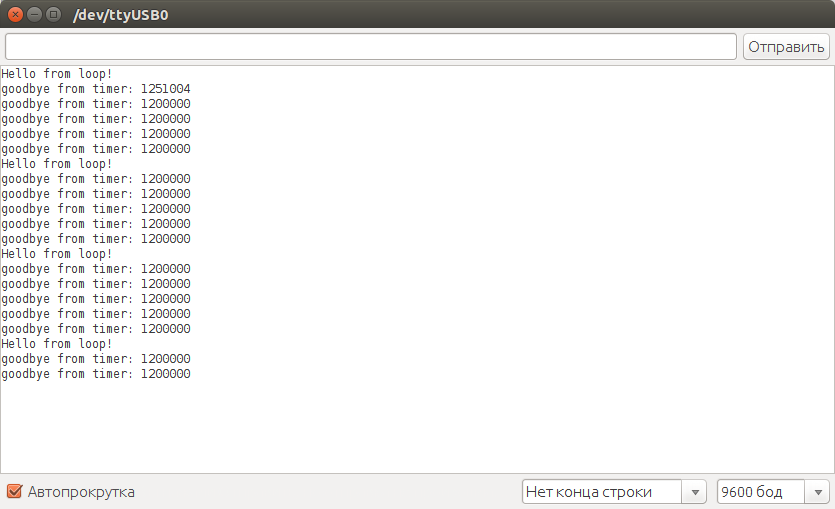
void loop() {
Serial.println("Hello from loop!");
delay(6000);
// здесь любой код: блокирующий или неблокирующий
}
void timer_handle_interrupts(int timer) {
static unsigned long prev_time = 0;
// дополнильный множитель периода
static int count = 11;
// Печатаем сообщение на каждый 12й вызов прерывания:
// если базовая частота 10Гц и базовый период 100мс,
// то сообщение будет печататься каждые 100мс*12=1200мс
// (5 раз за 6 секунд)
if(count == 0) {
unsigned long _time = micros();
unsigned long _period = _time - prev_time;
prev_time = _time;
Serial.print("goodbye from timer: ");
Serial.println(_period, DEC);
// мигаем лампочкой
digitalWrite(13, !digitalRead(13));
// взводим счетчик
count = 11;
} else {
count--;
}
}
Arbitrary frequency
There is another option to set an almost arbitrary (within certain limits) value of the frequency of the timer by calling timer_init_ISR (timer, prescaler, adjustment) with parameters - the system clock divider of the processor prescaler and an arbitrary adjustment value to place the timer counter in the register.
Without going into details so as not to overload the post, I will give a link to an example with detailed comments:
arduino-timer-api / examples / timer-api-custom-clock / timer-api-custom-clock.ino
And I just note that using this approach can lead to a loss of code portability between controllers with different clock speeds, because The parameters for obtaining the target frequency of the timer are selected in direct proportion to the frequency of the system signal generator on the chip, the bit depth of the timer, and the available options for prescaler system dividers .
Starting and stopping the timer in dynamics
To stop the timer, use the timer_stop_ISR call , to restart it, use any version of timer_init_ISR_XYHz , as before.
arduino-timer-api / examples / timer-api-start-stop / timer-api-start-stop.ino
#include"timer-api.h"
int _timer = TIMER_DEFAULT;
void setup() {
Serial.begin(9600);
while(!Serial);
pinMode(13, OUTPUT);
}
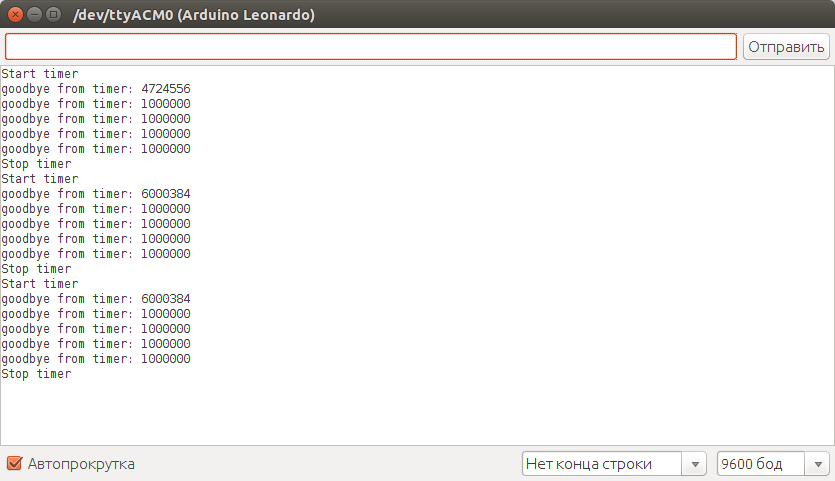
void loop() {
Serial.println("Start timer");
timer_init_ISR_1Hz(_timer);
delay(5000);
Serial.println("Stop timer");
timer_stop_ISR(_timer);
delay(5000);
}
void timer_handle_interrupts(int timer) {
static unsigned long prev_time = 0;
unsigned long _time = micros();
unsigned long _period = _time - prev_time;
prev_time = _time;
Serial.print("goodbye from timer: ");
Serial.println(_period, DEC);
// мигаем лампочкой
digitalWrite(13, !digitalRead(13));
}
Library installation
Clone the repository directly into the library directory
cd ~/Arduino/libraries/
git clone https://github.com/sadr0b0t/arduino-timer-api.git
and restart the Arduino environment.
Or, on the arduino-timer-api project page, download the snapshot of the Clone or download> Download ZIP repository or one of the releases as an archive, then install the arduino-timer-api-master.zip archive through the library setup menu in the Arduino environment ( Sketch> Connect library > Add .ZIP library ... ).
Examples should appear in the menu File> Examples> arduino-timer-api
Supported Chips and Platforms
- Atmega / AVR 16 bit 16 MHz on Arduino
- SAM / ARM 32 bit 84 MHz on Arduino Due
- PIC32MX / MIPS 32 bit 80 MHz on the ChipKIT family (PIC32MZ / MIPS 200 MHz - partially, in operation)
And finally,
Rotation by a stepping motor via the step-dir interface:
- in the background by the timer we generate a constant rectangular signal for a step along the HIGH-> LOW edge on the STEP leg
- in the main loop we receive commands from the user to select the direction of rotation (DIR leg) or stop the motor (leg EN) via the serial port
arduino-timer-api / examples / timer-api-stepper / timer-api-stepper.ino
#include"timer-api.h"
// Вращение шаговым моторов в фоновом режиме
// Pinout for CNC-shield
// http://blog.protoneer.co.nz/arduino-cnc-shield/
// X
#define STEP_PIN 2
#define DIR_PIN 5
#define EN_PIN 8
// Y
//#define STEP_PIN 3
//#define DIR_PIN 6
//#define EN_PIN 8
// Z
//#define STEP_PIN 4
//#define DIR_PIN 7
//#define EN_PIN 8
void setup() {
    Serial.begin(9600);
    // step-dir motor driver pins
    // пины драйвера мотора step-dir
    pinMode(STEP_PIN, OUTPUT);
    pinMode(DIR_PIN, OUTPUT);
    pinMode(EN_PIN, OUTPUT);
    // Будем вращать мотор с максимальной скоростью,
    // для разных настроек делителя шага оптимальная
    // частота таймера будет разная.
    // Оптимальные варианты задержки между шагами
    // для разных делителей:
    // https://github.com/sadr0b0t/stepper_h
    // 1/1: 1500 мкс
    // 1/2: 650 мкс
    // 1/4: 330 мкс
    // 1/8: 180 мкс
    // 1/16: 80 мкс
    // 1/32: 40 мкс
    // Делилель шага 1/1
    // частота=500Гц, период=2мс
    //timer_init_ISR_500Hz(TIMER_DEFAULT);
    // помедленнее
    timer_init_ISR_200Hz(TIMER_DEFAULT);
    // Делилель шага 1/2
    // частота=1КГц, период=1мс
    //timer_init_ISR_1KHz(TIMER_DEFAULT);
    // помедленнее
    //timer_init_ISR_500Hz(TIMER_DEFAULT);
    // Делилель шага 1/4
    // частота=2КГц, период=500мкс
    //timer_init_ISR_2KHz(TIMER_DEFAULT);
    // помедленнее
    //timer_init_ISR_1KHz(TIMER_DEFAULT);
    // Делилель шага 1/8
    // частота=5КГц, период=200мкс
    //timer_init_ISR_5KHz(TIMER_DEFAULT);
    // помедленнее
    //timer_init_ISR_2KHz(TIMER_DEFAULT);
    // Делилель шага 1/16
    // частота=10КГц, период=100мкс
    //timer_init_ISR_10KHz(TIMER_DEFAULT);
    // помедленнее
    //timer_init_ISR_5KHz(TIMER_DEFAULT);
    // Делилель шага 1/32
    // частота=20КГц, период=50мкс
    //timer_init_ISR_20KHz(TIMER_DEFAULT);
    // помедленнее
    //timer_init_ISR_10KHz(TIMER_DEFAULT);
    /////////
    // выключим мотор на старте
    // EN=HIGH to disable
    digitalWrite(EN_PIN, HIGH);
    // просим ввести направление с клавиатуры
    Serial.println("Choose direction: '<' '>', space or 's' to stop");
}
void loop() {
    if(Serial.available() > 0) {
        // читаем команду из последовательного порта:
        int inByte = Serial.read();
        if(inByte == '<' || inByte == ',') {
            Serial.println("go back");
            // назад
            digitalWrite(DIR_PIN, HIGH);
            // EN=LOW to enable
            digitalWrite(EN_PIN, LOW);
        } else if(inByte == '>' || inByte == '.') {
            Serial.println("go forth");
            // вперед
            digitalWrite(DIR_PIN, LOW);
            // EN=LOW to enable
            digitalWrite(EN_PIN, LOW);
        } else if(inByte == ' ' || inByte == 's') {
            Serial.println("stop");
            // стоп
            // EN=HIGH to disable
            digitalWrite(EN_PIN, HIGH);
        } else {
            Serial.println("press '<' or '>' to choose direction, space or 's' to stop,");
        }
    }
    delay(100);
}
void timer_handle_interrupts(int timer) {
    // шаг на фронте HIGH->LOW
    digitalWrite(STEP_PIN, HIGH);
    delayMicroseconds(1);
    digitalWrite(STEP_PIN, LOW);
}