Create an outbound call application in the 3CX Call Flow Designer development environment
- Tutorial
- Recovery mode
Introduction
In this article, we will tell you how to create an application for automatic outgoing dialing of subscribers (Dialer) in 3CX Call Flow Designer using the MakeCall component. The dialer automatically dials from the list of subscribers and connects the call to the extension or 3CX Call Queue. The dialer application allows you to conduct effective, automated outgoing call campaigns. Call center operators save time and energy by simply accepting switched calls - no need to search and dial the desired number!
Recall that in previous articles we examined the operation of CFDs with databases (which can also be used to obtain a subscriber number) and the routing of incoming calls depending on the time of day(which can be combined with outgoing calls).
Please note that the 3CX CFD development environment is free. But voice applications will only run on the 3CX edition of Pro and Enterprise . You can download CFDs from here .
A demo project of this voice application is supplied with the 3CX CFD distribution kit and is located in the Documents \ 3CX Call Flow Designer Demos folder .
It is important to note that by default, the dialer starts working when the 3CX Queue Manager Service starts. Therefore, it is necessary to set a certain condition under which the dialer will make calls. To do this, the component (s) Create a Condition is used in the voice application. For example, you can check (set) the time of day at which dialing should be performed.
Without setting conditions, the call starts at the moment the service starts and continues until the 3CX Queue Manager Service is stopped, the Queue with this voice application is deleted, or the voice application is not removed from the Call Queue. Agree, this is inconvenient.
Non-dialing can come from any source - a text file, a database, etc. In our example, the numbers are taken from a text file. The voice application also checks the current date and time (phoning is performed only on business days and during business hours), and the status of agents for distributing the call (if there are no free operators, phoning is suspended).
Project creation
To create a CFD project, go to File → New → Project , specify the project location folder and its name, for example, OutboundDialerDemo .
The new project contains the voice application Main.flow by default . It is not used in this project, so delete it in the Project Explorer window. In the same window, add a new application - right-click on the project name and select New Dialer . Name it MainDialer . In the Project Explorer, select the MailDialer object and set its properties in the Properties Window , as shown below.

The dialer has two parameters that determine its behavior:
- ParallelDialers - the number of simultaneously launched dialer entities;
- PauseBetweenDialerExecution - the time that each entity waits before making a call (strictly speaking, before starting the procedure for checking the conditions for making a call).
We explain this with an example. Suppose we set ParallelDialers to 5 and PauseBetweenDialerExecution to 30 seconds. The application will work as follows:
- The first dialer (entity) is created, gets the number to call, rings and starts to wait 30 seconds.
- After 6 sec a second dialer is created, gets a number, rings and starts to wait 30 seconds.
- After 6 sec a third dialer is created, gets a number, rings and starts to wait 30 seconds.
- After 6 sec a fourth dialer is created, gets a number, rings and starts to wait 30 seconds.
- After 6 sec the fifth dialer is created, gets the number, rings and starts to wait 30 seconds.
- After 6 sec The first dialer “wakes up”, gets a number to call, calls and starts to wait 30 seconds.
- After 6 sec The second dialer “wakes up”, gets a number to call, calls and starts to wait 30 seconds, etc.
As you can see, these two parameters determine the call frequency. When ParallelDialers is set to 5 and PauseBetweenDialerExecution is set to 30 seconds, 10 calls per minute will be made. By changing the parameters, we determine the desired frequency of calls.
Determining the appropriate call time
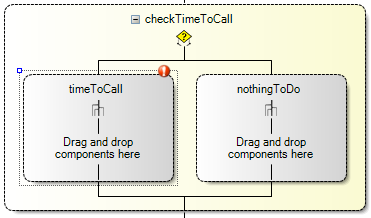
In our example, the call will be performed only from Monday to Friday from 9 to 17. To fulfill this condition, drag the Create a condition component from the component side panel to the main window of the development environment and name it checkTimeToCall . The component will have two branches: timeToCall - executed when the conditions (time) of the call are met and nothingToDo - executed if the conditions do not match .
Let's create a condition for branching timeToCall (parameter Condition). In CFDs, this uses the C # expression, which returns True when it falls within the time frame:
((int)DateTime.Now.DayOfWeek) > 0 && ((int)DateTime.Now.DayOfWeek) < 6 && DateTime.Now.Hour >= 9 && DateTime.Now.Hour < 17Definition of free operators
Let me remind you that our dialer “takes” the number from the text file and commutes it with the number of the 3CX Call Queue, to which, of course, the operators must be connected. Suppose that the Queue number is 800, and the numbers of the operators are 201, 202, and 203. You should check if any of these operators are ready to accept the call. To do this, execute the 3CX Call Control API script from the Launch External Script component .
This script is also written in C #. It checks the DN objects of each extension for an ActiveConnection attribute ::
using System;
using TCX.Configuration;
namespace OutboundDialerDemo
{
public class ExtensionStateHelper
{
public bool IsThereAnyFreeExtension()
{
return PhoneSystem.Root.GetDNByNumber("201").GetActiveConnections().Length == 0 ||
PhoneSystem.Root.GetDNByNumber("202").GetActiveConnections().Length == 0 ||
PhoneSystem.Root.GetDNByNumber("203").GetActiveConnections().Length == 0;
}
}
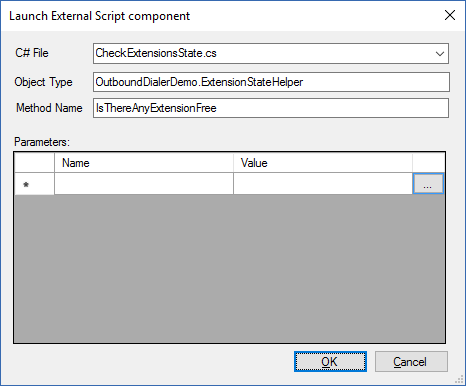
}Save the script in a file called CheckExtensionsState.cs in the Libraries folder of the project. Then drag the Launch External Script component to the timeToCall branch , name it checkFreeExtensions and configure as shown below.
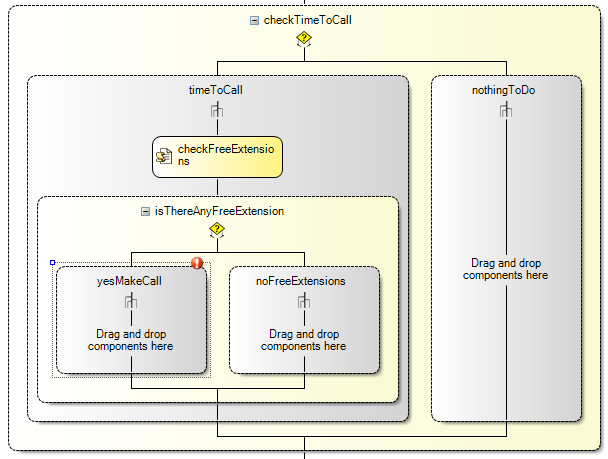
Now you should check the result of the script. Immediately below the Launch External Script component, add the Create a condition component component and call it isThereAnyFreeExtension . The component will have two branches: yesMakeCall and noFreeExtensions , as shown below.
Create a condition for branching yesMakeCallwhich is executed if the previous script returned True. The expression has the form:
checkFreeExtensions.ReturnValueWhen the condition is met, the yesMakeCall branch is executed, because all the necessary conditions are met: the right time and at least one free operator. You can call the subscriber!
Receiving and switching a subscriber number
Let me remind you that in our example, the numbers are taken from the file. We call the file NumbersToCall.txt - each line of the file contains one number.
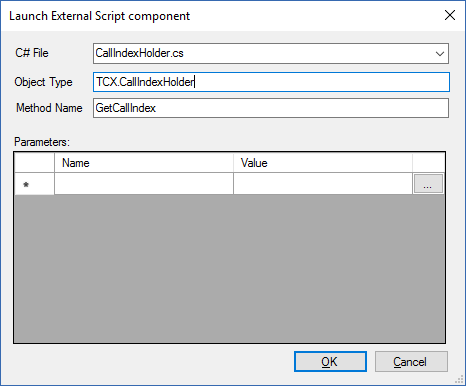
To successfully work with the file, you must create an index variable for the line number, which will be common to all dialer entities. Choosing a number, we increase the index, and the next dialer "takes" the number from the next line, and so on, in turn. Let's create another C # script CallIndexHolder.cs , in which we define a static variable (the script must also be stored in the Libraries folder .
using System;
namespace TCX
{
  public class CallIndexHolder
  {
    private static int callIndex = 0;
    public int GetCallIndex()
    {
      return callIndex;
    }
    public void SetCallIndex(int index)
    {
      callIndex = index;
    }
  }
}
Since the callIndex variable is declared as static, there is only one entity in the 3CX Queue Manager service that is shared between dialers.
So, we need one more component of Launch External Script (let's call it getCallIndex) , which we will put in the yesMakeCall branch and configure it as shown below:
Now let's move on to reading the number from the text file. Immediately after the getCallIndex component , add the Read / Write to File component , call it readNumberToCall and configure it as shown below:
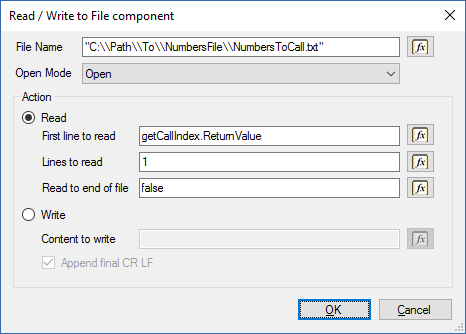
Pay attention to the format of the path to the file with the numbers and specify the path on your 3CX server.
When all lines in the file have been read, the readNumberToCall component considers an empty line. At this point, calls must be paused. To do this, add another component Create a condition , which will check whether the number is read from the file or not. It has one branch with the following condition:
GREAT_THAN(LEN(readNumberToCall.Result),0)If the condition is met, the CallIndexHolder.cs script is executed , increasing the variable callindex , and the Make Call component makes a call. The Make Call component is configured as follows:
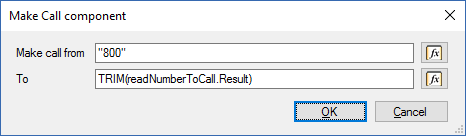
It makes a call from the extension number of Queue 800 (to which agents 201, 202, and 203 are connected) to the number read from the text file.
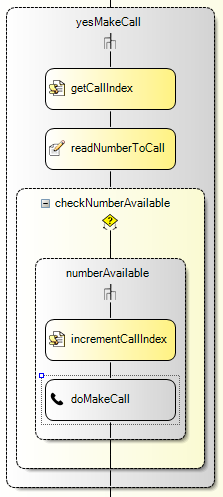
Note the general appearance of the yesMakeCall branch after adding all the necessary components.
Compiling and installing the application on the 3CX server
The voice application is ready! Now it should be compiled and downloaded to the 3CX server. For this:
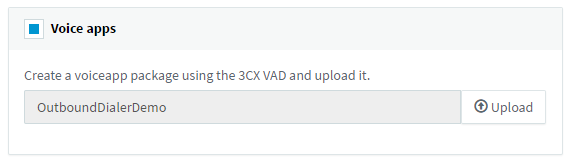
- Go to Build> Build All , and CFD will create an OutboundDialerDemo.tcxvoiceapp file .
- Go to the 3CX management interface, under Call Queues . Create a new Call Queue, specify the name and extension of the Queue, and then set the Voice applications option and download the compiled file.
- Save the changes to Call Queues. The voice application is ready to use.