We sharpen our tool on PyQt
I needed a tool. Sharp, practical, versatile. Meeting all my requirements and expandable as I wish.

But simple and convenient. It should be noted that at the main work I am not a developer, therefore I do not have a permanent programming environment on the working computer and, when required, I write on what I have to - bat, JScript, VBA in MSOffice (yes, this is Windows, corporate systems, there isn’t bash and perl “out of the box”), macros in different software, etc. All this helps to solve the current problem, but the level and capabilities are not the ones that I would like to have.
In short, I need an integrated environment with a built-in programming language in which I can parse and convert files, climb into databases, receive reports, call web services, generate requests in dir, etc., etc.
You will say that now there are tools for every taste and color, just choose. Aka TOAD frog for Oracle, SoapUI for the bus, and GNU and Apache products for everything else.
But the problem is that they are all specialized for one activity, but, on the other hand, are too universal - much can be done, but with many actions. And if the opportunity is not in the product, then you can’t add it. Either the product is closed, or you need to develop / buy a plug-in, or download the sources and understand them. But I needed a tool in which simple actions are done simply, but a little time is spent on complex ones and then again everything is simple.
Therefore, I decided to build myself the simplest shell from which I will launch the modules I need. The shell will be expandable, and the modules are simple and as independent of the shell as possible.
As a programming language, you need to take something that does not require compilation, or at minimal cost, so that you can easily rebuild for a specific task.
Javascript is good for small scripts and would be suitable, but it does not have a window interface, and I'm not interested in locally raising NodeJS for windows and fighting the browser.
Perl, PHP is the same problem.
Visual Basic and VBScript - well, it's under Windows. Yes, most enterprise IT systems where I have the honor to work are Windows. And each has an Office and therefore VBA. But if you do something that you want to constantly use, then cross-platform.
The choice fell on Python + PyQt5. I learned about the existence of the language (in addition to Habr, of course) from the raspberry Raspberry Pi, where Python was preinstalled. A pen breakdown was a bot for Telegram looking for synonyms for phrases (in pymorphy2 and YARN, then I will describe it, if interested). And I already knew Qt.
First, we’ll make a universal module for querying the database. And so that the request and its parameters are defined outside the module, in the ini-file, and the module is engaged in all work with the interface, working with the database and displaying data.
Connect PyQt. The naming conventions in Qt are strict, so we import everything in a row, it won’t interfere.
So that Qt error messages and warnings are not lost, we will connect the module with message handler, as suggested here
We will connect the connection to the database in a separate module so as not to clog here
Let's create a class based on QDialog (QWidget is also suitable, but in it default buttons do not work)
Fill the window, top to bottom
Layout with space for entering parameters and buttons
Place for output
And the status bar so that it is
Download the ini file. We take out the load in a separate method, so that later it can be blocked if necessary.
To work with ini files, I use Qt tools simply because I know how to do it. There are probably ways in Python too, but I didn’t dig. To avoid future problems with the Russian language, we will work in UTF-8 in all files.
We load request parameters from the Input section
The parameter is defined by the line “Name = Label: default value”
The name can be omitted along with a colon, then the Name will be in the interface.
For each parameter, create an input line, put it in a piggy bank, insert it with the label in the interface
Read the database connection parameters from the DB section
And finally, we read the text of the SQL query.
In the “Run” section, there will either be a “SQL” key with the query text itself (it is better to put it in quotation marks), or there will be a “SQLScript” key in which the sql file with the query is written - this makes it possible to create multi-line queries. In addition, queries in a file are more convenient to edit in FAR with Colorer highlighting.
Like ini, we believe that the sql file is encoded in UTF-8, only for transcoding we will use 'utf-8-sig' to get rid of the BOM at the beginning of the file.
Final touches - add a start button, arrange nicely.
The button will be assigned our method that runs the request for execution
Actually start method
Let's go work with the database.
We get the QSqlDatabase object, it must be valid and open. And if not - oops, nothing will come of it.
In Qt, essentially one way to work with database queries is QSqlQuery
Parsim sql-query, fill its parameters with values from input lines
In order not to wait until the request is executed, we will carry out its execution in a separate thread.
After the thread completes, this method will execute
Let's create a QTableView label as we need
But we will not pass the model with the query result to view immediately, but through the proxy - this will give us the opportunity to sort the plate by clicking on the column and do a search if necessary.
Let's launch what happened to check without a shell
And actually the launch
File artists.ini
We checked - it works.
Now we need the launch shell itself.
In the shell I want to see a tree of all my configured functions, and run them in separate windows. And so that the windows are not modal, i.e. you could switch between them and launch new ones.
For simplicity, we will use the MDI window, since Qt has everything for this. Reading the tree and its display is taken completely from the PyQt example , so we will not dwell on it.
We just determine that in the first column we have the name of the function displayed in the tree line, in the second - the description of the function, in the third - the ini-file passed to the module. I will show how to create the main window on QMainWindow
The main part of the MDI window is a special QMdiArea widget. The windows of the launched modules will live in it.
Let's make the main menu, so far with one item:
The tree will be in the dock panel on the left.
The description of the function will be displayed at the bottom (later)
On a double-click in the tree, assign a handler and put the panel in the main window
The double-click handler takes the name of the ini-file from the tree model and creates a class from it with the module. Our class is a widget; we insert it into the client part of the MDI window.
We check - it works:
Sources are posted on github under the MIT license. The link leads to the sources used for the article, and from the root you can take the latest version.
Tips:
1. PyQt, like Qt, does not include the QOCI binary driver needed to access Oracle. The driver must be assembled from the sources (C ++) supplied with Qt and put into PyQt5 \ Qt \ plugins \ sqldrivers. To build you will need a dll from Oracle Client.
2. Python is better to set so that the path to it does not contain Cyrillic. Otherwise, PyQt’s roof slides a little and it cannot find its files.
Continuation:
- We sculpt the toolbar on PyQt, export data to Excel and HTML
- We cut the XML according to the XQuery markup
-Preview documents in a Python program
But simple and convenient. It should be noted that at the main work I am not a developer, therefore I do not have a permanent programming environment on the working computer and, when required, I write on what I have to - bat, JScript, VBA in MSOffice (yes, this is Windows, corporate systems, there isn’t bash and perl “out of the box”), macros in different software, etc. All this helps to solve the current problem, but the level and capabilities are not the ones that I would like to have.
In short, I need an integrated environment with a built-in programming language in which I can parse and convert files, climb into databases, receive reports, call web services, generate requests in dir, etc., etc.
You will say that now there are tools for every taste and color, just choose. Aka TOAD frog for Oracle, SoapUI for the bus, and GNU and Apache products for everything else.
But the problem is that they are all specialized for one activity, but, on the other hand, are too universal - much can be done, but with many actions. And if the opportunity is not in the product, then you can’t add it. Either the product is closed, or you need to develop / buy a plug-in, or download the sources and understand them. But I needed a tool in which simple actions are done simply, but a little time is spent on complex ones and then again everything is simple.
Therefore, I decided to build myself the simplest shell from which I will launch the modules I need. The shell will be expandable, and the modules are simple and as independent of the shell as possible.
As a programming language, you need to take something that does not require compilation, or at minimal cost, so that you can easily rebuild for a specific task.
Javascript is good for small scripts and would be suitable, but it does not have a window interface, and I'm not interested in locally raising NodeJS for windows and fighting the browser.
Perl, PHP is the same problem.
Visual Basic and VBScript - well, it's under Windows. Yes, most enterprise IT systems where I have the honor to work are Windows. And each has an Office and therefore VBA. But if you do something that you want to constantly use, then cross-platform.
The choice fell on Python + PyQt5. I learned about the existence of the language (in addition to Habr, of course) from the raspberry Raspberry Pi, where Python was preinstalled. A pen breakdown was a bot for Telegram looking for synonyms for phrases (in pymorphy2 and YARN, then I will describe it, if interested). And I already knew Qt.
pip3 install pyqt5First, we’ll make a universal module for querying the database. And so that the request and its parameters are defined outside the module, in the ini-file, and the module is engaged in all work with the interface, working with the database and displaying data.
Connect PyQt. The naming conventions in Qt are strict, so we import everything in a row, it won’t interfere.
from PyQt5.QtCore import *
from PyQt5.QtWidgets import *
from PyQt5.QtSql import *
So that Qt error messages and warnings are not lost, we will connect the module with message handler, as suggested here
import meshandlerWe will connect the connection to the database in a separate module so as not to clog here
import dbpoolLet's create a class based on QDialog (QWidget is also suitable, but in it default buttons do not work)
class PyExecutor(QDialog):
  def __init__(self, iniFile, parent=None):
    super(PyExecutor, self).__init__(parent)
    self.setWindowFlags(self.windowFlags()
       | Qt.WindowMinimizeButtonHint
       | Qt.WindowMaximizeButtonHint
       )
Fill the window, top to bottom
 self.topLay = QVBoxLayout(self)
 self.topLay.setContentsMargins(6,6,6,6)
Layout with space for entering parameters and buttons
 self.lay = QFormLayout()
 self.topLay.addLayout(self.lay)
Place for output
 self.resultLay = QVBoxLayout()
 self.topLay.addLayout(self.resultLay)
And the status bar so that it is
 self.bar = QStatusBar(self)
 self.topLay.addWidget(self.bar)
Download the ini file. We take out the load in a separate method, so that later it can be blocked if necessary.
   self.loadIni(iniFile)
 def loadIni(self, iniFile):
To work with ini files, I use Qt tools simply because I know how to do it. There are probably ways in Python too, but I didn’t dig. To avoid future problems with the Russian language, we will work in UTF-8 in all files.
 ini = QSettings(iniFile, QSettings.IniFormat)
 ini.setIniCodec("utf-8")
We load request parameters from the Input section
 ini.beginGroup("Input")
 for key in sorted(ini.childKeys()):
The parameter is defined by the line “Name = Label: default value”
The name can be omitted along with a colon, then the Name will be in the interface.
 v = ini.value(key).split(':')
 if len(v)>1:
   paramTitle = v[0]
   paramValue = v[1]
 else:
   paramTitle = key
   paramValue = v[0]
For each parameter, create an input line, put it in a piggy bank, insert it with the label in the interface
 self.params.append([key, paramTitle, paramValue])
 if paramTitle != '':
   le = QLineEdit()
   self.inputs[key] = le
   le.setText(paramValue)
   le.paramTitle = paramTitle
   self.lay.addRow(paramTitle, le)
 ini.endGroup()
Read the database connection parameters from the DB section
 ini.beginGroup("DB")
 self.dbini = ini.value("DBConnect")
 if self.dbini == "this":
   self.dbini = iniFile
 ini.endGroup()
And finally, we read the text of the SQL query.
In the “Run” section, there will either be a “SQL” key with the query text itself (it is better to put it in quotation marks), or there will be a “SQLScript” key in which the sql file with the query is written - this makes it possible to create multi-line queries. In addition, queries in a file are more convenient to edit in FAR with Colorer highlighting.
Like ini, we believe that the sql file is encoded in UTF-8, only for transcoding we will use 'utf-8-sig' to get rid of the BOM at the beginning of the file.
  ini.beginGroup("Run")
  if ini.contains("SQL"):
    self.sql = ini.value("SQL")
  else:
    f = QFile(ini.value("SQLScript"))
    f.open(QIODevice.ReadOnly)
    self.sql = str(f.readAll(),'utf-8-sig')
  ini.endGroup()
Final touches - add a start button, arrange nicely.
  self.runBtn = QPushButton("Run")
  self.runBtn.setDefault(True)
  self.btnLay = QHBoxLayout()
  self.btnLay.addStretch()
  self.btnLay.addWidget(self.runBtn)
  self.lay.addRow(self.btnLay)
The button will be assigned our method that runs the request for execution
self.runBtn.clicked.connect(self.run)
Actually start method
def run(self):
  self.runBtn.setEnabled(False) #Отключим кнопку, что на нее не нажали второй раз
  self.clearResult() #Почистим предыдущие результаты, если были
Let's go work with the database.
We get the QSqlDatabase object, it must be valid and open. And if not - oops, nothing will come of it.
self.db = dbpool.openDatabase(self.dbini)
if self.db == None or not self.db.isValid() or not self.db.isOpen():
  print("No opened DB", self.dbini)
  self.endRun()
  return
In Qt, essentially one way to work with database queries is QSqlQuery
self.query = QSqlQuery(self.db)
Parsim sql-query, fill its parameters with values from input lines
self.query.prepare(self.sql)
for p in self.params:
  key = p[0]
  if key in self.inputs:
    le = self.inputs[key]
    par = ':'+key
    self.query.bindValue(par, le.text())
In order not to wait until the request is executed, we will carry out its execution in a separate thread.
  self.tr = QueryRunner(self.query)
  self.tr.finished.connect(self.showQueryResult)
  self.tr.start();
After the thread completes, this method will execute
def showQueryResult(self):
Let's create a QTableView label as we need
w = self.createTableView()
But we will not pass the model with the query result to view immediately, but through the proxy - this will give us the opportunity to sort the plate by clicking on the column and do a search if necessary.
  w.sqlModel = QSqlQueryModel(w)
  w.sqlModel.setQuery(self.query)
  w.proxyModel = QSortFilterProxyModel(w)
  w.proxyModel.setSourceModel(w.sqlModel)
  w.setModel(w.proxyModel)
  self.resultLay.addWidget(w)
  self.endRun()
Let's launch what happened to check without a shell
if __name__ == '__main__':
  # Немного магии для Windows
  import os
  import PyQt5
  import sys
  pyqt = os.path.dirname(PyQt5.__file__)
  QApplication.addLibraryPath(os.path.join(pyqt, "Qt", "plugins"))
And actually the launch
  app = QApplication(sys.argv)
  ex = PyExecutor("artists.ini")
  ex.show()
  sys.exit(app.exec_())
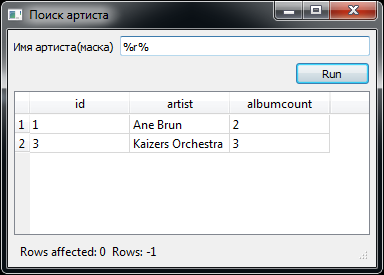
File artists.ini
[Common]
Title=Поиск артиста
[Input]
Name=Имя артиста(маска):%r%
[DB]
DBConnect=sqlite.ini
[Run]
SQL="SELECT * FROM artists where :Name = '' or artist like :Name"
We checked - it works.
Now we need the launch shell itself.
In the shell I want to see a tree of all my configured functions, and run them in separate windows. And so that the windows are not modal, i.e. you could switch between them and launch new ones.
For simplicity, we will use the MDI window, since Qt has everything for this. Reading the tree and its display is taken completely from the PyQt example , so we will not dwell on it.
We just determine that in the first column we have the name of the function displayed in the tree line, in the second - the description of the function, in the third - the ini-file passed to the module. I will show how to create the main window on QMainWindow
Тесты Тестовые папки

 Поиск артистов Поиск артистов по маске artists.ini
class MainWindow(QMainWindow):
 def __init__(self, parent=None):
   super(MainWindow, self).__init__(parent)
The main part of the MDI window is a special QMdiArea widget. The windows of the launched modules will live in it.
 self.mdiArea = QMdiArea(self)
 self.setCentralWidget(self.mdiArea)
Let's make the main menu, so far with one item:
 self.mainMenu = QMenuBar(self)
 self.setMenuBar(self.mainMenu)
 m = self.mainMenu.addMenu("Window")
 a = m.addAction("Cascade windows")
 a.triggered.connect(self.mdiArea.cascadeSubWindows)
The tree will be in the dock panel on the left.
 self.treePanel = QDockWidget("Дерево задач", self)
 w = QWidget(self.treePanel)
 self.treePanel.setWidget(w)
 lay = QVBoxLayout(w)
 lay.setSpacing(1)
 lay.setContentsMargins(1,1,1,1)
 w.setLayout(lay)
 self.tree = TreeWidget(self.treePanel)
 lay.addWidget(self.tree)
The description of the function will be displayed at the bottom (later)
 edit = QTextEdit(w)
 lay.addWidget(edit)
On a double-click in the tree, assign a handler and put the panel in the main window
 self.tree.activated.connect(self.handle_dblclick)
 self.addDockWidget(Qt.LeftDockWidgetArea, self.treePanel)
The double-click handler takes the name of the ini-file from the tree model and creates a class from it with the module. Our class is a widget; we insert it into the client part of the MDI window.
 def handle_dblclick(self, index):
   proc = index.data(Qt.UserRole)
   if proc != None:
     proc = proc.strip()
     ex = PyExecutor(proc)
     self.mdiArea.addSubWindow(ex)
     ex.show()
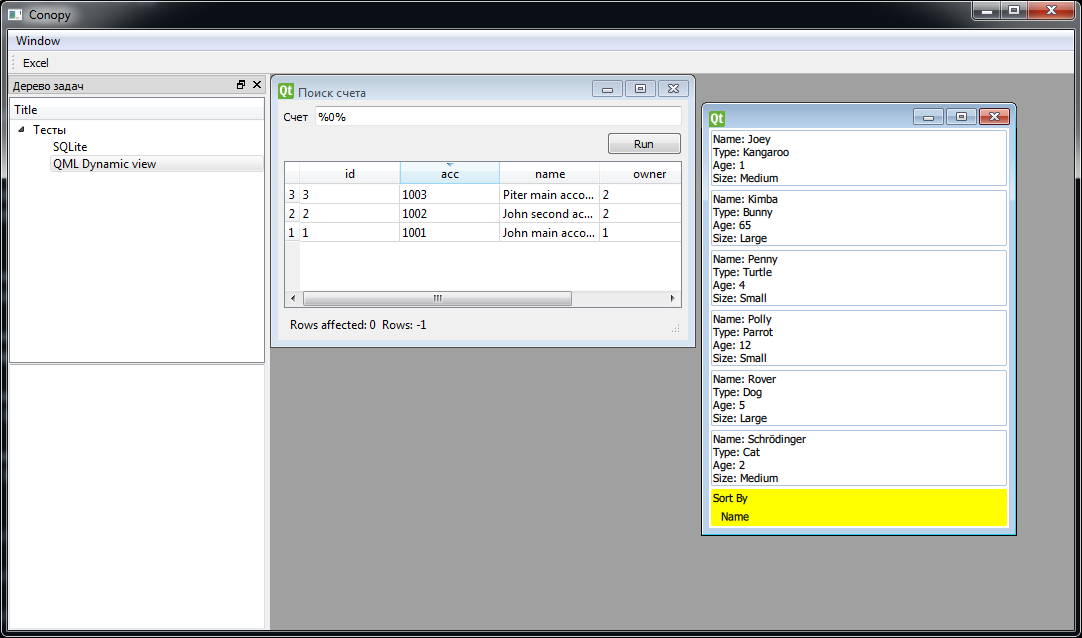
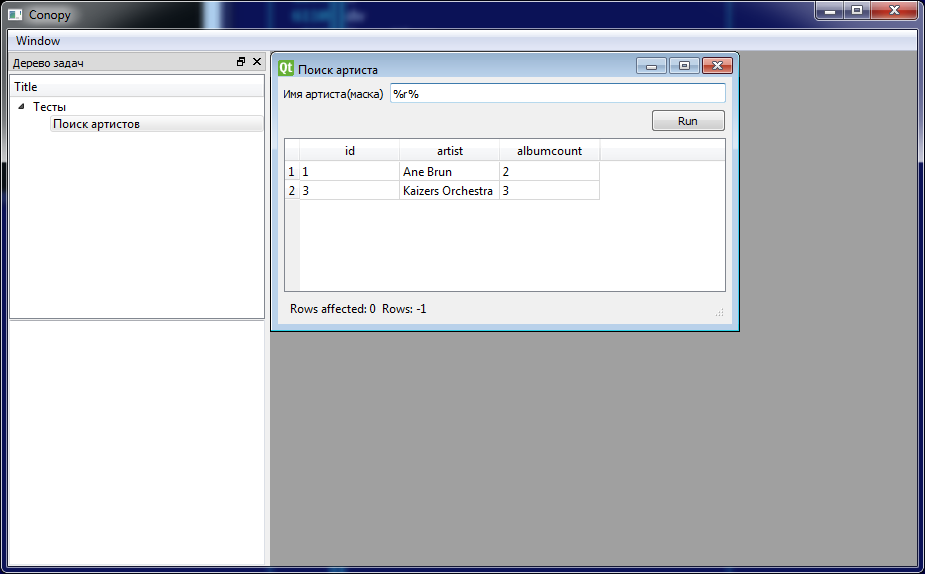
We check - it works:
Sources are posted on github under the MIT license. The link leads to the sources used for the article, and from the root you can take the latest version.
Tips:
1. PyQt, like Qt, does not include the QOCI binary driver needed to access Oracle. The driver must be assembled from the sources (C ++) supplied with Qt and put into PyQt5 \ Qt \ plugins \ sqldrivers. To build you will need a dll from Oracle Client.
2. Python is better to set so that the path to it does not contain Cyrillic. Otherwise, PyQt’s roof slides a little and it cannot find its files.
Continuation:
- We sculpt the toolbar on PyQt, export data to Excel and HTML
- We cut the XML according to the XQuery markup
-Preview documents in a Python program