August 21, 2017 at 13:55
Building a microservice architecture with Apache Kafka and .NET Core 2.0

Good day! Apache Kafka is a very fast distributed message broker, and today I will tell you how to “cook it” and implement a simple microservice architecture from console applications with it. So, for anyone who wants to get to know Apache Kafka and try it out, welcome to cat.
Overview part
Introduction
This material in no way claims to be a thorough description of Apache Kafka, nor the subtle issues of building a microservice architecture. The only thing you need to know is how to build applications on the .NET platform. We will use .Net Core 2.0
So, what will we create in the end? An application that tells you how to name your child. For simplicity, it will issue random male and female names from a predefined list. The system will consist of two console applications and one library.
The idea is to build not a “monolithic”, but a distributed application. Thus, we will secure a reserve for future scaling and many other advantages described, for example, here.
Here is the structure of our system:
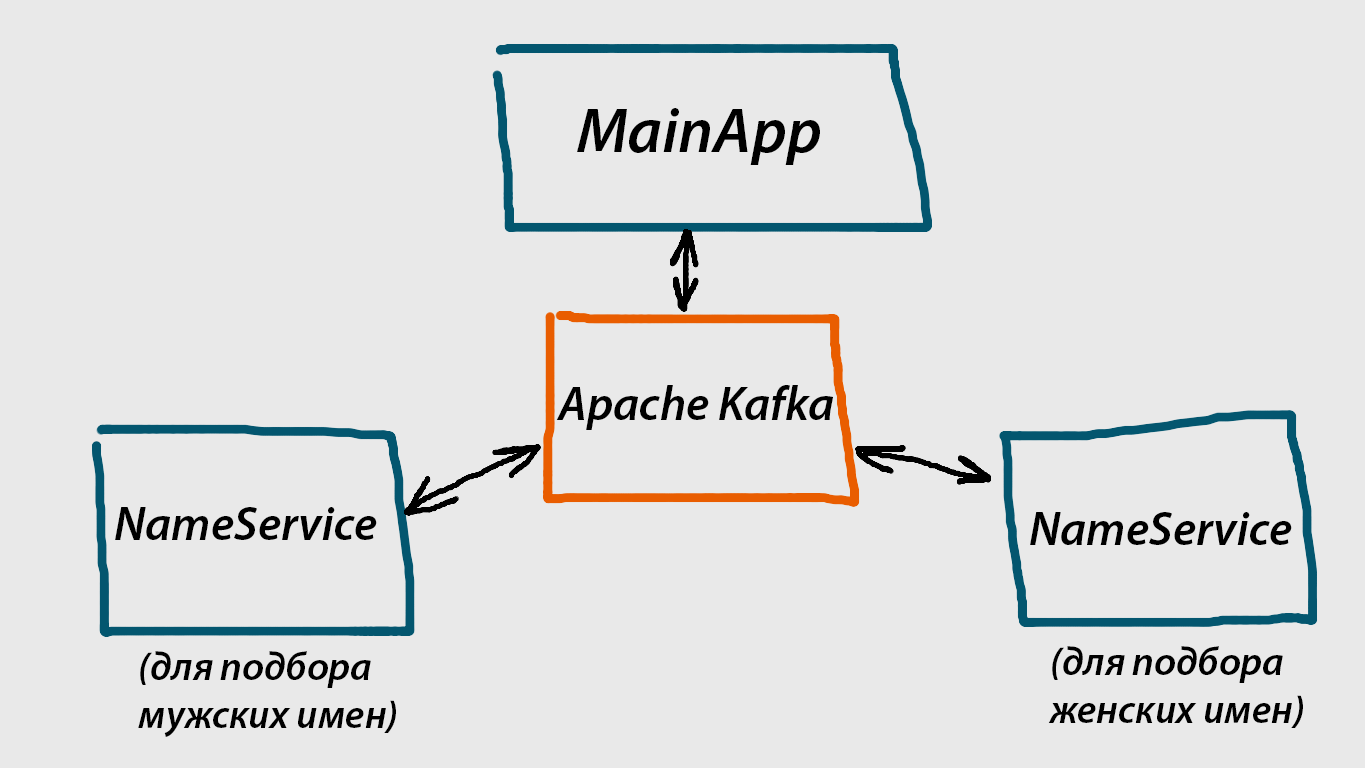 The 3 blue “rectangles” on the sides are console applications. In fact, those two that are below are microservices, and MainApp is a user application, through it we will request names. NameService will be a universal service capable of generating either male or female names.
 The orange “rectangle” in the middle is the Apache Kafka message broker. A message broker is what connects all parts of our system together. In our case, we will use Apache Kafka, but with the same success we could use RabbitMQ, ActiveMQ, or some other.
And this is how MainApp interacts with Apache Kafka:
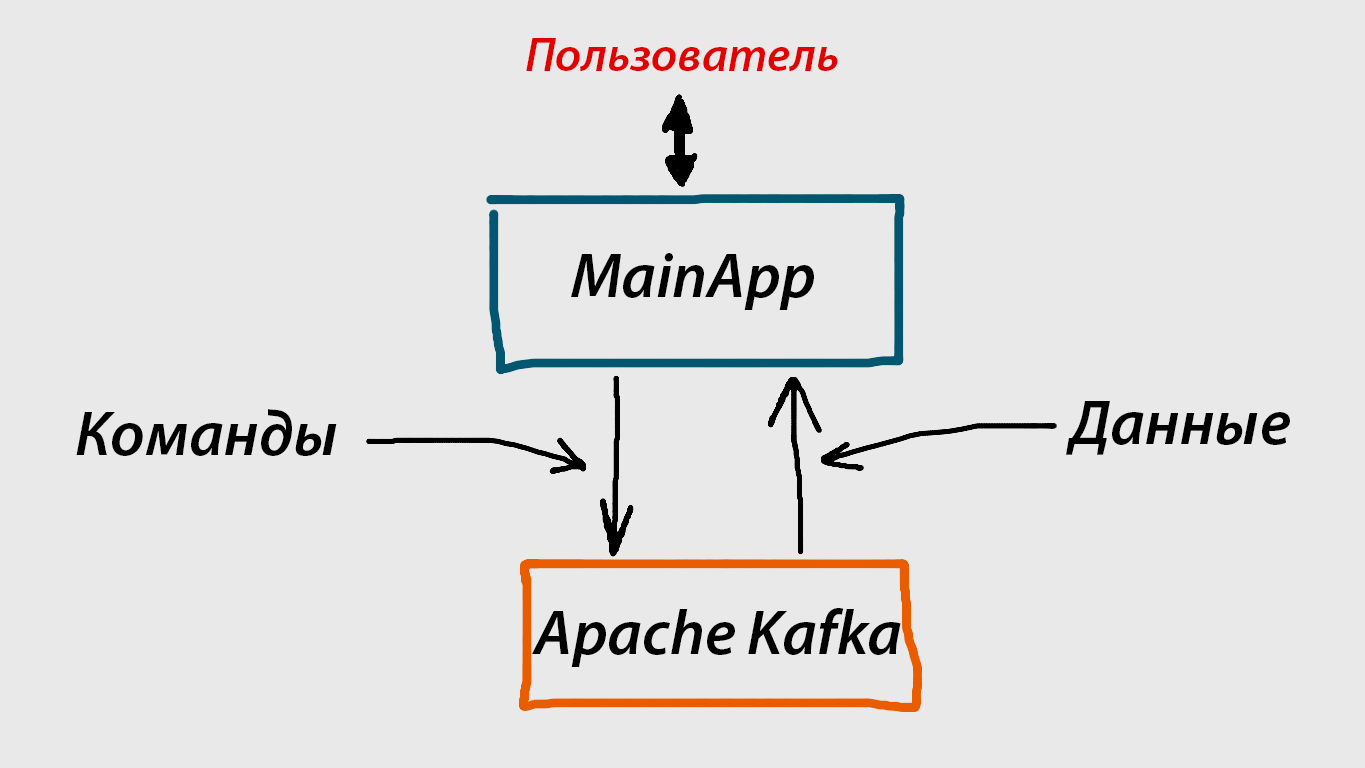
This works as follows:
- The user asks for some data (in our case, male or female name).
- MainApp sends a message (“Teams” in the diagram) to Apache Kafka, which automatically receives all the services we need.
- These services respond by sending another message (data in the diagram) to Apache Kafka. MainApp receives this message from Apache Kafka (in the diagram it is “Data”), which contains the information we need, and provides it to the user.
The interaction of each service with Apache Kafka takes place according to a similar “two-way” scheme.
Note that MainApp knows nothing about NameService, and vice versa. All interaction takes place through Apache Kafka. But both MainApp and NameService must use the same “communication channels”. In practice, this means that, for example, the name of the topic where MainApp sends messages must completely match the name of the topic from which the NameService listens.
As you can see, the work of Apache Kafka in our example is to transfer messages between different elements of the system. That is what she does, extremely quickly and reliably. Of course, she has other opportunities, you can read about them on the official website here
What is Apache Kafka
Apache Kafka is a distributed message broker. In fact, it is a system that can transfer your messages very quickly and efficiently. Messages can be any type of data, since for Kafka it is just a sequence of bytes. Apache Kafka can work both on one machine or on several, which together form a cluster and increase the efficiency of the entire system. In our case, we will launch Apache Kafka locally, and for interaction with it we will use the library from Confluent.
It's important to understand how Apache Kafka works. We can write messages in it, and we can read from it. All messages in Kafka belong to one topic or another (topic). The topic is like a title, and it must be defined for each message that we want to transfer to Apache Kafka. Similarly, if we are going to read messages from Kafka, we must specify which topic these messages will be with.
The topic is divided into sections, and we indicate their number, as a rule, on our own. The number of sections in the topic is of great importance for performance, you can read about it here
Practical part
Download and run Apache Kafka 0.11
At the moment, the latest version is version 0.11. Download the archive from the official site (https://kafka.apache.org/downloads) and unzip it to any folder. Further from the console, you need to run 2 files (zookeeper-server.start and kafka-server-start) as follows.
We open the first console (if we unpacked it to drive C, open it on behalf of the Administrator, just in case), go to the place where we unpacked our archive with Kafka, and enter the command:
bin \ windows \ zookeeper-server-start.bat config \ zookeeper. properties
After that, if everything is fine and this process did not stop shortly after start, open the second console as well, and start Apache Kafka
bin \ windows \ kafka-server-start.bat config \ server.properties itself
We just launched Zookeeper and Apache Kafka with the default settings specified in zookeeper.properties and server.properties respectively. Zookeeper is a necessary element, without it Apache Kafka does not work.
Full information on launching and configuring Kafka can be found on the official website
Start coding
So, Kafka is launched, now we will create our “distributed” application. It will consist of 2 console applications and one library. As a result, we get a solution of 3 projects that will look something like this:
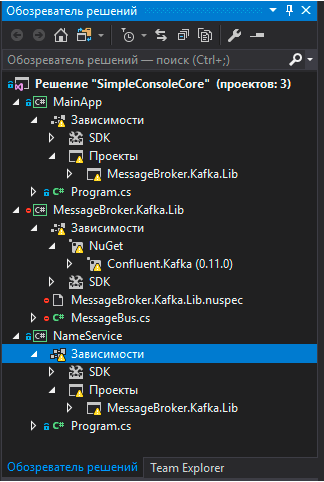
Our library is a “wrapper” around the Confluent.Kafka library, we need it to interact with Apache Kafka. In addition, it will be used by each of our console applications.
The library is intended for the target platform. NET Core 2.0 (Although, with the same success could be created for the platform. NET Standard) Its code is presented below. Please note, for it you need to download the nuget package Confluent.Kafka.
MessageBus.cs
using System;
using System.Collections.Generic;
using System.Text;
using System.Threading;
using Confluent.Kafka;
using Confluent.Kafka.Serialization;
namespace MessageBroker.Kafka.Lib
{
    public sealed class MessageBus : IDisposable
    {
        private readonly Producer _producer;
        private Consumer _consumer;
        private readonly IDictionary _producerConfig;
        private readonly IDictionary _consumerConfig;
        public MessageBus() : this("localhost") { }
        public MessageBus(string host)
        {
            _producerConfig = new Dictionary { { "bootstrap.servers", host } };
            _consumerConfig = new Dictionary
            {
                { "group.id", "custom-group"},
                { "bootstrap.servers", host }
            };
            _producer = new Producer(_producerConfig, null, new StringSerializer(Encoding.UTF8));
        }
        public void SendMessage(string topic, string message)
        {
             _producer.ProduceAsync(topic, null, message);
        }
        public void SubscribeOnTopic(string topic, Action action, CancellationToken cancellationToken) where T: class
        {
            var msgBus = new MessageBus();
            using (msgBus._consumer = new Consumer(_consumerConfig, null, new StringDeserializer(Encoding.UTF8)))
            {
                msgBus._consumer.Assign(new List { new TopicPartitionOffset(topic, 0, -1) });
                while (true)
                {
                    if (cancellationToken.IsCancellationRequested)
                        break;
                    Message msg;
                    if (msgBus._consumer.Consume(out msg, TimeSpan.FromMilliseconds(10)))
                    {
                        action(msg.Value as T);
                    }
                }
            }
        }
        public void Dispose()
        {
            _producer?.Dispose();
            _consumer?.Dispose();
        }
    }
}
Some explanations to the library code
This wrapper was created to simplify all interaction with Apache Kafka and focus on the moments in the interaction of system elements with each other. There are two methods in the library: SendMessage () and SubscribeOnTopic; within the tutorial, there are no more. Even in SubscribeOnTopic, we subscribe to the topic and continuously “listen” to messages, therefore, to subscribe to several topics, it is better to run them in separate streams, which we will do later when using this library using the Task.Run () constructions.
Next, we will build the “main” application MainApp, and then our “microservice” NameService, which we will launch after in two copies. Each of them will be responsible for the generation of either male or female names.
The MainApp simple console application code for the target .NET Core 2.0 platform is shown below. Please note that in it you need to add a link to the library that we just built and which is located in the MessageBroker.Kafka.Lib namespace.
MainApp.cs
using System;
using System.Threading;
using MessageBroker.Kafka.Lib;
using System.Threading.Tasks;
namespace MainApp
{
    class Program
    {
        private static readonly string bTopicNameCmd= "b_name_command";
        private static readonly string gTopicNameCmd = "g_name_command";
        private static readonly string bMessageReq = "get_boy_name";
        private static readonly string gMessageReq= "get_girl_name";
        private static readonly string bTopicNameResp = "b_name_response";
        private static readonly string gTopicNameResp= "g_name_response";
        private static readonly string userHelpMsg = "MainApp: Enter 'b' for a boy or 'g' for a girl, 'q' to exit";
        static void Main(string[] args)
        {
            using (var msgBus = new MessageBus())
            {
                Task.Run(() => msgBus.SubscribeOnTopic(bTopicNameResp, msg => GetBoyNameHandler(msg), CancellationToken.None));
                Task.Run(() => msgBus.SubscribeOnTopic(gTopicNameResp, msg => GetGirlNameHandler(msg), CancellationToken.None));
                string userInput;
                do
                {
                    Console.WriteLine(userHelpMsg);
                    userInput = Console.ReadLine();
                    switch (userInput)
                    {
                        case "b":
                            msgBus.SendMessage(topic: bTopicNameCmd, message: bMessageReq);
                            break;
                        case "g":
                            msgBus.SendMessage(topic: gTopicNameCmd, message: gMessageReq);
                            break;
                        case "q":
                            break;
                        default:
                            Console.WriteLine($"Unknown command. {userHelpMsg}");
                            break;
                    }
                } while (userInput != "q");
            }
        }
        public static void GetBoyNameHandler(string msg)
        {
            Console.WriteLine($"Boy name {msg} is recommended");
        }
        public static void GetGirlNameHandler(string msg)
        {
            Console.WriteLine($"Girl name {msg} is recommended");
        }
    }
}
A few explanations for the MainApp code
Seen a lot of readonly string variables at the beginning? These are the names of all topics and the messages that we will send to them. In other words, the title and text of the message. All services with which our MainApp will interact should be aware of them, because the topic names must match. For example, bTopicNameCmd is the name of the topic for the service command that we need to get the male name (gTopicNameCmd - similarly). The service must be subscribed to the topic of the same name in order to receive messages from it and then do something.
Similarly, our MainApp is subscribed to topics into which our NameService services transfer useful information. For example, the variable bTopicNameResp is the name of the topic, which is provided for ready-made male names that NameService generated. The service sends a name to this topic, and MainApp receives them from there.
Similarly, our MainApp is subscribed to topics into which our NameService services transfer useful information. For example, the variable bTopicNameResp is the name of the topic, which is provided for ready-made male names that NameService generated. The service sends a name to this topic, and MainApp receives them from there.
The following is the microservice code NameService. Please note, here, too, you need to add a link to the library that we already created in the MessageBroker.Kafka.Lib namespace
NameService.cs
using System;
using System.Threading;
using System.Threading.Tasks;
using MessageBroker.Kafka.Lib;
namespace NameService
{
    class Program
    {
        private static MessageBus msgBus;
        private static readonly string userHelpMsg = "NameService.\nEnter 'b' or 'g' to process boy or girl names respectively";
        private static readonly string bTopicNameCmd = "b_name_command";
        private static readonly string gTopicNameCmd = "g_name_command";
        private static readonly string bTopicNameResp = "b_name_response";
        private static readonly string gTopicNameResp = "g_name_response";
        private static readonly string[] _boyNames =
        {
            "Arsenii",
            "Igor",
            "Kostya",
            "Ivan",
            "Dmitrii",
        };
        private static readonly string[] _girlNames =
        {
            "Nastya",
            "Lena",
            "Ksusha",
            "Katya",
            "Olga"
        };
        static void Main(string[] args)
        {
            bool canceled = false;
            Console.CancelKeyPress += (_, e) =>
            {
                e.Cancel = true;
                canceled = true;
            };
            using (msgBus = new MessageBus())
            {
                Console.WriteLine(userHelpMsg);
                HandleUserInput(Console.ReadLine());
                while (!canceled) { }
            }
        }
        private static void HandleUserInput(string userInput)
        {
            switch (userInput)
            {
                case "b":
                    Task.Run(() => msgBus.SubscribeOnTopic(bTopicNameCmd, (msg) => BoyNameCommandListener(msg), CancellationToken.None));
                    Console.WriteLine("Processing boy names");
                    break;
                case "g":
                    Task gTask = Task.Run(() => msgBus.SubscribeOnTopic(gTopicNameCmd, (msg) => GirlNameCommandListener(msg), CancellationToken.None));
                    Console.WriteLine("Processing girl names");
                    break;
                default:
                    Console.WriteLine($"Unknown command. {userHelpMsg}");
                    HandleUserInput(Console.ReadLine());
                    break;
            }
        }
        private static void BoyNameCommandListener(string msg)
        {
            var r = new Random().Next(0, 5);
            var randName = _boyNames[r];
            msgBus.SendMessage(bTopicNameResp, randName);
            Console.WriteLine($"Sending {randName}");
        }
        private static void GirlNameCommandListener(string msg)
        {
            var r = new Random().Next(0, 5);
            var randName = _girlNames[r];
            msgBus.SendMessage(gTopicNameResp, randName);
            Console.WriteLine($"Sending {randName}");
        }
    }
}
Some explanations for the NameService code
The service works as follows:
In the body of the event handler method, we send a message with a ready name to the topic that MainApp has already subscribed to. And this event occurs every time when MainApp sends a message that it needs to get some name.
- First, we determine whether the service will generate male or female names (that is, simply select a random name from the prepared list, in our case)
- Subscribe to the appropriate topic
In the body of the event handler method, we send a message with a ready name to the topic that MainApp has already subscribed to. And this event occurs every time when MainApp sends a message that it needs to get some name.
We launch
At this stage, in theory, you should already have a ready-made solution with all the necessary code. Then you can do the following: configure the solution so that 2 applications (MainApp and NameService) start immediately, and start them ( Just make sure that you already have Apache Kafka running ). In the NameService, enter 'b', or 'g' to configure the service to generate male or female names, after which, in the same way, enter 'Main' b 'or' g 'in MainApp, but already to get these same names. Then in MainApp you should get some name.
At this stage, we get names of only one gender. Suppose only male. Now we wanted to get female names. We go to the folder where our NameService project is assembled, and start another service in the console using the command "dotnet NameService.dll ".
We enter the command 'g' in it, and now, when we request the female name in MainApp, we get it.
By the way, this way you can run any NameService entities, and this is one of the advantages of microservice architecture. For example if one of the services “crashes”, the whole system will not crash, because we have other services that do exactly the same job,
but one thing: now if we run 5 NameService for example, then 5 will come to MainApp names, not just one, because of Apache Kafka’s settings in server.properties file. I don’t touch, so as not to complicate the material.
Conclusion
In this article, I wanted to describe the principle of building a microservice architecture as simple and accessible as possible and introduce the reader to the distributed Apache Kafka message broker using a living example. I hope it works, and thanks for watching :)