Labyrinth Generation by Eller's Algorithm in Unity
Hello!
Today I would like to talk about how to generate labyrinths using the Eller algorithm, and how to make a beautiful 3D visualization in Unity, and then use it in your games. Also tell a little about how you can configure post processing inside this solution. And by tradition, a GitHub link to the generator itself.
Eller's algorithm is a fairly popular algorithm for generating “ideal” (there is only one way between two points) mazes, since it is one of the fastest and generates “interesting” mazes. They are “interesting” due to the fact that this algorithm is not based on the search for a spanning tree in a graph, as a result of which it generates less fractal structures. Including one of the advantages of the algorithm is that it allows you to generate labyrinths of infinite size in linear time.
The algorithm is based on the fact that we combine the cells of the labyrinth into different sets, and in the last step of the algorithm we combine them into one common set. Cells are in one set - if one cell can go to another. Initially, all the walls of the maze are raised, so that all cells are in different sets.
I saw a lot of different descriptions of the algorithm itself (even on the hub), so I won’t do it again, but in brief I will write a description of its implementation.
The algorithm itself consists of 3 main steps.
In the loop:
1. We process the row, randomly combining the cells in the row belonging to different sets.
2. We go along the same line and randomly combine the cells from the line above with our line (with some restrictions)
The last step: We
process the last row by combining cells from different sets
In general, this is the algorithm.
The maze needs to be stored in something. In my solution there are 2 structures for storing mazes.
W4Maze - which is essentially an array of 16 types of cells by the number of raised walls. The W4Cell cell itself stores just 4 bool fields that indicate which walls are raised. This structure is convenient for generating a maze by Eller's algorithm and is convenient for serialization.
But on the other hand, it is completely inconvenient for generating walls. The idea is that the walls of the maze must be thick, in order to implement such an algorithm it is graph structures that are convenient. To do this, a MazeGraph structure was established and a conversion from W4Maze to it was implemented. In addition, for convenience, 2 lists were created in it - paths and walls. As a result, writing a simple visualization using Gizmos, we get such a maze. Yellow is the wall, and green is the way.

In general, it’s already not bad, but there are too many extra nodes in the walls and paths, which will be inconvenient in the future to generate three-dimensional visualization, so we simplify them. This will generate fewer meshes and avoid artifacts of lighting at the joints.

The rest is a matter of technology. I have written my own tool for generating planes, the MeshTools class with the simplest triangulation (since we know the order of adding points) In general, unit Quads could be used, but in any case, it would be necessary to recalculate the uv coordinates in order to the tiling of the material on all walls was the same and one material could be used. More details can be found on the link on GitHub .

So, the maze is built, uv-shki are correctly exposed. Now I want to show the simplest example of the possibility of post-processing using the example of automatic placement of light. To do this, I created the LightPlacer class and here the W4Maze maze will come in handy again. The post processing algorithm is pretty simple. We simply set the illumination levels, convert the cell type to int and make a decision whether to set the light source or not.
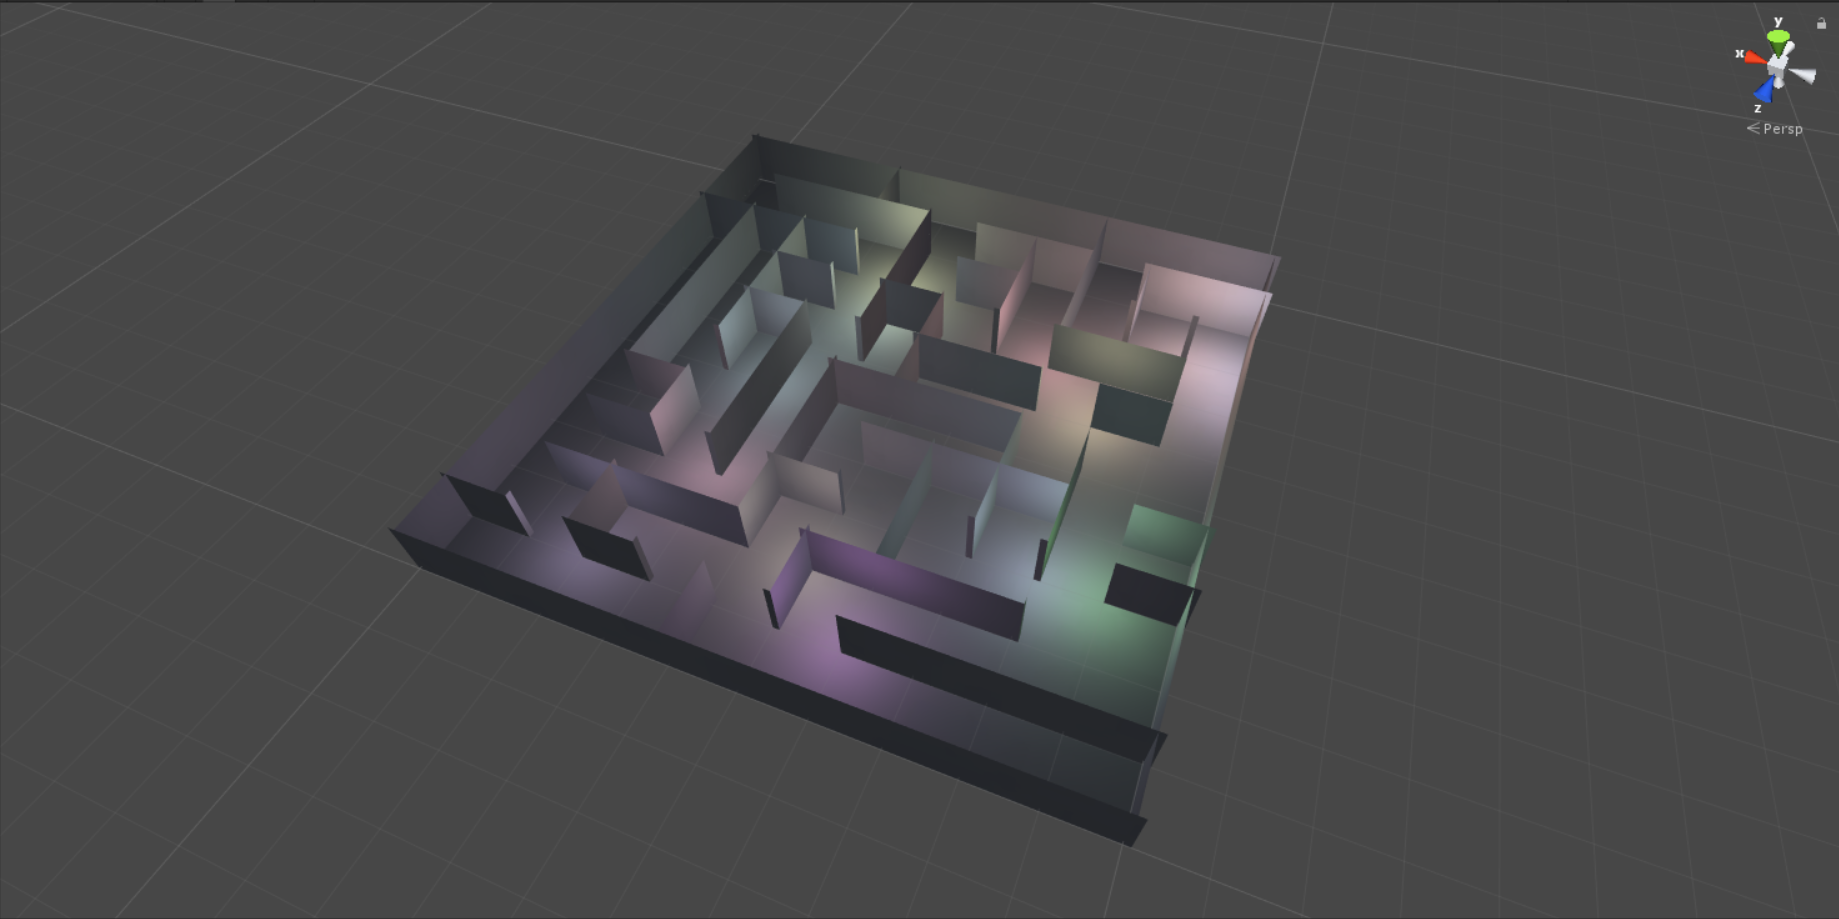
And here is our final maze!

With the help of such post processing, decals, enemies, traps, and anything else can be arranged.
Thanks for attention! Who wants to get acquainted with the solution ? Link to GitHub in more detail .
If someone would be interested in more detail on the topic of mesh generation, which is an important part of the solution, I can write about this in a separate article.
Today I would like to talk about how to generate labyrinths using the Eller algorithm, and how to make a beautiful 3D visualization in Unity, and then use it in your games. Also tell a little about how you can configure post processing inside this solution. And by tradition, a GitHub link to the generator itself.
Eller's algorithm is a fairly popular algorithm for generating “ideal” (there is only one way between two points) mazes, since it is one of the fastest and generates “interesting” mazes. They are “interesting” due to the fact that this algorithm is not based on the search for a spanning tree in a graph, as a result of which it generates less fractal structures. Including one of the advantages of the algorithm is that it allows you to generate labyrinths of infinite size in linear time.
The algorithm is based on the fact that we combine the cells of the labyrinth into different sets, and in the last step of the algorithm we combine them into one common set. Cells are in one set - if one cell can go to another. Initially, all the walls of the maze are raised, so that all cells are in different sets.
I saw a lot of different descriptions of the algorithm itself (even on the hub), so I won’t do it again, but in brief I will write a description of its implementation.
The algorithm itself consists of 3 main steps.
In the loop:
1. We process the row, randomly combining the cells in the row belonging to different sets.
The code
private void CreateRow(W4Maze maze, int rowNum)
        {
            for(int i = 0; i < maze.ColumnCount - 1; i++)
            {
                var cell = maze.GetCell(i, rowNum);
                var nextCell = maze.GetCell(i + 1, rowNum);
                if (cell.Set != nextCell.Set)
                {
                    if (UnityEngine.Random.Range(0, 2) > 0)
                    {
                        RemoveHorizonWallBetweenCells(
                            maze,
                            cell,
                            nextCell,
                            rowNum);
                    }
                }
            }
        }
2. We go along the same line and randomly combine the cells from the line above with our line (with some restrictions)
The code
 private void CreateVerticalConnections(
            W4Maze maze,
            int rowNum)
        {
            bool removeVertical = false;
            bool isAddedVertical = false;
            for (int i = 0; i < maze.ColumnCount - 1; i++)
            {
                W4Cell cell = maze.GetCell(i, rowNum);
                W4Cell nextCell = maze.GetCell(i + 1, rowNum);
                W4Cell topCell = maze.GetCell(i, rowNum + 1);
                if (cell.Set != nextCell.Set)
                {
                    if (!isAddedVertical)
                    {
                        RemoveVerticalWall(cell, topCell);
                    }
                    isAddedVertical = false;
                }
                else
                {
                    removeVertical = Random.Range(0, 2) > 0;
                    if (removeVertical)
                    {
                        RemoveVerticalWall(cell, topCell);
                        isAddedVertical = true;
                    }
                }
            }
            CheckLastVertical(maze, rowNum, isAddedVertical);
        }
The last step: We
process the last row by combining cells from different sets
The code
private void CreateLastRow(W4Maze maze)
        {
            int y = maze.RowCount - 1;
            for(int i = 0; i < maze.ColumnCount - 1; i++)
            {
                var cell = maze.GetCell(i, y);
                var nextCell = maze.GetCell(i + 1, y);
                if(cell.Set != nextCell.Set)
                {
                    RemoveHorizonWallBetweenCells(
                        maze,
                        cell,
                        nextCell,
                        y);
                }
            }
        }
In general, this is the algorithm.
The maze needs to be stored in something. In my solution there are 2 structures for storing mazes.
W4Maze - which is essentially an array of 16 types of cells by the number of raised walls. The W4Cell cell itself stores just 4 bool fields that indicate which walls are raised. This structure is convenient for generating a maze by Eller's algorithm and is convenient for serialization.
But on the other hand, it is completely inconvenient for generating walls. The idea is that the walls of the maze must be thick, in order to implement such an algorithm it is graph structures that are convenient. To do this, a MazeGraph structure was established and a conversion from W4Maze to it was implemented. In addition, for convenience, 2 lists were created in it - paths and walls. As a result, writing a simple visualization using Gizmos, we get such a maze. Yellow is the wall, and green is the way.
In general, it’s already not bad, but there are too many extra nodes in the walls and paths, which will be inconvenient in the future to generate three-dimensional visualization, so we simplify them. This will generate fewer meshes and avoid artifacts of lighting at the joints.
For example, the code for the walls
private void ProcessWallEdges()
        {
            for(int i = 0; i < _WallEdges.Count; i++)
            {
                for(int j = i + 1; j < _WallEdges.Count; j++)
                {
                    var edge1 = _WallEdges[i];
                    var edge2 = _WallEdges[j];
                    if (Mathf.Abs(edge1.Normal.x)
                        == Mathf.Abs(edge2.Normal.x)
                        && Mathf.Abs(edge1.Normal.y)
                        == Mathf.Abs(edge2.Normal.y))
                    {
                        if (Edge.IsCanMerge(edge1, edge2))
                        {
                            var edge = Edge.Merge(edge1, edge2);
                            _WallEdges.Remove(edge1);
                            _WallEdges.Remove(edge2);
                            _WallEdges.Remove(edge);
                            _WallEdges.Insert(i, edge);
                            j = i;
                        }
                    }
                }
            }
        }
The rest is a matter of technology. I have written my own tool for generating planes, the MeshTools class with the simplest triangulation (since we know the order of adding points) In general, unit Quads could be used, but in any case, it would be necessary to recalculate the uv coordinates in order to the tiling of the material on all walls was the same and one material could be used. More details can be found on the link on GitHub .
So, the maze is built, uv-shki are correctly exposed. Now I want to show the simplest example of the possibility of post-processing using the example of automatic placement of light. To do this, I created the LightPlacer class and here the W4Maze maze will come in handy again. The post processing algorithm is pretty simple. We simply set the illumination levels, convert the cell type to int and make a decision whether to set the light source or not.
And again the code
 public GameObject SetUpLights(
            W4Maze maze,
            float height)
        {
            GameObject lights = new GameObject();
            for(int i = 0; i < maze.ColumnCount; i++)
            {
                for(int j = 0; j < maze.RowCount; j++)
                {
                    var cell = maze.GetCell(i, j);
                    if(cell.ToInt() < (int) _LightLevel)
                    {
                        var lightGo = CreatePointLight();
                        lightGo.transform.position = new Vector3(
                            i ,
                            height * 0.9f,
                            j);
                    }
                }
            }
            return lights;
        }
        public enum LightLevel : byte
        {
            Low = 3,
            Medium = 5,
            High = 10,
            VeryHigh = 16
        }
And here is our final maze!
With the help of such post processing, decals, enemies, traps, and anything else can be arranged.
Thanks for attention! Who wants to get acquainted with the solution ? Link to GitHub in more detail .
If someone would be interested in more detail on the topic of mesh generation, which is an important part of the solution, I can write about this in a separate article.