UI tests for iOS: why you need to believe in the friendship of QA and development, but do not flatter yourself
Recently, we have taken up the implementation of UI testing in iOS for iFunny. This path is thorny, long and holistic. But still I want to share my first steps in this direction with smart people. We do not pretend to be true - they tried on everything to their own product. Therefore, under the cat there is a little information about what iFunny is on iOS and why we needed UI + a lot of feedback on tools and code samples.
What is iFunny on iOS
iFunny is a popular in the USA application about humor and memes with a monthly audience of 10M. You can read more about how everything was started here . Application development on iOS started 6 years ago, and we still do without any revolutionary inclusions:
- We keep 99% of the code on Objective-C;
- We adhere to the classic MVC with neat module divisions;
- actively working with Cocoapods for dependencies;
- We use our own webm content player: third-party solutions slowed down, prevented the content from looping and so on. In the case of iFunny, which is fully UGC, this topic is critical;
- fork from SDWebImage we use not only for pictures, but also for the rest of the downloaded content;
- for the API, we select RestKit - a fairly mature framework, for several years of work with which there were almost no problems.
Unit tests

We use Unit tests for critical moments of business logic and Workarounds. Here is a fairly simple test: we test the method of our model, which checks the receipt of new content to it.
- (void)testIsNewFeaturedSetForContentArrayFalse {
    FNContentFeedDataSource *feedDataSource = [FNContentFeedDataSource new];
    NSMutableArray *insertArray = [NSMutableArray arrayWithArray:[self baseContentArray]];
    feedDataSource.currentSessionCID = @"0";
    BOOL result = [feedDataSource isNewFeaturedSetForContentArray:insertArray];
    XCTAssertFalse(result, @"cid check assert");
    feedDataSource.currentSessionCID = @"777";
    result = [feedDataSource isNewFeaturedSetForContentArray:insertArray];
    XCTAssertTrue(result, @"cid check assert");
}
The second class of tests that we use is the tests that are needed to check the rules for overriding classes. At one point we needed to write a lot of the same type of classes for the analytics system, differing in a set of static methods.
Xcode and Objective-C did not provide any solution for protecting against incorrectly written code.
Therefore, we wrote this test:
- (void)testAllAnalyticParametersClasses {
    NSArray *parameterClasses = [FNTestUtils classesForClassesOfType:[FNAnalyticParameter class]];
    for (Class parameterClass in parameterClasses) {
        FNAnalyticParameter *parameter = [parameterClass value:@"TEST_VALUE"];
        XCTAssertNotNil(((FNAnalyticParameter *)parameter).key);
        XCTAssertNotNil(((FNAnalyticParameter *)parameter).dictionary);
    }
}
Here it is checked that the class has 2 static methods, key and dictionary, which are necessary for the correct operation of sending events to analytics systems.
UI tests
We have already studied quite well how to work with UI elements and thought about the test environment while writing tests for Android. It turned out something like this:
- Separate flavor for launching the application with presets so as not to set them manually in tests every time;
- Mocks for APIs using WireMock, so that each time you don’t get to the server’s answers and depend on it;
- We played around with the test launch process and set up a fairly convenient flow on CI Bitrise, during which tests are poured and run on real devices in Amazon Device Farm, we can see reports with screenshots and videos there by following the link from Bitrise.
We couldn’t put it on the stream, as we were developing a new version and waiting for everything to settle down. Now we are actively restoring and developing a test base.
The turn of iOS has come, and we, the QA team and iOS developers, started by once again gathering together and arguing for ourselves why we need autotests. It was an important ritual, and it acted almost like a mantra:
- reduce manual checks;
- automate regression;
- Provide ongoing testing of the application, so that at any moment in time to know what state it is in.
Instruments
We started with a selection of tools. There were 3 main frameworks on the agenda, which are now most often used for testing mobile applications. We tried on each of them.

Appium is a popular cross-platform framework. It is believed that it will become the standard in testing mobile applications in the near future. A few months ago, we decided to test it like iOS 10 was released half a year ago, but were a little upset: the version of Appium with its support was in beta, and we did not really want to use the unstable version in the prod. They could not use the Appium Inspector, which runs on Android: there was no support for Xcode 8 and iOS 10. Soon they released a stable version, but it is extremely undesirable for us to wait six months after updating the axis. We decided not to torment myself or Appium.

Calabash is a cross-platform open source solution that uses the BDD approach in writing tests and until recently was supported by Xamarin. Recently, developers said that support is everything. We also decided not to go further.

And finally, XCTest is Apple’s native framework, which we eventually selected. Therefore, read about the pros:
- there are no unnecessary dependencies, which we have in the project and so many;
- except Apple itself, no one from outside will bring or add bugs. We already had experience with Appium and KIF. It turned out that at the bottom XCTest is still used and Apple bugs are superimposed on KIF bugs, which means sit down, friend, and pick big frameworks. We definitely did not need these dependencies;
- You can use the standard iOS-development languages Objective-C and Swift: QA can easily interact with developers;
- the application under test is a black box, in addition, in the test you can work with any application in the system.
Then we considered Recorder , a native tool from Apple, which is positioned as an auxiliary one, without the hope that it will be used when writing real tests. With it, you can study the labels of UI elements and play around with basic gestures. Recoder writes the code itself and generates pointers to objects, if this was not done during development. This is the only advantage we have been able to single out. There were much more minuses:
- It’s difficult to record a test, because the UI slows down - you do some action and wait 10-15 seconds for it to be recorded. Inconvenient;
- the code is always different. Today I am so smart and call this element button [1], and tomorrow - “smilebutton”. Unclear;
- persistent errors in gesture recognition. You can swipe left, and it will determine that it is tap. You do tap, and this is already swipe. Unstable;
- a broken test recorded with Recorder will most likely have to be completely rewritten again because it will not reflect the real situation. Just WTF ?!
The developer is in a hurry to help
And now about the problems that were encountered in practice: we will solve them by involving development.
Black box

The plus of the black box turns into a minus: we cannot know about the current state of the application either on the device or on the simulator. We need to reset it and create, by analogy with Android, a certain environment where the application is informed in which country we work and with which users we want to interact. All this is solved using the application launch settings.
We also needed pre-action in Xcode. In order to reset the working environment before each test, we decided to remove the installed application from the simulator to reset the user settings and everything that is saved in the sandbox:
xcrun simctl uninstall booted ${PRODUCT_BUNDLE_IDENTIFIER}With Environment variables, we work like this:
app = [[XCUIApplication alloc] init];
app.launchEnvironment = @{
                          testEnviromentUserToken  : @"",
                          testEnviromentDeviceID   : @"",
                          testEnviromentCountry    : @""
                          };
app.launchArguments = @[testArgumentNotClearStart];
In the test, the application object is created and the dictionary (or array) with the settings that need to be transferred to the application is written into the launchEnviroment and launchArguments fields. In the application, settings and arguments are read in the delegate at the very start of the application in the method:
- (BOOL)application:(UIApplication *)application didFinishLaunchingWithOptions:(NSDictionary *)launchOptions
So we do the processing:
NSProcessInfo *processInfo = [NSProcessInfo processInfo];
[FNTestAPIEnviromentHandler handleArguments:processInfo.arguments
                                 enviroment:processInfo.environment];
The TestAPIEnvHandler class implements processing of a configuration dictionary and an array of arguments.
Item Properties
When we started working with ХСТest for UI, there was a problem: the standard set of tools does not allow reading fonts and colors.
We can only work with gestures for elements, but we cannot read the text that is written in them, take their position or other properties interesting for UI testing.
After searching for alternative solutions, we looked towards the Accessibility API, with which UI tests work.
As a “bridge” between the test and the application, we decided to use the accessibilityValue, which every visible element from the iOS SDK has.
The bicycle went, and the following decision turned out:
- In the accessibilityValue, write the json string.
- In the test we read and decode.
- For UI elements, we write categories that define the set of fields we need in tests.
Here is an example for UIButton:
@implementationUIButton (TestApi)
- (NSString *)accessibilityValue {
    NSMutableDictionary *result = [NSMutableDictionary new];
    UIColor *titleColor = [self titleColorForState:UIControlStateNormal];
    CGColorRef cgColor = titleColor.CGColor;
    CIColor *ciColor = [CIColor colorWithCGColor:cgColor];
    NSString *colorString = ciColor.stringRepresentation;
    if (titleColor) {
        [result setObject:colorString forKey:testKeyTextColor];
    }
    return [FNTestAPIParametersParser encodeDictionary:result];
}
@end
To read accessibilityValue in a test, you need to access it; for this, each XCUElement object has a value field:
XCUIElement *button = app.buttons[@"FeedSmile"];
NSData *stringData = [button.value dataUsingEncoding:NSUTF8StringEncoding];
NSError *error;
NSDictionary *dictionary = [NSJSONSerialization JSONObjectWithData:stringData options:0 error:&error];
User interactions
The problem of gestures and actions is solved (lo and behold!) By the tool itself, thanks to a large set of standard methods - tap, double tap. But in our application there are not only standard, but also very non-trivial things. For example triple tap, swipe along all axes in different directions. To solve this, we used the same standard methods, configuring the parameters. This was not a big splinter.
An example of a simple test using the approach:
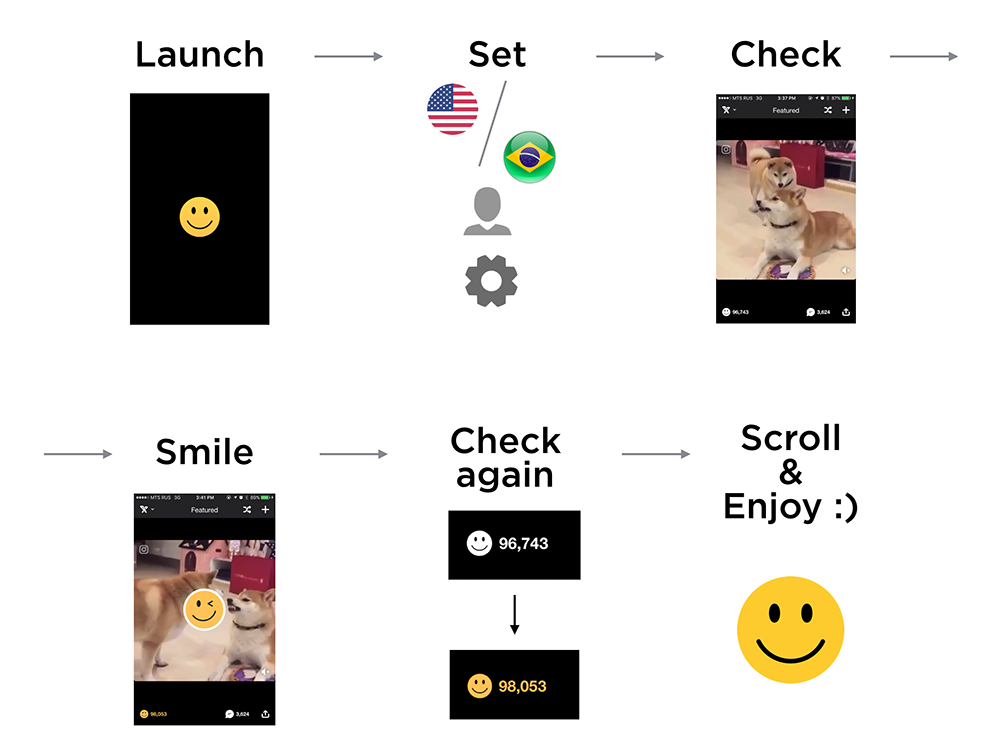
- launch iFunny with certain settings;
- choose a country;
- select the desired user;
- specify additional settings (whether this is the first application launch or not);
- we check the opening of the tape and the loading of content;
- make a smile;
- we check through the UI whether the content is smoothed (the state of the button has changed). We continue to scroll;
- We look at the memasics and enjoy life.
- (void)testExample {
    XCUIElement *feedElement = app.otherElements[@"FeedContentItem"];
    XCTAssertNotNil(feedElement);
    XCUIElement *button = app.buttons[@"FeedSmile"];
    [button tap];
    [[[[XCUIApplication alloc] init].otherElements[@"FeedContentItem"].scrollViews childrenMatchingType:XCUIElementTypeImage].element tap];
    NSDictionary *result = [FNTestAPIParametersParser decodeString:button.value];
    CIColor *color = [CIColor colorWithString:result[testKeyTextColor]];
    XCTAssertFalse(color.red    - 1.f   < FLT_EPSILON &&
                color.green  - 0.76f < FLT_EPSILON &&
                color.blue   - 0.29f < FLT_EPSILON,
                @"Color not valid");
    XCUIElement *feed = app.scrollViews[@"FeedContentFeed"];
    [feed swipeLeft];
    [feed swipeLeft];
    [feed swipeLeft];
}
We did not plan to do a full test coverage, so this is where our experiments have ended. It became clear that if we once decided to fully implement autotests in the process, we will use XCtest, but now it is very difficult to do this on an ongoing basis. And that's why:
- still have to reinvent the wheel;
- QA will not be able to fully test applications without developers;
- UI-tests for our product development - this is crap functionality and it can be applied only in exceptional cases.
PS When shooting a preview, not a single bug was hurt. Semyon continues to inspire the QA team.