Configuring Authentication in Citrix XenDesktop 7.xc Using JaCarta PKI Smart Cards
This article describes the process of setting up two-factor authentication using JaCarta PKI smart cards developed by Aladdin R.D. in a Citrix XenDesktop version 7.x virtual environment.
JaCarta PKI - a line of USB-, MicroUSB-tokens or smart cards for strong two-factor authentication of users when accessing secure information resources of the enterprise, secure storage of keys, key containers of software cryptographic information protection tools.
The advantages of using solutions "Aladdin R.D." with Citrix products are:
Authentication in a Citrix virtual environment using JaCarta smart cards and USB tokens from Aladdin R.D. based on the public key infrastructure (PKI) and digital certificates of the X.509 standard stored on these devices. The solutions comply with international standards, only configuration without complex software integrations is required.
All models of JaCarta smart cards and USB tokens are based on a smart card microcontroller that has special built-in protection against cloning, hacking and other special attacks (secure by design).
Before creating a directory for virtual machines, you must prepare a reference machine. In this test environment, it is a virtual machine with the operating system (OS) Windows 7 (32-bit).
To prepare the reference machine, it is necessary to install the Virtual Delivery Agent software (the distribution of which is located on the XenDesktop 7.0 software disk), JC Client 6.24.16 (installation and configuration of JC Client 6.24.16 software are described in the document "JC-Client - Administrator Guide" ), as well as other software that is necessary for the work of users of this group. After installation, the virtual machine must be turned off.
Creating a directory for virtual machines
On the server where the Citrix Studio component is installed (installation and configuration of Citrix XenDesktop 7.x software is described on the websitehttp://support.citrix.com/proddocs/topic/xendesktop-71/cds-install-config-intro.html ), launch Citrix Studio (Start -> All Programs -> Citrix), connect to the Citrix Delivery Controller and go in Machine Catalogs , run the Create Machine Catalog wizard (Figure 1).

Fig. 1 - Create Machine Catalog window
Click Next .
Select Windows Desktop OS or another item, depending on the settings of your environment (Fig. 2).
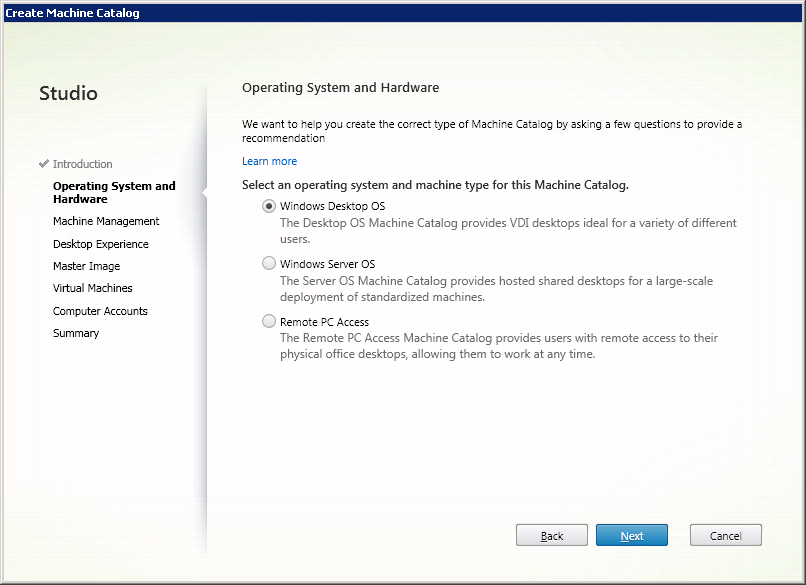
Fig. 2 - Window for selecting the operating system for the directory.
Click Next .
Select Virtual Machines and Machine Creation Services (MCS) (Fig. 3).
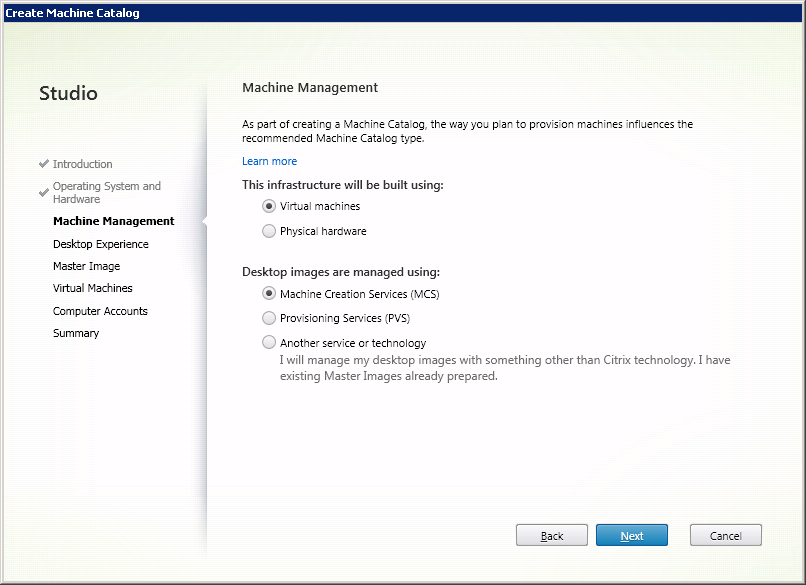
Fig. 3 - The window for choosing the delivery method of the virtual machine.
Click Next .
In the Desktop Experience window, configure the desktop settings for users and the method of storing user data as shown below (Fig. 4). Other options may be selected depending on your environment settings and required tasks.

Fig. 4 - Virtual machine settings window
Click Next .
From the list of available virtual machines, select the previously created reference machine (Fig. 5).
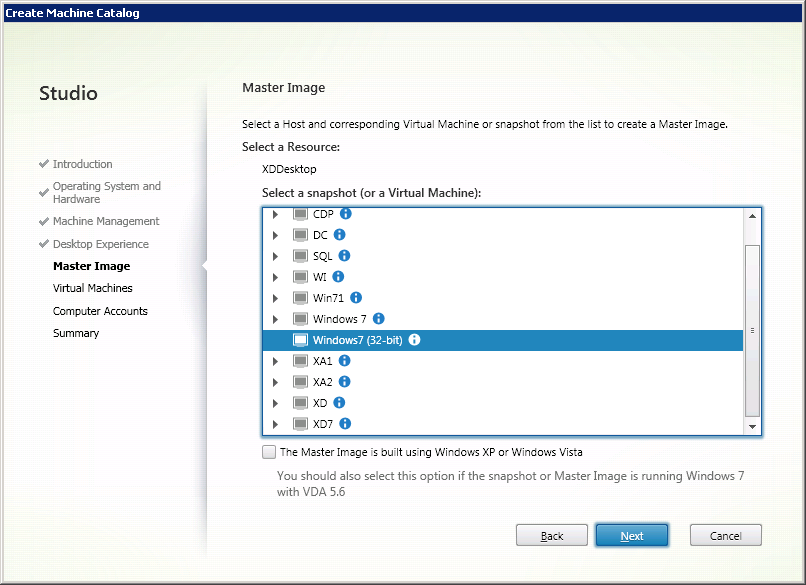
Fig. 5 - Window for selecting a reference machine.
Click Next .
Set the number of virtual machines in the catalog and set their technical characteristics (Fig. 6).
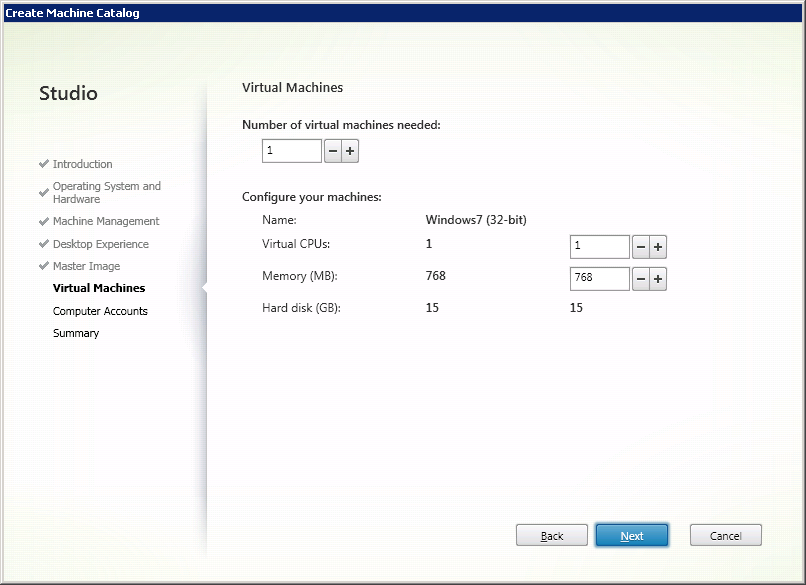
Fig. 6 - Selecting the parameters of user virtual machines
Click Next .
Configure the scheme for automatically adding the created machine accounts to the Active Directory (AD) directory service (Fig. 7).
For ease of administration, you can first create an organizational unit (OU) in the AD directory service , where the accounts of the created virtual machines will be added.
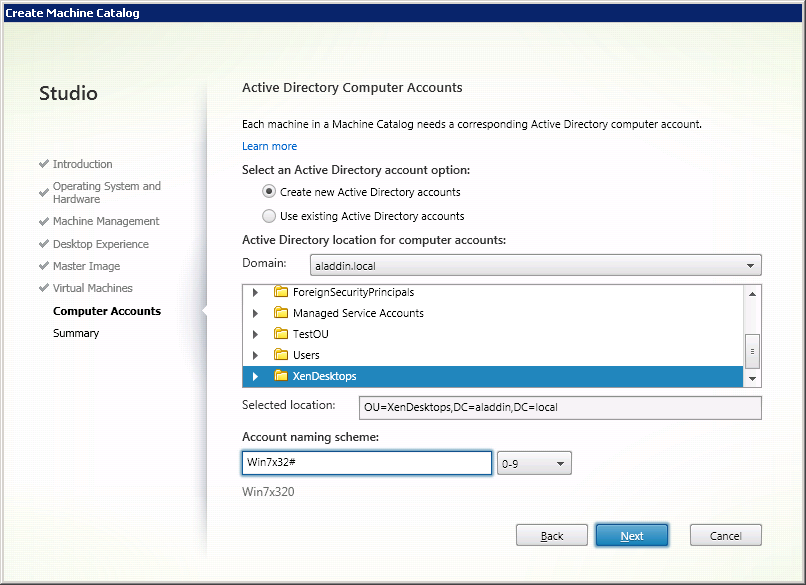
Fig. 7 - “Active Directory Computer Account” window
Click Next .
Check the parameters of the created virtual machines and determine the name for the directory, as well as the name of the virtual machine to be displayed to users (Fig. 8).
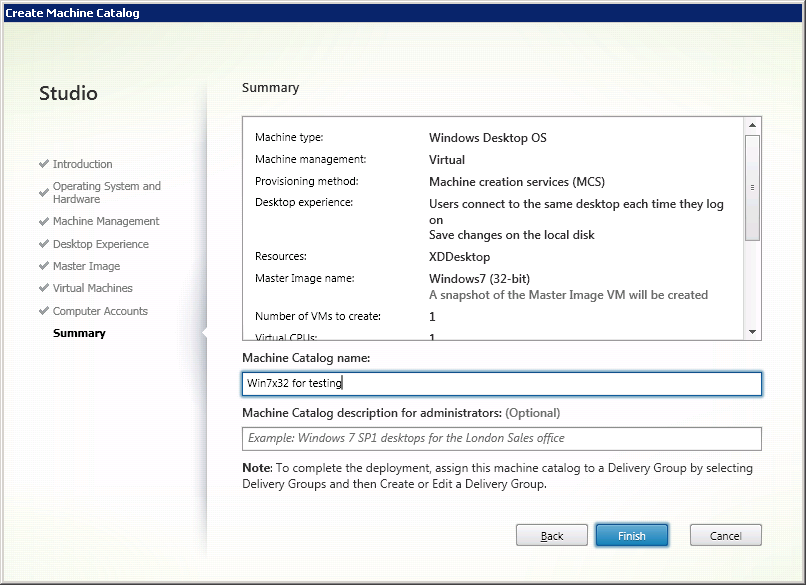
Fig. 8 - Summary window
Click Finish .
A catalog of virtual machines has been created (Fig. 9).
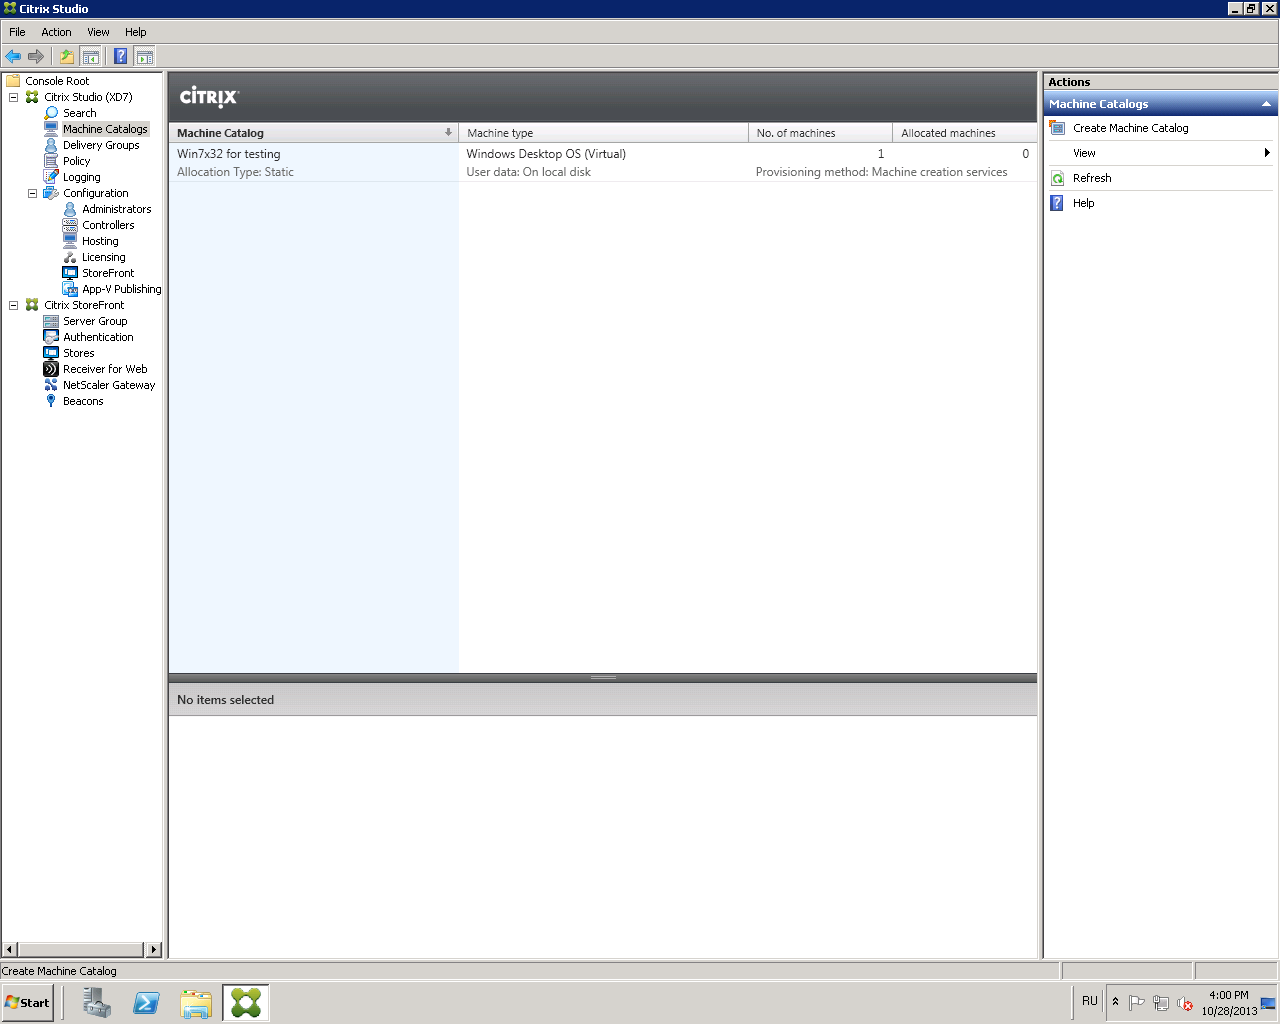
Fig. 9 - Created virtual machine catalog
To connect the created virtual machines with users, you must configure the user group of virtual machines ( Delivery Group ).
Open the Citrix Studio management console and go to the Delivery Group -> Create Delivery Group tab (Fig. 10).
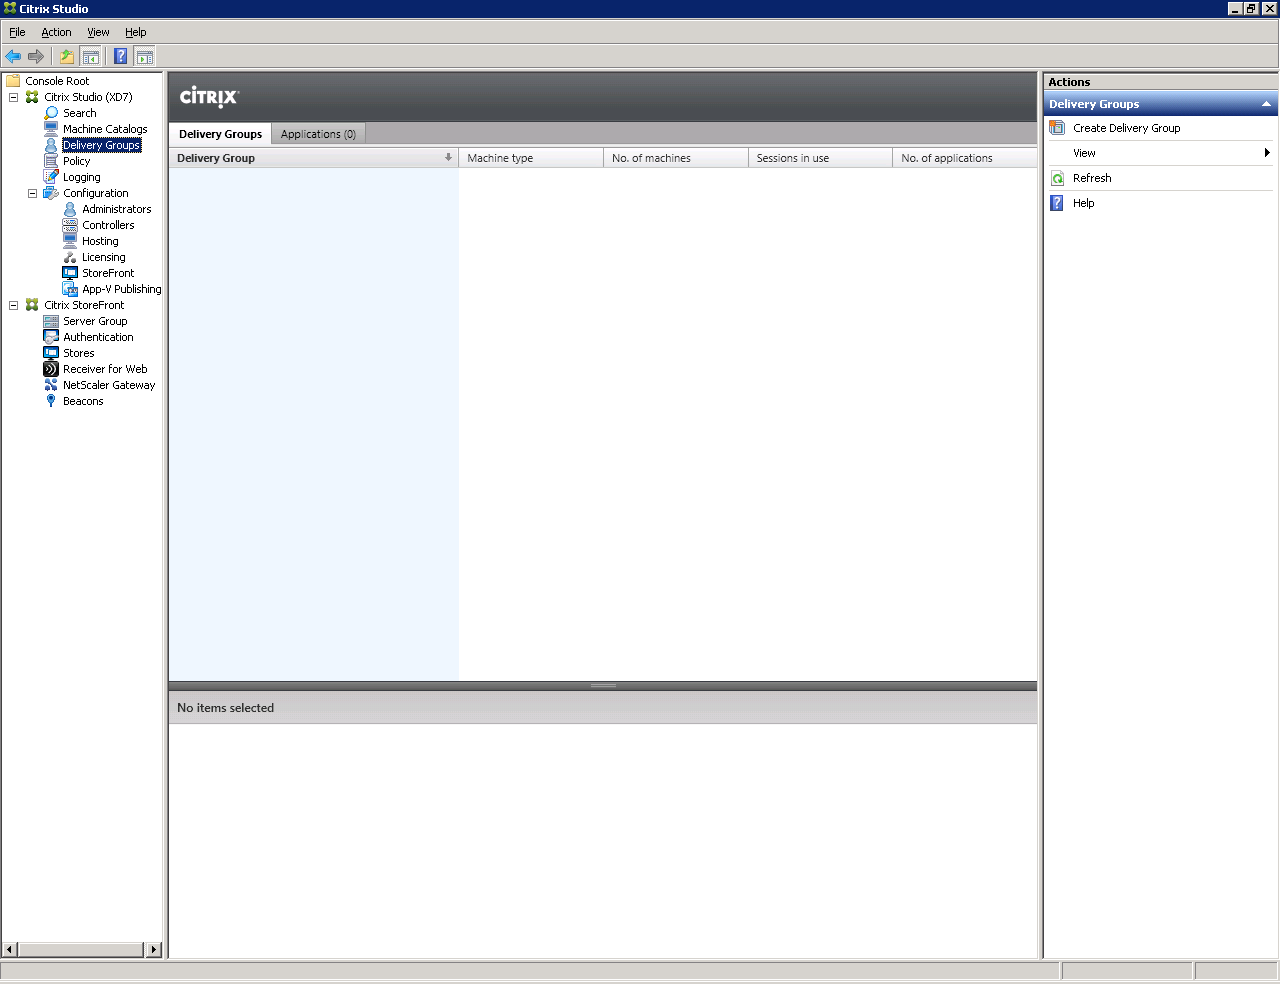
Fig. 10 - “Delivery Group” window.
Select a previously created catalog of virtual machines and specify how many virtual machines will be available for users of this group (Fig. 11).
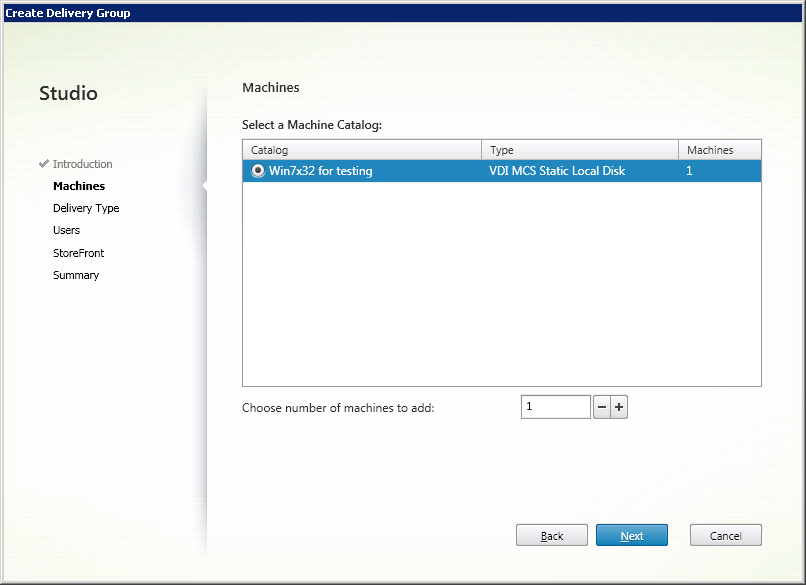
Fig. 11 - Machines Window
Click Next .
Select the type of resources to be delivered: applications or virtual machines (Fig. 12).
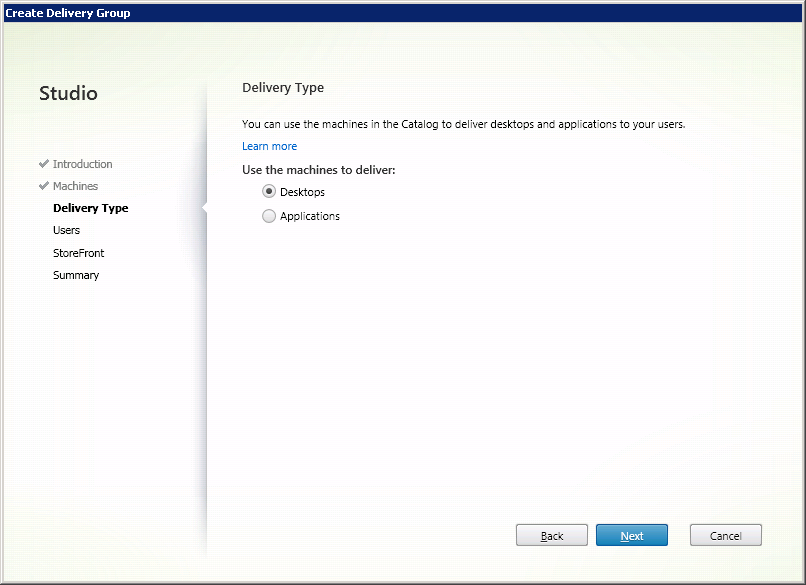
Fig. 12 - Select “Delivery Type”
Click Next .
Assign the users with whom the virtual machines will be associated (Figure 13).
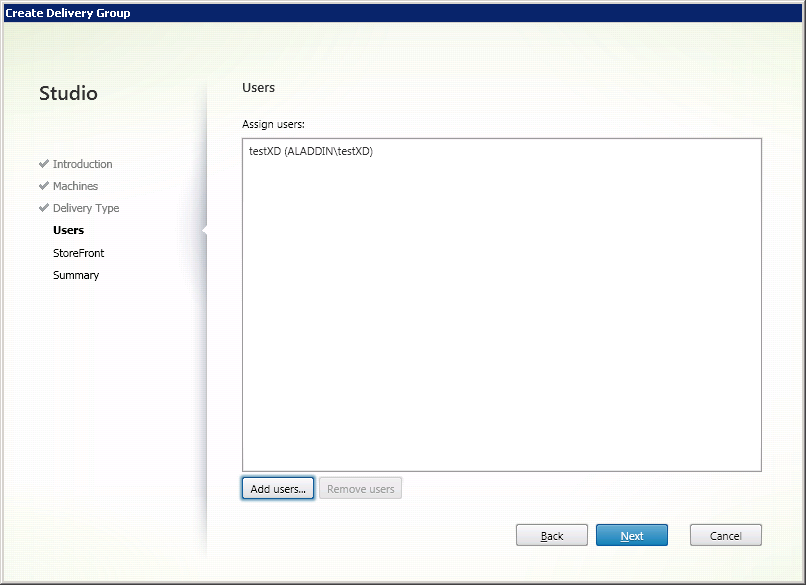
Fig. 13 - User selection window
Click Next . Citrix Receiver
software is configured later (see section 2.5). In the next window, select Manually, using a StoreFront server address that I will provide later (Fig. 14).

Fig. 14 - “Citrix StoreFront” settings window
Click Next .
Check the final settings and determine the name of the group (Fig. 15).
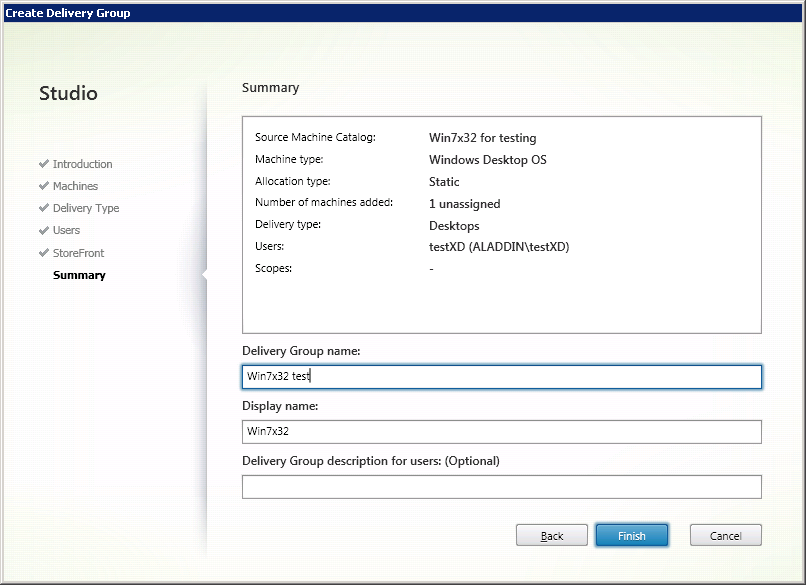
Fig. 15 - Summary Window
Click Finish .
A group of users of virtual machines has been created (Fig. 16).
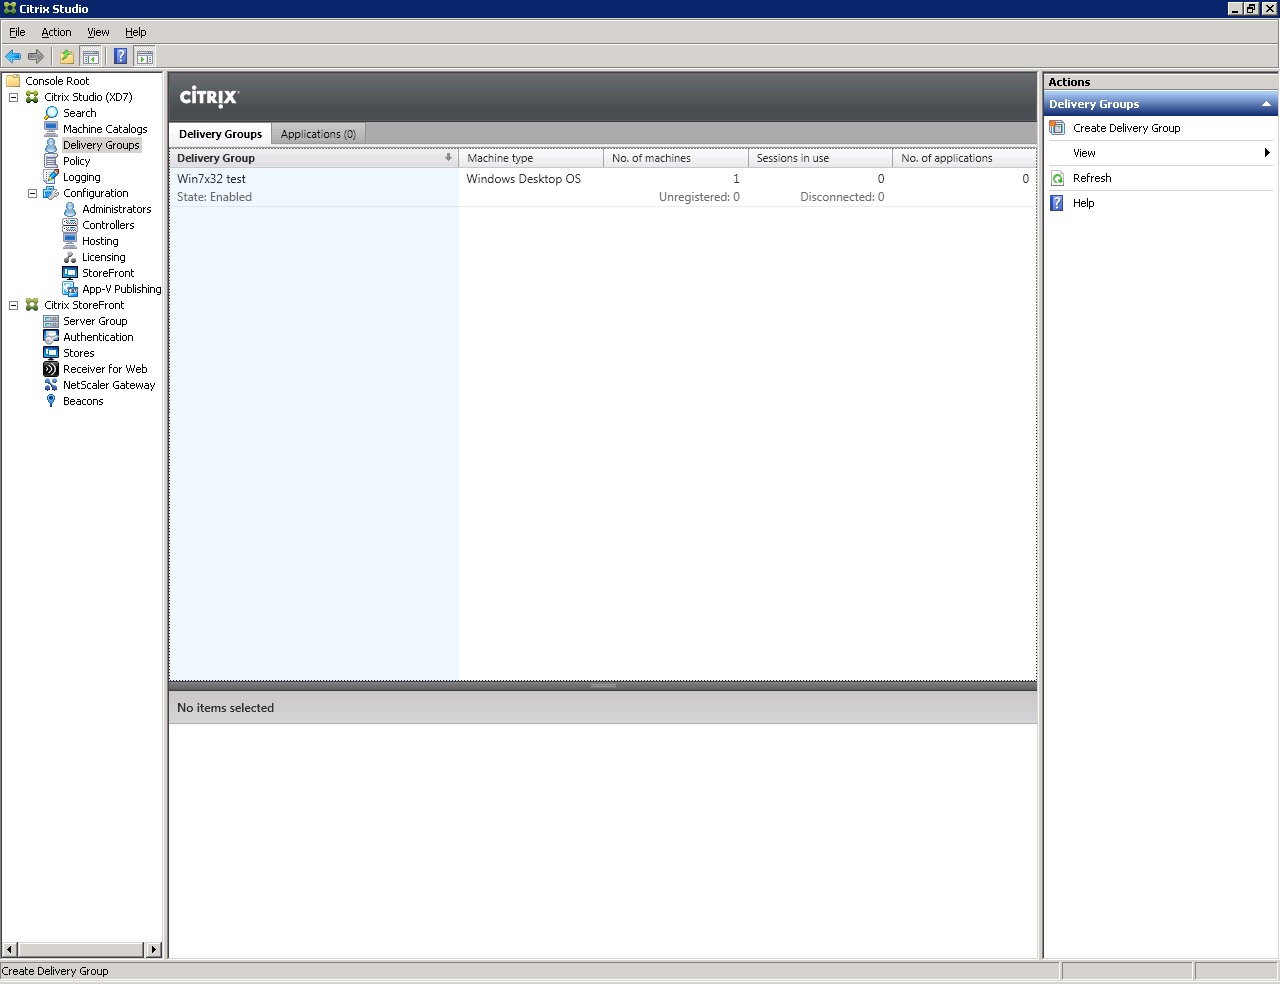
Fig. 16 - Created by “Delivery Group”
Attention : Make sure that all virtual machines in the pool are registered (have the status Registered (Fig. 17)).
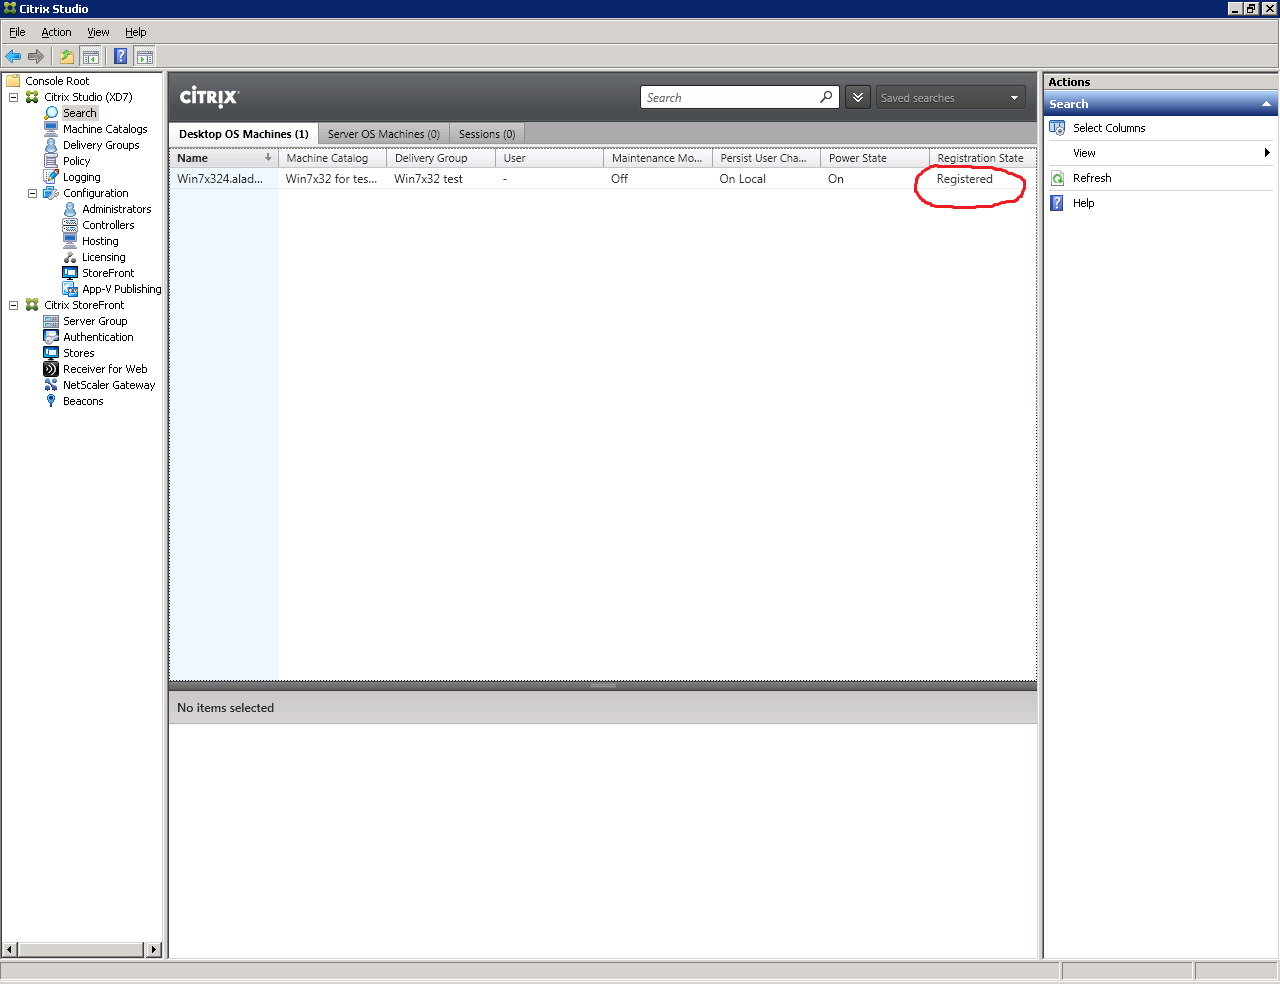
Fig. 17 - Status window of virtual machines
Go to the user's workstation (PC). This is Windows 7 x64 with JC Client 6.24.16 preinstalled.
Open a browser and in the address bar specify the path to the Web interface of the Citrix XenDesktop software : http: //xd7.aladdin.local/Citrix/StoreWeb/ (Fig. 18).
If Citrix Receiver software is not installed, the Citrix Receiver software installation window will be displayed (Fig. 19).
Click Install .
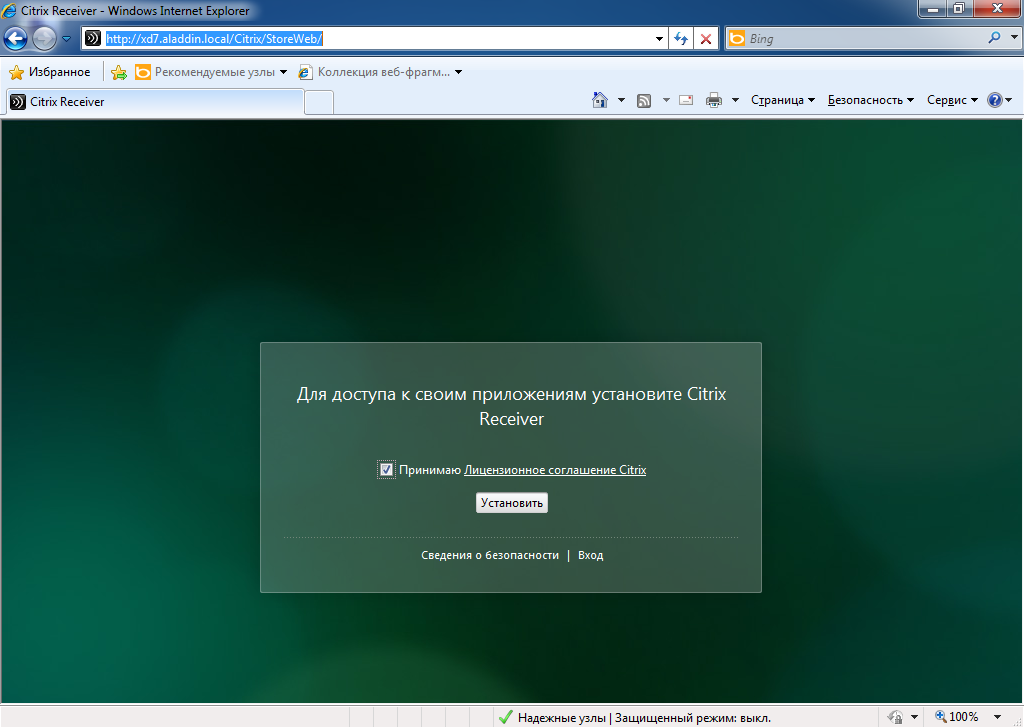
Fig. 18 - Web-based XenDesktop software

Fig. 19 - Installing the Citrix Receiver
Enter Username and Password user account in AD directory. This account must be a member of the virtual machine user group that was created in section 1.2 (Fig. 20).

Fig. 20 - User authentication window on the Web interface of XenDesktop software
Make sure that the virtual machine is accessible, then end the user session (Fig. 21).
(Start -> Logout)
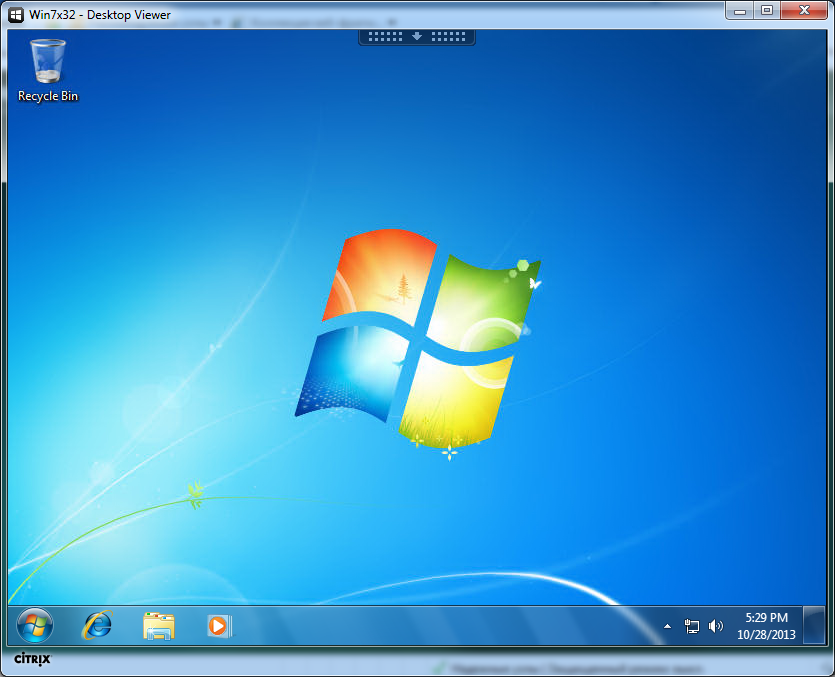
Fig. 21 - User virtual machine
On the server where XenDesktop 7 software is installed, run the Internet Information Services (IIS) management snap-in (Fig. 22).
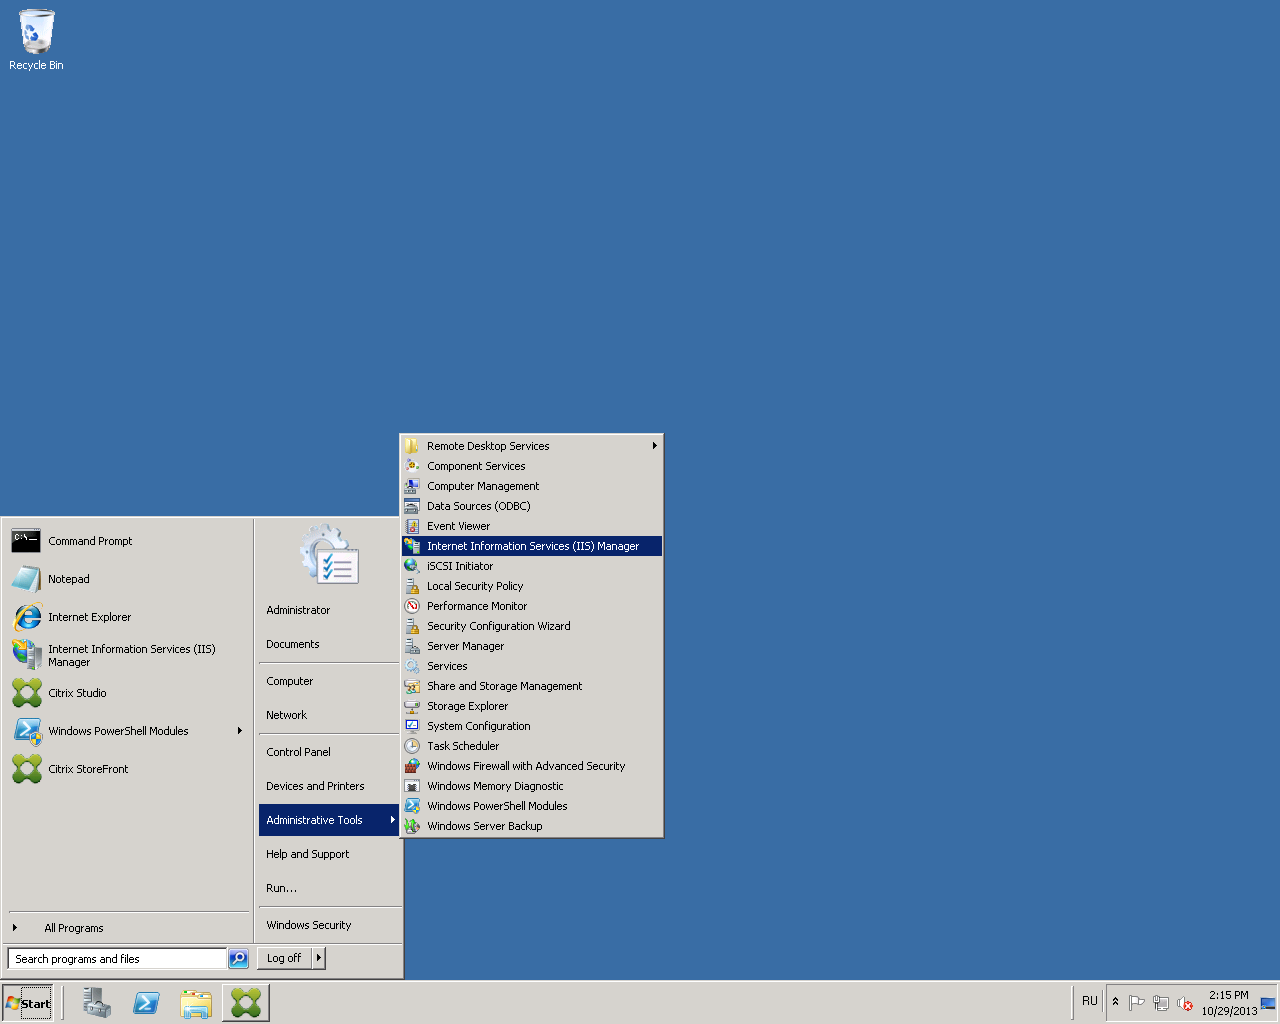
Fig. 22 - Path to the IIS service management snap-in
Click the Server Certificates tab (Figure 23).

Fig. 23 - IIS service management snap-in
Select Create Domain Certificate (Fig. 24).
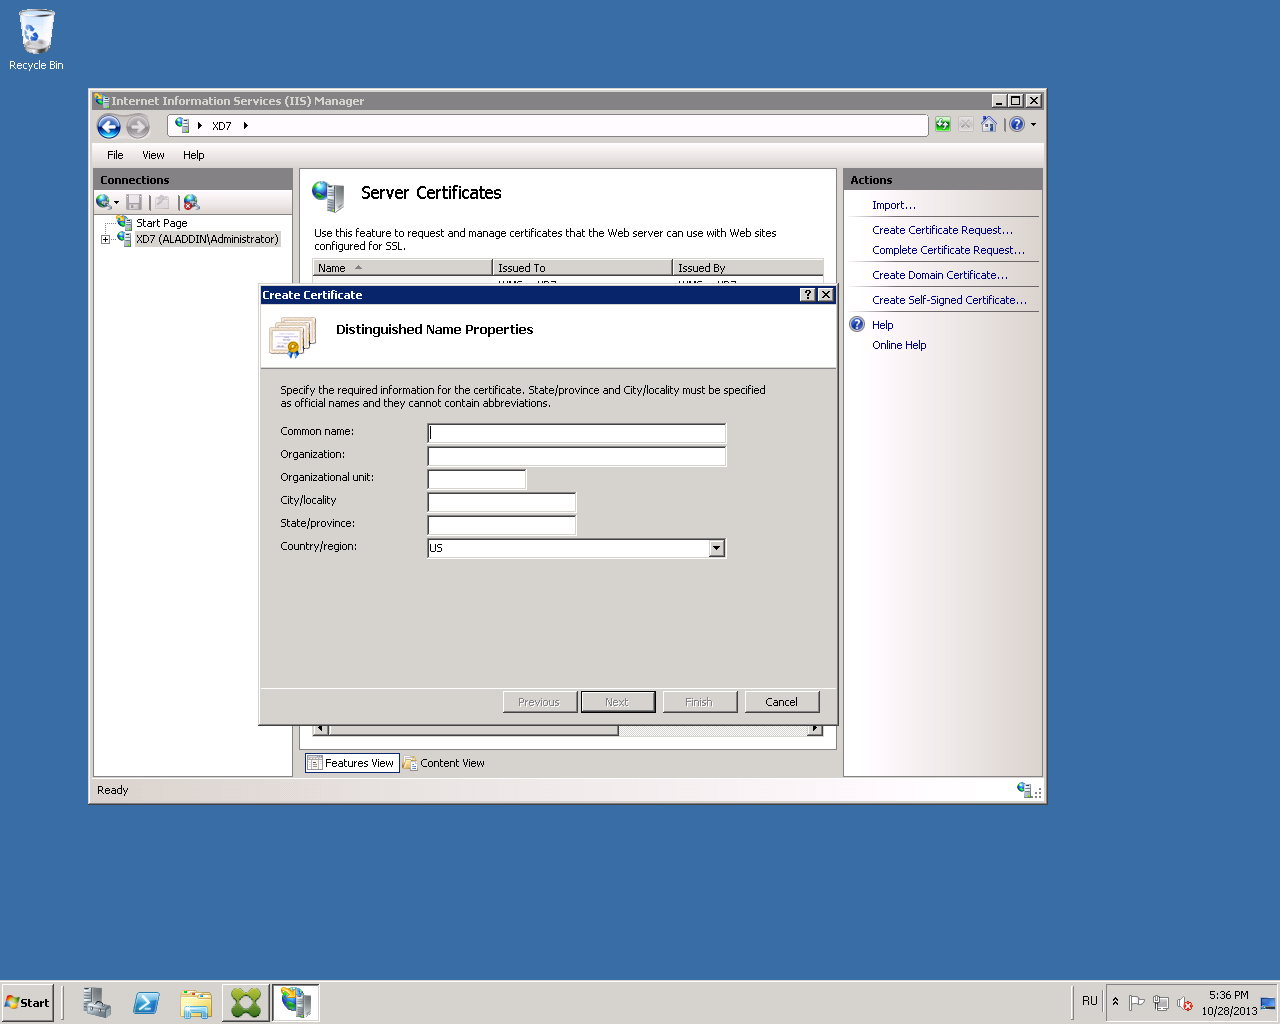
Fig. 24 - “Create Certificate” tab
Fill in the organization information for the issued certificate (Fig. 25).
In the Common name field, specify the fully qualified domain name of the server with XenDesktop installed. In the present example: xd7.aladdin.local.
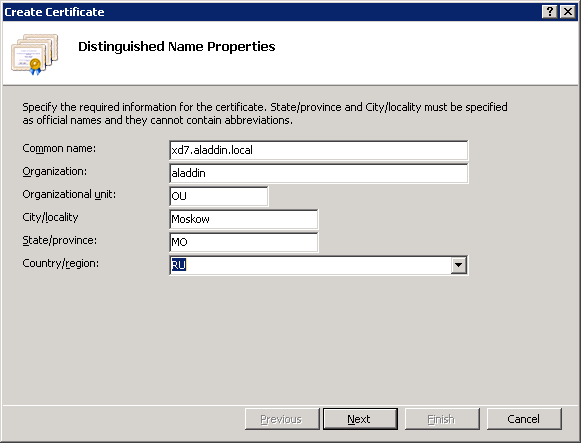
Fig. 25 - Organization information in the issued certificate
Select the organization’s certification authority and in the Friendly name field specify the fully qualified domain name of the server with XenDesktop software installed . In the present example: xd7.aladdin.local (Figure 26).

Fig. 26 - Issuing a Certificate for IIS
Click Finish .
Make sure that the certificate is issued successfully (Figure 27).
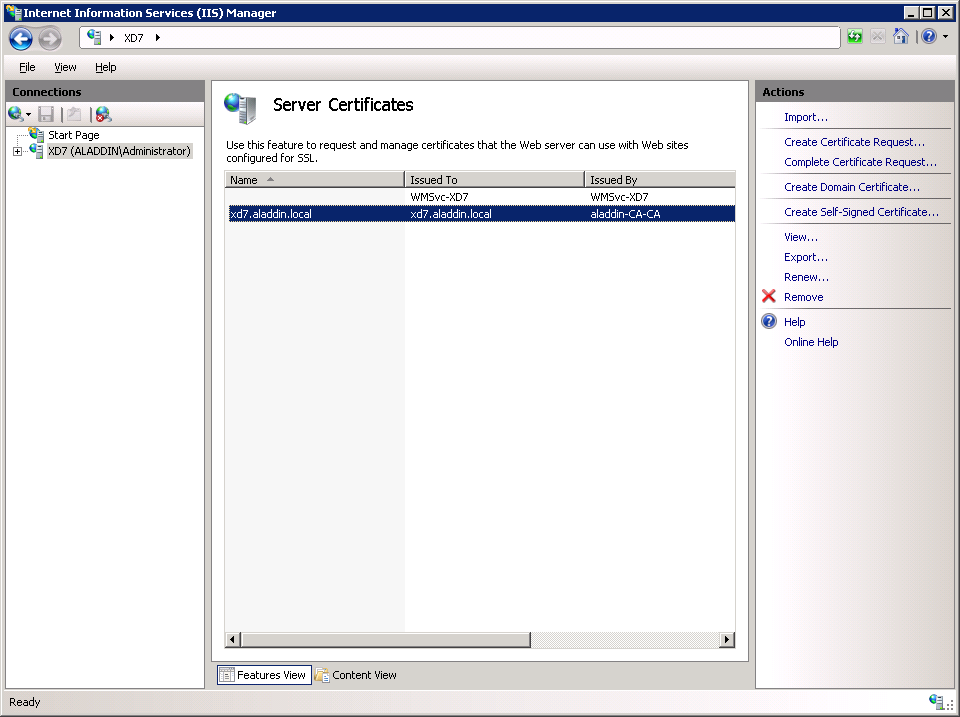
Fig. 27 - Certificate issuance result
Go to the Default Web Site tab and click Bindings ...
In the window that opens, click Add (Fig. 28).
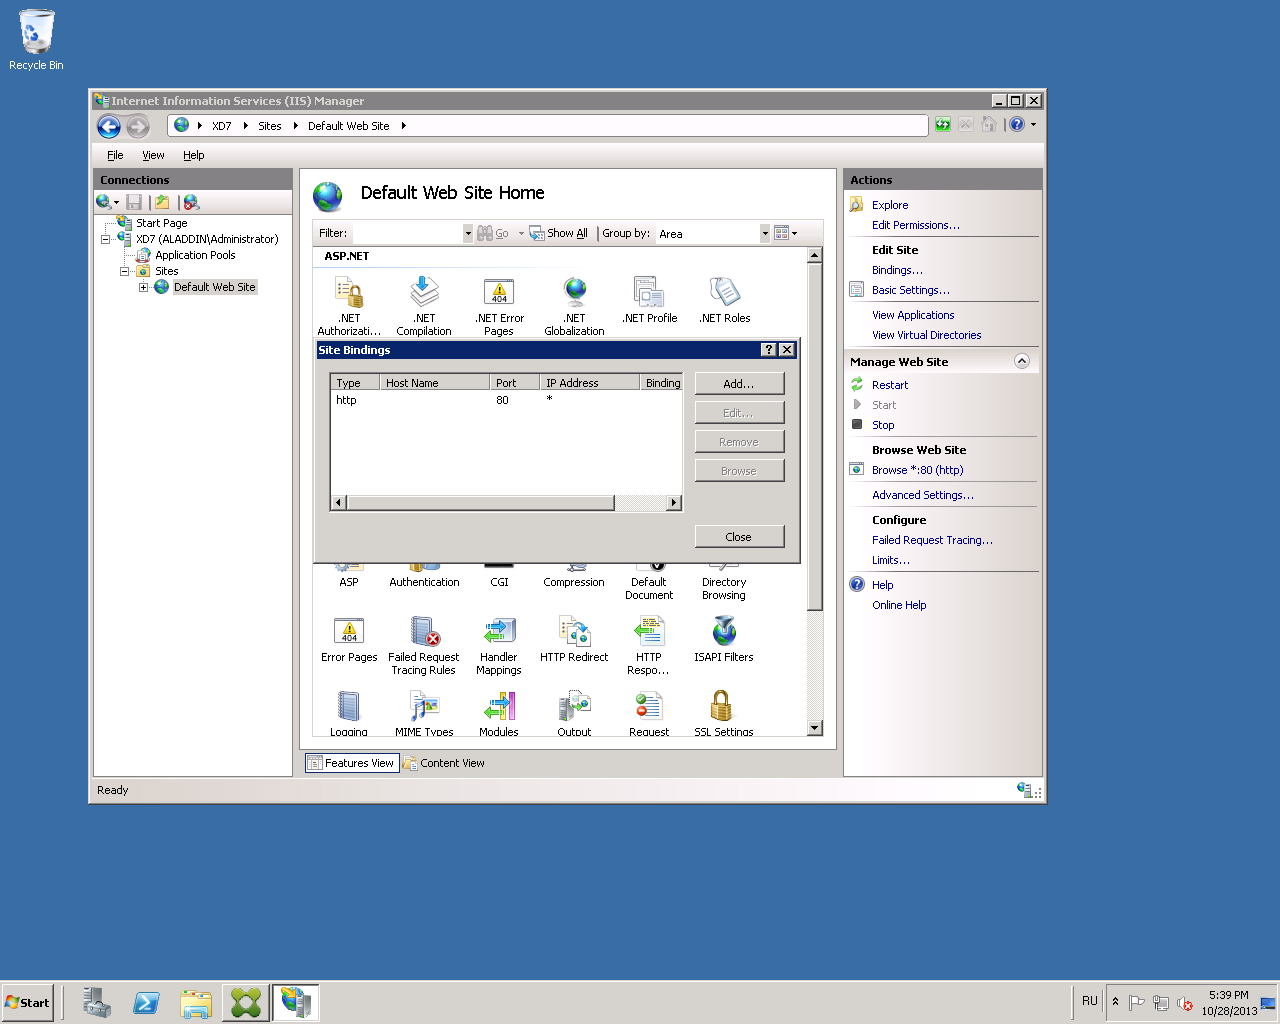
Fig. 28 - “Site Bindings” settings window
Select the type of https connection , and in the SSL certificate list, select the previously issued certificate for IIS (Fig. 29).
In this example, the certificate name is xd7.aladdin.local.

Fig. 29 - “Add Site Binding” window
Click OK .
Make sure that this type of connection is added to the list (Fig. 30).
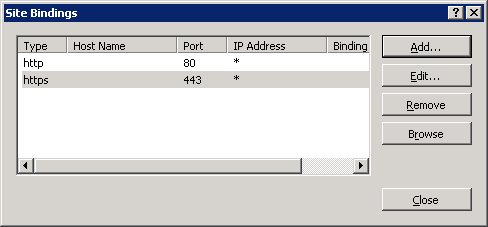
Fig. 30 - Result of setting the connection type
Close the “Site Bindings” window.
Attention! When working with StoreFront in multi-server installations, use only one server when making changes to the settings. Verify that the Citrix StoreFront Management Console is not running on another server or servers in this server group. After the configuration is complete, make sure that the changes are applied to all the servers in the group ( propagate your configuration changes to the server group ).
Launch Citrix Studio. In the Citrix StoreFront tab, open the Authentication tab (Figure 31).
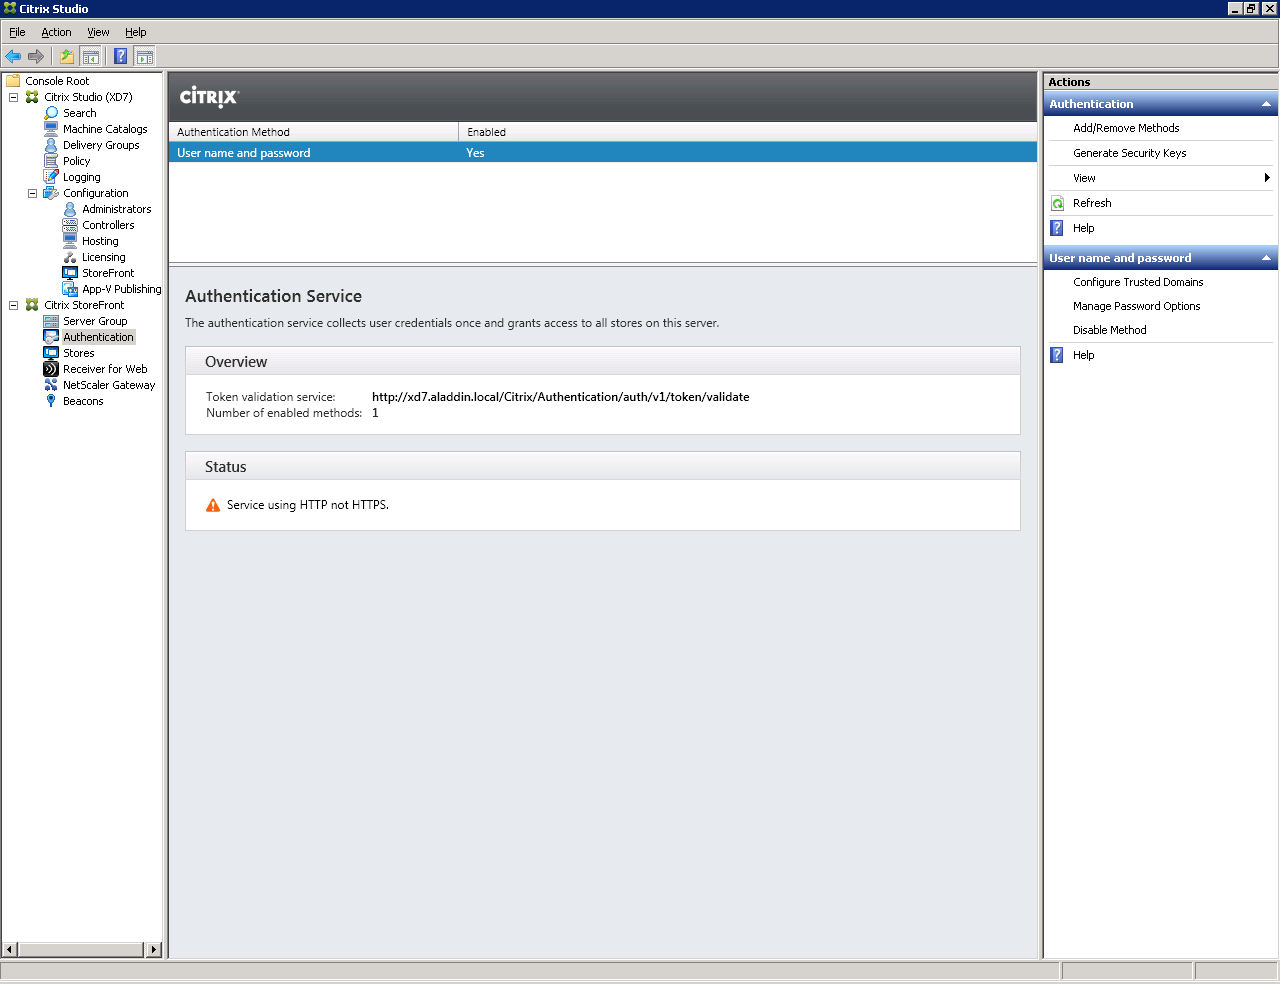
Fig. 31 - StoreFront Authentication Tab
Select Add / Remove Authentication Methods.
The Add / Remove Methods window opens (Figure 32).
Select a smart card authentication method.

Fig. 32 - Add / Remove Authentication Methods Window
Click OK .
Make sure that the Smart card authentication method has been added on the Authentication tab (Figure 33).

Fig. 33 - Result of changing authentication methods
Open Default Web Site -> Citrix -> Authentication -> Certificate (Fig. 34).
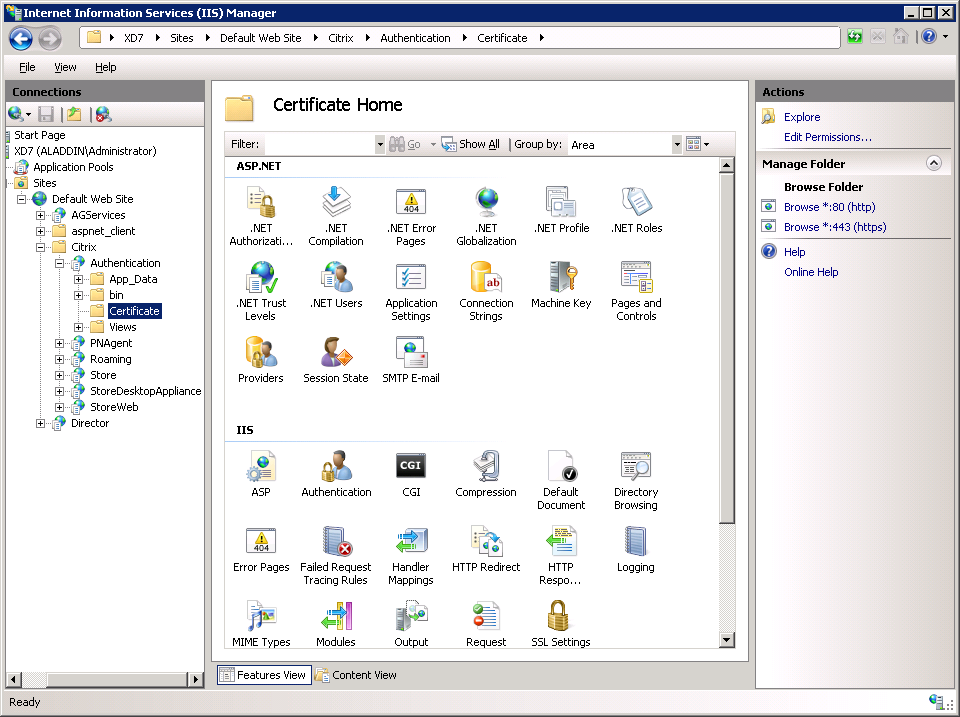
Fig. 34 - Certificate Home tab
Select SSL Settings -> Require SSL. Check the Require parameter (Fig. 35).
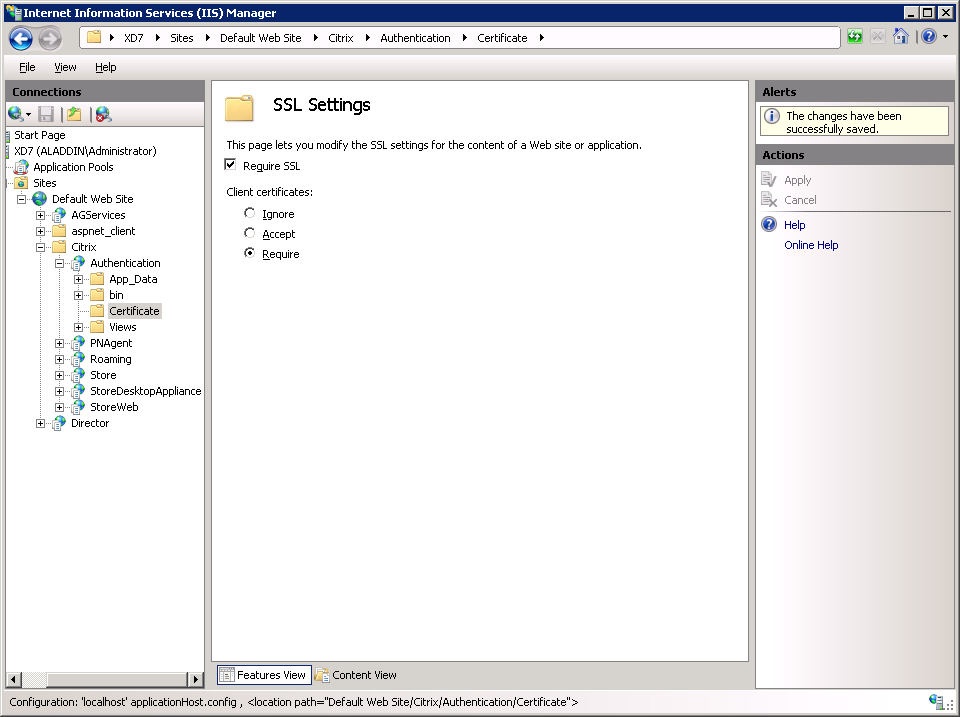
Fig. 35 - SSL Settings
To verify the validity of SSL settings, you must perform the following sequence of actions:
Instead of xd7.aladdin.local, you must specify the fully qualified domain name of the server with Citrix XenDesktop software.
The following window will appear, in which you need to select a user certificate (Fig. 36).
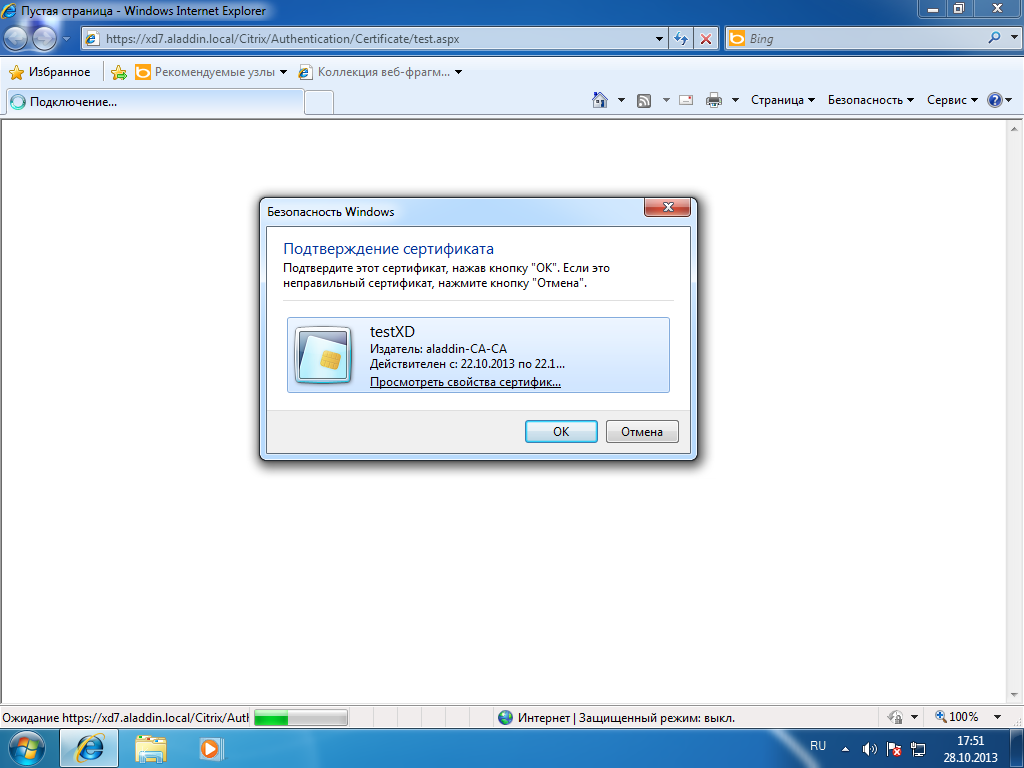
Fig. 36 - User certificate request window
Select a user certificate and click OK .
The following window will be displayed (Fig. 37).

Fig. 37 - The window for requesting the PIN code for the user's smart card.
Enter the PIN code of the user's smart card and click OK .
If the SSL connection is successful, then you will see information about the user certificate on the opened page (Fig. 38).

Fig. 38 - User certificate verification window
Connect to the server with Citrix XenDesktop software installed and configure the communication protocols for SSL .
Launch the Citrix Studio Management Console . To do this, open Citrix StoreFront software and select the Server Group tab . Select the Change Base URL item and change the http value to https (Fig. 39).
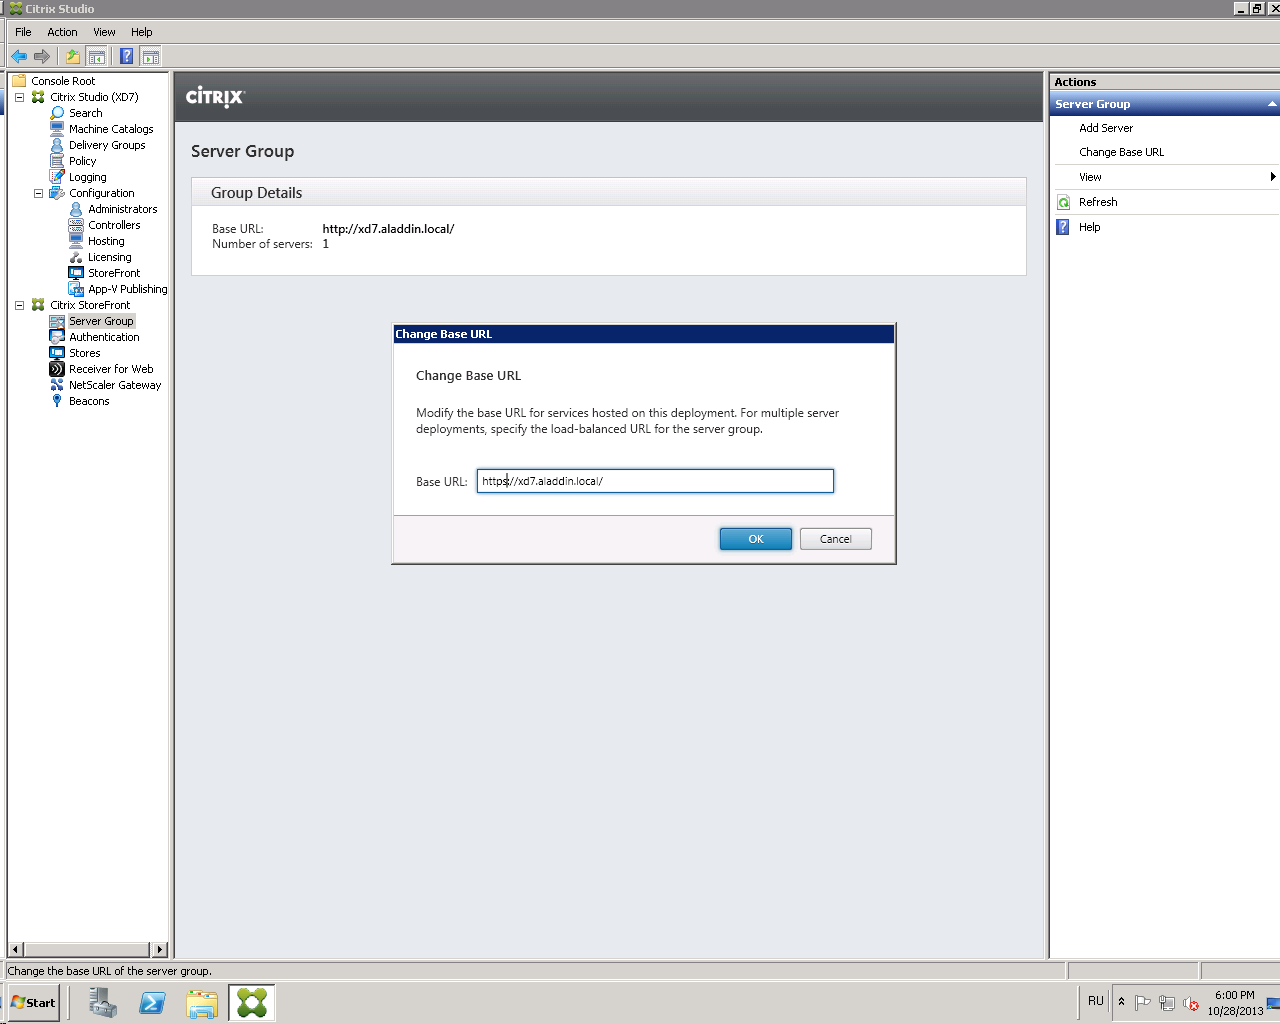
Fig. 39 - “Change Base URL” window
Click OK .
Click on the Stores tab (Figure 40).
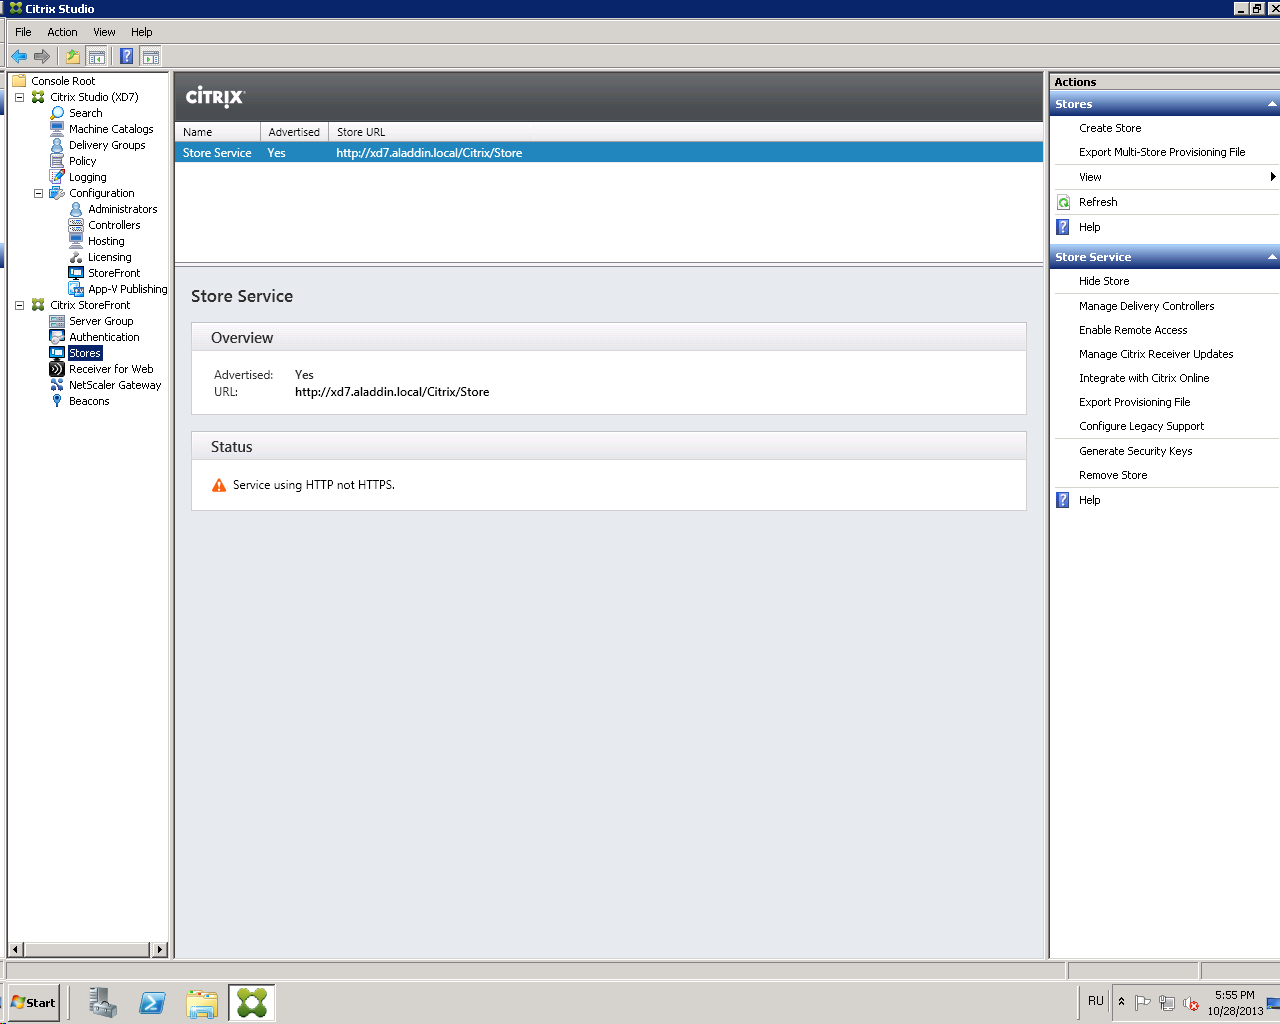
Fig. 40 - Stores Tab
Select Manage Delivery Controllers .
In the window that opens, click Edit (Fig. 41).
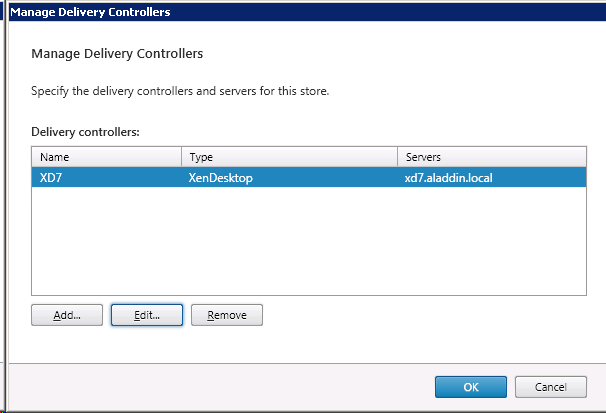
Fig. 41 - “Manage Delivery Controllers” window
In the Transport type field, replace HTTP with HTTPS (Fig. 42, Fig. 43).
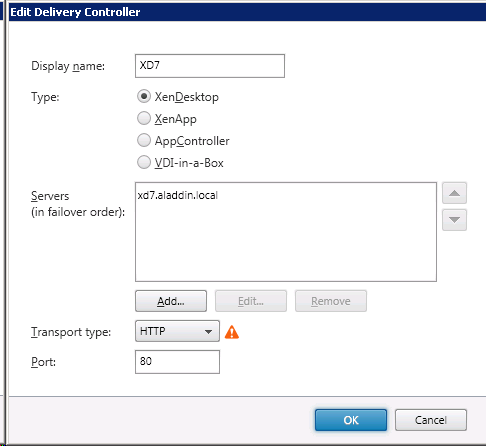
Fig. 42 - "Edit Delivery Controller" window with an HTTP value
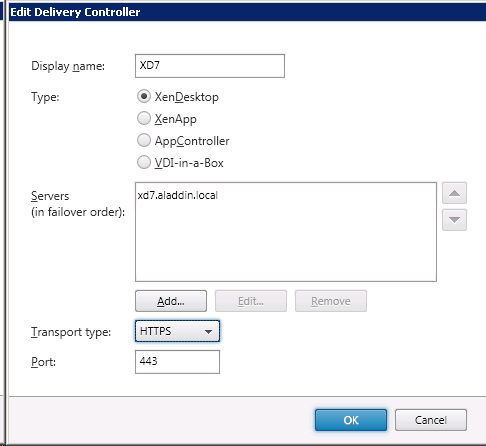
Fig. 43 - “Edit Delivery Controller” window with HTTPS value
Click OK .
Make sure that the value Service using HTTPS appears in the Status field (Fig. 44). Attention : After applying the settings, you must restart the server with Citrix XenDesktop software.
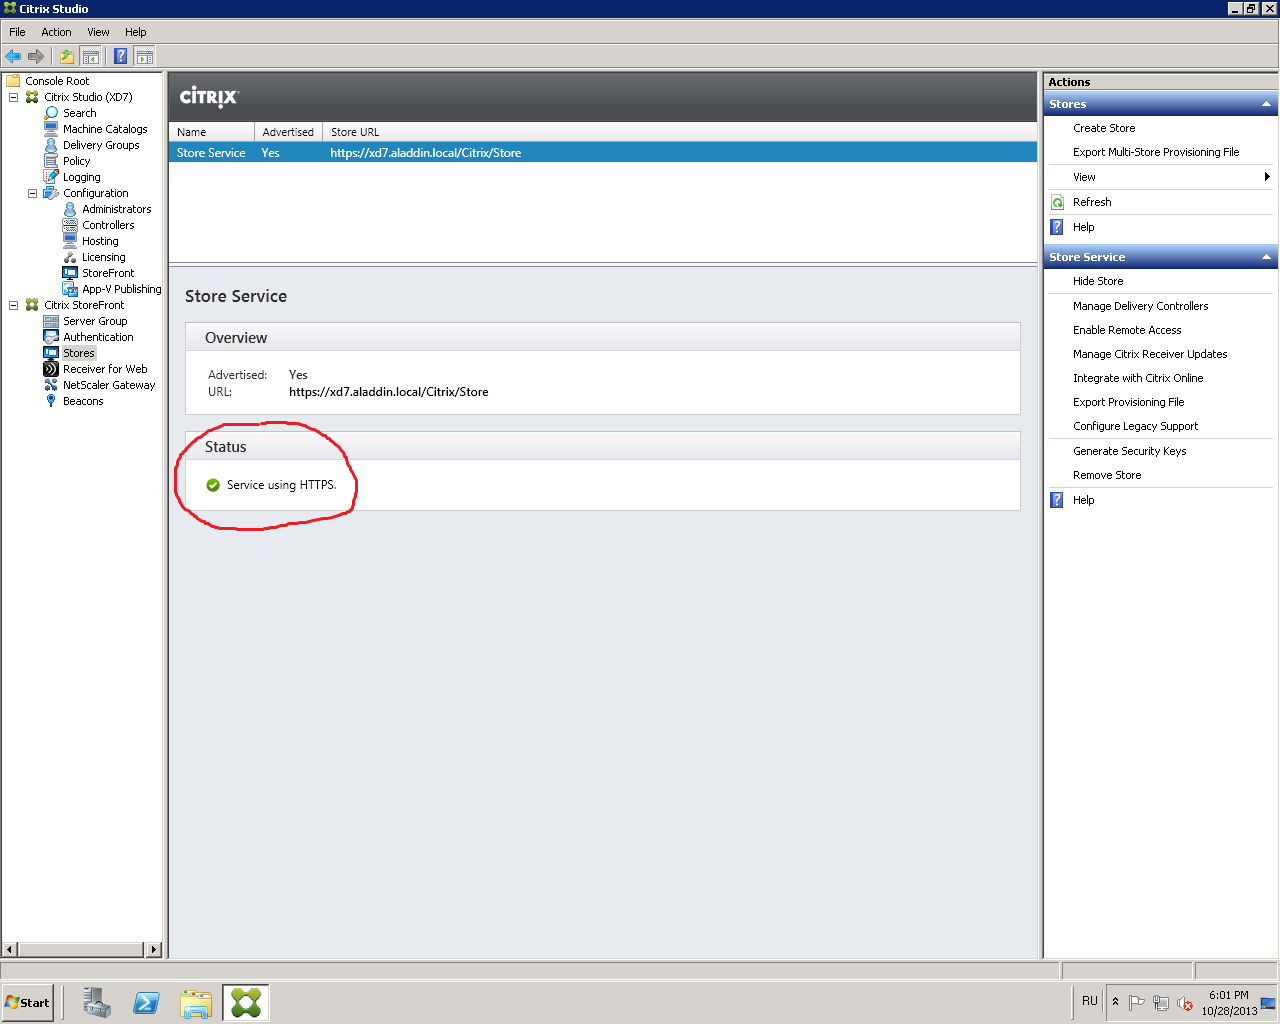
Fig. 44 - Status field value
You must allow XML requests to the server with Citrix XenDesktop installed. To do this, follow these steps.
On the server with Citrix XenDesktop installed, open the Windows PowerShell command prompt (see Figure 45).
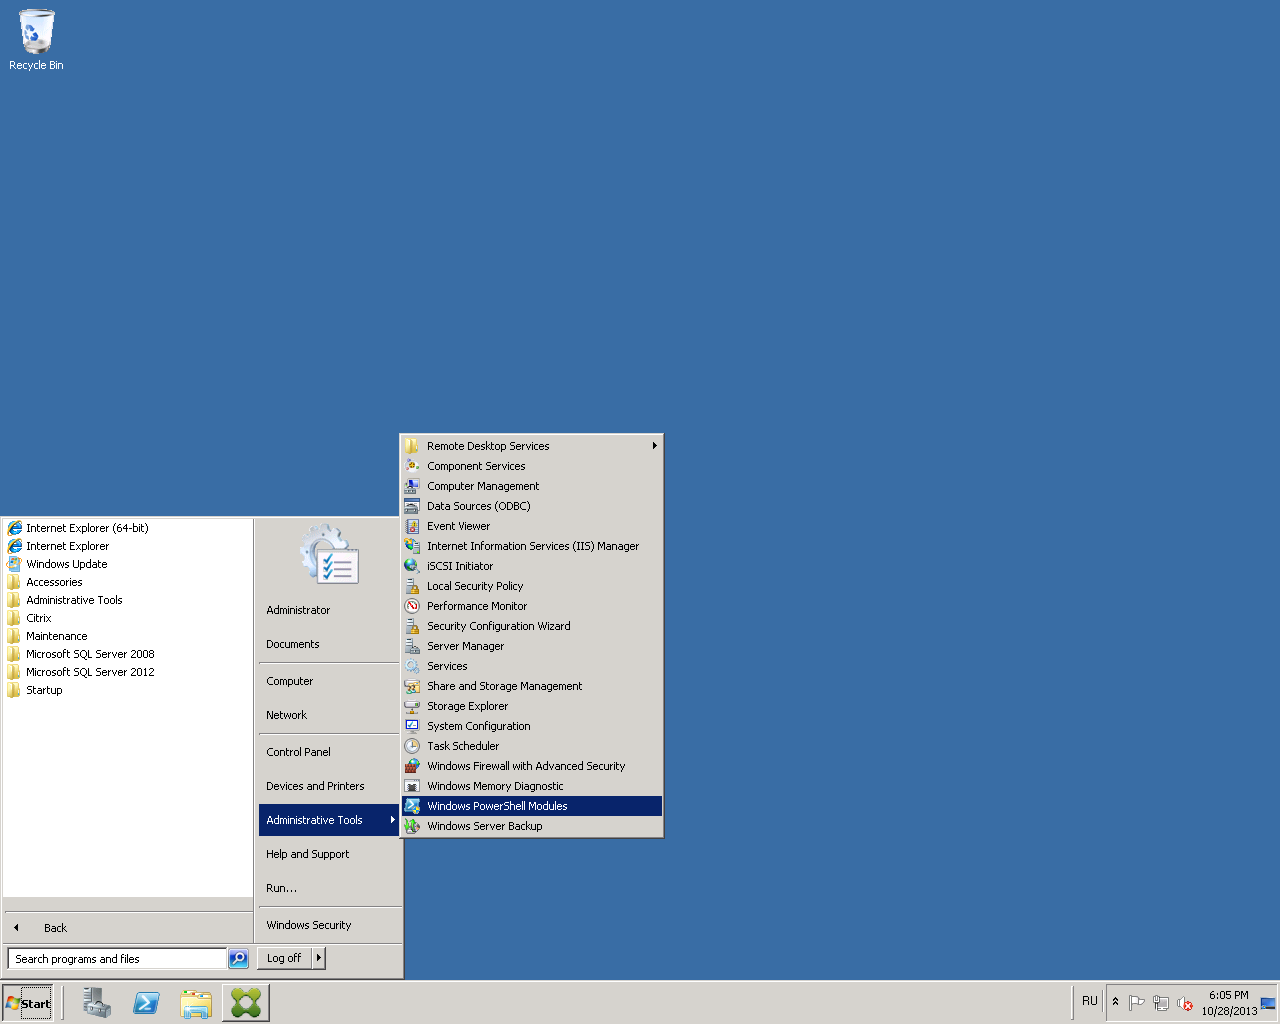
Fig. 45 - The path to the “Windows PowerShell”
command line In the command line that opens, run the command:
Set-BrokerSite -TrustRequestsSentToTheXmlServicePort $ true (Fig. 46)
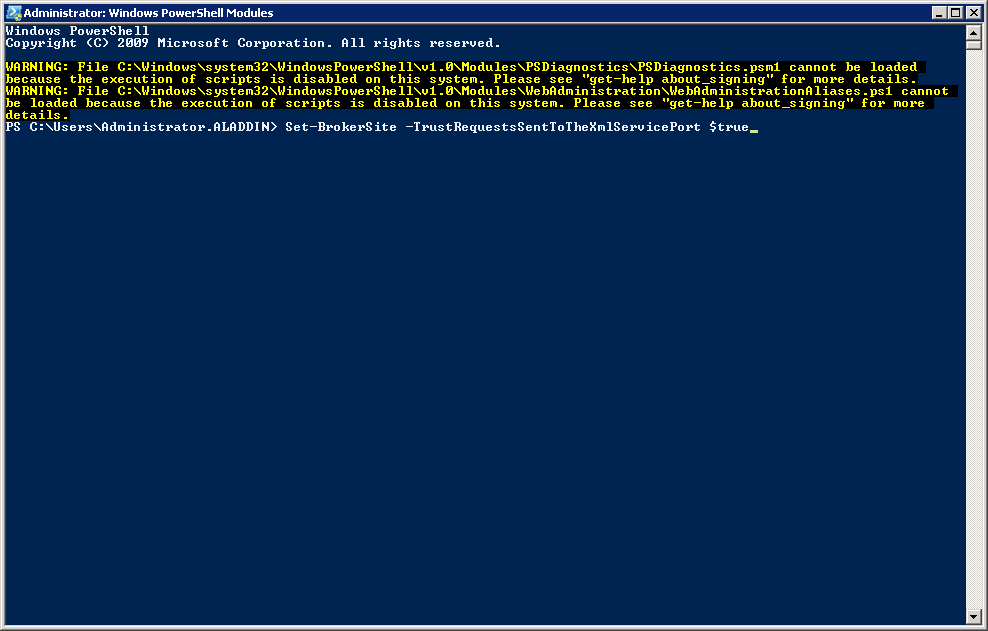
Fig. 46 - Windows PowerShell Command Prompt
Connect to the user's PC. Open Citrix Receiver software and add the server connection string with published desktops and / or applications (Fig. 47).

Fig. 47 - Adding a server address to the Citrix Receiver
software To ensure correct operation, it is necessary that the server address with the Citrix StoreFront software be added to the trusted (Trusted) or local (Local Intranet) sites in the browser used. In the security level settings for each option, you need to make sure that the Automatic logon with the current user name and password setting is enabled . It is recommended to use a browser - Internet Explorer 9.0 and higher.
If the server address is correct and the smart card with the certificate is connected to the USB port of the user’s PC, a window will open asking for the user’s PIN code (Fig. 48).
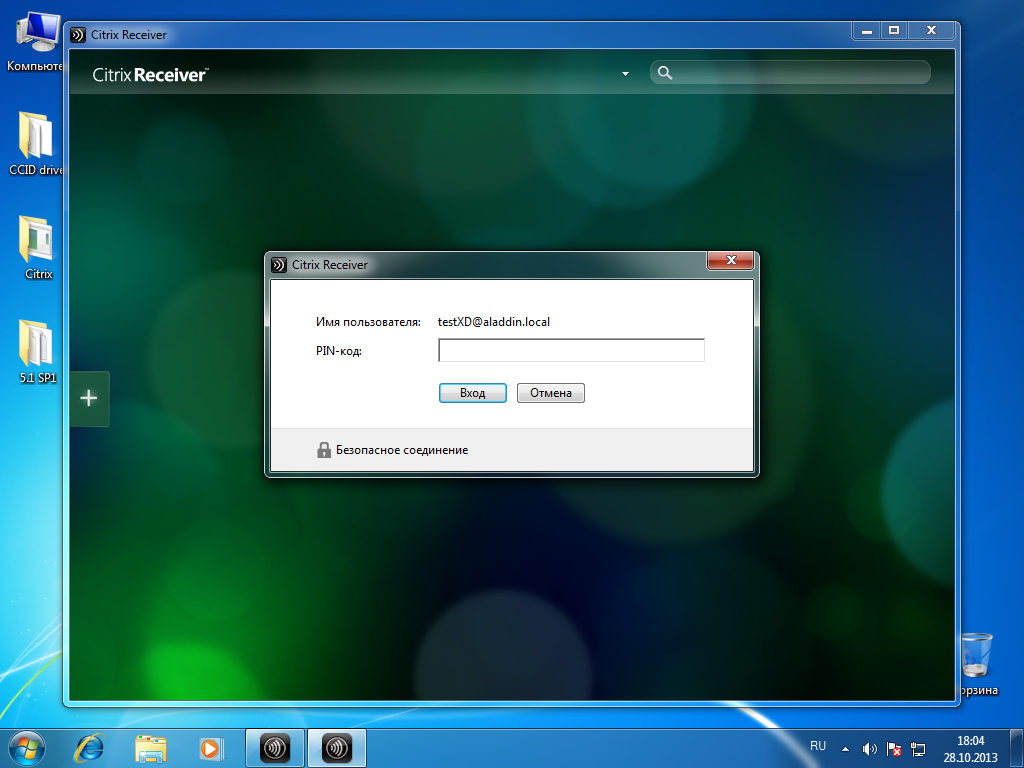
Fig. 48 - Citrix Receiver software: requesting a PIN code for a user's smart card
Enter the user PIN (Fig. 49).

Fig. 49 - Enter user PIN-code
Connection to the application server (Fig. 50).

Fig. 50 - Connecting to the application server
After connecting, open the All applications tab . Available applications and desktops are displayed.
In this example, select Win7x32 (Figure 51).
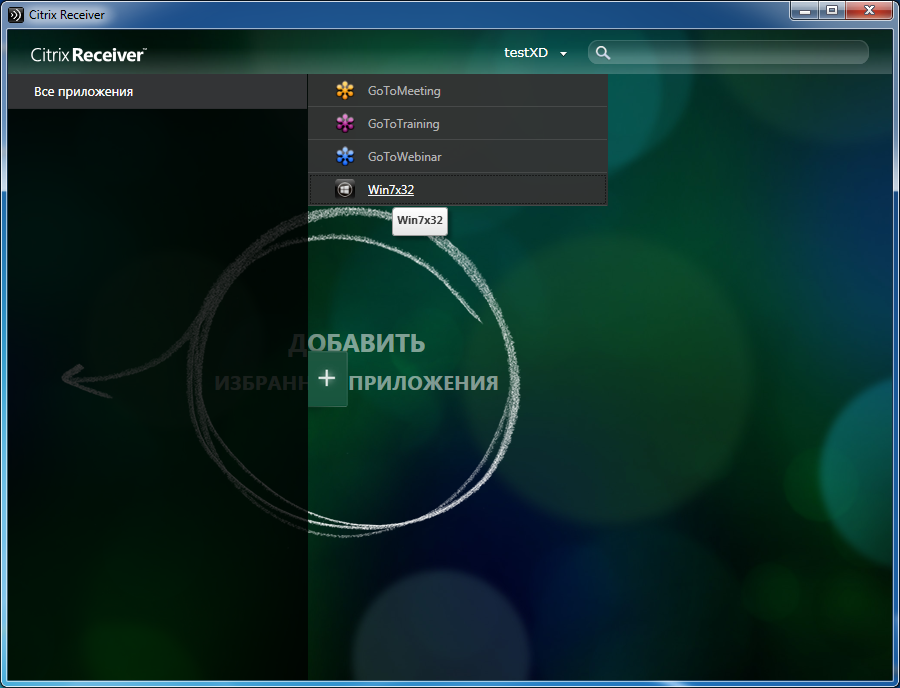
Fig. 51 - List of available applications
To enter the Windows OS on a virtual machine, you must enter the PIN code on the user's key medium (Fig. 52).

Fig. 52 - Smart card authentication on a remote desktop
Authentication was successful (Fig. 53).
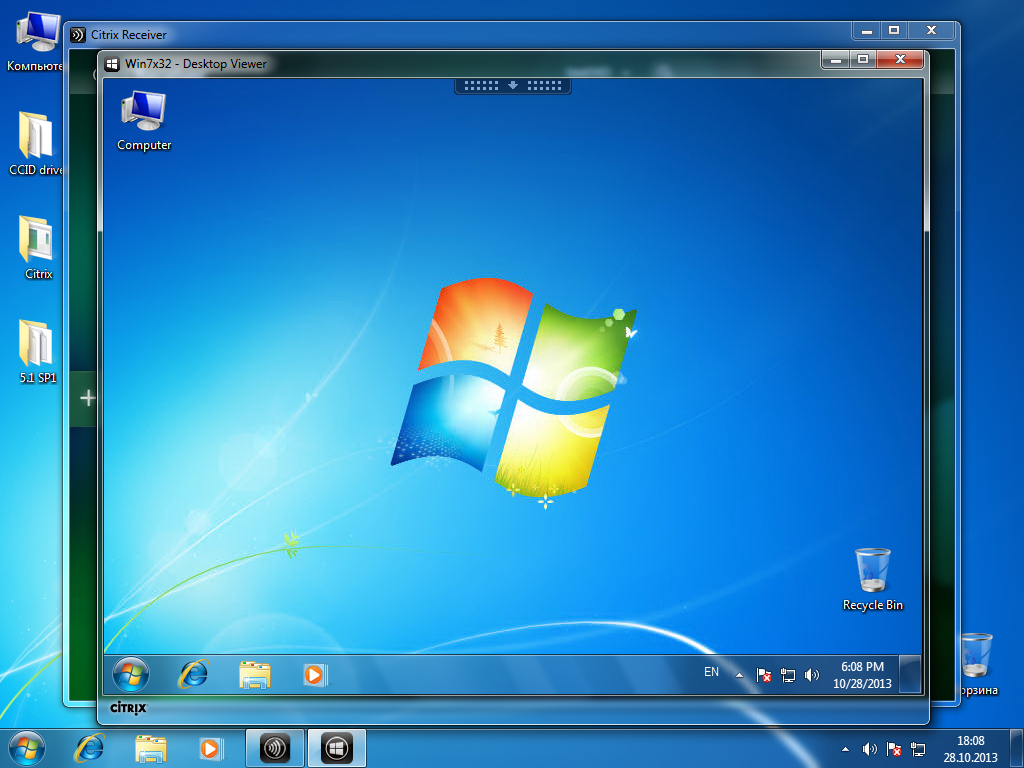
Fig. 53 - Successful smart card authentication in remote desktop
Attention : For the end-to-end authentication via smart cards to work correctly, it is necessary that the end device of the user (user PC) be added to the domain in which the infrastructure servers with Citrix XenDesktop 7 software are installed (Delivery Controller, StoreFront, etc.) or, when using multiple domains, trust relationships have been configured between domains.
Setting up Single Sign-on (SSO) for smart card authentication when using XenDesktop7 software consists of several steps.
Creating a directory of virtual machines.
Creating a group of users of virtual machines.
Install Citrix Receiver 4.0 software and higher on a user's PC.
Configure Citrix XenDesktop Software Authentication Policies.
Issue a certificate for IIS and configure SSL access to IIS.
Configuring XML queries to a server with XenDesktop 7 installed.
Configuring Citrix StoreFront 2.1 software to enable SSO for smart card authentication.
Setting up the user's PC (page 34).
To configure pass-through smart card authentication on Citrix Receiver 4.0, you must install Citrix Receiver 4.0 with additional parameters. Installing Citrix Receiver 4.0 is done from the command line:
Detailed information for setting smart card authentication can be found on the online documentation website: http://support.citrix.com/proddocs/topic/receiver-windows-40/receiver-windows-smart-card-cfg.html . To configure pass-through authentication settings, pay attention to the following sections: To enable single sign-on for smart card authentication, To use CSP PIN prompts .
We recommend that you configure policies through Active Directory directory service group policies. You can also configure from the local policy management snap-in.
To configure group policies, you must perform the following sequence of actions:
Detailed information is available on the website - http://support.citrix.com/proddocs/topic/ica-settings/ica-settings-wrapper.html
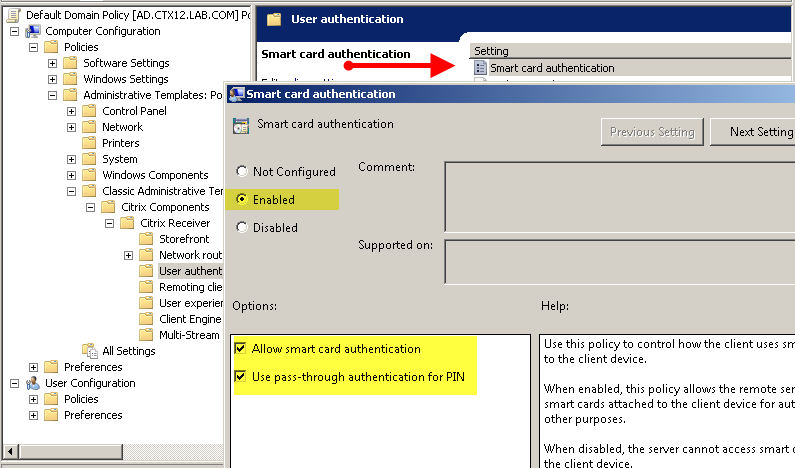
Fig. 54 - Configuring AD Group Policies for SSO
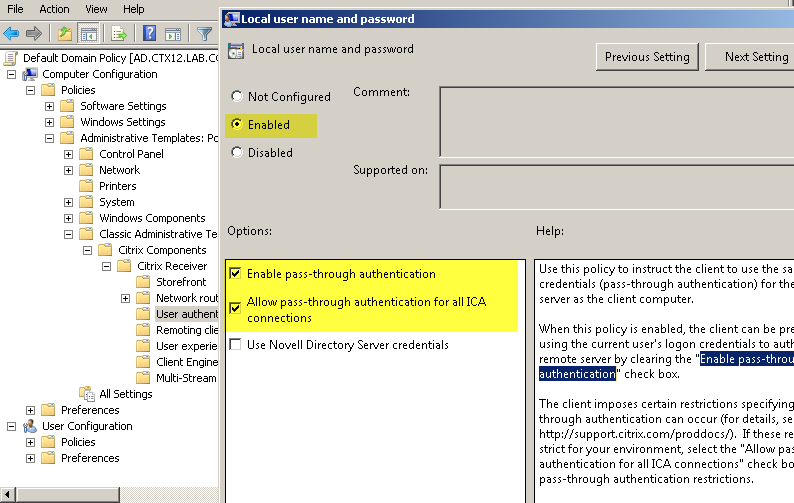
Fig. 55 - Configuring AD Directory Group Policy for SSO
Caution : When working with Citrix StoreFront software in multi-server installations, use only one server when making changes to the settings. Ensure that the Citrix StoreFront Management Console is not running on the other (s) servers in this server group. After the configuration is complete, make sure that the changes are applied to all the servers in the group ( propagate your configuration changes to the server group ).
To configure Citrix StoreFront software to operate SSO during smart card authentication, you must perform the following steps on a server with Citrix StoreFront software installed:
As a result, I would like to once again note the advantages of using strong two
- factor authentication in VDI using the solutions "Aladdin R.D.":
JaCarta PKI - a line of USB-, MicroUSB-tokens or smart cards for strong two-factor authentication of users when accessing secure information resources of the enterprise, secure storage of keys, key containers of software cryptographic information protection tools.
The advantages of using solutions "Aladdin R.D." with Citrix products are:
- secure access to virtual desktops and applications, the possibility of multi-factor authentication in XenApp / XenDesktop;
- Netscaler Gateway support
- the ability to work with smart cards and USB tokens after authentication in a Citrix VDI session with any applications that support these devices;
- the ability to integrate Citrix solutions into an existing public key infrastructure (PKI), and vice versa - embed PKI into an existing Citrix virtual environment.
Authentication in a Citrix virtual environment using JaCarta smart cards and USB tokens from Aladdin R.D. based on the public key infrastructure (PKI) and digital certificates of the X.509 standard stored on these devices. The solutions comply with international standards, only configuration without complex software integrations is required.
All models of JaCarta smart cards and USB tokens are based on a smart card microcontroller that has special built-in protection against cloning, hacking and other special attacks (secure by design).
Brief description of demo booth infrastructure
- Microsoft Windows Server 2008 R2 - server with the domain controller role (DC.aladdin.local)
- Microsoft Windows Server 2008 R2 - Server with the Microsoft Certification Authority (MS CA) role (CA.aladdin.local)
- JC Client 6.24.16
- Microsoft Windows Server 2008 R2 - software components (software) XenDesktop (Citrix Director, Citrix License Server, Citrix Studio, Citrix StoreFront, Citrix Delivery Controller) (XD7.aladdin.local). These components can be installed on different servers.
- Citrix XenDesktop 7.0 Software
- Microsoft Windows 7 64-bit - user test PC (Test2.aladdin.local)
- Citrix Receiver 4.0.0.45893
- JC Client 6.24.16
- Citrix Receiver 4.0.0.45893
- Microsoft Windows 7 32-bit - test reference machine - the "golden" image from which virtual machines for users will be deployed (win7x32.aladdin.local)
- Citrix Receiver 4.0.0.45893
- JC Client 6.24.16
- Virtual delivery agent
- Citrix Receiver 4.0.0.45893
Creating virtual machines
1. Creating a directory of virtual machines
Before creating a directory for virtual machines, you must prepare a reference machine. In this test environment, it is a virtual machine with the operating system (OS) Windows 7 (32-bit).
To prepare the reference machine, it is necessary to install the Virtual Delivery Agent software (the distribution of which is located on the XenDesktop 7.0 software disk), JC Client 6.24.16 (installation and configuration of JC Client 6.24.16 software are described in the document "JC-Client - Administrator Guide" ), as well as other software that is necessary for the work of users of this group. After installation, the virtual machine must be turned off.
Creating a directory for virtual machines
On the server where the Citrix Studio component is installed (installation and configuration of Citrix XenDesktop 7.x software is described on the websitehttp://support.citrix.com/proddocs/topic/xendesktop-71/cds-install-config-intro.html ), launch Citrix Studio (Start -> All Programs -> Citrix), connect to the Citrix Delivery Controller and go in Machine Catalogs , run the Create Machine Catalog wizard (Figure 1).
Fig. 1 - Create Machine Catalog window
Click Next .
Select Windows Desktop OS or another item, depending on the settings of your environment (Fig. 2).
Fig. 2 - Window for selecting the operating system for the directory.
Click Next .
Select Virtual Machines and Machine Creation Services (MCS) (Fig. 3).
Fig. 3 - The window for choosing the delivery method of the virtual machine.
Click Next .
In the Desktop Experience window, configure the desktop settings for users and the method of storing user data as shown below (Fig. 4). Other options may be selected depending on your environment settings and required tasks.
Fig. 4 - Virtual machine settings window
Click Next .
From the list of available virtual machines, select the previously created reference machine (Fig. 5).
Fig. 5 - Window for selecting a reference machine.
Click Next .
Set the number of virtual machines in the catalog and set their technical characteristics (Fig. 6).
Fig. 6 - Selecting the parameters of user virtual machines
Click Next .
Configure the scheme for automatically adding the created machine accounts to the Active Directory (AD) directory service (Fig. 7).
For ease of administration, you can first create an organizational unit (OU) in the AD directory service , where the accounts of the created virtual machines will be added.
Fig. 7 - “Active Directory Computer Account” window
Click Next .
Check the parameters of the created virtual machines and determine the name for the directory, as well as the name of the virtual machine to be displayed to users (Fig. 8).
Fig. 8 - Summary window
Click Finish .
A catalog of virtual machines has been created (Fig. 9).
Fig. 9 - Created virtual machine catalog
2. Creating a group of users of virtual machines - Delivery Group
To connect the created virtual machines with users, you must configure the user group of virtual machines ( Delivery Group ).
Open the Citrix Studio management console and go to the Delivery Group -> Create Delivery Group tab (Fig. 10).
Fig. 10 - “Delivery Group” window.
Select a previously created catalog of virtual machines and specify how many virtual machines will be available for users of this group (Fig. 11).
Fig. 11 - Machines Window
Click Next .
Select the type of resources to be delivered: applications or virtual machines (Fig. 12).
Fig. 12 - Select “Delivery Type”
Click Next .
Assign the users with whom the virtual machines will be associated (Figure 13).
Fig. 13 - User selection window
Click Next . Citrix Receiver
software is configured later (see section 2.5). In the next window, select Manually, using a StoreFront server address that I will provide later (Fig. 14).
Fig. 14 - “Citrix StoreFront” settings window
Click Next .
Check the final settings and determine the name of the group (Fig. 15).
Fig. 15 - Summary Window
Click Finish .
A group of users of virtual machines has been created (Fig. 16).
Fig. 16 - Created by “Delivery Group”
Attention : Make sure that all virtual machines in the pool are registered (have the status Registered (Fig. 17)).
Fig. 17 - Status window of virtual machines
3. Checking the availability of virtual machines
Go to the user's workstation (PC). This is Windows 7 x64 with JC Client 6.24.16 preinstalled.
Open a browser and in the address bar specify the path to the Web interface of the Citrix XenDesktop software : http: //xd7.aladdin.local/Citrix/StoreWeb/ (Fig. 18).
If Citrix Receiver software is not installed, the Citrix Receiver software installation window will be displayed (Fig. 19).
Click Install .
Fig. 18 - Web-based XenDesktop software
Fig. 19 - Installing the Citrix Receiver
Enter Username and Password user account in AD directory. This account must be a member of the virtual machine user group that was created in section 1.2 (Fig. 20).
Fig. 20 - User authentication window on the Web interface of XenDesktop software
Make sure that the virtual machine is accessible, then end the user session (Fig. 21).
(Start -> Logout)
Fig. 21 - User virtual machine
Configure smart card authentication
1. Certificate Issue for IIS
On the server where XenDesktop 7 software is installed, run the Internet Information Services (IIS) management snap-in (Fig. 22).
Fig. 22 - Path to the IIS service management snap-in
Click the Server Certificates tab (Figure 23).
Fig. 23 - IIS service management snap-in
Select Create Domain Certificate (Fig. 24).
Fig. 24 - “Create Certificate” tab
Fill in the organization information for the issued certificate (Fig. 25).
In the Common name field, specify the fully qualified domain name of the server with XenDesktop installed. In the present example: xd7.aladdin.local.
Fig. 25 - Organization information in the issued certificate
Select the organization’s certification authority and in the Friendly name field specify the fully qualified domain name of the server with XenDesktop software installed . In the present example: xd7.aladdin.local (Figure 26).
Fig. 26 - Issuing a Certificate for IIS
Click Finish .
Make sure that the certificate is issued successfully (Figure 27).
Fig. 27 - Certificate issuance result
2. Configure SSL access to IIS
Go to the Default Web Site tab and click Bindings ...
In the window that opens, click Add (Fig. 28).
Fig. 28 - “Site Bindings” settings window
Select the type of https connection , and in the SSL certificate list, select the previously issued certificate for IIS (Fig. 29).
In this example, the certificate name is xd7.aladdin.local.
Fig. 29 - “Add Site Binding” window
Click OK .
Make sure that this type of connection is added to the list (Fig. 30).
Fig. 30 - Result of setting the connection type
Close the “Site Bindings” window.
3. Configure Citrix StoreFront
Attention! When working with StoreFront in multi-server installations, use only one server when making changes to the settings. Verify that the Citrix StoreFront Management Console is not running on another server or servers in this server group. After the configuration is complete, make sure that the changes are applied to all the servers in the group ( propagate your configuration changes to the server group ).
Launch Citrix Studio. In the Citrix StoreFront tab, open the Authentication tab (Figure 31).
Fig. 31 - StoreFront Authentication Tab
Select Add / Remove Authentication Methods.
The Add / Remove Methods window opens (Figure 32).
Select a smart card authentication method.
Fig. 32 - Add / Remove Authentication Methods Window
Click OK .
Make sure that the Smart card authentication method has been added on the Authentication tab (Figure 33).
Fig. 33 - Result of changing authentication methods
Open Default Web Site -> Citrix -> Authentication -> Certificate (Fig. 34).
Fig. 34 - Certificate Home tab
Select SSL Settings -> Require SSL. Check the Require parameter (Fig. 35).
Fig. 35 - SSL Settings
To verify the validity of SSL settings, you must perform the following sequence of actions:
- connect to the user's PC;
- connect a smart card with a user certificate to the user's PC;
- open the browser;
- in the address bar, specify the path to the page with the test application. In this example, https: //xd7.aladdin.local/Citrix/Authentication/Certificate/test.aspx .
Instead of xd7.aladdin.local, you must specify the fully qualified domain name of the server with Citrix XenDesktop software.
The following window will appear, in which you need to select a user certificate (Fig. 36).
Fig. 36 - User certificate request window
Select a user certificate and click OK .
The following window will be displayed (Fig. 37).
Fig. 37 - The window for requesting the PIN code for the user's smart card.
Enter the PIN code of the user's smart card and click OK .
If the SSL connection is successful, then you will see information about the user certificate on the opened page (Fig. 38).
Fig. 38 - User certificate verification window
Connect to the server with Citrix XenDesktop software installed and configure the communication protocols for SSL .
Launch the Citrix Studio Management Console . To do this, open Citrix StoreFront software and select the Server Group tab . Select the Change Base URL item and change the http value to https (Fig. 39).
Fig. 39 - “Change Base URL” window
Click OK .
Click on the Stores tab (Figure 40).
Fig. 40 - Stores Tab
Select Manage Delivery Controllers .
In the window that opens, click Edit (Fig. 41).
Fig. 41 - “Manage Delivery Controllers” window
In the Transport type field, replace HTTP with HTTPS (Fig. 42, Fig. 43).
Fig. 42 - "Edit Delivery Controller" window with an HTTP value
Fig. 43 - “Edit Delivery Controller” window with HTTPS value
Click OK .
Make sure that the value Service using HTTPS appears in the Status field (Fig. 44). Attention : After applying the settings, you must restart the server with Citrix XenDesktop software.
Fig. 44 - Status field value
4. Configuring XML Queries
You must allow XML requests to the server with Citrix XenDesktop installed. To do this, follow these steps.
On the server with Citrix XenDesktop installed, open the Windows PowerShell command prompt (see Figure 45).
Fig. 45 - The path to the “Windows PowerShell”
command line In the command line that opens, run the command:
Set-BrokerSite -TrustRequestsSentToTheXmlServicePort $ true (Fig. 46)
Fig. 46 - Windows PowerShell Command Prompt
5. User PC setup
Connect to the user's PC. Open Citrix Receiver software and add the server connection string with published desktops and / or applications (Fig. 47).
Fig. 47 - Adding a server address to the Citrix Receiver
software To ensure correct operation, it is necessary that the server address with the Citrix StoreFront software be added to the trusted (Trusted) or local (Local Intranet) sites in the browser used. In the security level settings for each option, you need to make sure that the Automatic logon with the current user name and password setting is enabled . It is recommended to use a browser - Internet Explorer 9.0 and higher.
If the server address is correct and the smart card with the certificate is connected to the USB port of the user’s PC, a window will open asking for the user’s PIN code (Fig. 48).
Fig. 48 - Citrix Receiver software: requesting a PIN code for a user's smart card
Enter the user PIN (Fig. 49).
Fig. 49 - Enter user PIN-code
Connection to the application server (Fig. 50).
Fig. 50 - Connecting to the application server
After connecting, open the All applications tab . Available applications and desktops are displayed.
In this example, select Win7x32 (Figure 51).
Fig. 51 - List of available applications
To enter the Windows OS on a virtual machine, you must enter the PIN code on the user's key medium (Fig. 52).
Fig. 52 - Smart card authentication on a remote desktop
Authentication was successful (Fig. 53).
Fig. 53 - Successful smart card authentication in remote desktop
Configure Pass-Through Smart Card Authentication
1. The procedure for setting up Single Sing-On for smart card authentication when using XenDesktop 7 software
Attention : For the end-to-end authentication via smart cards to work correctly, it is necessary that the end device of the user (user PC) be added to the domain in which the infrastructure servers with Citrix XenDesktop 7 software are installed (Delivery Controller, StoreFront, etc.) or, when using multiple domains, trust relationships have been configured between domains.
Setting up Single Sign-on (SSO) for smart card authentication when using XenDesktop7 software consists of several steps.
Creating a directory of virtual machines.
Creating a group of users of virtual machines.
Install Citrix Receiver 4.0 software and higher on a user's PC.
Configure Citrix XenDesktop Software Authentication Policies.
Issue a certificate for IIS and configure SSL access to IIS.
Configuring XML queries to a server with XenDesktop 7 installed.
Configuring Citrix StoreFront 2.1 software to enable SSO for smart card authentication.
Setting up the user's PC (page 34).
2. Installing and configuring Citrix Receiver 4.0 software to enable SSO for smart card authentication.
To configure pass-through smart card authentication on Citrix Receiver 4.0, you must install Citrix Receiver 4.0 with additional parameters. Installing Citrix Receiver 4.0 is done from the command line:
- on the user's PC, run the CMD command-line utility with administrator rights;
- specify the path to the Citrix Receiver 4.0 installer file on the command line and optionally specify the parameters for enabling SSO: / includeSSON AM_SMARTCARDPINENTRY = CSP; Example: C: \ Distr \ CitrixReceiver.exe / includeSSON AM_SMARTCARDPINENTRY = CSP
- wait until the installation of Citrix Receiver 4.0 software is completed and reboot the user's PC;
- after rebooting the user's PC, check that the ssonsrv.exe process is present in the executable processes (Task Manager / Processes);
- configure authentication policies for Citrix XenDesktop software that will be applied to Citrix servers and user devices, as described in section 3.3.
Detailed information for setting smart card authentication can be found on the online documentation website: http://support.citrix.com/proddocs/topic/receiver-windows-40/receiver-windows-smart-card-cfg.html . To configure pass-through authentication settings, pay attention to the following sections: To enable single sign-on for smart card authentication, To use CSP PIN prompts .
3. Configure Authentication Policies for Citrix XenDesktop Software
We recommend that you configure policies through Active Directory directory service group policies. You can also configure from the local policy management snap-in.
To configure group policies, you must perform the following sequence of actions:
- in the Active Directory directory service group policy templates, import the Citrix ADM Template ( Add Template in the Group Policy Management snap-in); The policy template can be found in the Citrix Receiver software installation folder: C: \ Program Files (x86) \ Citrix \ ICA Client \ Configuration \ icaclient.adm .
- create a policy (or edit an existing one) and enable end-to-end smart card authentication;
- go to Computer Configuration -> Policies -> Administrative templates -> Classic -> Citrix Components -> Citrix receiver -> User Authentica-tion;
- select the Smart Card Authentication setting and enable the “Allow smart card authentication” and “Use pass-through authentication for PIN” options. Select the Local User Name and Password setting and enable the “Enable pass-through authentication” and “Allow pass-through authentication for all ICA connections” parameters (Fig. 54, Fig. 55).
Detailed information is available on the website - http://support.citrix.com/proddocs/topic/ica-settings/ica-settings-wrapper.html
Fig. 54 - Configuring AD Group Policies for SSO
Fig. 55 - Configuring AD Directory Group Policy for SSO
4. Configure Citrix StoreFront 2.1 software to enable pass-through smart card authentication
Caution : When working with Citrix StoreFront software in multi-server installations, use only one server when making changes to the settings. Ensure that the Citrix StoreFront Management Console is not running on the other (s) servers in this server group. After the configuration is complete, make sure that the changes are applied to all the servers in the group ( propagate your configuration changes to the server group ).
To configure Citrix StoreFront software to operate SSO during smart card authentication, you must perform the following steps on a server with Citrix StoreFront software installed:
- initial setup of Citrix StoreFront 2.1 software, according to —Configuration of Citrix StoreFront;
- in the Add / Remove Authentication Methods section add the domain pass-through authentication method (Fig. 56);

Рис. 56 — Настройка метода аутентификации - для включения сквозной аутентификации с использованием смарт-карт необходимо внести дополнительные изменения в конфигурацию. Для этого отредактируйте default.ica для каждого ПО Citrix Store, где требуется сквозная аутентификация по смарт-картам;
- используя текстовый редактор, откройте файл default.ica, который находится в папке:
C:\inetpub\wwwroot\Citrix\storename\App_Data\; - если в инфраструктуре не используется аутентификация через NetScaler Gateway, то добавьте следующий параметры
[Application]: DisableCtrlAltDel=Off.
Данная настройка будет применяться для всех пользователей; - для включения сквозной аутентификации по смарт-картам с использованием NetScaler Gateway добавьте следующий параметр:
[Application]: UseLocalUserAndPassword=On; Подробная информация доступна на сайте: http://support.citrix.com/proddocs/topic/dws-storefront-21/dws-configure-conf-smartcard.html. - выполните настройку пользователя, согласно разделу — Настройка ПК пользователя (см. раздел 2.5). Проверьте, что вход на виртуальную машину пользователя выполняется успешно. Проверьте, что после входа на ПК пользователя (по смарт-карте или по паролю) больше не появляется окно запроса учётных данных или PIN-кода при доступе к StoreFront или/и виртуальной машине пользователя.
As a result, I would like to once again note the advantages of using strong two
- factor authentication in VDI using the solutions "Aladdin R.D.":
- increasing the overall level of security, which occurs due to the rejection of simple passwords and the transition to strong authentication using the second factor;
- providing secure access to virtual desktops and applications;
- the ability to work with smart cards and USB tokens after authentication in a secure session;
- the possibility of using an electronic signature;
- support for RSA and GOST algorithms;
- additional advantages - the same card, in addition to the basic functions of authentication and ES, can serve as a pass to the premises (the presence of an RFID tag), it can also be a salary (MasterCard or VISA payment application) or transport card;
- other customization options are also available - drawing a logo and using the
corporate style of the customer.