Local update server Comodo Internet Security
- Tutorial
This instruction will detail the process of raising your local Comodo update server on Windows without using any paid components. Unlike Comodo Offline Updater and analogues, there is no need to configure proxies on the client side.
Requirements:
As the server will be used Windows 7 SP1 Pro x64 (IIS 6.7). For newer operating systems, installation and configuration is similar.
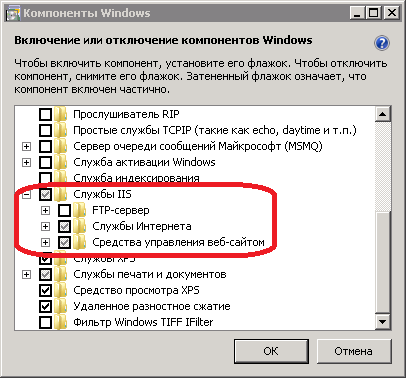
“Enable or disable Windows components” in the “Add or Remove Programs” section, check “IIS” for installation. Automatically tagged components are sufficient.
The script is written in PowerShell v4, so WMF4.0 must be updated to work correctly on Windows 7. Reboot after installation is required. 7-Zip is also needed for unpacking. Of course, to run the script, you need to translate the PS execution policy into Unrestricted. This is done with the Set-ExecutionPolicy Unrestricted command .
Comodo updates are divided into 2 parts: databases and updates of the program itself. Files of both parts can be packed or not. I recommend using packaged ones, since they take up much less disk space - 290MB versus 635MB only in databases.
The following user variables are used in the script:
$ 7z - Path to 7z.exe
$ downloadpath - Path to download, folders are created automatically. In this example - “C: \ inetpub \ wwwroot”
$ serverurl - Comodo server from which
$ inis is downloaded - Update branch, more on that below
$ proto - Recognition version
$ xx - Bit rate for download (“x32”, “x64” ), you can specify only one
$ cispacked - Download packaged (* .7z) updates or not. Possible values: $ True or $ False
$ avpacked - Download packaged (* .cav.z) databases. Possible Values: $ True or $ False
$ release_notes- Download Release Notes. Possible values: $ True or $ False.
Regarding the program update branches: to version 8.2.0.4508 inclusive, inis_4010 is used, then any existing one, for example 4080, is used. That is, if you need to update clients of versions 8 and lower, then you need to download inis_4010 ($ inis = "4010", $ proto = "6") and actual ($ inis = "4080", $ proto = "10"). Thus, I managed to upgrade from v6 to the current v10 with two reboots without any problems.
To facilitate administration, the script has 3 launch options:
cis - download
av program update - download
av-clean databases - delete obsolete databases
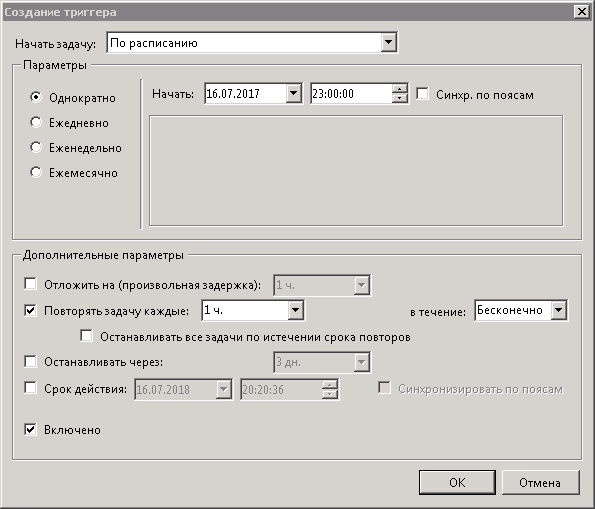
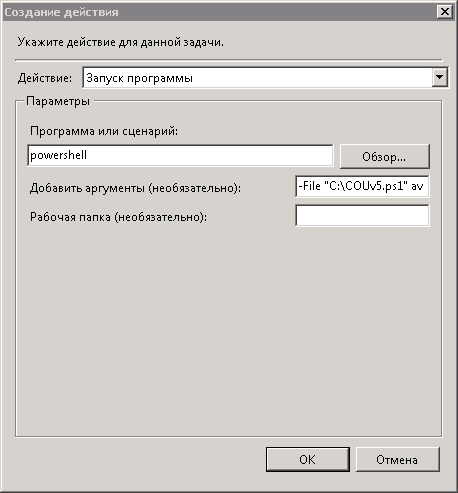
It remains only to add tasks with a given frequency to the Task Scheduler.
In this example, the Default Web Site, created automatically, will be used.
For debugging, I recommend turning on “View Directory”. To do this, select the site you want, go to the "View Directory" menu and click "Enable" on the right side.
To correctly download updates, you need to configure MIME Types: in the corresponding menu item you need to add file extensions and assign them type application / octet-stream .
Installing the Rewrite 2.1 URL module is trivial. This module is required to redirect to the desired inis_ branch.
After installation, you must re-open IIS Manager, otherwise the corresponding menu item will not be visible. To configure, go to the "URL rewriting" item and add an empty rule for incoming traffic with the following contents:
Name: optional
Template:
(cis / download / updates / release / inis) _ [0-9] * / (. * )
Override URL:
{R: 1} _4080 / {R: 2}
In the last address, specify the numbers that are specified in the script in the variable $ inis .
If you need to update outdated versions, then you need to create another rule above.
Name: optional
Template:
(cis / download / updates / release / inis) _ [0-9] * / (. *)
Conditions (match any of the elements):
{REQUEST_URI},. * / Inis_40 [0-1] 0 /.* and {REQUEST_URI},. * / Inis_ [1-3] [0-9] * /. *
Override URL:
{R: 1} _4010 / {R: 2}
Stop processing subsequent rules
This completes the setup of the server side.
The easiest way to do this is manually or through the registry. In the registry, the list of update servers is located at HKEY_LOCAL_MACHINE \ SOFTWARE \ COMODO \ CIS \ Options in the UpdateURL parameter .
For example, this parameter looks like this when setting up the av.local server and turning off the default server: av.local ! Https: //download.comodo.com/
As a result, you get a local Comodo update server and significantly reduce the load on the external channel.
Requirements:
- OS: Windows 7 SP1 and higher or Windows Server 2008 and higher ( WMF 3.0 or WMF 4.0 will be required for 7 and 2008 )
- Rewrite 2.1 URL Module
- PowerShell update download script
- 7-zip
As the server will be used Windows 7 SP1 Pro x64 (IIS 6.7). For newer operating systems, installation and configuration is similar.
1) Install IIS
“Enable or disable Windows components” in the “Add or Remove Programs” section, check “IIS” for installation. Automatically tagged components are sufficient.
2) Script and logic for downloading updates
The script is written in PowerShell v4, so WMF4.0 must be updated to work correctly on Windows 7. Reboot after installation is required. 7-Zip is also needed for unpacking. Of course, to run the script, you need to translate the PS execution policy into Unrestricted. This is done with the Set-ExecutionPolicy Unrestricted command .
Comodo updates are divided into 2 parts: databases and updates of the program itself. Files of both parts can be packed or not. I recommend using packaged ones, since they take up much less disk space - 290MB versus 635MB only in databases.
COU.ps1
List of changes
v6 - Fixed the lack of incremental databases in some cases, fixed database cleaning.
v6.1 - In the next update, they changed deletevendors.txt to delven.txt.
v6.1 - In the next update, they changed deletevendors.txt to delven.txt.
The following user variables are used in the script:
$ 7z - Path to 7z.exe
$ downloadpath - Path to download, folders are created automatically. In this example - “C: \ inetpub \ wwwroot”
$ serverurl - Comodo server from which
$ inis is downloaded - Update branch, more on that below
$ proto - Recognition version
$ xx - Bit rate for download (“x32”, “x64” ), you can specify only one
$ cispacked - Download packaged (* .7z) updates or not. Possible values: $ True or $ False
$ avpacked - Download packaged (* .cav.z) databases. Possible Values: $ True or $ False
$ release_notes- Download Release Notes. Possible values: $ True or $ False.
Regarding the program update branches: to version 8.2.0.4508 inclusive, inis_4010 is used, then any existing one, for example 4080, is used. That is, if you need to update clients of versions 8 and lower, then you need to download inis_4010 ($ inis = "4010", $ proto = "6") and actual ($ inis = "4080", $ proto = "10"). Thus, I managed to upgrade from v6 to the current v10 with two reboots without any problems.
To facilitate administration, the script has 3 launch options:
cis - download
av program update - download
av-clean databases - delete obsolete databases
It remains only to add tasks with a given frequency to the Task Scheduler.
Add Example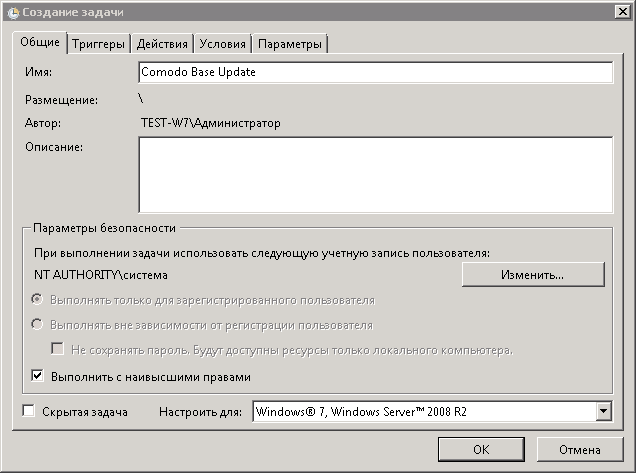
3) Configure IIS
In this example, the Default Web Site, created automatically, will be used.
For debugging, I recommend turning on “View Directory”. To do this, select the site you want, go to the "View Directory" menu and click "Enable" on the right side.
To correctly download updates, you need to configure MIME Types: in the corresponding menu item you need to add file extensions and assign them type application / octet-stream .
MIME Types for Packaged Updates
.ini
.7z
.7z
MIME Types for Unpacked Updates
.xml
.ini
.dat
.lang
.set
.theme
.sys
.cav
.ini
.dat
.lang
.set
.theme
.sys
.cav
4) Rewrite module
Installing the Rewrite 2.1 URL module is trivial. This module is required to redirect to the desired inis_ branch.
After installation, you must re-open IIS Manager, otherwise the corresponding menu item will not be visible. To configure, go to the "URL rewriting" item and add an empty rule for incoming traffic with the following contents:
Name: optional
Template:
(cis / download / updates / release / inis) _ [0-9] * / (. * )
Override URL:
{R: 1} _4080 / {R: 2}
In the last address, specify the numbers that are specified in the script in the variable $ inis .
Self-Test Image
If you need to update outdated versions, then you need to create another rule above.
Name: optional
Template:
(cis / download / updates / release / inis) _ [0-9] * / (. *)
Conditions (match any of the elements):
{REQUEST_URI},. * / Inis_40 [0-1] 0 /.* and {REQUEST_URI},. * / Inis_ [1-3] [0-9] * /. *
Override URL:
{R: 1} _4010 / {R: 2}
Stop processing subsequent rules
Self-Test Image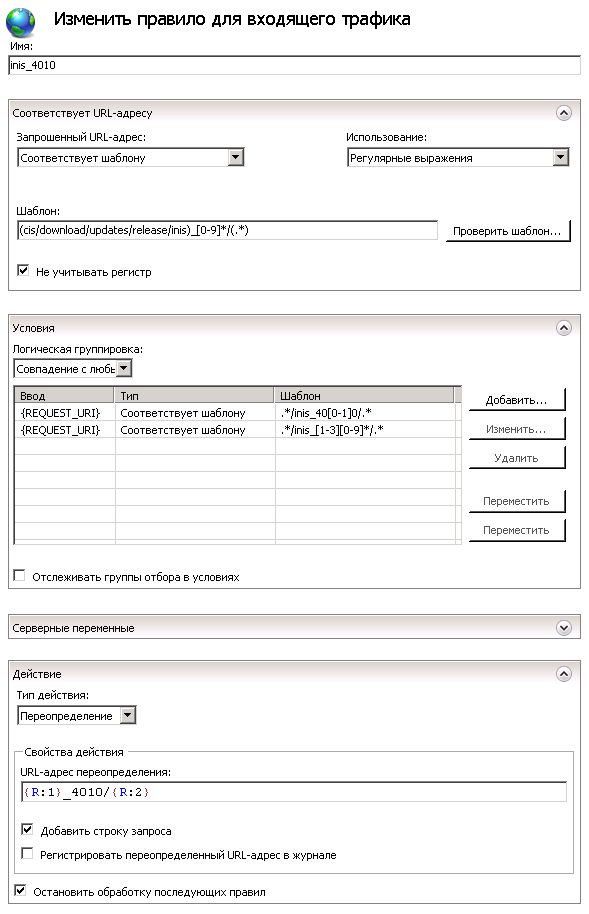
This completes the setup of the server side.
5) Configuring clients on a local server
The easiest way to do this is manually or through the registry. In the registry, the list of update servers is located at HKEY_LOCAL_MACHINE \ SOFTWARE \ COMODO \ CIS \ Options in the UpdateURL parameter .
For example, this parameter looks like this when setting up the av.local server and turning off the default server: av.local ! Https: //download.comodo.com/
As a result, you get a local Comodo update server and significantly reduce the load on the external channel.