Work with animation. AnimatedVectorDrawableCompat
In this article, I would like to tell everyone and show in practice how you can make animations in an Android application using AnimatedVectorDrawableCompat, for example, your custom buttons, ImageView, FloatingActionButton.
To date, there is not much information on this subject in the network, or rather, it is completely absent. All that I managed to find was the recent Google innovations presented, namely:
An article from the Android Developer Blog
Video from Google I / O 2016
Android Reference
This is essentially not enough to understand how to put into practice AnimatedVectorDrawableCompat.
Now let's proceed directly to the application.
At the first stage, we need to get rid of the fact that the framework turns the icon into .png. From version 23.3.0 you can use .xml and for this you need to add the following flag in the Gradle app level:
And add the latest version of AppComapt to the dependency:
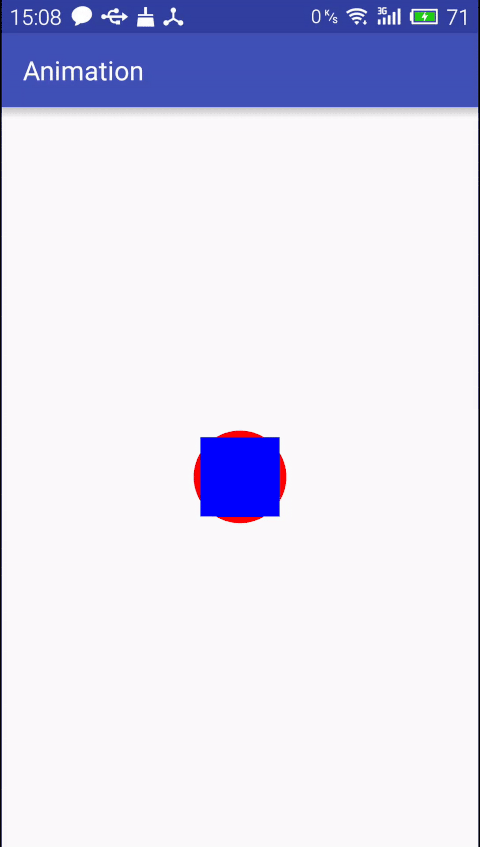
Further, in the example, I will use a square (blue), which will slightly cover its corners with a circle (red).
At the exit, we must use 2 objects and make them move continuously along the X (square) and Y (circle) axes, respectively.
Steps:
1)
Create a Drawable Resource File, name the file - icon.xml and put it in the drawable folder:
2)
To store the animation in our project, we create the animator folder - res / animator
In it we put two objects and name them accordingly:
a) circle.xml:
b) square.xml
Here we also indicated that the objects will move along the X and Y axis, from where they will start the movement, as well as the infinity of movements.
If you have more named groups that need to be animated - then in this directory you need to create them, respectively, and more groups will be in the main file - icon.xml
3)
Now we create a directly animated file that we will reference in layout or in code - res / drawable / anim_icon:
Note: Android Studio underlines animated-vector in red (if the min.version of the project is less than 21), but if you connected the flag, as indicated at the beginning, everything will work.
4)
Now we can access animated vectors in xml. It could be - ImageView, ImageButton, FloatingActinonButton:
5)
We turn from the code to the vectors. Here I also hung an OnClickListener and saved the state during the flip:
Note: do not forget to tighten the dependency:
The result of the work done:
PS
Recently, it was possible to combine the files my_vector.xml and anim_vector into one anim_vector (now a separate file res / drawable / my_vector.xml is not needed), as well as add here animator files (objectAnimator) this way we get one file on the whole animation.
They introduced it to Google on I / O, but unfortunately it doesn’t work. The video from 14 minutes talking about it.
To date, there is not much information on this subject in the network, or rather, it is completely absent. All that I managed to find was the recent Google innovations presented, namely:
An article from the Android Developer Blog
Video from Google I / O 2016
Android Reference
This is essentially not enough to understand how to put into practice AnimatedVectorDrawableCompat.
Now let's proceed directly to the application.
At the first stage, we need to get rid of the fact that the framework turns the icon into .png. From version 23.3.0 you can use .xml and for this you need to add the following flag in the Gradle app level:
android {
    ...
    defaultConfig {
       ...
        vectorDrawables.useSupportLibrary = true
    }
}
And add the latest version of AppComapt to the dependency:
dependencies {
    ...
    compile 'com.android.support:appcompat-v7:23.4.0'
}
Further, in the example, I will use a square (blue), which will slightly cover its corners with a circle (red).
At the exit, we must use 2 objects and make them move continuously along the X (square) and Y (circle) axes, respectively.
Steps:
1)
Create a Drawable Resource File, name the file - icon.xml and put it in the drawable folder:
<?xml version="1.0" encoding="utf-8"?><vectorxmlns:android="http://schemas.android.com/apk/res/android"android:width="120dp"android:height="120dp"android:viewportWidth="24.0"android:viewportHeight="24.0"><groupandroid:name="circle"android:scaleX=".7"android:scaleY=".7"android:pivotX="12"android:pivotY="12"><pathandroid:fillColor="#ff0000 "android:pathData="M12,2C6.48,2 2,6.48 2,12s4.48,10 10,10 10,-4.48 10,-10S17.52,2 12,2z"/></group><groupandroid:name="square"android:scaleX="1"android:scaleY="1"android:pivotX="12"android:pivotY="12"><pathandroid:fillColor="#FF0000ff"android:pathData="M6,6h12v12H6z"/></group></vector>2)
To store the animation in our project, we create the animator folder - res / animator
In it we put two objects and name them accordingly:
a) circle.xml:
<?xml version="1.0" encoding="utf-8"?><setxmlns:android="http://schemas.android.com/apk/res/android"><objectAnimatorandroid:propertyName="translateX"android:valueType="floatType"android:valueFrom="0"android:valueTo="5"android:repeatMode="reverse"android:repeatCount="infinite"android:duration="250" /></set>b) square.xml
<?xml version="1.0" encoding="utf-8"?><setxmlns:android="http://schemas.android.com/apk/res/android"><objectAnimatorandroid:propertyName="translateY"android:valueType="floatType"android:valueFrom="0"android:valueTo="5"android:repeatMode="reverse"android:repeatCount="infinite"android:duration="250" /></set>Here we also indicated that the objects will move along the X and Y axis, from where they will start the movement, as well as the infinity of movements.
If you have more named groups that need to be animated - then in this directory you need to create them, respectively, and more groups will be in the main file - icon.xml
3)
Now we create a directly animated file that we will reference in layout or in code - res / drawable / anim_icon:
<?xml version="1.0" encoding="utf-8"?><animated-vectorxmlns:android="http://schemas.android.com/apk/res/android"android:drawable="@drawable/icon"><targetandroid:name="square"android:animation="@animator/square" /><targetandroid:name="circle"android:animation="@animator/circle" /></animated-vector>Note: Android Studio underlines animated-vector in red (if the min.version of the project is less than 21), but if you connected the flag, as indicated at the beginning, everything will work.
4)
Now we can access animated vectors in xml. It could be - ImageView, ImageButton, FloatingActinonButton:
<LinearLayout...xmlns:app="http://schemas.android.com/apk/res-auto"/><ImageViewapp:srcCompat="@drawable/anim_icon"... /></LinearLayout>5)
We turn from the code to the vectors. Here I also hung an OnClickListener and saved the state during the flip:
staticfinal String STATE_ANIM = "isAnim";
    boolean mIsAnim;
    AnimatedVectorDrawableCompat avd;
    @OverrideprotectedvoidonCreate(Bundle savedInstanceState){
        super.onCreate(savedInstanceState);
        setContentView(R.layout.activity_main);
        ImageView imageView = (ImageView) findViewById(R.id.imageView);
        if (imageView != null) {
            Drawable drawable = imageView.getDrawable();
            avd = (AnimatedVectorDrawableCompat) drawable;
            if (savedInstanceState != null) {
                mIsAnim = savedInstanceState.getBoolean(STATE_ANIM);
                if (mIsAnim) {
                    avd.start();
                }
            }
            imageView.setOnClickListener(new View.OnClickListener() {
                @OverridepublicvoidonClick(View v){
                        if (avd.isRunning()) {
                            avd.stop();
                            mIsAnim = false;
                        }
                        avd.start();
                        mIsAnim = true;
                }
            });
        }
    }
    @OverridepublicvoidonSaveInstanceState(Bundle outState){
        super.onSaveInstanceState(outState);
        outState.putBoolean(STATE_ANIM, mIsAnim);
    }
}
Note: do not forget to tighten the dependency:
import android.support.graphics.drawable.AnimatedVectorDrawableCompat;
The result of the work done:
PS
Recently, it was possible to combine the files my_vector.xml and anim_vector into one anim_vector (now a separate file res / drawable / my_vector.xml is not needed), as well as add here animator files (objectAnimator) this way we get one file on the whole animation.
They introduced it to Google on I / O, but unfortunately it doesn’t work. The video from 14 minutes talking about it.