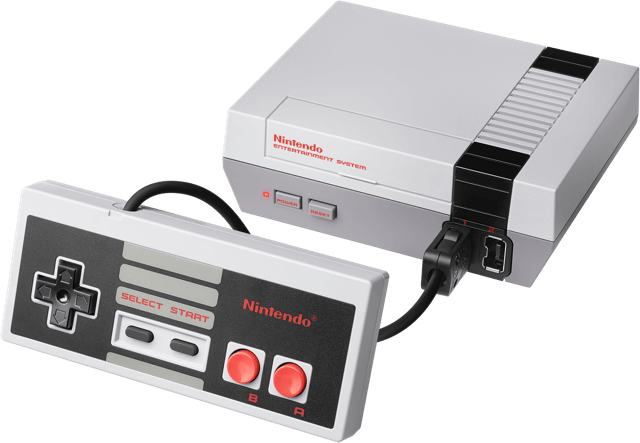
We pump NES Classic Mini - continued
In February, I wrote an article about how Russian enthusiasts “cracked” the NES Classic Mini console , how we engaged in its reverse engineering, and how I wrote an application so that everyone could easily upload their games to it in just a couple of clicks.
Today I will write a continuation of this story, because in six months we have made much more substantial progress in this matter.
As usual, under the cut my story is both in modern video form and in the form of a traditional article.
The first turning point came when a person under the pseudonym madmonkey (if anyone doesn’t remember, he is the author of the hack) was able to compile RetroArch emulator for NES Mini . More precisely, this is not an emulator, but a multi-platform shell based on Libretro to run other emulators that are installed in the form of modules. Thanks to this, on the NES Mini you can now run not only any games for NES, regardless of the mappers, but also games from other consoles: SNES, Sega Mega Drive, Gameboy, Gameboy Advance and even simple games with Nintendo 64. Even emulation of the cartridge works, which I developed it myself if I compile the fceux emulator module with my add-ons. The magic of Open Source.
Of course, the emergence of such opportunities was accompanied by a bunch of new problems and challenges. For example, I really wanted the emulation through RetroArch to start not from its own menu, but also from the NES Mini shell.

I already said that for each game in the config, the executable file that needs to be run and the command line parameters are simply indicated. But in addition to this, the native NES Mini emulator interacts with the shell, namely it allows you to go to the menu, save and change settings. I wanted all these features to be preserved when using RetroArch. So that the user could not even understand that a third-party emulator is used.
This required some research into how the shell in the NES Mini works. However, everything turned out to be banal and simple. In fact, when during the game you press the button to display the menu, the emulation does not pause. The shell kills the emulator process, and the emulator, upon exiting, saves the game in a temporary file and takes a screenshot. The shell picks up these temporary files and shows this as a paused game that can be saved. In this case, temporary files are simply copied to the permanent memory.
As for the settings, they are all just passed in command line options.
It turns out that the task is very simple: you need to write a script to launch RetroArch, which will parse the parameters from the NES Mini shell, start emulation, kill the emulator by a signal from the shell, while maintaining the game in the right place and taking a screenshot.
However, there were some crutches. If RetroArch can do automatic save, then with the creation of a screenshot at the exit, everything is not so simple. Yes, RetroArch has the option to take screenshots of the save. But it does not apply to automatic save. I decided to get a screenshot with an alternative method. On Linux, the framebuffer that contains the screen image is accessible via the pseudo-file " / dev / fb0". You only need to somehow read the data from it and save it as a PNG file. Fortunately, I quickly found a ready-made utility for this, which is called“ fbgrab ”. To my great surprise, I was able to compile it under NES Mini myself , but the screenshots obtained with its help were somehow strange. For some reason, in the NES Mini framebuffer, almost all useful pixels have a 100% transparency level. I had to modify this utility so that it ignored transparency:
And where can there be transparency in the screenshot? Hope someone will explain this to me in the comments.
Soon everything worked, though the aspect ratios of the screenshots were a little wrong, because the shell was designed to receive a screenshot in a ratio of four to three, and not sixteen to nine, but this was again decided by a simple refinement of the utility. Well or not so simple. I did an automatic aspect ratio detection.
Alas, I could not find a full replacement for the retro filter, which is in the original emulator, and which very realistically creates an imitation of a CRT TV. I don’t like such filters, but in this case it looks really amazing and very realistic, I haven’t seen anything like it anywhere else. Therefore, if possible, I still give priority to the original NES Mini emulator, but it does not launch all games.
Let me remind you that inside each ".nes" file with the game contains a header, it describes the hardware that was inside the original cartridge. The emulator must emulate not only the console itself, but also this hardware. The original NES Mini emulator emulates only the most popular cartridge options, while RetroArch can launch almost everything thanks to the modules. I added code to the RetroArch startup script that reads the header of the NES file through the hexdump utility, parses it and automatically decides which emulator to run - the original or RetroArch:
As a result, the user generally does not need to worry about the compatibility of NES games. If the native NES Mini emulator does not support the game, RetroArch will start automatically. If necessary, you can force the emulator to be selected through a special command line parameter.
However, there were more serious tasks ahead. How to allow users to easily install emulator and modules? madmonkey suggested developing a universal mod system that would be compatible with both his hakchi and my hakchi2, and at the same time would allow installing various hacks on the NES Mini as flexible as plugins: from common skins to emulators and alternative shells.
It was a series of sleepless nights when madmonkey and I sat in the IRC and discussed how best to do everything. At the same time, he wrote a very beautiful code, and I tested it, found errors and fixed them using my terrible code. Then he replaced my curve code with his own, after which everything was repeated again. This went on for a week, as a result, the mod system was ready.
We agreed that the modules should have the extension “.hmod”, while being in fact “.tar.gz” archives that contain the necessary files and scripts that are executed during installation and uninstallation. At the same time, a set of functions for copying and replacing files was implemented in hakchi itself. Later, I wrote a detailed guide on creating mods with examples, starting with banal editing the interface and right up to putting the password on your NES Mini, you can read it on GitHub:
github.com/ClusterM/hakchi2/wiki/Modifications-and -modules-guide (in English).
All this allowed the community to participate in the creation and distribution of a variety of modifications. So the skins and modules for translating Famikom into English soon began to appear on the network, and much more. By the way, madmonkey made it very easy to turn the NES Mini into the Famicom Mini, as well as the other way around. I transferred part of the hakchi2 functionality to the modules like extended fonts and controller drivers. And of course, the very first mod introduced to the public was the RetroArch emulator described above and its plugins for emulating different consoles. We must pay tribute to the man with the nickname pcm720, who took the responsibility to develop the mod project further, I even gave him full rights on GitHub. It's great when there are such people, because it is difficult to follow several projects at once, but I wanted to continue working on hakchi2.
RetroArch mod on GitHub: github.com/ClusterM/retroarch-clover
By the way, hakchi2, of course, had to be modified as well. And if everything is clear with the installation and removal of modules, then with games everything was not entirely clear. I really didn’t want to add support for games from platforms other than NES directly to hakchi2. Still, this is a non-standard chip, added by a separate mod, which is not included in the kit. However, a huge community of users really wanted this, and even with icons, covers and other chips. So I gave up. Made a separate class for each console with its own characteristics. and the man under the nickname NeoRame drew a bunch of cool pictures for each console, for which many thanks to him.
And then there was the most interesting. When people began to record hundreds of different games from different platforms, constantly adding or removing something, they ran into the problem that every time, even when adding just one game, it was necessary to download all the games again. After all, as I already said in a previous article, we do not have any feedback from the console. We just take a bunch of games, a script to install them and run this thing on the NES Mini, assuming that already installed games should be deleted, and new ones should be installed. We have no way of knowing which games are already installed.
Similarly, without a UART cable, there is no way to get any files from the system. You can’t even save your save from there. You can’t even see why they dirtied up their system, that there is not enough space there, which is really bad.
In general, we began to think how to solve this problem. madmonkey, for example, suggested writing the necessary information to separate areas of flash memory, and then reading them from there through the FEL mode, but I considered this option as the most extreme.
Reflecting on this task, I gradually continued to study the device of the NES Mini system and noticed that in startup it was worth launching a USB gadget called “clover”. Obviously, this is something developed by Nintendo itself. Under the GPL, the source code of the module must be publicly available. That's right, I found it among the Linux kernel sources on the Nintendo website . Just one small file ...
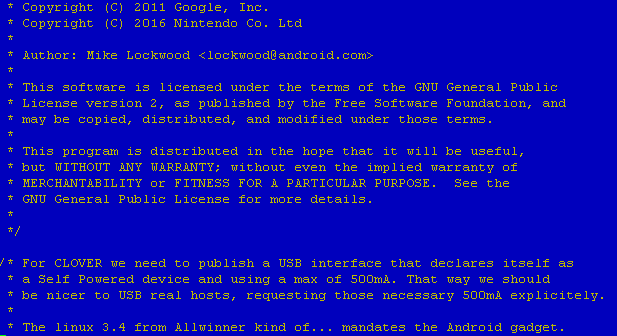
Judging by the comments, its main purpose is to request a large current consumption from USB. Logically, this is so that the console can be powered not only from mobile chargers, but also from a computer. That is why the computer defines the NES Mini as a device. What else is there?
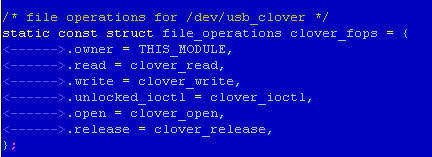
Suddenly, a USB data input / output code. And the code for working with a pseudo file. I checked - this pseudo file really is on the NES Mini.
At this moment, I was torn by contradiction and misunderstanding. On the one hand, I see that this should work. In theory. On the other hand, I cannot believe that no one had thought of this before me. And if this is true, have we really used such crutches in vain for so long? I quickly sketched a program for a computer that writes data to USB. And I successfully read them from this pseudo file. As well as vice versa. It works.
Over the next few days, I recalled my long-forgotten programming skills for Linux and wrote a daemon that runs on the NES Mini and allows us to directly access the console and execute commands via USB, redirecting USB input / output streams. For the computer, the client wrote:
github.com/ClusterM/clovershell-client
Using it, you can dump all the original firmware with one simple command:
Later I completely adapted hakchi2 to the new data transfer method. As a result, to download games, you no longer need to clamp the reset, and the transfer is very, very fast. Literally in a minute all memory will be filled. Previously, this took half an hour, and it was necessary to split the process into several calls, and large files could not be transferred at all. I don’t know why Nintendo left this functionality, but it helped us a lot.
Soon, on the basis of all this, a game save manager, the ability to take screenshots and even an FTP server appeared in hakchi2. Yes, I took a ready-made FTP server library, where work with the file system was implemented as a separate abstraction, and simply wrote a class that redirects all operations with files to USB. As a result, we connect via FTP to localhost and see the files that are inside the NES Mini. Needless to say, how much this facilitated the work of the creators of mods. UART-cable, even I stopped using it without special need.
The moral of this story is this: if no one has yet done what seems easy and obvious to you, do not stop. You are very likely to really do this. There are millions of people in the world who can do awesome things, but don’t do it just because they don’t believe in themselves. They do not believe that others would not do it if they could. And sometimes it’s enough just to start.
In the future, there were many more minor corrections and improvements, which there is no point in talking about. I’ll tell you about the most interesting.
I was able to figure out why many third-party controllers designed for Wii did not work with the NES Mini, despite the same connector and protocol. I didn’t have such, but they often complained about the problem.
Firstly, it turns out that Classic Controller has two data transfer formats. And they can be chosen. On the Internet, only one is described everywhere:

And in many third-party controllers, only it is implemented. The driver of clovercon controllers (I recall that its sources are also publicly available) uses a different format, which has more bit depth and accuracy of analog sticks. Very ironic, because the NES Mini does not initially use analogues.
Secondly, in the clovercon code of the driver on the NES Mini there is protection against power disturbances that are inherent when not powered by batteries. He checks that all unused data in the controller’s memory is equal to zero, although on many Chinese controllers they are clogged with FFs.
All this was decided by finalizing the driver. But still there were very, very Chinese controllers who did not want to work. And the problem was hardware, apparently. To solve this riddle, two people at once sent me their controllers for testing. Thanks for this to Vladimir Kondratenko and keithelmcity from the GBATemp website. The answer was simple - just pull up the SDA and SCL lines with two power resistors. This is required by the I²C protocol that is used in these controllers. The Chinese saved a couple of resistors. Alas, fixing this is not as simple as updating the program, but so many users were able to do it themselves without any problems. Fortunately, probably even the one who holds the soldering iron for the first time can solder two resistors.
When I was already tired of bothering with this project, and plans for further development were almost over, I finally shared a table with lines from the program for people, and almost two dozen people from different parts of the world translated it into their languages. You know, this is a very strange feeling when you work on a program for a long time, and then you see it in French, German, Spanish, Italian, Greek and even a bunch of different languages: It is

perceived as something native and foreign at the same time.
I still had some ideas and plans. For example, connect the SD card to the free contacts that are inside the NES Mini. But I really do not like to be engaged in any one project for a long time, and the people’s interest has already faded away. So I’ll probably make further changes only after the release of SNES Mini, if it is cracked.
hakchi2 on github: github.com/ClusterM/hakchi2
Today I will write a continuation of this story, because in six months we have made much more substantial progress in this matter.
As usual, under the cut my story is both in modern video form and in the form of a traditional article.
Video
Article
More emulators
The first turning point came when a person under the pseudonym madmonkey (if anyone doesn’t remember, he is the author of the hack) was able to compile RetroArch emulator for NES Mini . More precisely, this is not an emulator, but a multi-platform shell based on Libretro to run other emulators that are installed in the form of modules. Thanks to this, on the NES Mini you can now run not only any games for NES, regardless of the mappers, but also games from other consoles: SNES, Sega Mega Drive, Gameboy, Gameboy Advance and even simple games with Nintendo 64. Even emulation of the cartridge works, which I developed it myself if I compile the fceux emulator module with my add-ons. The magic of Open Source.
Of course, the emergence of such opportunities was accompanied by a bunch of new problems and challenges. For example, I really wanted the emulation through RetroArch to start not from its own menu, but also from the NES Mini shell.
I already said that for each game in the config, the executable file that needs to be run and the command line parameters are simply indicated. But in addition to this, the native NES Mini emulator interacts with the shell, namely it allows you to go to the menu, save and change settings. I wanted all these features to be preserved when using RetroArch. So that the user could not even understand that a third-party emulator is used.
This required some research into how the shell in the NES Mini works. However, everything turned out to be banal and simple. In fact, when during the game you press the button to display the menu, the emulation does not pause. The shell kills the emulator process, and the emulator, upon exiting, saves the game in a temporary file and takes a screenshot. The shell picks up these temporary files and shows this as a paused game that can be saved. In this case, temporary files are simply copied to the permanent memory.
As for the settings, they are all just passed in command line options.
It turns out that the task is very simple: you need to write a script to launch RetroArch, which will parse the parameters from the NES Mini shell, start emulation, kill the emulator by a signal from the shell, while maintaining the game in the right place and taking a screenshot.
However, there were some crutches. If RetroArch can do automatic save, then with the creation of a screenshot at the exit, everything is not so simple. Yes, RetroArch has the option to take screenshots of the save. But it does not apply to automatic save. I decided to get a screenshot with an alternative method. On Linux, the framebuffer that contains the screen image is accessible via the pseudo-file " / dev / fb0". You only need to somehow read the data from it and save it as a PNG file. Fortunately, I quickly found a ready-made utility for this, which is called“ fbgrab ”. To my great surprise, I was able to compile it under NES Mini myself , but the screenshots obtained with its help were somehow strange. For some reason, in the NES Mini framebuffer, almost all useful pixels have a 100% transparency level. I had to modify this utility so that it ignored transparency:
	/* ALPHA */
        outbuffer[(i<<2)+Alpha] = /*srcAlpha >= 0 ? inbuffer[i*4+srcAlpha] :*/ 0;
And where can there be transparency in the screenshot? Hope someone will explain this to me in the comments.
Soon everything worked, though the aspect ratios of the screenshots were a little wrong, because the shell was designed to receive a screenshot in a ratio of four to three, and not sixteen to nine, but this was again decided by a simple refinement of the utility. Well or not so simple. I did an automatic aspect ratio detection.
Alas, I could not find a full replacement for the retro filter, which is in the original emulator, and which very realistically creates an imitation of a CRT TV. I don’t like such filters, but in this case it looks really amazing and very realistic, I haven’t seen anything like it anywhere else. Therefore, if possible, I still give priority to the original NES Mini emulator, but it does not launch all games.
Let me remind you that inside each ".nes" file with the game contains a header, it describes the hardware that was inside the original cartridge. The emulator must emulate not only the console itself, but also this hardware. The original NES Mini emulator emulates only the most popular cartridge options, while RetroArch can launch almost everything thanks to the modules. I added code to the RetroArch startup script that reads the header of the NES file through the hexdump utility, parses it and automatically decides which emulator to run - the original or RetroArch:
supported_mappers="0 1 2 3 4 5 7 9 10 86 87 184"
emulator=retroarch
args=$@
filename=$1
extension=${filename##*.}
if [ "$extension" == "nes" ]; then
  header=$(hexdump -v -n 8 -e '1/1 "%02X"' "$filename")
  mapper=$((0x${header:14:1}${header:12:1}))
  fourscreen=$(expr $((0x${header:13:1})) / 8)
  echo mapper: $mapper
  echo four-screen: $fourscreen
  for m in $supported_mappers; do
    [ "$m" == "$mapper" ] && emulator=kachikachi
  done
  [ "$fourscreen" == "1" ] && emulator=retroarch
fi
As a result, the user generally does not need to worry about the compatibility of NES games. If the native NES Mini emulator does not support the game, RetroArch will start automatically. If necessary, you can force the emulator to be selected through a special command line parameter.
Mod system
However, there were more serious tasks ahead. How to allow users to easily install emulator and modules? madmonkey suggested developing a universal mod system that would be compatible with both his hakchi and my hakchi2, and at the same time would allow installing various hacks on the NES Mini as flexible as plugins: from common skins to emulators and alternative shells.
It was a series of sleepless nights when madmonkey and I sat in the IRC and discussed how best to do everything. At the same time, he wrote a very beautiful code, and I tested it, found errors and fixed them using my terrible code. Then he replaced my curve code with his own, after which everything was repeated again. This went on for a week, as a result, the mod system was ready.
We agreed that the modules should have the extension “.hmod”, while being in fact “.tar.gz” archives that contain the necessary files and scripts that are executed during installation and uninstallation. At the same time, a set of functions for copying and replacing files was implemented in hakchi itself. Later, I wrote a detailed guide on creating mods with examples, starting with banal editing the interface and right up to putting the password on your NES Mini, you can read it on GitHub:
github.com/ClusterM/hakchi2/wiki/Modifications-and -modules-guide (in English).
All this allowed the community to participate in the creation and distribution of a variety of modifications. So the skins and modules for translating Famikom into English soon began to appear on the network, and much more. By the way, madmonkey made it very easy to turn the NES Mini into the Famicom Mini, as well as the other way around. I transferred part of the hakchi2 functionality to the modules like extended fonts and controller drivers. And of course, the very first mod introduced to the public was the RetroArch emulator described above and its plugins for emulating different consoles. We must pay tribute to the man with the nickname pcm720, who took the responsibility to develop the mod project further, I even gave him full rights on GitHub. It's great when there are such people, because it is difficult to follow several projects at once, but I wanted to continue working on hakchi2.
RetroArch mod on GitHub: github.com/ClusterM/retroarch-clover
By the way, hakchi2, of course, had to be modified as well. And if everything is clear with the installation and removal of modules, then with games everything was not entirely clear. I really didn’t want to add support for games from platforms other than NES directly to hakchi2. Still, this is a non-standard chip, added by a separate mod, which is not included in the kit. However, a huge community of users really wanted this, and even with icons, covers and other chips. So I gave up. Made a separate class for each console with its own characteristics. and the man under the nickname NeoRame drew a bunch of cool pictures for each console, for which many thanks to him.
Could be easier
And then there was the most interesting. When people began to record hundreds of different games from different platforms, constantly adding or removing something, they ran into the problem that every time, even when adding just one game, it was necessary to download all the games again. After all, as I already said in a previous article, we do not have any feedback from the console. We just take a bunch of games, a script to install them and run this thing on the NES Mini, assuming that already installed games should be deleted, and new ones should be installed. We have no way of knowing which games are already installed.
Similarly, without a UART cable, there is no way to get any files from the system. You can’t even save your save from there. You can’t even see why they dirtied up their system, that there is not enough space there, which is really bad.
In general, we began to think how to solve this problem. madmonkey, for example, suggested writing the necessary information to separate areas of flash memory, and then reading them from there through the FEL mode, but I considered this option as the most extreme.
Reflecting on this task, I gradually continued to study the device of the NES Mini system and noticed that in startup it was worth launching a USB gadget called “clover”. Obviously, this is something developed by Nintendo itself. Under the GPL, the source code of the module must be publicly available. That's right, I found it among the Linux kernel sources on the Nintendo website . Just one small file ...
Judging by the comments, its main purpose is to request a large current consumption from USB. Logically, this is so that the console can be powered not only from mobile chargers, but also from a computer. That is why the computer defines the NES Mini as a device. What else is there?
Suddenly, a USB data input / output code. And the code for working with a pseudo file. I checked - this pseudo file really is on the NES Mini.
At this moment, I was torn by contradiction and misunderstanding. On the one hand, I see that this should work. In theory. On the other hand, I cannot believe that no one had thought of this before me. And if this is true, have we really used such crutches in vain for so long? I quickly sketched a program for a computer that writes data to USB. And I successfully read them from this pseudo file. As well as vice versa. It works.
Over the next few days, I recalled my long-forgotten programming skills for Linux and wrote a daemon that runs on the NES Mini and allows us to directly access the console and execute commands via USB, redirecting USB input / output streams. For the computer, the client wrote:
github.com/ClusterM/clovershell-client
Using it, you can dump all the original firmware with one simple command:
clovershell exec "dd if=/dev/mapper/root-crypt | gzip" > dump.img.gzLater I completely adapted hakchi2 to the new data transfer method. As a result, to download games, you no longer need to clamp the reset, and the transfer is very, very fast. Literally in a minute all memory will be filled. Previously, this took half an hour, and it was necessary to split the process into several calls, and large files could not be transferred at all. I don’t know why Nintendo left this functionality, but it helped us a lot.
Soon, on the basis of all this, a game save manager, the ability to take screenshots and even an FTP server appeared in hakchi2. Yes, I took a ready-made FTP server library, where work with the file system was implemented as a separate abstraction, and simply wrote a class that redirects all operations with files to USB. As a result, we connect via FTP to localhost and see the files that are inside the NES Mini. Needless to say, how much this facilitated the work of the creators of mods. UART-cable, even I stopped using it without special need.
The moral of this story is this: if no one has yet done what seems easy and obvious to you, do not stop. You are very likely to really do this. There are millions of people in the world who can do awesome things, but don’t do it just because they don’t believe in themselves. They do not believe that others would not do it if they could. And sometimes it’s enough just to start.
In the future, there were many more minor corrections and improvements, which there is no point in talking about. I’ll tell you about the most interesting.
Improved support for third-party controllers
I was able to figure out why many third-party controllers designed for Wii did not work with the NES Mini, despite the same connector and protocol. I didn’t have such, but they often complained about the problem.
Firstly, it turns out that Classic Controller has two data transfer formats. And they can be chosen. On the Internet, only one is described everywhere:
And in many third-party controllers, only it is implemented. The driver of clovercon controllers (I recall that its sources are also publicly available) uses a different format, which has more bit depth and accuracy of analog sticks. Very ironic, because the NES Mini does not initially use analogues.
Secondly, in the clovercon code of the driver on the NES Mini there is protection against power disturbances that are inherent when not powered by batteries. He checks that all unused data in the controller’s memory is equal to zero, although on many Chinese controllers they are clogged with FFs.
All this was decided by finalizing the driver. But still there were very, very Chinese controllers who did not want to work. And the problem was hardware, apparently. To solve this riddle, two people at once sent me their controllers for testing. Thanks for this to Vladimir Kondratenko and keithelmcity from the GBATemp website. The answer was simple - just pull up the SDA and SCL lines with two power resistors. This is required by the I²C protocol that is used in these controllers. The Chinese saved a couple of resistors. Alas, fixing this is not as simple as updating the program, but so many users were able to do it themselves without any problems. Fortunately, probably even the one who holds the soldering iron for the first time can solder two resistors.
Other
When I was already tired of bothering with this project, and plans for further development were almost over, I finally shared a table with lines from the program for people, and almost two dozen people from different parts of the world translated it into their languages. You know, this is a very strange feeling when you work on a program for a long time, and then you see it in French, German, Spanish, Italian, Greek and even a bunch of different languages: It is
perceived as something native and foreign at the same time.
I still had some ideas and plans. For example, connect the SD card to the free contacts that are inside the NES Mini. But I really do not like to be engaged in any one project for a long time, and the people’s interest has already faded away. So I’ll probably make further changes only after the release of SNES Mini, if it is cracked.
hakchi2 on github: github.com/ClusterM/hakchi2