Translation of the Appium Essentials book. Chapter 5
- Tutorial
Hey. We continue to translate the Appium Essentials book and the study of mobile automation. What has already been completed:
In this chapter, we move on to application automation:
There is a lot of code ahead. Go!
Before launching Appium, let's make sure that all the necessary software is installed:
Requirements for Android:
Requirements for iOS:
When working with Appium, you need to install the desired capabilities and initiate the Android / iOS driver.
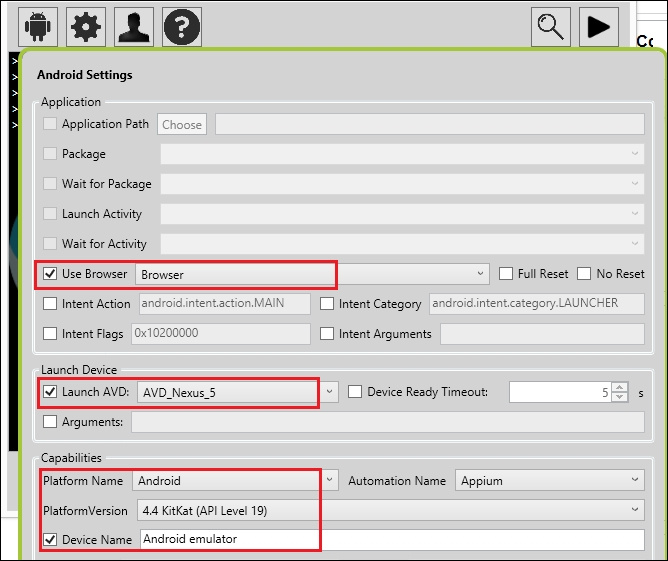
There are two ways to set desired capabilities: through the Appium GUI and by initiating the desired capabilities object. The desired capabilities object is preferred. Let's consider both options: Below are the Android settings in the Appium GUI for native and hybrid applications:

How to configure:
Now about the Android settings in the Appium GUI for web applications:
How to configure:
Now about the second method of forming DC.
In the first chapter, we already discussed what the desired capabilities are and why they are needed, so here we will immediately plunge into the code [at the end !! 1!]. First of all, you need to import the packages:
Then, create the desired capabilities (for native and hybrid):
In web applications on Android, some options are not needed. For example APP, APP PACKAGE and APP ACTIVITY, because we launch the browser.
First, you need to import the packages:
Then, create the desired capabilities (for the web):
In terms of desired capabilities, we did everything. Now you need to initiate the Android driver and connect it to the Appium server.
Again you need to import the packages:
Then, initialize the Android driver:
This line will launch the application on the emulator, using those settings that were set in the desired capabilities.
Well, now you can create a blank for the test using TestNG:
As on Android, you can set desired capabilities in two ways.
Settings for native and hybrid applications:
Settings for web applications:
What DCs are and why, we discussed in Chapter 1, so let's get right to the code. First, import packages:
Then, create the desired capabilities (for native and hybrid):
Package Import:
Now install the desired capacities for the web application:
It remains to initialize the iOS driver.
Import:
Initialization:
Now you can write a test using TestNG:
Below is an example of Android calculator automation. In the example, we are trying to add two numbers.
Below is an example of working with the TestApp application; it can be downloaded from here . After downloading, unzip it.
In this example, we will try to add two numbers:
Take the Google search page as an example. We will use the native Android browser for work:
Take the Google search page as an example. For work, we will use the native Safari browser:
For study, we use testApp. It can be downloaded from here . Before working with hybrid applications, you need to follow the instructions .
Here we take, for example, WebViewApp. You can download from here . After downloading, unzip the application:
That's all. In the next chapter, we will look at the features of working with real devices
- Chapter 1, in which we understand what is here and how
- Chapter 2 on installing and configuring everything you need to work
- Chapter 3, where we learn what the Appium GUI is.
- Chapter 4 on how to localize elements in a mobile application
In this chapter, we move on to application automation:
- Automation of native applications
- Hybrid Automation
- Work with web applications and native browsers
- Work with web applications and Safari
There is a lot of code ahead. Go!
Before start
Before launching Appium, let's make sure that all the necessary software is installed:
Requirements for Android:
- Java (version 7 and higher)
- Android SDK API (version 17 and higher)
- Emulator
- Eclipse [or Idea]
- Testng
- Appium server
- Appium Client Library (Java)
- Selenium Server and WebDriver java library
- APK of the application under test
Requirements for iOS:
- Mac OS 10.7 and higher
- Xcode (version 4.6.3 and higher; 5.1 recommended)
- Simulator
- On the simulator is Safari
- Java version 7
- Eclipse [or Idea]
- Testng
- Appium server
- Appium Client Library (Java)
- Selenium Server and WebDriver java library
When working with Appium, you need to install the desired capabilities and initiate the Android / iOS driver.
Necessary desired capabilities for Android and running Android driver
There are two ways to set desired capabilities: through the Appium GUI and by initiating the desired capabilities object. The desired capabilities object is preferred. Let's consider both options: Below are the Android settings in the Appium GUI for native and hybrid applications:
How to configure:
- Open the Android settings in the Appium GUI.
- Specify the path to the application under test.
- Select a package from the list.
- Select from the list of activities to start.Note from the authorIf the application is already installed on the virtual device, steps 2-4 are not necessary. You need to transfer the APK information to the emulator for further work. How to do it:
- Run emulator
- Open a command prompt [on computer]
- Write
adb -e install <путь до apk> - Press Enter
- You should see a successful installation message.
- Turn on Launch AVD and select the emulator you created from the list [it is assumed that you have already created an emulator].
- Select PlatformVersion from the list.
- Turn on the Device Name and write “Android emulator”.
- Launch the Appium server.
Now about the Android settings in the Appium GUI for web applications:
How to configure:
- Open your Android settings.
- Turn on Launch AVD and select the emulator you created from the list [it is assumed that you have already created an emulator].
- Select PlatformVersion from the list.
- Turn on Use Browser and select a browser from the list.
- Turn on the Device Name and write “Android emulator”.
- Launch the Appium server.
Now about the second method of forming DC.
Desired capabilities for native and hybrid applications
In the first chapter, we already discussed what the desired capabilities are and why they are needed, so here we will immediately plunge into the code [at the end !! 1!]. First of all, you need to import the packages:
import java.io.File;
import org.openqa.selenium.remote.DesiredCapabilities;
import io.appium.java_client.remote.MobileCapabilityType;
Then, create the desired capabilities (for native and hybrid):
DesiredCapabilities caps = new DesiredCapabilities();//создаем объект
File app=new File("path of the apk");//создаем объект File, чтобы определить путь до apk
caps.setCapability(MobileCapabilityType.APP,app);//требуется, если приложение еще НЕ установлено на эмулятор.
caps.setCapability(MobileCapabilityType.PLATFORM_VERSION, "4.4");//указываем версию Android
caps.setCapability(MobileCapabilityType.PLATFORM_NAME, "Android");//Имя OS
caps.setCapability(MobileCapabilityType.DEVICE_NAME, "Android emulator");//Сообщаем, что будет использоваться эмулятор
caps.setCapability("avd","Name of the AVD to launch");//Указываем, какой конкретно эмулятор хотим запустить
caps.setCapability(MobileCapabilityType.APP_PACKAGE, "package name of your app (you can get it from apk info app)");//определяем package для запуска
caps.setCapability(MobileCapabilityType.APP_ACTIVITY, "Launch activity of your app (you can get it from apk info app)");//activity для запуска
Desired capabilities for web applications
In web applications on Android, some options are not needed. For example APP, APP PACKAGE and APP ACTIVITY, because we launch the browser.
First, you need to import the packages:
import org.openqa.selenium.remote.DesiredCapabilities;
import io.appium.java_client.remote.MobileCapabilityType;
Then, create the desired capabilities (for the web):
DesiredCapabilities caps = new DesiredCapabilities();//создаем объект
caps.setCapability(MobileCapabilityType.PLATFORM_VERSION, "4.4");//указываем версию Android
caps.setCapability(MobileCapabilityType.PLATFORM_NAME, "Android");//Имя OS
caps.setCapability(MobileCapabilityType.DEVICE_NAME, "Android emulator");//Сообщаем, что будет использоваться эмулятор
caps.setCapability("avd","Name of the AVD to launch");//Указываем, какой конкретно эмулятор хотим запустить
caps.setCapability(MobileCapabilityType.BROWSER_NAME, "Browser"); //для запуска браузера
In terms of desired capabilities, we did everything. Now you need to initiate the Android driver and connect it to the Appium server.
Again you need to import the packages:
import io.appium.java_client.android.AndroidDriver;
import java.net.URL;
Then, initialize the Android driver:
AndroidDriver driver = new AndroidDriver (new URL("http://127.0.0.1:4723/wd/hub"), caps); //caps был создан вышеThis line will launch the application on the emulator, using those settings that were set in the desired capabilities.
Well, now you can create a blank for the test using TestNG:
import io.appium.java_client.android.AndroidDriver;
import io.appium.java_client.remote.MobileCapabilityType;
import java.io.File;
import java.net.MalformedURLException;
import java.net.URL;
import java.util.concurrent.TimeUnit;
import org.openqa.selenium.remote.DesiredCapabilities;
import org.testng.annotations.AfterClass;
import org.testng.annotations.BeforeClass;
import org.testng.annotations.Test;
public class TestAppIication {
  AndroidDriver driver;
  @BeforeClass
  public void setUp() throws MalformedURLException{
  //Определяем desired capabilities
    DesiredCapabilities caps = new DesiredCapabilities();
    File app=new File("path of the apk");
    caps.setCapability(MobileCapabilityType.APP,app);
    caps.setCapability(MobileCapabilityType.PLATFORM_VERSION, "4.4");
    caps.setCapability(MobileCapabilityType.PLATFORM_NAME, "Android");
    caps.setCapability(MobileCapabilityType.DEVICE_NAME, "Android emulator");
    caps.setCapability("avd","Name of the AVD to launch");
    caps.setCapability(MobileCapabilityType.APP_PACKAGE, "package name of your app (you can get it from apk info app)");
    caps.setCapability(MobileCapabilityType.APP_ACTIVITY, "Launch activity of your app (you can get it from apk info app)");
    caps.setCapability(MobileCapabilityType.BROWSER_NAME, "Browser");// при работе с веб-приложением
    driver = new AndroidDriver (new URL("http://127.0.0.1:4723/wd/hub"), caps);
    driver.manage().timeouts().implicitlyWait(30,TimeUnit.SECONDS);
  }
  @Test
  public void testExample(){
  //здесь будет сам тест
  }
  @AfterClass
  public void tearDown(){
    driver.closeApp();//CloseApp() функция используется для закрытия нативного или гибридного приложения, а quit() и close() - для веба
  }
}
Required desired capabilities for iOS and running iOS driver
As on Android, you can set desired capabilities in two ways.
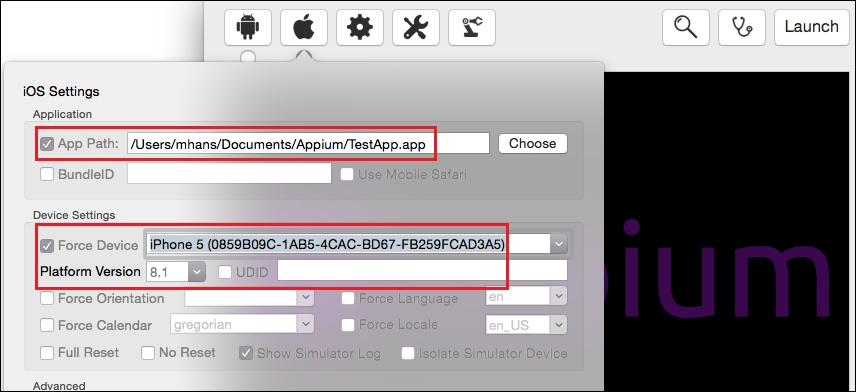
Settings for native and hybrid applications:
- Open iOS Settings
- Specify the path to the application under test
- Turn on Force Device and select a simulator from the list
- Select Platform Version from the list (or you can write yourself, for example 8.1)
- Launch Appium Server
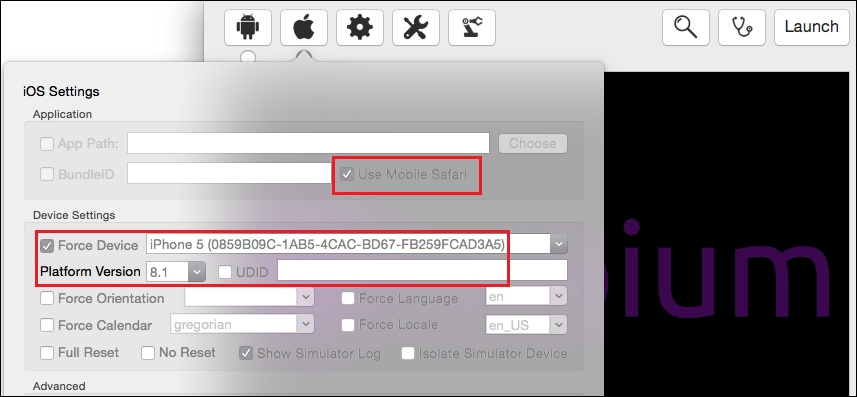
Settings for web applications:
- Open iOS Settings
- Select Use Mobile Safari
- Turn on Force Device and select a simulator from the list
- Select Platform Version from the list (or you can write yourself, for example 8.1)
- Launch Appium Server
Desired capabilities for native and hybrid applications
What DCs are and why, we discussed in Chapter 1, so let's get right to the code. First, import packages:
import java.io.File;
import org.openqa.selenium.remote.DesiredCapabilities;
import io.appium.java_client.remote.MobileCapabilityType;
Then, create the desired capabilities (for native and hybrid):
DesiredCapabilities caps = new DesiredCapabilities();//создаем объект
File app=new File("path of the app");//создаем объект File, чтобы определить путь до приложения
caps.setCapability(MobileCapabilityType.APP,app);//указываем путь до приложения
caps.setCapability(MobileCapabilityType.PLATFORM_VERSION, "8.1");//Версия iOS
caps.setCapability(MobileCapabilityType.PLATFORM_NAME, "iOS");//Имя OS
caps.setCapability(MobileCapabilityType.DEVICE_NAME, "iPhone 5");//Укажите корректное имя эмулятора или Appium сгенерирует исключение
Desired capabilities for web applications
Package Import:
import java.io.File;
import org.openqa.selenium.remote.DesiredCapabilities;
import io.appium.java_client.remote.MobileCapabilityType;
Now install the desired capacities for the web application:
DesiredCapabilities caps = new DesiredCapabilities();//создаем объект
caps.setCapability(MobileCapabilityType.PLATFORM_VERSION, "8.1");//Версия iOS
caps.setCapability(MobileCapabilityType.PLATFORM_NAME, "iOS");//Имя OS
caps.setCapability(MobileCapabilityType.DEVICE_NAME, "iPhone 5");//Укажите корректное имя эмулятора или Appium сгенерирует исключение
caps.setCapability(MobileCapabilityType.BROWSER_NAME, "Safari"); //Чтобы запустить Safari
It remains to initialize the iOS driver.
Import:
import io.appium.java_client.ios.IOSDriver;
import java.net.URL;
Initialization:
IOSDriver driver = new IOSDriver (new URL("http://127.0.0.1:4723/wd/hub"),caps);Now you can write a test using TestNG:
import io.appium.java_client.ios.IOSDriver;
import io.appium.java_client.remote.MobileCapabilityType;
import java.io.File;
import java.net.MalformedURLException;
import java.net.URL;
import java.util.concurrent.TimeUnit;
import org.openqa.selenium.remote.DesiredCapabilities;
import org.testng.annotations.AfterClass;
import org.testng.annotations.BeforeClass;
import org.testng.annotations.Test;
public class TestAppIication {
  IOSDriver driver;
  @BeforeClass
  public void setUp() throws MalformedURLException{
  //Задаем desired capabilities
    DesiredCapabilities caps = new DesiredCapabilities();
    File app=new File("path of the .app");
    caps.setCapability(MobileCapabilityType.APP,app);
    caps.setCapability(MobileCapabilityType.PLATFORM_VERSION, "8.1");
    caps.setCapability(MobileCapabilityType.PLATFORM_NAME, "iOS");
    caps.setCapability(MobileCapabilityType.DEVICE_NAME, "iPhone 5");
    caps.setCapability(MobileCapabilityType.BROWSER_NAME, "Safari");// при работе с веб-приложением
    driver = new IOSDriver (new URL("http://127.0.0.1:4723/wd/hub"), caps);
    driver.manage().timeouts().implicitlyWait(30,TimeUnit.SECONDS);
  }
  @Test
    public void testExample(){
    //здесь будет сам тест
  }
  @AfterClass
  public void tearDown(){
    driver.closeApp();//для нативных или гибридных приложений
    //driver.quit(); //для веб-приложений
  }
}
Automation of native applications
Android
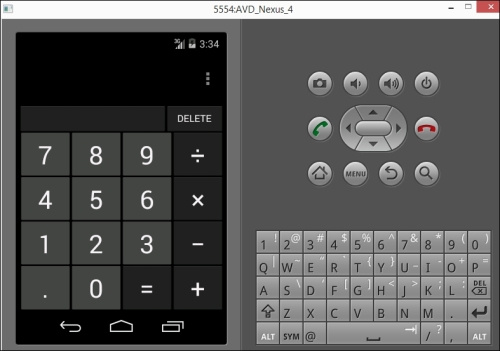
Below is an example of Android calculator automation. In the example, we are trying to add two numbers.
- Update your desired capabilities in the setup () method to run the calculator:
caps.setCapability("avd","AVD_Nexus_4");// Mention the created AVD name caps.setCapability(MobileCapabilityType.APP_PACKAGE, "com.android.calculator2"); caps.setCapability(MobileCapabilityType.APP_ACTIVITY, "com.android.calculator2.Calculator"); - Now you need to find two numbers. We will search for them by name:
WebElement five=driver.findElement(By.name("5")); WebElement four=driver.findElement(By.name("4")); - Also, you need to find the signs "+" and "="; We will search by AccessabilityID:
WebElement plus=driver.findElement(By.name("+")); WebElement equalTo=driver.findElementByAccessibilityId("equals")); - Now, click:
five.click(); plus.click(); four.click(); equalTo.click(); - Run your test using TestNG:
public class TestAppIication {
  AndroidDriver driver;
  @BeforeClass
  public void setUp() throws MalformedURLException{
    DesiredCapabilities caps = new DesiredCapabilities();
    caps.setCapability(MobileCapabilityType.PLATFORM_VERSION, "4.4");
    caps.setCapability(MobileCapabilityType.PLATFORM_NAME, "Android");
    caps.setCapability(MobileCapabilityType.DEVICE_NAME, "Android emulator");
    caps.setCapability("avd","AVD_Nexus_4");// Mention the created AVD name
    caps.setCapability(MobileCapabilityType.APP_PACKAGE, "com.android.calculator2");
    caps.setCapability(MobileCapabilityType.APP_ACTIVITY, "com.android.calculator2.Calculator");
    driver = new AndroidDriver (new URL("http://127.0.0.1:4723/wd/hub"), caps);
    driver.manage().timeouts().implicitlyWait(30,TimeUnit.SECONDS);
  }
  @Test
  public void testExample(){
    WebElement five=driver.findElement(By.name("5"));
    five.click();
    WebElement plus=driver.findElement(By.name("+"));
    plus.click();
    WebElement four=driver.findElement(By.name("4"));
    four.click();
    WebElement equalTo=driver.findElementByAccessibilityId("equals"));
    equalTo.click();
  }
  @AfterClass
  public void tearDown(){
    driver.closeApp();
  }
}
iOS
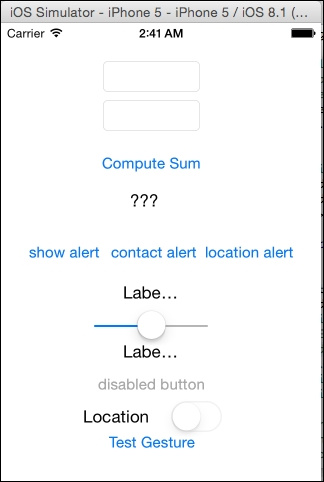
Below is an example of working with the TestApp application; it can be downloaded from here . After downloading, unzip it.
In this example, we will try to add two numbers:
- Update the setup () method to run TestApp:
File app=new File("/Users/mhans/appium/ios/TestApp.app");//You can change it with your app address caps.setCapability(MobileCapabilityType.APP,app); - Now you need to find elements for entering numbers; We will search by name:
WebElement editBox1=driver.findElement(By.name("TextField1")); WebElement editBox2=driver.findElement(By.name("TextField2")); - Then, find the compute button; use AccessibilityID:
WebElement computeSumBtn=driver.findElementByAccessibilityId("Compute Sum")); - Enter the value in the first field:
editBox1.sendKeys("10"); - We introduce the value in the second:
editBox2.sendKeys("20"); - Now, click on the Compute Sum button:
computeSumBtn.click(); - Run your test using TestNG:
public class TestAppIication {
  IOSDriver driver;
  @BeforeClass
  public void setUp() throws MalformedURLException{
  File app=new File("/Users/mhans/appium/ios/TestApp.app");//You can change it with your app address
    DesiredCapabilities caps = new DesiredCapabilities();
    caps.setCapability(MobileCapabilityType.APP,app);
    caps.setCapability(MobileCapabilityType.PLATFORM_VERSION, "8.1");
    caps.setCapability(MobileCapabilityType.PLATFORM_NAME, "iOS");
    caps.setCapability(MobileCapabilityType.DEVICE_NAME, "iPhone 5");
    driver = new IOSDriver (new URL("http://127.0.0.1:4723/wd/hub"), caps);
    driver.manage().timeouts().implicitlyWait(30,TimeUnit.SECONDS);
  }
  @Test
  public void testExample(){
    WebElement editBox1=driver.findElement(By.name("TextField1"));
    editBox1.sendKeys("10");
    WebElement editBox2=driver.findElement(By.name("TextField2"));
    editBox2.sendKeys("20");
    WebElement computeSumBtn=driver.findElementByAccessibilityId("Compute Sum"));
    computeSumBtn.click();
  }
  @AfterClass
  public void tearDown(){
    driver.closeApp();
  }
}
Work with web applications
Android
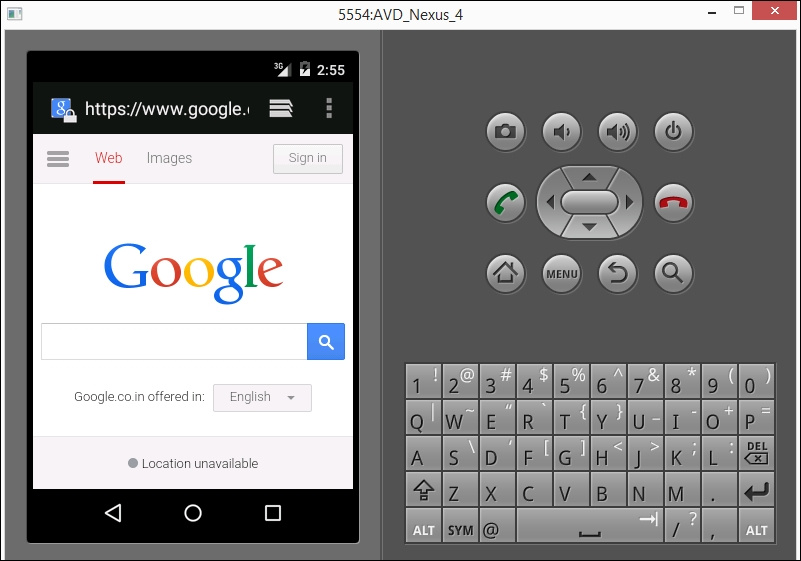
Take the Google search page as an example. We will use the native Android browser for work:
- Update the setup () method to launch the browser:
caps.setCapability("avd","AVD_Nexus_4"); caps.setCapability(MobileCapabilityType.BROWSER_NAME, "Browser"); - Now you need to go to www.google.com :
driver.get("https://www.google.com"); - You need to find the searchBox element; we will search by name:
WebElement searchBox=driver.findElement(By.name("q")); - Then, enter a search query:
searchBox.sendKeys("Appium for mobile automation"); - Run your test using TestNG:
public class TestAppIication {
  AndroidDriver driver;
  @BeforeClass
    public void setUp() throws MalformedURLException{
      DesiredCapabilities caps = new DesiredCapabilities();
      caps.setCapability(MobileCapabilityType.BROWSER_NAME, "Browser");
      caps.setCapability(MobileCapabilityType.PLATFORM_VERSION, "4.4");
      caps.setCapability(MobileCapabilityType.PLATFORM_NAME, "Android");
      caps.setCapability(MobileCapabilityType.DEVICE_NAME, "Android emulator");
      caps.setCapability("avd","AVD_Nexus_4");// Mention the created AVD name
      driver = new AndroidDriver (new URL("http://127.0.0.1:4723/wd/hub"), caps);
      driver.manage().timeouts().implicitlyWait(30,TimeUnit.SECONDS);
      }
    @Test
    public void testExample() {
    driver.get("https://www.google.com");
    WebElement searchBox=driver.findElement(By.name("q"));
    searchBox.sendKeys("Appium for mobile automation");
  }
  @AfterClass
  public void tearDown(){
    driver.quit();
  }
}
iOS
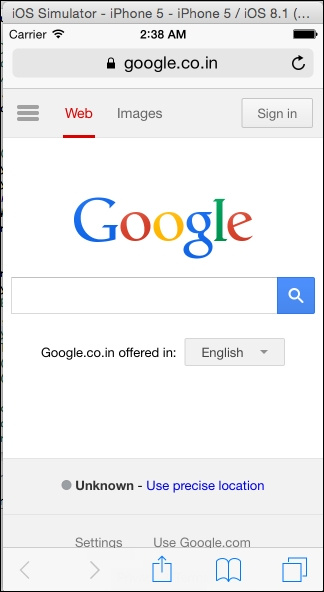
Take the Google search page as an example. For work, we will use the native Safari browser:
- Update the setup () method to start Safari:
caps.setCapability(MobileCapabilityType.BROWSER_NAME, "Safari"); - Go to www.google.com :
driver.get("https://www.google.com"); - Then, find the search string (by name):
WebElement searchBox=driver.findElement(By.name("q")); - In the search bar send a request:
searchBox.sendKeys("Appium for mobile automation"); - Run your test using TestNG:
public class TestAppIication {
  IOSDriver driver;
  @BeforeClass
  public void setUp() throws MalformedURLException{
    DesiredCapabilities caps = new DesiredCapabilities();
    caps.setCapability(MobileCapabilityType.BROWSER_NAME, "Safari");
    caps.setCapability(MobileCapabilityType.PLATFORM_VERSION, "8.1");
    caps.setCapability(MobileCapabilityType.PLATFORM_NAME, "iOS");
    caps.setCapability(MobileCapabilityType.DEVICE_NAME, "iPhone 5");
    driver = new IOSDriver (new URL("http://127.0.0.1:4723/wd/hub"), caps);
    driver.manage().timeouts().implicitlyWait(30,TimeUnit.SECONDS);
    }
  @Test
  public void testExample(){
    driver.get("https://www.google.com");
    WebElement searchBox=driver.findElement(By.name("q"));
    searchBox.sendKeys("Appium for mobile automation");
    }
  @AfterClass
  public void tearDown(){
  driver.quit();
  }
}
Hybrid Automation
Android
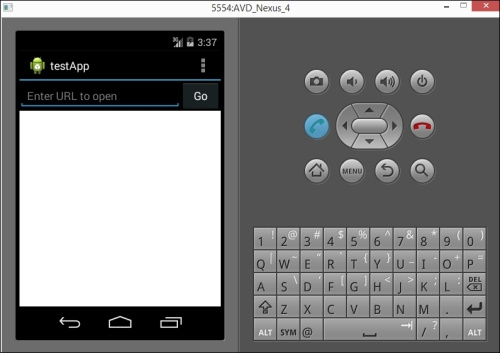
For study, we use testApp. It can be downloaded from here . Before working with hybrid applications, you need to follow the instructions .
- Update the setup () method to start the application:
File app=new File("C:\\Appium_test\\testApp.apk"); caps.setCapability(MobileCapabilityType.APP,app); caps.setCapability("avd","AVD_Nexus_4"); caps.setCapability(MobileCapabilityType.APP_PACKAGE, " com.example.testapp"); caps.setCapability(MobileCapabilityType.APP_ACTIVITY, " MainActivity"); - We need to find the field for entering our URL (https://www.google.com), we will find it by ID:
WebElement editBox=driver.findElement(By.id("com.example.testapp:id/urlField")); editBox.sendKeys("https://www.google.com"); - Now find the Go button:
WebElement goButton=driver.findElement(By.name("Go")); - Click on the button:
goButton.click(); - Now we need to switch the context:
Setcontexts = driver.getContextHandles(); for (String context : contexts) { System.out.println(context); //выведет список контекстов вроде NATIVE_APP или WEBVIEW_com.example.testapp } - Switch to web_view:
driver.context("WEBVIEW_com.example.testapp");
or so:driver.context((String) contextNames.toArray()[1]); - Now you can work with the Google web page. We can click on the Images tab and find the element by linkText:
WebElement images=driver.findElement(By.linkText("Images")); images.click(); - Run your test using TestNG:
public class TestAppIication { AndroidDriver driver; @BeforeClass public void setUp() throws MalformedURLException{ DesiredCapabilities caps = new DesiredCapabilities(); File app= new File("/Users/mhans/appium/ios/webViewApp. app"); caps.setCapability(MobileCapabilityType.APP,app"); caps.setCapability(MobileCapabilityType.PLATFORM_VERSION, "4.4"); caps.setCapability(MobileCapabilityType.PLATFORM_NAME, "Android"); caps.setCapability(MobileCapabilityType.DEVICE_NAME, "Android emulator"); caps.setCapability("avd","AVD_Nexus_4");// Mention the created AVD name caps.setCapability(MobileCapabilityType.AUTOMATION_NAME, "Appium");//Use Selendroid in case of <4.4 android version caps.setCapability(MobileCapabilityType.APP_PACKAGE, "com.example.testapp"); caps.setCapability(MobileCapabilityType.APP_ACTIVITY, "com.example.testapp.MainActivity"); driver = new AndroidDriver (new URL("http://127.0.0.1:4723/wd/hub"), caps); driver.manage().timeouts().implicitlyWait(30,TimeUnit.SECONDS); } @Test public void testExample(){ WebElement editBox=driver.findElement(By.id("com.example.testapp:id/urlField")); editBox.sendKeys("https://www.google.com"); WebElement goButton=driver.findElement(By.name("Go")); goButton.click(); Setcontexts = driver.getContextHandles(); for (String context : contexts) { System.out.println(context); } driver.context((String) contexts.toArray()[1]); WebElement images=driver.findElement(By.linkText("Images")); images.click(); } @AfterClass public void tearDown(){ driver.closeApp(); } }
iOS
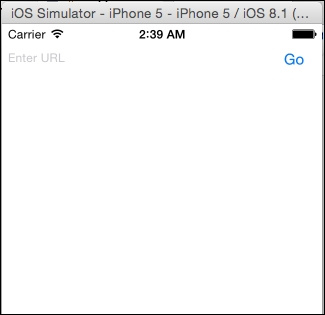
Here we take, for example, WebViewApp. You can download from here . After downloading, unzip the application:
- Update the setup () method to start the application:
File app=new File("/Users/mhans/appium/ios/WebViewApp.app"); caps.setCapability(MobileCapabilityType.APP,app); - You need to find the search bar to pass the URL (https://www.google.com). Let's find it by className:
WebElement editBox=driver.findElement(By.className("UIATextField")); editBox.sendKeys("www.google.com"); - Now, by name we will find the Go button:
WebElement goButton=driver.findElement(By.name("Go")); - Cry:
goButton.click(); - Now we need to get a list of contexts:
Setcontexts = driver.getContextHandles(); for (String context : contexts) { System.out.println(context); } - And switch to work with web_view:
driver.context("WEBVIEW_com.example.testapp");
ordriver.context((String) contextNames.toArray()[1]); - Now you can work with the Google web page. We can click on the Images tab and find the element by linkText:
WebElement images=driver.findElement(By.linkText("Images")); images.click(); - Run your test using TestNG:
public class TestAppIication { IOSDriver driver; @BeforeClass public void setUp() throws MalformedURLException{ DesiredCapabilities caps = new DesiredCapabilities(); caps.setCapability(MobileCapabilityType.PLATFORM_VERSION, "8.1"); caps.setCapability(MobileCapabilityType.PLATFORM_NAME, "iOS"); caps.setCapability(MobileCapabilityType.DEVICE_NAME, "iPhone 5"); driver = new IOSDriver (new URL("http://127.0.0.1:4723/wd/hub"), caps); driver.manage().timeouts().implicitlyWait(30,TimeUnit.SECONDS); } @Test public void testExample(){ WebElement editBox=driver.findElement(By.className("UIATextField")); editBox.sendKeys("https://www.google.com"); WebElement goButton=driver.findElement(By.name("Go")); goButton.click(); Setcontexts = driver.getContextHandles(); for (String context : contexts) { System.out.println(context); } driver.context((String) contexts.toArray()[1]); WebElement images=driver.findElement(By.linkText("Images")); images.click(); } @AfterClass public void tearDown(){ driver.closeApp(); } }
That's all. In the next chapter, we will look at the features of working with real devices