Backup scripts to the Google Cloud Platform cloud (GCP) in five minutes
- Tutorial
For a long time already the guys have been asking questions how to organize backups to the cloud, without spending a lot of effort, time and best of all for free. The reason for writing the article was another dialogue on this topic. Based on the results of a long correspondence with colleagues, explanations of the theory and enumeration of practical implementation options, I decided to write about it. Everything is just like five fingers, but often ask HOW.
Backing up to the cloud is no longer a new topic. Everyone chooses their own cloud provider, their own copy tools, etc. There are many vendors, here we will consider the Google Cloud Platform. We all implement the simplest scripts, without buying software, buying disk storage, and more.
We will not go into the intricacies of infrastructure, to each his own. As a result, there is a backup server on which copies of the file storage and data from the machines merge, are packed into archives and fall on two disk arrays. As a result, a decision was made to take out one copy perimeter.
Yes, we needed to apply two schemes for backing up various data:
Let's start with cloud.
We are creating a trial for $ 300 in the Google Cloud Platform ($ 300 is given for a year, enough for a long time).
After connecting the trial, the console will be available to us. In the menu, go to the Storage section .

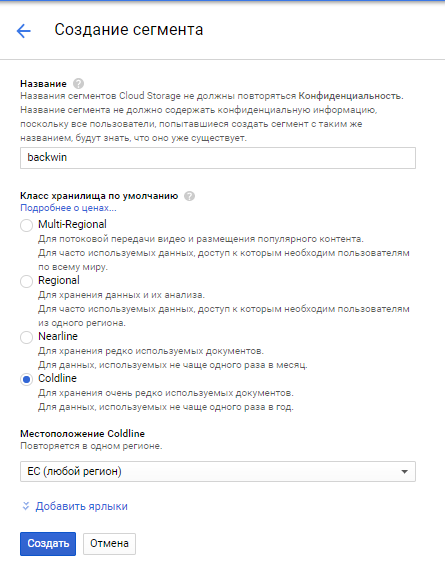
We will be asked to create a project, create, call as we please. After creating the project, in the Storage section, create the Segment , this will be our storage for copies. We call it convenient, for the article I called backwin for replication and separately created backupwin for copying and storage by day. The storage class we will specify is the cheapest used for Coldline backups . The cost of a gigabyte in it is $ 0.007 per month.
With the server, everything is simple. We go to the Google Cloud documentation section, open the Cloud SDK section and follow the instructions. In my case, there was a machine with Windows Server, so download, install. It is enough standard parameters during installation, therefore further, further, it is ready .
Open the command line, write
In a nutshell, why did we need her. There is a machine on which there is a set of backups in a specific directory ( c: \ bak \ ). These are encrypted archives and need to be stored somewhere outside. No problem. Open the command line, write:
It is worth mentioning that we experimented with a Windows machine, but it also works on Linux in the same way, only the path to the directory needs to be fixed.
The command is complete, everything flew into the cloud. Save as a script, include in the scheduler. All! Five minutes really. A little more tuning and the script will be sharpened for a specific task and error handling.
In this case, we needed to store data for each day in a separate directory in Google Cloud Storage. Everything turned out to be simple too, take a sandwich and pour coffee.
For fans of PowerShell, I did it on it because machine on windows server. The modules we installed on the system along with the Cloud SDK. Therefore, for starters,
We show where we have the directory for copying and in which segment to put it:
Here you can add the creation of a directory by the current date of copying:
Actually the script itself for copying:
We check it works. We compose it in a script, put it in the scheduler. That is all love.
At the cost of storing 10 TB of data (in cloud storage), payment will be from $ 70 per month. In general, everything works. Tuning scripts for specific conditions was not applied.
In general, backing up to Google Cloud Storage can be used together with such software as Cloudberry, Veritas, etc. and use cloud storage as additional space for copies. In the case of hardware, most vendors already at the storage level support their backup to Google Cloud.
Conclusion: cheap, fast, reliable, and the transfer from trial to commercial version occurs without any reconfiguration and bank cards.
Backing up to the cloud is no longer a new topic. Everyone chooses their own cloud provider, their own copy tools, etc. There are many vendors, here we will consider the Google Cloud Platform. We all implement the simplest scripts, without buying software, buying disk storage, and more.
What we have
We will not go into the intricacies of infrastructure, to each his own. As a result, there is a backup server on which copies of the file storage and data from the machines merge, are packed into archives and fall on two disk arrays. As a result, a decision was made to take out one copy perimeter.
Two types of copying
Yes, we needed to apply two schemes for backing up various data:
- Replicate an existing set of copies on the server
- Storage of copies for a long time only in the cloud
Let's start with cloud.
Cloud preparation
We are creating a trial for $ 300 in the Google Cloud Platform ($ 300 is given for a year, enough for a long time).
After connecting the trial, the console will be available to us. In the menu, go to the Storage section .
We will be asked to create a project, create, call as we please. After creating the project, in the Storage section, create the Segment , this will be our storage for copies. We call it convenient, for the article I called backwin for replication and separately created backupwin for copying and storage by day. The storage class we will specify is the cheapest used for Coldline backups . The cost of a gigabyte in it is $ 0.007 per month.
Machine preparation
With the server, everything is simple. We go to the Google Cloud documentation section, open the Cloud SDK section and follow the instructions. In my case, there was a machine with Windows Server, so download, install. It is enough standard parameters during installation, therefore further, further, it is ready .
Open the command line, write
gcloud initReplication storage
In a nutshell, why did we need her. There is a machine on which there is a set of backups in a specific directory ( c: \ bak \ ). These are encrypted archives and need to be stored somewhere outside. No problem. Open the command line, write:
gsutil -m rsync -r -d -e -C file://c:\bak gs://bakwin- c: \ bak - directory with copies for replication to the cloud
- bakwin - " Segment " in Google Cloud Storage, which we created earlier
It is worth mentioning that we experimented with a Windows machine, but it also works on Linux in the same way, only the path to the directory needs to be fixed.
The command is complete, everything flew into the cloud. Save as a script, include in the scheduler. All! Five minutes really. A little more tuning and the script will be sharpened for a specific task and error handling.
Directory backup
In this case, we needed to store data for each day in a separate directory in Google Cloud Storage. Everything turned out to be simple too, take a sandwich and pour coffee.
For fans of PowerShell, I did it on it because machine on windows server. The modules we installed on the system along with the Cloud SDK. Therefore, for starters,
Import-Module GoogleCloudwe will not need anything else. We show where we have the directory for copying and in which segment to put it:
$folder = "C:\Bak"
$bucket = "gs:\backupwin"
Here you can add the creation of a directory by the current date of copying:
$date = Get-date -format dd.MM.yyyy
$bucket = $bucket + "\" + $date
mkdir $bucket
Actually the script itself for copying:
cd $folder
$files = Get-ChildItem -Recurse -Attributes !Directory
$data = @()
foreach ($file in $files) {
      $objectPath = $file | Resolve-Path -Relative
      $data += @{file = $file; objectPath = $objectPath} #
}
cd $bucket
foreach($element in $data) {
      Write-Host $element.objectPath
      New-Item -ItemType File -Path $element.objectPath
}
We check it works. We compose it in a script, put it in the scheduler. That is all love.
At the cost of storing 10 TB of data (in cloud storage), payment will be from $ 70 per month. In general, everything works. Tuning scripts for specific conditions was not applied.
In general, backing up to Google Cloud Storage can be used together with such software as Cloudberry, Veritas, etc. and use cloud storage as additional space for copies. In the case of hardware, most vendors already at the storage level support their backup to Google Cloud.
Conclusion: cheap, fast, reliable, and the transfer from trial to commercial version occurs without any reconfiguration and bank cards.