Reflective Shadow Maps: Part 2 - Implementation
- Transfer
Hi, Habr! This article presents a simple implementation of Reflective Shadow Maps (the algorithm is described in the previous article ). Next, I will explain how I did it and what the pitfalls were. Some possible optimizations will also be considered.
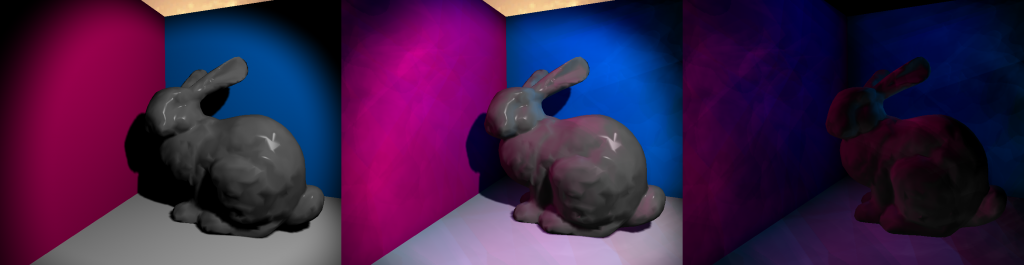
Figure 1: From left to right: no RSM, with RSM, difference
In Figure 1, you can see the result obtained using RSM . The Stanford rabbit and three multi-colored quadrangles were used to create these images. In the image on the left, you can see the result of the render without RSM using only spot light . Everything in the shade is completely black. The image in the center shows the result with RSM . The following differences are noticeable: brighter colors everywhere, pink color, floor and rabbit flooding, shading is not completely black. The last image shows the difference between the first and second, and therefore the contribution of RSM. On the middle image, more hard edges and artifacts are visible, but this can be solved by adjusting the core size, indirect illumination intensity and the number of samples.
The algorithm was implemented on its own engine. Shaders are written in HLSL, and render on DirectX 11. I already set up deferred shading and shadow mapping for directional light (directional light source) before writing this article. First, I implemented RSM for directional light and only after added support for the shadow map and RSM for the spot light.
Traditionally, Shadow Maps (SM) is nothing more than a depth map. This means that you don't even need a pixel / fragment shader to fill SM. However, for RSM you need some additional buffers. You need to store the world-space position , world-space normals and flux (luminous flux). This means that you need a pixel / fragment shader with multiple render targets. Keep in mind that for this technique you need to cut off the back faces ( face culling ), not the front ones.
Using face culling of front faces is a widely used way to avoid shadow artifacts, but this does not work with RSM .
You transfer the world-space positions and normals to the pixel shader and write them into the corresponding buffers. If you use normal mapping , then also count them in a pixel shader. Flux is also calculated by multiplying the albedo material by the color of the light source. For spot light you need to multiply the resulting value by the angle of incidence. For directional light, a non-shaded image is obtained.
For the main passage you need to do a few things. You must bind all the buffers used in the shadow pass as textures. You also need random numbers. The official article says that you need to pre-calculate these numbers and store them in a buffer in order to reduce the number of operations in the RSM sampling pass . Since the algorithm is heavy in terms of performance, I completely agree with the official article. It also recommends adhering to temporal coherence (using the same sampling pattern for all indirect illumination calculations). This will avoid flickering when different shadows are used in each frame.
You need two random floating-point numbers in the range [0, 1] for each sample. These random numbers will be used to determine the coordinates of the sample. You will also need the same matrix that you use to convert positions from world-space (world space) to shadow-space (light source space). You will also need such sampling parameters, which will be given in black color if sampled beyond the boundaries of the texture.
Now the hard part to understand. I recommend counting indirect illumination after you have calculated the direct light for a particular light source. This is because you need a full-screen quad for directional light . However, for spot and point light, you usually want to use meshes of a certain shape with culling to fill smaller pixels.
On the code snippet below, indirect lighting is calculated for the pixel. Next, I will explain what is happening there.
The first argument of the function is P , which is the world-space position (in world space) for a particular pixel. DivideByW is used for the perspective division needed to get the correct Z value . N is world-space normal.
In this part of the code, the light-space is calculated (relative to the light source) position, the indirect illumination variable is initialized, in which the values calculated from each sample are summed, and the variable rMax is set from the lighting equation in the official article , the value of which I will explain in the next section.
Here we start the cycle and prepare our variables for the equation. In order to optimize, the random samples that I calculated already contain coordinate offsets, that is, to get UV coordinates I just need to add rMax * rnd to the light-space coordinates. If the resulting UV is outside the range [0,1], the samples should be black. Which is logical, since they go beyond the range of coverage.
This is the part where the indirect lighting equation is calculated ( Figure 2 ), and is also weighted according to the distance from the light-space coordinates to the sample. The equation looks daunting, and the code does not help to understand everything, so I will explain in more detail.
The variable Φ (phi) is the luminous flux ( flux ), which is the radiation intensity. The previous article describes flux in more detail.
FluxScaled by two scalar products. The first is between the normal of the light source (texel) and the direction from the light source to the current position. The second is between the current normal and the direction vector from the current position to the position of the light source (texel). In order not to get a negative contribution to the illumination (obtained if the pixel is not illuminated), the scalar products are limited to the range [0, ∞]. In this equation, at the end normalization is performed, I suppose, for performance reasons. It is equally permissible to normalize direction vectors before performing scalar products.

Figure 2: Equation of illumination of a point with position x and normal n directed by a pixel light source p
The result of this passage can be mixed with the backbuffer (direct lighting), and the result is obtained as shown in Figure 1 .
When implementing this algorithm, I ran into some problems. I will talk about these issues so that you do not step on the same rake.
I spent a considerable amount of time figuring out why my indirect lighting looked repetitive. The Crytek Sponza textures are lined, so a sampler was needed for it. But for RSM it is not very suitable.
To improve the workflow, it is important to be able to change some variables by pressing buttons. For example, indirect illumination intensity and sampling range ( rMax ). These parameters must be configured for each light source. If you have a large sampling range, then you get indirect illumination from anywhere, which is useful for large scenes. For more local indirect lighting, you'll need a smaller range. On Figure 3 shows global and local indirect lighting.
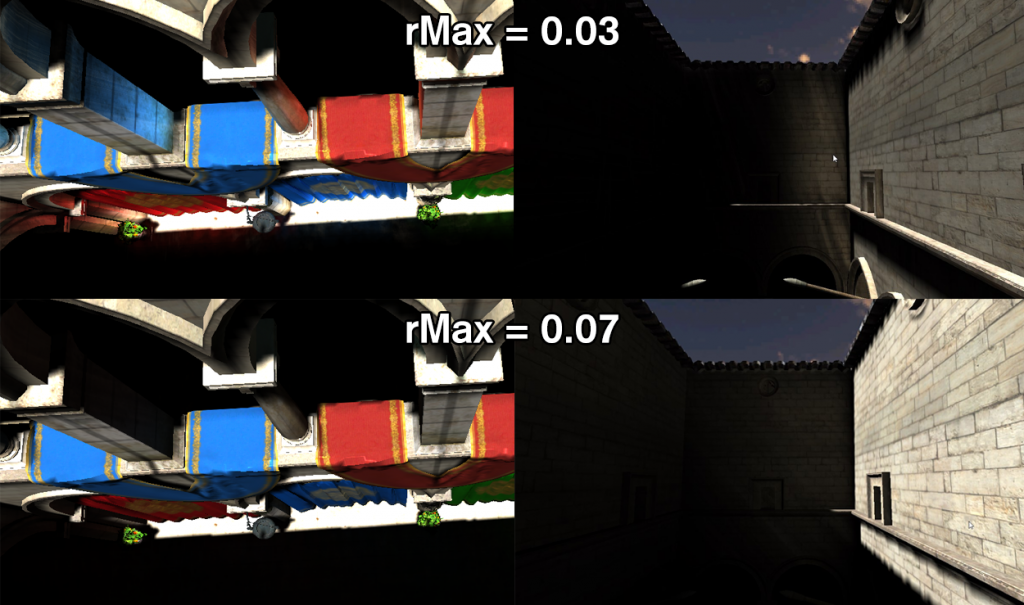
Figure 3: Demonstration of rMax dependencies .
At first I thought I could make indirect lighting in the shader, in which I consider direct lighting. For directional light, this works because you still draw a full-screen quad. However, for spot and point light you need to optimize the calculation of indirect illumination. Therefore, I considered indirect lighting a separate passage, which is necessary if you also want to do screen-space interpolation .
This algorithm is not at all friendly with the cache. It is sampled at random points in multiple textures. The number of samples without optimizations is also unacceptably large. With a resolution of 1280 * 720 and the number of RSM 400 samples, you will make 1.105.920.000 samples for each light source.
I will list the pros and cons of this indirect illumination calculation algorithm.
I made several attempts to increase the speed of this algorithm. As described in the official article , you can implement screen-space interpolation . I did it, and the rendering accelerated a bit. Below I will describe some of the optimizations, and make a comparison (in frames per second) between the following implementations, using the 3-wall and rabbit scene: no RSM , a naive RSM implementation , interpolated RSM .
One of the reasons why my RSM worked inefficiently was because I also counted on indirect lighting for the pixels that were part of the skybox. Skybox definitely does not need this.
Preliminary calculation of samples will not only give greater temporal coherence, but also eliminates the need to recalculate these samples in the shader.
The official article proposes using low-resolution render target to calculate indirect illumination. For scenes with a lot of smooth normals and straight walls, the lighting information can be easily interpolated between points with lower resolution. I will not describe the interpolation in detail so that this article is a bit shorter.
Below are the results for different number of samples. I have a few comments about these results:
Figure 1: From left to right: no RSM, with RSM, difference
Result
In Figure 1, you can see the result obtained using RSM . The Stanford rabbit and three multi-colored quadrangles were used to create these images. In the image on the left, you can see the result of the render without RSM using only spot light . Everything in the shade is completely black. The image in the center shows the result with RSM . The following differences are noticeable: brighter colors everywhere, pink color, floor and rabbit flooding, shading is not completely black. The last image shows the difference between the first and second, and therefore the contribution of RSM. On the middle image, more hard edges and artifacts are visible, but this can be solved by adjusting the core size, indirect illumination intensity and the number of samples.
Implementation
The algorithm was implemented on its own engine. Shaders are written in HLSL, and render on DirectX 11. I already set up deferred shading and shadow mapping for directional light (directional light source) before writing this article. First, I implemented RSM for directional light and only after added support for the shadow map and RSM for the spot light.
Shadow map extension
Traditionally, Shadow Maps (SM) is nothing more than a depth map. This means that you don't even need a pixel / fragment shader to fill SM. However, for RSM you need some additional buffers. You need to store the world-space position , world-space normals and flux (luminous flux). This means that you need a pixel / fragment shader with multiple render targets. Keep in mind that for this technique you need to cut off the back faces ( face culling ), not the front ones.
Using face culling of front faces is a widely used way to avoid shadow artifacts, but this does not work with RSM .
You transfer the world-space positions and normals to the pixel shader and write them into the corresponding buffers. If you use normal mapping , then also count them in a pixel shader. Flux is also calculated by multiplying the albedo material by the color of the light source. For spot light you need to multiply the resulting value by the angle of incidence. For directional light, a non-shaded image is obtained.
Preparation for the calculation of lighting
For the main passage you need to do a few things. You must bind all the buffers used in the shadow pass as textures. You also need random numbers. The official article says that you need to pre-calculate these numbers and store them in a buffer in order to reduce the number of operations in the RSM sampling pass . Since the algorithm is heavy in terms of performance, I completely agree with the official article. It also recommends adhering to temporal coherence (using the same sampling pattern for all indirect illumination calculations). This will avoid flickering when different shadows are used in each frame.
You need two random floating-point numbers in the range [0, 1] for each sample. These random numbers will be used to determine the coordinates of the sample. You will also need the same matrix that you use to convert positions from world-space (world space) to shadow-space (light source space). You will also need such sampling parameters, which will be given in black color if sampled beyond the boundaries of the texture.
Perform aisle lighting
Now the hard part to understand. I recommend counting indirect illumination after you have calculated the direct light for a particular light source. This is because you need a full-screen quad for directional light . However, for spot and point light, you usually want to use meshes of a certain shape with culling to fill smaller pixels.
On the code snippet below, indirect lighting is calculated for the pixel. Next, I will explain what is happening there.
float3 DoReflectiveShadowMapping(float3 P, bool divideByW, float3 N){
    float4 textureSpacePosition = mul(lightViewProjectionTextureMatrix,
        float4(P, 1.0));
    if (divideByW) textureSpacePosition.xyz /= textureSpacePosition.w;
    float3 indirectIllumination = float3(0, 0, 0);
    float rMax = rsmRMax;
    for (uint i = 0; i < rsmSampleCount; ++i)
    {
        float2 rnd    = rsmSamples[i].xy;
        float2 coords = textureSpacePosition.xy + rMax * rnd;
        float3 vplPositionWS = g_rsmPositionWsMap
            .Sample(g_clampedSampler, coords.xy).xyz;
        float3 vplNormalWS = g_rsmNormalWsMap
            .Sample(g_clampedSampler, coords.xy).xyz;
        float3 flux = g_rsmFluxMap.Sample(g_clampedSampler, coords.xy).xyz;
        float3 result = flux
            * ((max(0, dot(vplNormalWS, P – vplPositionWS))
            * max(0, dot(N, vplPositionWS – P)))
            / pow(length(P – vplPositionWS), 4));
        result *= rnd.x * rnd.x;
        indirectIllumination += result;
    }
    return saturate(indirectIllumination * rsmIntensity);
}
The first argument of the function is P , which is the world-space position (in world space) for a particular pixel. DivideByW is used for the perspective division needed to get the correct Z value . N is world-space normal.
float4 textureSpacePosition = mul(lightViewProjectionTextureMatrix,
    float4(P, 1.0));
if (divideByW) textureSpacePosition.xyz /= textureSpacePosition.w;
float3 indirectIllumination = float3(0, 0, 0);
float rMax = rsmRMax;
In this part of the code, the light-space is calculated (relative to the light source) position, the indirect illumination variable is initialized, in which the values calculated from each sample are summed, and the variable rMax is set from the lighting equation in the official article , the value of which I will explain in the next section.
for (uint i = 0; i < rsmSampleCount; ++i)
{
    float2 rnd    = rsmSamples[i].xy;
    float2 coords = textureSpacePosition.xy + rMax * rnd;
    float3 vplPositionWS = g_rsmPositionWsMap
            .Sample(g_clampedSampler, coords.xy).xyz;
    float3 vplNormalWS = g_rsmNormalWsMap
            .Sample(g_clampedSampler, coords.xy).xyz;
    float3 flux = g_rsmFluxMap.Sample(g_clampedSampler, coords.xy).xyz;
Here we start the cycle and prepare our variables for the equation. In order to optimize, the random samples that I calculated already contain coordinate offsets, that is, to get UV coordinates I just need to add rMax * rnd to the light-space coordinates. If the resulting UV is outside the range [0,1], the samples should be black. Which is logical, since they go beyond the range of coverage.
    float3 result = flux
        * ((max(0, dot(vplNormalWS, P – vplPositionWS))
        * max(0, dot(N, vplPositionWS – P)))
        / pow(length(P – vplPositionWS), 4));
    result *= rnd.x * rnd.x;
    indirectIllumination += result;
}
return saturate(indirectIllumination * rsmIntensity);
This is the part where the indirect lighting equation is calculated ( Figure 2 ), and is also weighted according to the distance from the light-space coordinates to the sample. The equation looks daunting, and the code does not help to understand everything, so I will explain in more detail.
The variable Φ (phi) is the luminous flux ( flux ), which is the radiation intensity. The previous article describes flux in more detail.
FluxScaled by two scalar products. The first is between the normal of the light source (texel) and the direction from the light source to the current position. The second is between the current normal and the direction vector from the current position to the position of the light source (texel). In order not to get a negative contribution to the illumination (obtained if the pixel is not illuminated), the scalar products are limited to the range [0, ∞]. In this equation, at the end normalization is performed, I suppose, for performance reasons. It is equally permissible to normalize direction vectors before performing scalar products.
Figure 2: Equation of illumination of a point with position x and normal n directed by a pixel light source p
The result of this passage can be mixed with the backbuffer (direct lighting), and the result is obtained as shown in Figure 1 .
Underwater rocks
When implementing this algorithm, I ran into some problems. I will talk about these issues so that you do not step on the same rake.
Wrong sampler
I spent a considerable amount of time figuring out why my indirect lighting looked repetitive. The Crytek Sponza textures are lined, so a sampler was needed for it. But for RSM it is not very suitable.
Opengl
В OpenGL для RSM текстур задается параметр GL_CLAMP_TO_BORDER
Custom values
To improve the workflow, it is important to be able to change some variables by pressing buttons. For example, indirect illumination intensity and sampling range ( rMax ). These parameters must be configured for each light source. If you have a large sampling range, then you get indirect illumination from anywhere, which is useful for large scenes. For more local indirect lighting, you'll need a smaller range. On Figure 3 shows global and local indirect lighting.
Figure 3: Demonstration of rMax dependencies .
Separate passage
At first I thought I could make indirect lighting in the shader, in which I consider direct lighting. For directional light, this works because you still draw a full-screen quad. However, for spot and point light you need to optimize the calculation of indirect illumination. Therefore, I considered indirect lighting a separate passage, which is necessary if you also want to do screen-space interpolation .
Cache
This algorithm is not at all friendly with the cache. It is sampled at random points in multiple textures. The number of samples without optimizations is also unacceptably large. With a resolution of 1280 * 720 and the number of RSM 400 samples, you will make 1.105.920.000 samples for each light source.
Pros and cons
I will list the pros and cons of this indirect illumination calculation algorithm.
| Behind | Vs |
| Easy to understand algorithm | Not at all friendly with the cache |
| Well integrated with deferred renderer | Variable setting required |
| Can be used in other algorithms ( LPV ) | Forced choice between local and global indirect lighting |
Optimization
I made several attempts to increase the speed of this algorithm. As described in the official article , you can implement screen-space interpolation . I did it, and the rendering accelerated a bit. Below I will describe some of the optimizations, and make a comparison (in frames per second) between the following implementations, using the 3-wall and rabbit scene: no RSM , a naive RSM implementation , interpolated RSM .
Z-check
One of the reasons why my RSM worked inefficiently was because I also counted on indirect lighting for the pixels that were part of the skybox. Skybox definitely does not need this.
Predict random samples on CPU
Preliminary calculation of samples will not only give greater temporal coherence, but also eliminates the need to recalculate these samples in the shader.
Screen space interpolation
The official article proposes using low-resolution render target to calculate indirect illumination. For scenes with a lot of smooth normals and straight walls, the lighting information can be easily interpolated between points with lower resolution. I will not describe the interpolation in detail so that this article is a bit shorter.
Conclusion
Below are the results for different number of samples. I have a few comments about these results:
- Logically, the FPS is about 700 for different number of samples when the RSM calculation is not performed .
- Interpolation gives some overhead and is not very useful with a small number of samples.
- Even with 100 samples, the final image looked quite good. This may be due to interpolation, which “blurs” indirect illumination.
| Sample count | FPS for No RSM | FPS for Naive RSM | FPS for Interpolated RSM |
| 100 | ~ 700 | 152 | 264 |
| 200 | ~ 700 | 89 | 179 |
| 300 | ~ 700 | 62 | 138 |
| 400 | ~ 700 | 44 | 116 |