Hard Reverse or File Reverse Features for PowerPC Big-Endian Architecture
 Reverse engineering jobs are a must for any CTF, and NeoQUEST is no exception. We add a “twist” to each task, which, on the one hand, makes it more difficult for participants to complete the task, and on the other hand, it makes it possible in practice to deal with something that has not yet been worked on.
 If we talk about the “highlights”, then the task of the online-stage NeoQUEST-2017 of the planet Endian “Saving the crew” is almost a cupcake! Welcome to the cut, to the very jungle of reverse: let's talk about the PowerPC Big-Endian architecture and a little about QEMU !
And we remind you that on June 29 in St. Petersburg , the NeoQUEST-2017 Face-to-Face Meeting will take place : reports, workshops, contests, prizes, excellent pastime andfree entry when registering on the site - everything is for you! Read more about what will be included in the program of “Confrontation”, read here and on the site!
Where to begin? From the legend!
So ... While spacecraft plowed the vast expanses of the universe, NeoQUEST members found themselves on the planet "Endian" and "discovered the ship of the last expedition, the very one that was considered missing!" Already not bad! And it's nice to know that in space they also use IP addresses.
We carefully read the legend and get the following information:
- IP address of the on-board computer 213.170.100.211
- "Special" file 1_8139.rom
- A PowerPC Big-Endian binary 2_quest.cod_data
The first thing we do is drive this IP address into the address bar of the browser and drive it!

The name of the tab immediately gives the first hint. Somehow QEMU is used here. Mentally put a tick in order not to forget, register and load the file 1_8139.rom.

What is going on? A screenshot is displayed, apparently from the qemu virtual machine; in the screenshot, please enter a password. However, how to introduce it? All we can do is upload a strange file, though ... SeaBIOS and Booting from ROM ... Those who worked with QEMU have probably already guessed what kind of file we are loading. But in order to clean the experiment, let's try to set the file command on it.
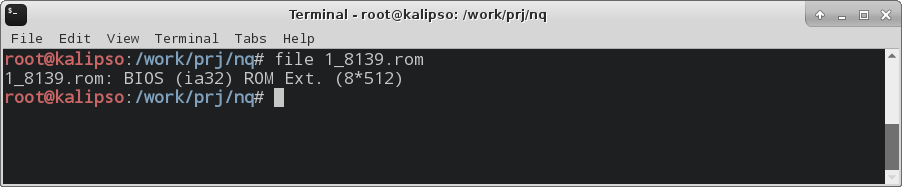
Thus, it turns out that our 8139 file is a BIOS ROM Extension or PCI Expansion ROM.
If you try to download an arbitrary file, here is the output we will have:

It seems like the first 3 bytes are being checked. Well, this is not a problem - we put the first three bytes, as requested, and ... Nothing! Same. How so? But the fact is that if the file is not in the PCI Expansion ROM format, then qemu simply will not start it. And judging by the assignment, there is also a signature there. We will understand further.
PCI Expansion ROM
What kind of beast is this? PCI Expansion ROM is a special piece of initialization code for a logical PCI device, usually stored either in the BIOS or on the chip of a PCI device. One of the most common use cases is the implementation of the network boot (PXE) mechanism. If you want to see how this happens, run qemu without parameters, and after the attempt to boot from the CD / HDD fails, qemu will show you PXE.

We decided on the type of file, let's look at its structure.
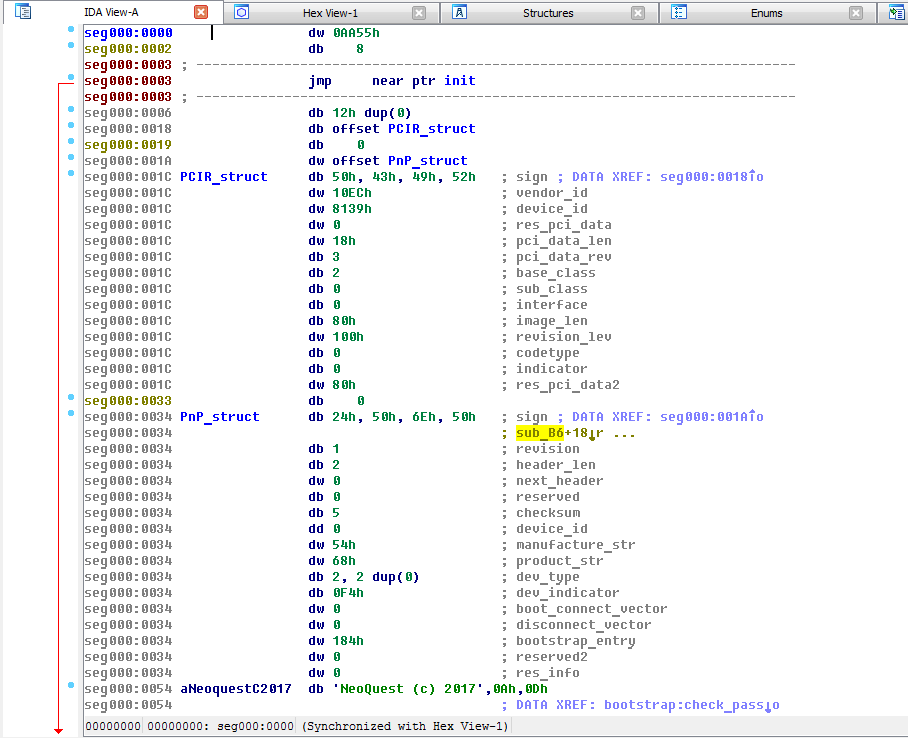
Under x86, the PCI ROM has the first 2 bytes for the signature 0x55aa, the third byte indicates the size of the module (PCI ROM size = 3 bytes * 512), the fourth code is already executable. On most PCI ROMs, if not all, this is a normal jump to the initialization code.
Oh yeah, I almost forgot: since this is a rather old technology, and it was used even before the UEFI, all the code we have is 16-bit Real Mode.
Further, bytes 0x18 indicate the offset of the PCIR structure, and 0x1A indicates the PnP structure. These structures are official in nature and carry basic information about the PCI ROM module.
An attentive reader will notice that the vendor and id device just correspond to the reltek 8139 network card. It was her module that was taken as a basis.
Of these structures, PnP is of most interest. It contains interesting fields such as checksum and bootstrap entry.
Bootstrap entry points to the code to which control is transferred when trying to boot from this device. In this case, it looks like this:
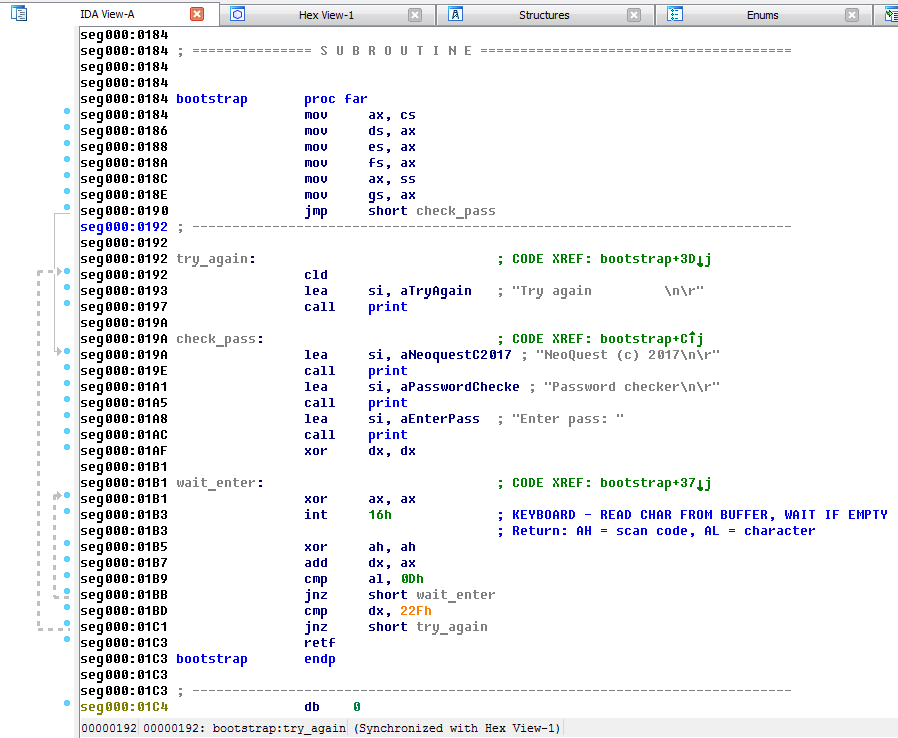
And, as we see, it is very similar to our screenshot, which means that we are on the right track! Now all you need to do is to record the password verification procedure and try to feed the modified webcam file.
Do not forget that we have the checksum field in the PnP structure. How is cheksumma considered? It's simple - initially it is set to 0x00 and the sum of the bytes of the file is considered. Then the amount received is deducted from 0x100. So we get the value we need. Why is 0x100? Because the hexum is single-byte. The fact is that the sum of all bytes during the check should show 0x0. That is, if the sum of bytes showed us 0x10, the value of the hexum will be 0xF0.
It is clear that when the module is loaded, it starts in qemu. But nothing prevents us from trying to also use the qemu -option-rom 1_8139.rom command
If everything is done correctly (patch the ROM and correct the checksum), then this ROM will simply return control to the BIOS. We try in the webcam ... Success! Something new appeared:

Read CRC? Another checklist? Well, at least the line hints that we use CRC (and therefore XOR) to test the module. Find this value in the module.

Almost the very end of the file. We know the place, now it remains to understand the CRC signature algorithm. Or at least find a polynomial, and then you can sort out the options. On assignment, they give us a PowerPC Big-endian. No need to scare us with all sorts of PPC, we are already scared. Take IDA Pro, the HEX editor, and go!
The file size is quite large, so the "forehead" solution is hardly appropriate here. Let's try to search for the clues that we have: the CRC algorithm and the message "CRC error". To begin with, we will find error messages, the strings utility will help us here.
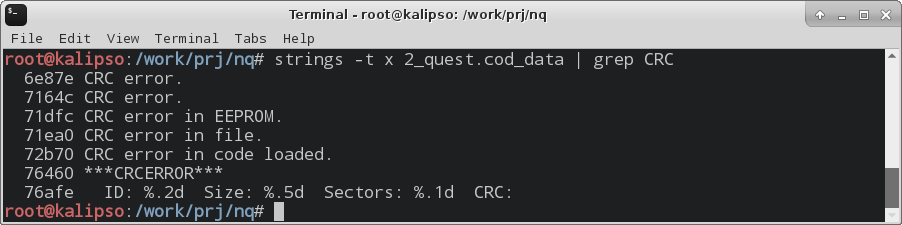
Excellent! Everything is there, but why 2 times? Let's figure it out! We look in the HEX editor or in the IDA.
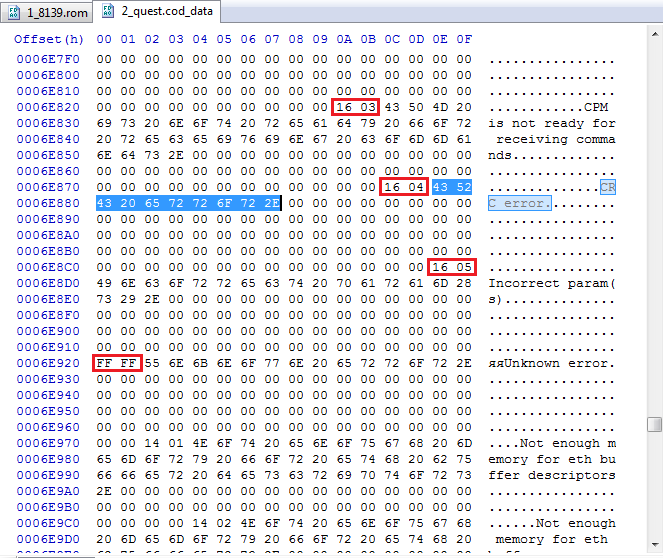
We found the line, and at the same time the remaining error messages. And also - look carefully! - before each error message we have 2 bytes, and very similar. Well, 0xFFFF (or -1) puts everything in its place. This is an associative array of error messages. Create a structure in IDA Pro and get this beauty:
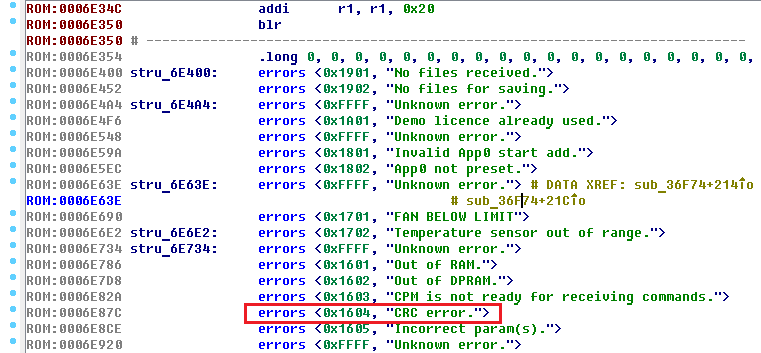
Now, following the logic, all this code uses error codes. However, we have 2 hits - error code 0x1604 and 0xA04. Well, we'll watch both.
0x1604
We are looking for in the IDA mentions 0x1604:

Great, 2 hits. We look!
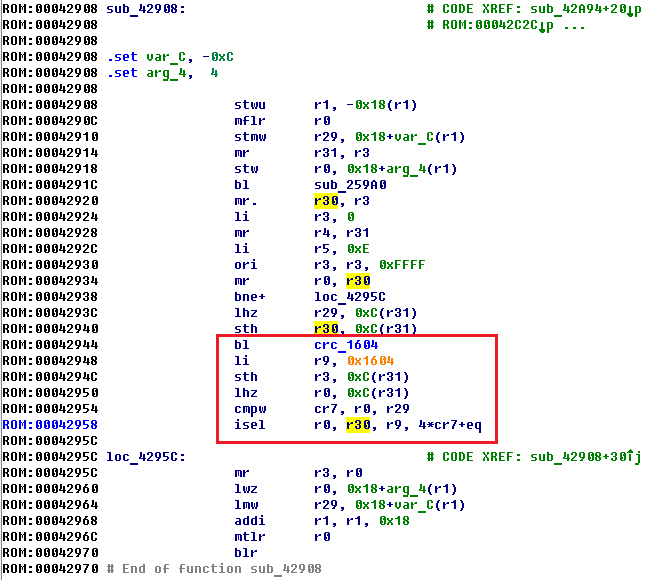
This code checks the correctness of the CRC. For convenience, we immediately denote the function call at 0x42944 as crc_1604 and remember that the function returns a value through register R3. In register R29, most likely, the recorded value of CRC is stored, and in register R0 is the calculated value of CRC. This becomes clear after viewing the crc_1604 function code:

A small function, but it is not like CRC. There is no polynomial here, but the usual byte XOR is used! From here it immediately becomes clear that the code 0x1604 is for a single-byte pseudo-CRC. It’s also clear that the calculated value is returned via R3 to the calling function, and most likely, the CRC must be compared with either the one written earlier, or the CRC must be zero. Here are the two most common integrity checks.
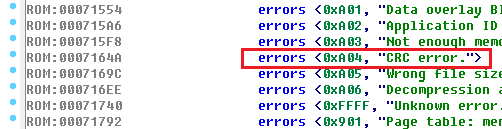
Well, it follows that we need the code 0xA04 - look!
0xA04
Similarly, we look in the IDA for mentions of 0x1604:

Oh, just one function, we're lucky!

So what is visible? Code 0xA04 is set only if the r3 register is not equal to zero. So, the function at 0x229c8 is our client!
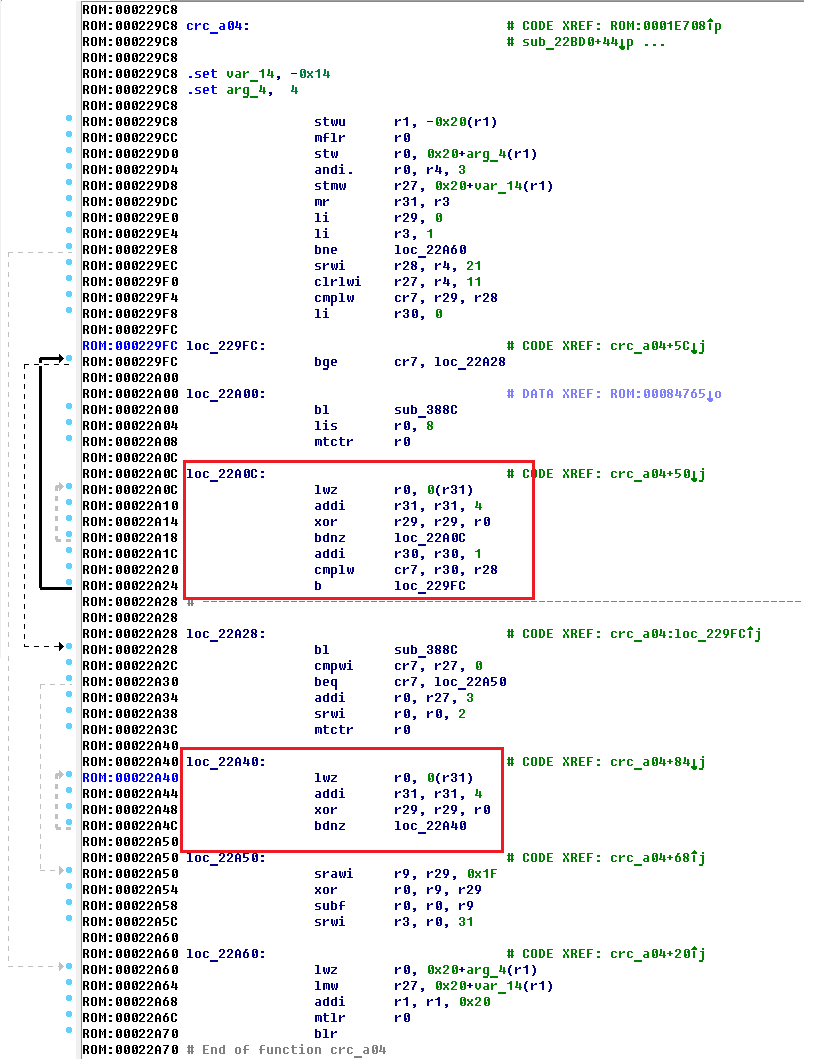
Immediately pay attention to these sections of the code! And yes, the usual XOR is also used here, only 4 bytes already. If you analyze the function in detail, you can find some conditions that are imposed on the file being checked. But we do not need this, since we have a file format, and we only need a signature mechanism. We found it! Normal XOR by 4 bytes.
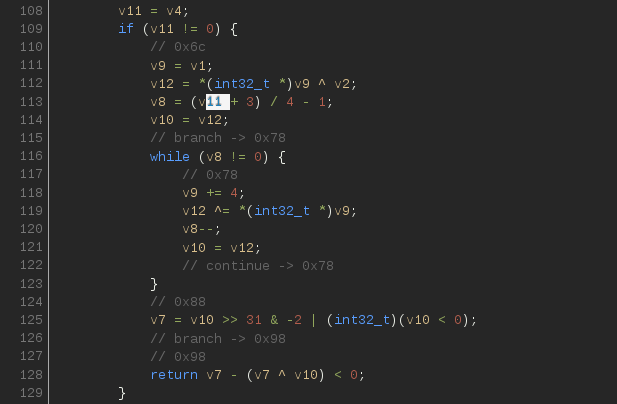
Especially unbelievers can be shown an approximate decompilation of this site (thanks retdec.com ).
It remains only to write the CRC count and go for the key! We write the coveted lines of code a la while (size--) {crc ^ = * input ++;} and replace the value at the end of the PCI ROM file. Do not forget to change the check sum, ii ... We are the champions!

At the confrontation, it will also be interesting!
While doing this assignment, we fell into nostalgia a bit and recalled the times when the MacBooks were on PowerPC, because not one Intel’s beautiful and diverse world!
The participants of the final hackquest competition on June 29 in St. Petersburg are waiting for a lot of different tasks, which, in addition to the reverse, will also require knowledge of steganography, cryptography, the ability to conduct OSINT , work with “horned green monsters” (we, of course, about Android) and many much more!