Cisco Catalyst Notes: VLAN Configuration, Password Reset, IOS Firmware Flashing
- Tutorial
A step-by-step guide on performing the most common tasks related to servicing Cisco Catalyst 2950 switches. Namely: VLAN configuration, password reset, reinstallation of a damaged Cisco IOS operating system. The issue of connection has been examined in detail, including through the com-port.

This article is a continuation of the Fundamentals of TCP / IP for future amateurs , where I talked about the theoretical foundations of building a LAN. Like the previous article, this one is for beginners in the field.
In order to perform any configuration of the switch, you need to connect to it from a personal computer or laptop-book. There are two types of connection - through the com port or through the web interface.
To connect via com port you will need a "console wire". This is usually a blue flat wire. It should come with the switch. One end of the wire connects to the com port of your PC (laptops usually do not have a com port; of course, if you do not carry a dock with you). This end is called DB-9. Insert the other end into the place to connect to the switch through the console. Where exactly it is located is impossible to say, it depends on the specific model. But, as a rule, it is signed accordingly, and is located on the rear panel of the switch. The place to connect the console looks the same as the regular 10mb / 100mb port on the switch. The connector (i.e. tip) at the other end of the cantilever wire, like the twisted pair connector, is called the RJ-45. So, by reading the documentation, you can see this definition: RJ-45 - to DB-9. So sometimes denote the cantilever wire. Connecting this wire should not cause you any difficulties, because getting tangled up or inserting the wrong wire is almost impossible.
Next you need to start the terminal. Click Start-> Run and write hypertrm (Windows). In the window that appears, write any connection name and press Enter. Next, click on the "standard settings" button and select the com port to which the console wire is connected. In this case, the switch must be turned off. If you haven’t turned it off, do it now. Then click OK. And then turn on the power of the switch. After a few seconds, you will see information on the progress of loading the switch operating system on the console. But you can (and sometimes need) to turn on the switch without booting the operating system, and enter the bootloader and boot the system manually. Read more about this in Installing iOS. Now you have to wait a little while the operating system is unpacked, flash memory is initialized and the system will boot. Then, an invitation will be displayed on the console, after which you need to wait another 10 seconds (depending on the model of the switch). And after all this, you finally get the management console, in which you can type commands, thereby configuring the switch. The functionality of the switch is very large, and the younger the model, the more functionality. An explanation of all functions is beyond the scope of this help file. Here you can learn how to use one of the main functions of the switch - setting up VLANs. Read more details on VLANs, theory and VLANs, practice.
Perhaps the connection process may seem long and inconvenient for you, but in practice it takes no more than two minutes to connect the console wire. After you complete all the above steps, the first command you need to enter to the switch is enable. This command gives you administrator privileges for the switch, and you get access to the full set of commands that you need to configure. But, after typing the enable command, the switch may ask you for a password. If you do not know the password and you have no one to ask him for, then the password must be reset. In the future, as well as the password, you can reset all settings if they were unsuccessful. You can read more about this in the Forgot password recovery section.. If the settings have already been reset, then the switch, after loading the OS, will ask you a few questions regarding the basic settings. If you do not have difficulty reading technical literature in English, then this should not be a problem for you. But I note that the second question about managment must be answered no.
If the operating system does not boot, you will probably have to reinstall it. Read more about this in Installing iOS. But keep in mind that she could not boot without obvious reasons. If you are not sure what you are doing, then you should not follow the instructions from the item on installing iOS. All the same, it is better to contact a specialist, if only in order to identify the reason why the OS does not load. Such a case can be considered emergency. There is nothing complicated in reinstalling the OS on the switch, but, I repeat, without the obvious reason, the OS could not get out of standing. I will also warn you that there are situations after which the switch cannot be repaired at home, and it will have to be taken to the service, making a tidy amount for the repair. If you are not sure what you are doing, you may accidentally enter the switch into this state.
If the switch is already on, you can connect to it through the web interface. To do this, you need to connect your PC or laptop to the switch port with a standard twisted pair (patch cord). Although this is not always possible, depending on the model of the switch, on its location and on the settings available on it (the web interface can be disabled / disabled). To connect via the web interface, you need to know the ip address of the switch (more precisely, the ip address, when accessed by which the switch gives the web interface), and the port you need to connect to.
If you do not know this, then you need to load the switch through the com port, as described above, delete / rename the configuration file, if any, and go through the initial configuration of the switch, during which you will be asked about the ip address, going to which is normal Browsing from your PC, you will get the web interface of the switch.
After you enter the web interface of the switch, you can manage it in two ways. First: press the appropriate buttons provided by the interface. Second: by the usual set of commands, calling the console via the Telnet web interface.
I note that some versions of the operating system of the switch do not work with all browsers. You may also need a specific version of java2 sdk (jdk).
It is assumed that you already have access to the web interface or console of the telnet switch. Configuration through the graphical console is carried out differently, depending on the version of the operating system. But the principle is always the same. A special case of VLAN configuration through the web interface of the IOS 12.1 operating system will be shown here.
Attention! When you install the port through which you manage the switch into a non-interface vlan (by default it is vlan 1), the connection to the switch will be disconnected. After entering the web interface, click on Smartports in the interface menu. Then select the ports that will be used in the work and click the Customize button, as shown in the figure:

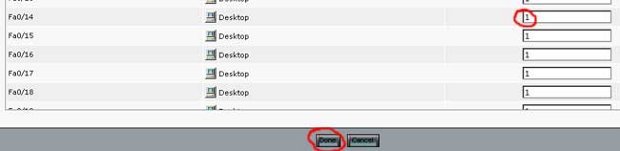
Then write the VLAN number to which the port should belong, and click the "done" button. If such a VLAN does not exist, it will automatically be created without asking any questions. For example, you can put ports 1, 2 and 3 in VLAN number 1, and ports 18 and 20 in VLAN number 37. Set the required ports to the VLAN you need as shown in the figure:
Then click the submit button (at the bottom of the page) for the changes to take effect.
Now you can connect personal computers to the appropriate ports, and the ping team will make sure that they are located individually on different networks, just as you configured vlan.
If you do not know the password for the switch, then you need to reset it. To do this, follow these steps:
Connect to the switch through the console. How to do this is described in detail in Connecting to a Switch. But this time you need to connect a little differently. We need to go into the bootloader. To do this, before turning on the power of the switch, press and hold the “mode” button (the button on the front panel, on the left, is usually signed). Turn on the power while holding this button, and hold it until you see the bootloader prompt on the console. This should happen a few seconds after turning on the power.
From here you can manage files in the flash memory of the switch. But before that, it must be initialized. To do this, type flash_init. After that, you can view, copy, delete files and directories from memory. The commands for this are almost the same as in the MS-DOC operating system. In order to view the contents of flash memory, type the dir flash command : I note that if you would type “C:” or “D:” in MS_DOC, then you need to type “flash:”, i.e. the \ character is not needed. After typing this command, you should see something like the following:
Here, html is the directory where the web interface is located. config.text - file, which stores all the switch settings, including the password. c2950-i6q412-mz.121-9.EA1.bin - the operating system of the switch. Depends on the switch series. vlan.dat - vlan settings are stored here. env_vars - file with environment variables. One day, you may need this file when installing the operating system on the formatted flash memory of the switch. Read more about this in Installing iOS .
Next, rename the configuration file if you need it in the future, or if the switch settings are not needed, just delete it. To rename, the command is accordingly: r ename flash: config.text flash: config.text.old . For removingdelete flash: config.text . Next, load the operating system either by turning the power off and on again, either by the reset command or by the boot command . The latter is preferable.
After loading, the operating system will ask you a question: “Continue with the configuration dialog? [yes / no]: ". If you do not need a configuration file, and in the previous step you deleted it, then answer Y. And you can finish reading this item, because during the preliminary configuration, the switch will ask you what password to set. If the configuration file contains many settings that worked stably in production and you renamed it in the previous step, answer N.
Next, enter enable mode with enable. The switch will not ask for the password. Then rename the configuration file back with the rename flash: config.text.old flash: config.text command . Now apply the settings from this file to the current switch settings and set a new password:
It's all. Now, when you enter the switch and enter the enable command , the correct password will be the one you entered in the place ""in the previous step.
Cisco Catalyst Series Switches and many other switches are running an IOS operating system. This OS is a single file, size 1.5 - 4.0 megabytes, depending on the version of the switch. Each version of iOS is designed for only one series of switches. A series of switches can consist of many switches. The following are a few Catalyst 2950 series switches:


The Cat2950 Series IOS operating system for the switches will run on all the switches shown. But, although, in this series, there is an exception - this is the LRE (Long Reach Ethernet) switch. It needs a different version of iOS. The operating system file names look something like this: c2950lre-i6k2l2q4-mz.121-22.EA7.bin. This is just the IOS for the last of the switches shown. As you can see, after the numbers "2950" are the letters "lre". The operating system is distributed as a binary file and, in most cases, as a * .tar archive. The archive contains the same binary file, as well as the html directory in which the web interface of the switch is located. The operating system must be included with the switch. But if the attached disk with the OS is lost, or you want to update the OS, then you have to download it.
There are three ways to install IOS: copy the operating system file through xmodem or through a TFTP server. The third way is through the web interface. But this feature is not always available, and it is implemented each time in a different way, depending on the version of iOS. Therefore, we consider only the first two methods.
Installation using the xmodem protocol should only be done if the operating system on the switch is either wiped or damaged. 3 megabytes of IOS copying time to the flash memory of the switch is approximately one hour. To reinstall IOS using the Xmodem protocol, you need to connect to the switch through the console, as described in Connecting to the switch, and enter the bootloader, as described in Restoring a forgotten password.
Next, you need to initialize flash memory with the flash_init command . Then look at what is currently in the switch memory: dir flash:. At the end of the list of files in memory, the size of the memory and the available free space are written. Make sure you have enough space to download iOS. If there is no space, delete * .tar and * .bin files with the delete flash: file_name.tar (bin) command . You can also format the memory with the format flash: command .
After the space is cleared, you can start copying. Type the command copy xmodem: flash: file_name.bin and immediately (!) Send the desired file through the terminal. Click on the menu of the terminal Transfer-> Send file. In the window that appears, select xmodem, as shown in the figure, and the file you want to transfer:

I note that if you download the operating system as a * .tar archive, this will not lead to anything. Since bootloader lacks unzip functions.
After copying is complete, reboot the switch. Perhaps if you formatted flash memory, you will have to create an env_vars file in which you need to write the mac address of your switch. To do this, carefully review the information that bootloader gives out at boot and find the mac address in it. Then, with the set MAC_ADDR xx: xx: xx: xx: xx: xx command, enter the mac address in the list of environment variables, and then type the set_param command . Flash memory must be initialized. After these steps, the env_vars file should be created, which you can check with the dir flash command :. The web interface can only be downloaded as a * .tar archive, since the html directory contains a huge number of files. This is best done through TFTP, as it is hundreds of times faster.
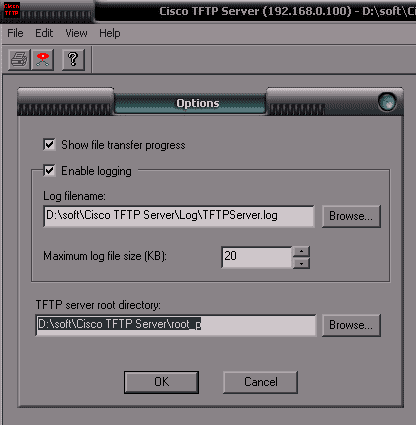
You can install IOS via TFTP only if the switch is currently operational (i.e., IOS is loaded) and you are in privileged mode ( enable command ). To copy files using TFTP, you need the TFTPServer program. You can download it from the Internet. It takes less than one and a half megabytes. Install this program on your computer and run. Do not forget to give appropriate instructions to your brandmauser, or turn it off while copying files. Copy the files you want to transfer to the directory to the TFTP server, or to any other directory, after indicating this to the program, as shown in the picture:
You probably want to use TFTP just to download the web interface of the operating system. In this case, only the html directory should be in your * .tar arrow. The OS itself needs to be removed from the archive. To do this under windows, install the total commander program. This is a file manager that supports the * .tar archive format, i.e. allows you to view the archive, delete / add files and directories and much more.
The switch must be turned on, IOS is loaded, the Telnet console is running. Type copy tftp: flash: in the console , and answer a few questions that the switch will ask you. Then the download will begin. And, if the archive contains only the web interface, it will download in about 10-15 seconds. Then you need to unzip the web interface. To do this, type the commandarchive tar / xtract 1.tar flash: where 1.tar is the downloaded archive.
Reinstalling the iOS operating system on the switch is completed.
This article is a continuation of the Fundamentals of TCP / IP for future amateurs , where I talked about the theoretical foundations of building a LAN. Like the previous article, this one is for beginners in the field.
Connect to Switch
In order to perform any configuration of the switch, you need to connect to it from a personal computer or laptop-book. There are two types of connection - through the com port or through the web interface.
Connection via com port
To connect via com port you will need a "console wire". This is usually a blue flat wire. It should come with the switch. One end of the wire connects to the com port of your PC (laptops usually do not have a com port; of course, if you do not carry a dock with you). This end is called DB-9. Insert the other end into the place to connect to the switch through the console. Where exactly it is located is impossible to say, it depends on the specific model. But, as a rule, it is signed accordingly, and is located on the rear panel of the switch. The place to connect the console looks the same as the regular 10mb / 100mb port on the switch. The connector (i.e. tip) at the other end of the cantilever wire, like the twisted pair connector, is called the RJ-45. So, by reading the documentation, you can see this definition: RJ-45 - to DB-9. So sometimes denote the cantilever wire. Connecting this wire should not cause you any difficulties, because getting tangled up or inserting the wrong wire is almost impossible.
Next you need to start the terminal. Click Start-> Run and write hypertrm (Windows). In the window that appears, write any connection name and press Enter. Next, click on the "standard settings" button and select the com port to which the console wire is connected. In this case, the switch must be turned off. If you haven’t turned it off, do it now. Then click OK. And then turn on the power of the switch. After a few seconds, you will see information on the progress of loading the switch operating system on the console. But you can (and sometimes need) to turn on the switch without booting the operating system, and enter the bootloader and boot the system manually. Read more about this in Installing iOS. Now you have to wait a little while the operating system is unpacked, flash memory is initialized and the system will boot. Then, an invitation will be displayed on the console, after which you need to wait another 10 seconds (depending on the model of the switch). And after all this, you finally get the management console, in which you can type commands, thereby configuring the switch. The functionality of the switch is very large, and the younger the model, the more functionality. An explanation of all functions is beyond the scope of this help file. Here you can learn how to use one of the main functions of the switch - setting up VLANs. Read more details on VLANs, theory and VLANs, practice.
Perhaps the connection process may seem long and inconvenient for you, but in practice it takes no more than two minutes to connect the console wire. After you complete all the above steps, the first command you need to enter to the switch is enable. This command gives you administrator privileges for the switch, and you get access to the full set of commands that you need to configure. But, after typing the enable command, the switch may ask you for a password. If you do not know the password and you have no one to ask him for, then the password must be reset. In the future, as well as the password, you can reset all settings if they were unsuccessful. You can read more about this in the Forgot password recovery section.. If the settings have already been reset, then the switch, after loading the OS, will ask you a few questions regarding the basic settings. If you do not have difficulty reading technical literature in English, then this should not be a problem for you. But I note that the second question about managment must be answered no.
If the operating system does not boot, you will probably have to reinstall it. Read more about this in Installing iOS. But keep in mind that she could not boot without obvious reasons. If you are not sure what you are doing, then you should not follow the instructions from the item on installing iOS. All the same, it is better to contact a specialist, if only in order to identify the reason why the OS does not load. Such a case can be considered emergency. There is nothing complicated in reinstalling the OS on the switch, but, I repeat, without the obvious reason, the OS could not get out of standing. I will also warn you that there are situations after which the switch cannot be repaired at home, and it will have to be taken to the service, making a tidy amount for the repair. If you are not sure what you are doing, you may accidentally enter the switch into this state.
Connection via web interface
If the switch is already on, you can connect to it through the web interface. To do this, you need to connect your PC or laptop to the switch port with a standard twisted pair (patch cord). Although this is not always possible, depending on the model of the switch, on its location and on the settings available on it (the web interface can be disabled / disabled). To connect via the web interface, you need to know the ip address of the switch (more precisely, the ip address, when accessed by which the switch gives the web interface), and the port you need to connect to.
If you do not know this, then you need to load the switch through the com port, as described above, delete / rename the configuration file, if any, and go through the initial configuration of the switch, during which you will be asked about the ip address, going to which is normal Browsing from your PC, you will get the web interface of the switch.
After you enter the web interface of the switch, you can manage it in two ways. First: press the appropriate buttons provided by the interface. Second: by the usual set of commands, calling the console via the Telnet web interface.
I note that some versions of the operating system of the switch do not work with all browsers. You may also need a specific version of java2 sdk (jdk).
VLANs, practice
It is assumed that you already have access to the web interface or console of the telnet switch. Configuration through the graphical console is carried out differently, depending on the version of the operating system. But the principle is always the same. A special case of VLAN configuration through the web interface of the IOS 12.1 operating system will be shown here.
Configure VLAN via the web interface
Attention! When you install the port through which you manage the switch into a non-interface vlan (by default it is vlan 1), the connection to the switch will be disconnected. After entering the web interface, click on Smartports in the interface menu. Then select the ports that will be used in the work and click the Customize button, as shown in the figure:
Then write the VLAN number to which the port should belong, and click the "done" button. If such a VLAN does not exist, it will automatically be created without asking any questions. For example, you can put ports 1, 2 and 3 in VLAN number 1, and ports 18 and 20 in VLAN number 37. Set the required ports to the VLAN you need as shown in the figure:
Then click the submit button (at the bottom of the page) for the changes to take effect.
Configure VLAN through the console
- Enter privileged mode with the enable command .
- Log in to the vlan database : vlan database .
- A team ? you can see what commands can be done in the vlan database.
- With vlan 200, you create and activate a new vlan. 200 is the vlan number. There can be any digit from 1 to 1005.
- show will show you the available vlan and information about them.
- The no command does the opposite of the command following it. For example, no vlan 200 will remove vlan with id 200.
- Now we write the exit command and exit the vlan database. Now we need to add the port we need to the vlan we need.
- To do this, enter the configuration mode, command the configure . When asked what to configure, answer terminal.
- Then select the port you need with the interface FastEthernet 0/17 command , where 17 is the port number.
- You are in port configuration mode. Also, to see your capabilities, type a team ? .
- To scroll through the output on a line, press any button, on the screen - spacebar, interrupt the output of the list of information on the monitor - Ctrl + z or Ctrl + c.
- Then, with the switchport access vlan 200 command, set the port to the vlan we need. 200 - vlan number.
- After exiting configuration mode, use the show vlan command to view the result of the actions taken.
Now you can connect personal computers to the appropriate ports, and the ping team will make sure that they are located individually on different networks, just as you configured vlan.
Forgotten password recovery
If you do not know the password for the switch, then you need to reset it. To do this, follow these steps:
Connect to the switch through the console. How to do this is described in detail in Connecting to a Switch. But this time you need to connect a little differently. We need to go into the bootloader. To do this, before turning on the power of the switch, press and hold the “mode” button (the button on the front panel, on the left, is usually signed). Turn on the power while holding this button, and hold it until you see the bootloader prompt on the console. This should happen a few seconds after turning on the power.
From here you can manage files in the flash memory of the switch. But before that, it must be initialized. To do this, type flash_init. After that, you can view, copy, delete files and directories from memory. The commands for this are almost the same as in the MS-DOC operating system. In order to view the contents of flash memory, type the dir flash command : I note that if you would type “C:” or “D:” in MS_DOC, then you need to type “flash:”, i.e. the \ character is not needed. After typing this command, you should see something like the following:
Directory of flash:/
  3  drwx       10176   Mar 01 2001 00:04:34  html
  6  -rwx        2343   Mar 01 2001 03:18:16  config.text
171  -rwx     1667997   Mar 01 2001 00:02:39  c2950-i6q412-mz.121-9.EA1.bin
  7  -rwx        3060   Mar 01 2001 00:14:20  vlan.dat
172  -rwx         100   Mar 01 2001 00:02:54  env_vars
7741440 bytes total (3884509 bytes free)
Here, html is the directory where the web interface is located. config.text - file, which stores all the switch settings, including the password. c2950-i6q412-mz.121-9.EA1.bin - the operating system of the switch. Depends on the switch series. vlan.dat - vlan settings are stored here. env_vars - file with environment variables. One day, you may need this file when installing the operating system on the formatted flash memory of the switch. Read more about this in Installing iOS .
Next, rename the configuration file if you need it in the future, or if the switch settings are not needed, just delete it. To rename, the command is accordingly: r ename flash: config.text flash: config.text.old . For removingdelete flash: config.text . Next, load the operating system either by turning the power off and on again, either by the reset command or by the boot command . The latter is preferable.
After loading, the operating system will ask you a question: “Continue with the configuration dialog? [yes / no]: ". If you do not need a configuration file, and in the previous step you deleted it, then answer Y. And you can finish reading this item, because during the preliminary configuration, the switch will ask you what password to set. If the configuration file contains many settings that worked stably in production and you renamed it in the previous step, answer N.
Next, enter enable mode with enable. The switch will not ask for the password. Then rename the configuration file back with the rename flash: config.text.old flash: config.text command . Now apply the settings from this file to the current switch settings and set a new password:
switch# copy flash:config.text system:running-config
Source filename [config.text]?
Destination filename [running-config]?
switch# config terminal
switch(config)# enable secret
switch(config)# enable password
switch(config)# exit
switch#
switch# copy running-config startup-config
It's all. Now, when you enter the switch and enter the enable command , the correct password will be the one you entered in the place "
IOS installation
Cisco Catalyst Series Switches and many other switches are running an IOS operating system. This OS is a single file, size 1.5 - 4.0 megabytes, depending on the version of the switch. Each version of iOS is designed for only one series of switches. A series of switches can consist of many switches. The following are a few Catalyst 2950 series switches:
The Cat2950 Series IOS operating system for the switches will run on all the switches shown. But, although, in this series, there is an exception - this is the LRE (Long Reach Ethernet) switch. It needs a different version of iOS. The operating system file names look something like this: c2950lre-i6k2l2q4-mz.121-22.EA7.bin. This is just the IOS for the last of the switches shown. As you can see, after the numbers "2950" are the letters "lre". The operating system is distributed as a binary file and, in most cases, as a * .tar archive. The archive contains the same binary file, as well as the html directory in which the web interface of the switch is located. The operating system must be included with the switch. But if the attached disk with the OS is lost, or you want to update the OS, then you have to download it.
There are three ways to install IOS: copy the operating system file through xmodem or through a TFTP server. The third way is through the web interface. But this feature is not always available, and it is implemented each time in a different way, depending on the version of iOS. Therefore, we consider only the first two methods.
Xmodem
Installation using the xmodem protocol should only be done if the operating system on the switch is either wiped or damaged. 3 megabytes of IOS copying time to the flash memory of the switch is approximately one hour. To reinstall IOS using the Xmodem protocol, you need to connect to the switch through the console, as described in Connecting to the switch, and enter the bootloader, as described in Restoring a forgotten password.
Next, you need to initialize flash memory with the flash_init command . Then look at what is currently in the switch memory: dir flash:. At the end of the list of files in memory, the size of the memory and the available free space are written. Make sure you have enough space to download iOS. If there is no space, delete * .tar and * .bin files with the delete flash: file_name.tar (bin) command . You can also format the memory with the format flash: command .
After the space is cleared, you can start copying. Type the command copy xmodem: flash: file_name.bin and immediately (!) Send the desired file through the terminal. Click on the menu of the terminal Transfer-> Send file. In the window that appears, select xmodem, as shown in the figure, and the file you want to transfer:
I note that if you download the operating system as a * .tar archive, this will not lead to anything. Since bootloader lacks unzip functions.
After copying is complete, reboot the switch. Perhaps if you formatted flash memory, you will have to create an env_vars file in which you need to write the mac address of your switch. To do this, carefully review the information that bootloader gives out at boot and find the mac address in it. Then, with the set MAC_ADDR xx: xx: xx: xx: xx: xx command, enter the mac address in the list of environment variables, and then type the set_param command . Flash memory must be initialized. After these steps, the env_vars file should be created, which you can check with the dir flash command :. The web interface can only be downloaded as a * .tar archive, since the html directory contains a huge number of files. This is best done through TFTP, as it is hundreds of times faster.
TFTP
You can install IOS via TFTP only if the switch is currently operational (i.e., IOS is loaded) and you are in privileged mode ( enable command ). To copy files using TFTP, you need the TFTPServer program. You can download it from the Internet. It takes less than one and a half megabytes. Install this program on your computer and run. Do not forget to give appropriate instructions to your brandmauser, or turn it off while copying files. Copy the files you want to transfer to the directory to the TFTP server, or to any other directory, after indicating this to the program, as shown in the picture:
You probably want to use TFTP just to download the web interface of the operating system. In this case, only the html directory should be in your * .tar arrow. The OS itself needs to be removed from the archive. To do this under windows, install the total commander program. This is a file manager that supports the * .tar archive format, i.e. allows you to view the archive, delete / add files and directories and much more.
The switch must be turned on, IOS is loaded, the Telnet console is running. Type copy tftp: flash: in the console , and answer a few questions that the switch will ask you. Then the download will begin. And, if the archive contains only the web interface, it will download in about 10-15 seconds. Then you need to unzip the web interface. To do this, type the commandarchive tar / xtract 1.tar flash: where 1.tar is the downloaded archive.
Reinstalling the iOS operating system on the switch is completed.