Fur Shader on WebGL 2
- Transfer
Idea
The new WebGL 2 standard was recently available in the latest versions of Firefox and Chrome, so there was a desire to try out some new features. One of the most useful and popular features of WebGL 2 (and OpenGL ES 3.0, on which it is based) is the duplication of geometry (English instanced rendering). This feature allows you to reduce the number of draw calls by repeatedly drawing the same geometry with changed parameters. This feature was present in some implementations of WebGL 1, but it required a certain extension. Most often, this function is used to create systems of particles and vegetation, but also quite often it is used to simulate fur.
Concept and demo
There are quite a few different approaches to simulating fur in OpenGL, but this implementation is based on the technique described in this video tutorial . Despite the fact that it describes the creation of a shader for Unity, the detailed and clear step-by-step instructions from this video were taken as the basis for creating an OpenGL ES shader from scratch. If you are not familiar with the general principles of fur simulation, we recommend that you spend 13 minutes watching this video to understand the general principles of its operation.
All the graphic materials for the demo were created from scratch (just looking at the photos of different wool samples). These textures are very simple and their creation did not require any special skills in creating realistic textures.
View the finished demo here. If the browser does not support WebGL 2 (for example, at the moment, mobile browsers only support WebGL 1), then here is the video demo:
Implementation
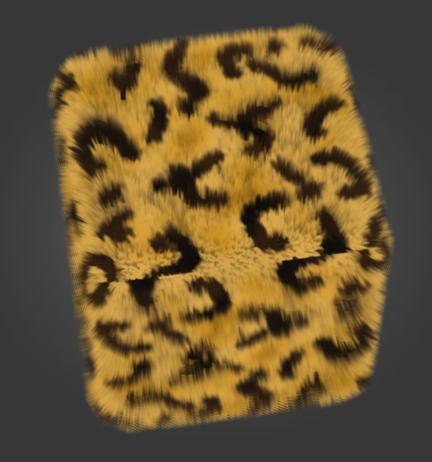
To clearly demonstrate how the fur simulation works, we start by rendering two additional layers of fur with a sufficiently large thickness (the distance between the layers). The following image shows the original object without fur and two translucent layers on top of it:
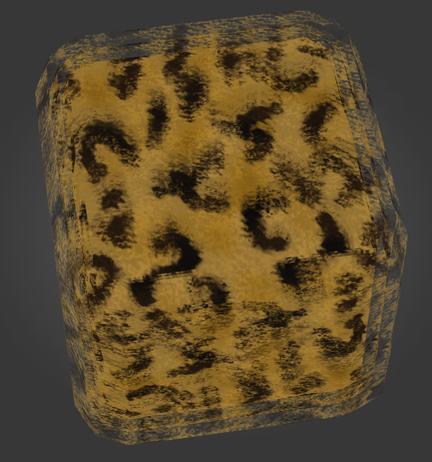
Increasing the number of layers and reducing the thickness of the layer, we gradually get a more realistic result. In this image of 6 relatively dense layers, a gradual decrease in the transparency of layers from completely opaque to completely transparent is already clearly visible:
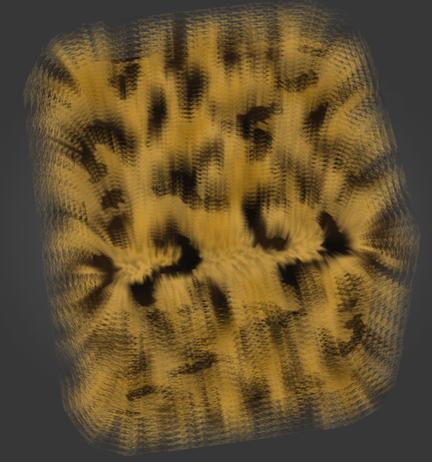
And a fairly realistic end result using 20 very thin layers:
Our demo uses 5 different predefined parameters - 4 furs and one moss. All of them are rendered with the same shaders but with different specified parameters.
First, a cube with the same diffuse texture that is used for all layers of the fur is rendered. However, it must be darkened so that it blends with the first layer of fur, so that the color from the texture multiplies by the color of the initial color of the fur. Here we use the simplest shader that simply takes a color from a texture and multiplies it by a different color.
Next, the rendering of the fur layers begins. They are transparent and therefore require the selection of the correct color mixing mode in order to look realistic. Using the usual glBlendFunc () led to either too bright or too dull colors of the fur, as this mode affects the alpha channel and thus distorts the colors. The glBlendFuncSeparate () function allows you to set different color blending modes for RGB and alpha channels of fragments and using it, it was possible to save the alpha channel unchanged (it is completely controlled by the shader) and at the same time correctly mix the color of each fur layer with itself and other geometry .
The following color blending mode is used in the demo:
gl.blendFuncSeparate(gl.SRC_ALPHA, gl.ONE_MINUS_SRC_ALPHA, gl.ZERO, gl.ONE);Examples of attempts to select a mixing mode:
After you set the correct mode for mixing colors, you can proceed to the actual rendering of the fur. The rendering of the entire fur is implemented in one call - all the work of duplicating the geometry is performed in one shader. A video card without drivers involves repeating geometry rendering a specified number of times and, therefore, there is no cost for additional calls to OpenGL commands. All subsequent clarifications apply only to this shader. The GLSL 3.0 syntax used in WebGL 2 and OpenGL ES 3.0 is slightly different from GLSL 1.0 - you can see the differences and instructions for porting older shaders here .
To create layers of fur, the shader shifts each vertex in the normal direction. This gives some flexibility in adjusting the direction of hair styling, because the normals of the model can be tilted if desired (in the demo, the normals are perpendicular to the main geometry). From the built-in variable gl_InstanceID, the shader receives the value of the current geometry instance. The larger this value, the farther the vertex moves:
float f = float(gl_InstanceID + 1) * layerThickness; // calculate final layer offset distance
vec4 vertex = rm_Vertex + vec4(rm_Normal, 0.0) * vec4(f, f, f, 0.0); // move vertex in direction of normal
In order for the fur to look realistic, it must be denser at the base and gradually taper at the tips. This effect is achieved by gradually changing the transparency of the layers. Also, to simulate ambient occlusion, the fur should be darker at the base and lighter on the surface. Typical parameters for the fur are the initial color [0.0, 0.0, 0.0, 1.0] and the final color [1.0, 1.0, 1.0, 0.0]. Thus, the fur begins completely black and ends with the color of the diffuse texture, while transparency increases from a completely opaque layer to a completely transparent one.
First, the color coefficient is calculated in the vertex shader and the color between the start and end is interpolated based on this coefficient. In the fragment shader, this color is multiplied by the color of the diffuse texture. The final step is to multiply the alpha channel of the fragment by the color from the black and white texture, which determines the distribution of the coat.
// vertex shader
float layerCoeff = float(gl_InstanceID) / layersCount;
vAO = mix(colorStart, colorEnd, layerCoeff);
// fragment shader
vec4 diffuseColor = texture(diffuseMap, vTexCoord0); // get diffuse color
float alphaColor = texture(alphaMap, vTexCoord0).r; // get alpha from alpha map
fragColor = diffuseColor * vAO; // simulate AO
fragColor.a *= alphaColor; // apply alpha mask
There are many different options for the implementation of swaying fur in the wind. In our demo, we slightly shift each vertex based on the cyclically changed parameter passed to the shader. In order for all layers to move synchronously, it is necessary to calculate some unique value for each vertex with the same coordinates. In this case, it will not be possible to use the built-in variable gl_VertexID , since its value differs for different vertices, even for those whose coordinates are the same. So we calculate some “magic sum” from the coordinates of the vertex and use it in a sinusoidal function to create “waves” of the wind. An example of vertex displacement based on the value of the time parameter :
const float PI2 = 6.2831852; // Pi * 2 for sine wave calculation
const float RANDOM_COEFF_1 = 0.1376; // just some random float
float timePi2 = time * PI2;
vertex.x += sin(timePi2 + ((rm_Vertex.x+rm_Vertex.y+rm_Vertex.z) * RANDOM_COEFF_1)) * waveScaleFinal;
vertex.y += cos(timePi2 + ((rm_Vertex.x-rm_Vertex.y+rm_Vertex.z) * RANDOM_COEFF_2)) * waveScaleFinal;
vertex.z += sin(timePi2 + ((rm_Vertex.x+rm_Vertex.y-rm_Vertex.z) * RANDOM_COEFF_3)) * waveScaleFinal;
Further improvements
Despite a fairly realistic result, this fur implementation can be significantly improved. For example, it is possible to implement the use of wind strength and direction and have wool of different lengths in different areas of the model, setting length factors for each vertex.
You can take the code from Github , use and improve it in your projects - it uses the MIT license.