Modular Sci-Fi level on UE4: inspired by Nostromo and Serenity
- Transfer
Balance and replayability are perhaps one of the main points for a PvP shooter. The visual is also important, and for all this we have a whole pipeline level designer . Another thing - genres, where the atmosphere of the environment is in the first place, and above the level one person works instead of the whole team. And the workflow of such an “orchestra man” turned out to be very interesting to me. Recently I came across just an article where the author performs just such a role and creates a Sci-Fi location.
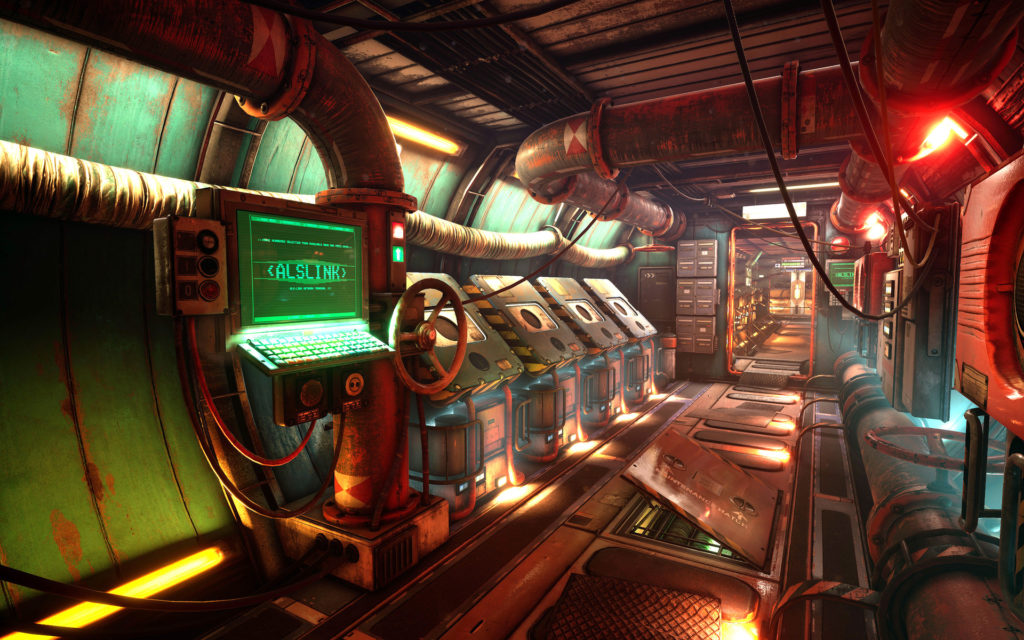
Under the cat a large translation of the whole process - from modular assets and materials based on photos to the lighting and the nature of the scene. And as a teaser - that's what happened in the end:
My name is Matt Olson , I am an environmental artist from Orange County, California. He studied art, illustration and graphic design at the University of California, Long Beach.
My career began in 1997 as a concept artist for a small company developing a science fiction MMORPG Atriarch. Most of the time, I painted aliens and alien landscapes, but still worked with Lightwave 3D. It was a great platform for learning modeling, lighting, and animation. In 2001, he started working at Collective, a small independent studio based in Newport Beach. Did Wrath: Unleashed, Getting Up, Star Wars, Silent Hill: Homecoming, Front Mission Evolved and a few more unreleased projects. For 9 years in this studio from the artist of the environment, I became the leading artist of the environment, and then art director.
Then I left the management to go back to creating art - at Turtle Rock Studios . There he worked as a senior artist on the shooter EVOLVEand several VR projects. And now we are developing an unannounced title.


Sci-Fi is my favorite genre for working on environmental design. I like the freedom to create spaces, shapes, and shapes. This is probably why EVOLVE and Star Wars have always been favorite projects. In Sci-Fi, I wanted to dive after creating my Wild West vision for the ArtStation Challenge . There, the Wild West mixed with science fiction and it became clear that I was closer from this.
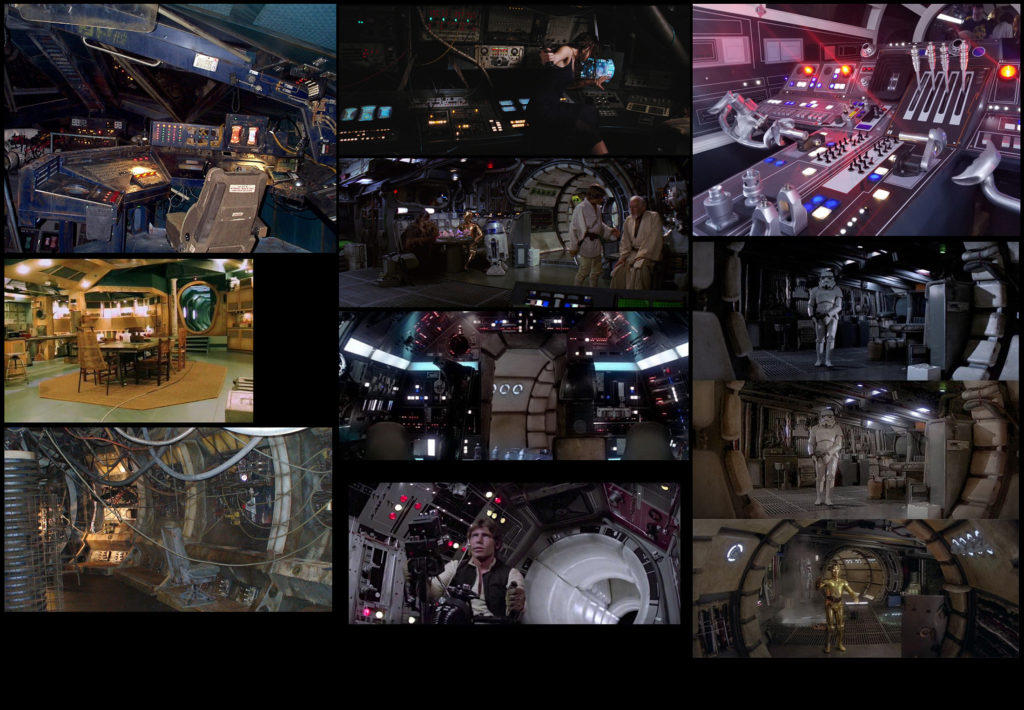
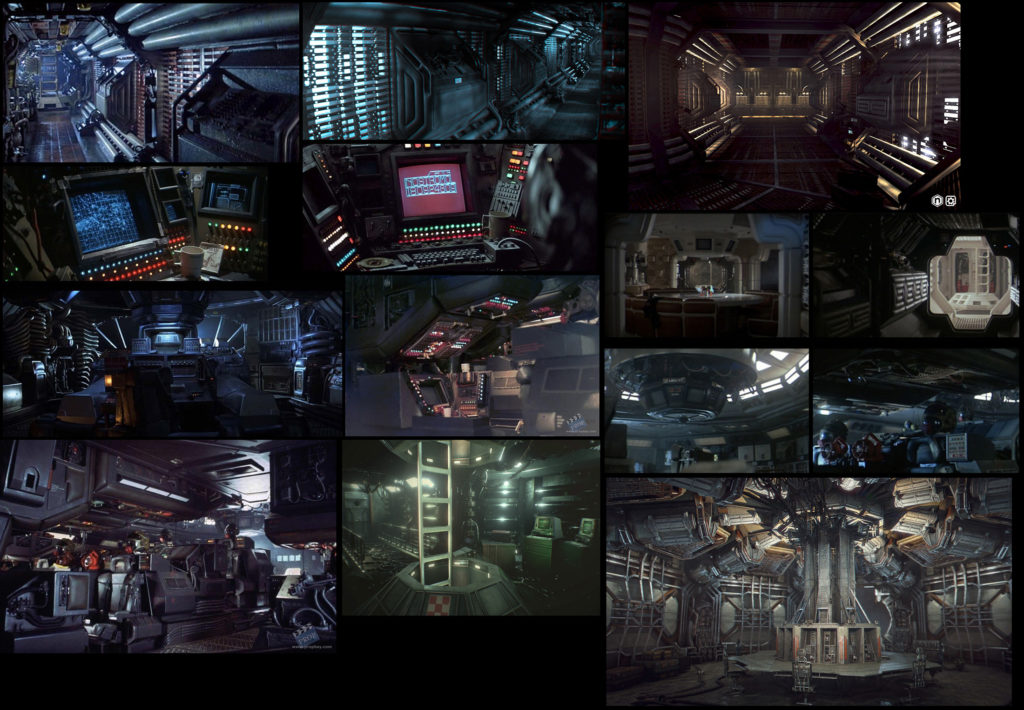
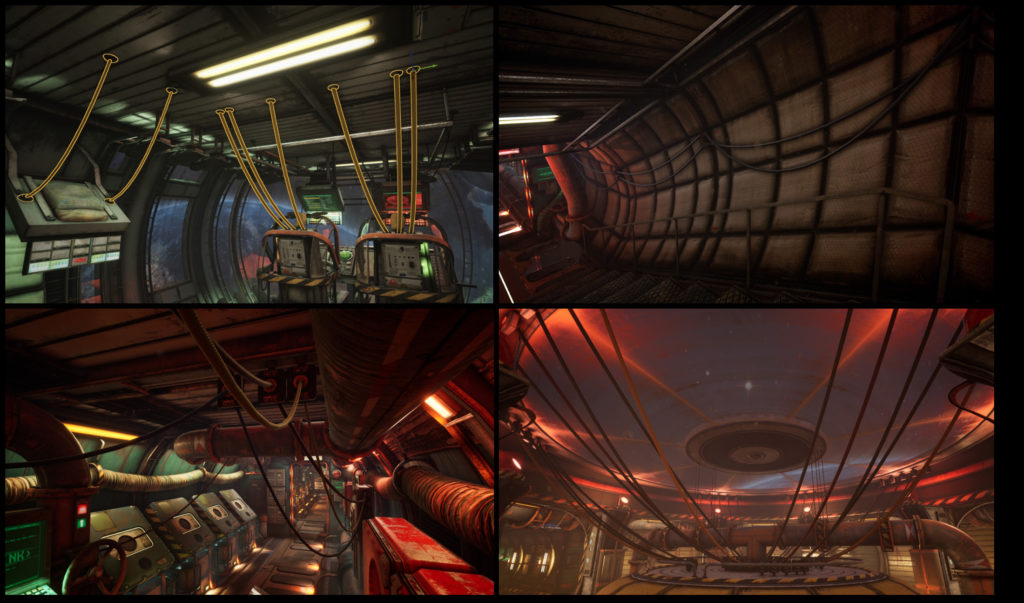
Usually during work I turn on the movie. Recently watched "Alien", "Mission" Serenity "" and 4-6 episodes of "Star Wars". "Mission" Serenity "" is where the idea to make the "lived-in" ship originally came from. "Alien" greatly influenced the atmosphere with the old school technology. I like the bulky old type of electronics with tactile switches, buttons and green CRT monitors.
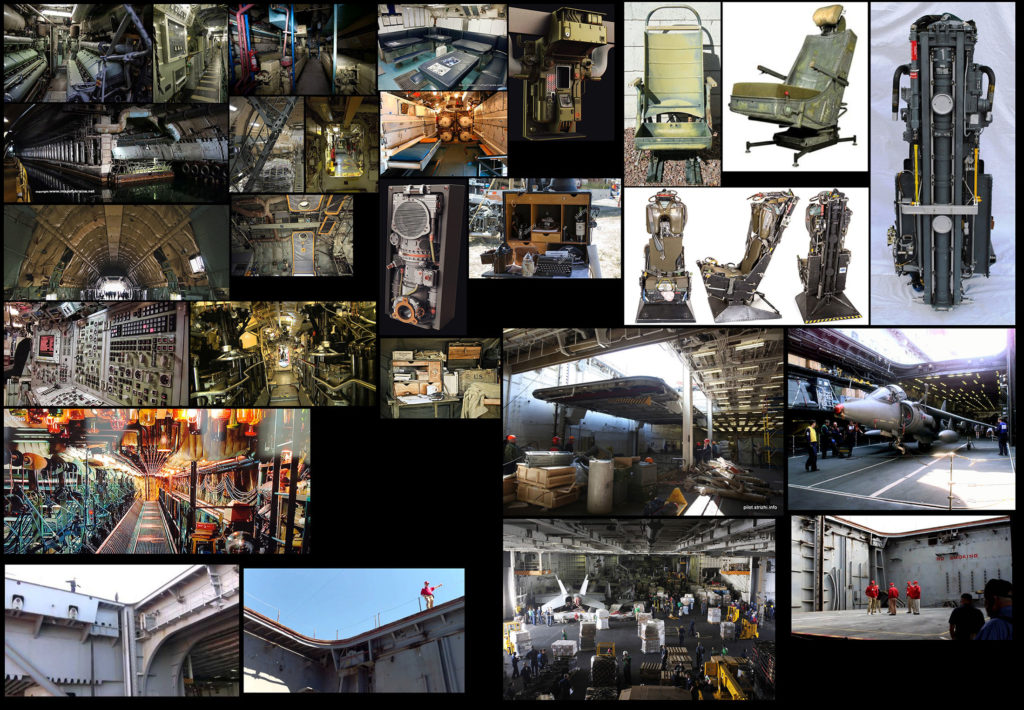
It was also inspired by old submarines and sea ships, mainly because of the beautiful engineering chaos around (and to avoid copying the style from the films). I wanted all surfaces to be rough, scratched, oily, dirty and untidy. The location should have looked like it needed a good repair.
I wanted to limit myself to a typical Sci-Fi corridor, but when everything was ready, I decided to develop the idea further. The result was a whole ship interior. True, it is not finished yet (I want to add more details that would indicate the presence of people).
I repeat, at first it was planned to create a small section of the corridor. The main goal: to make crowded and chaotic space, which in this case would have a clearly visible passage for people. The first block of the corridor was too wide, and I tried to make it as dense as on a submarine. Therefore, I sketched a much narrower version, but after a quick import into UE4, I realized that I had overdone it. Now he did not allow to place the camera in any place to create good screenshots. I modeled the corridor to determine the minimum and maximum distances, and then used them as standards for the rest of the ship. It is obvious that some of the rooms have become larger, especially the two hangars and a round core in the middle of the ship.
Then he made a rough blockade of the entire corridor.

When a question with a general view of the scene (no matter if it is concept art or reference) is closed, the creation of a set of textures begins (it will grow as necessary).
The environment is built using trim and tile textures (trim sheets and tileable texture). First I modeled the modular walls, floors and ceilings. Initially, there were three types of walls, in the end they became five. Then a modular set of pipes and modular door elements (door frames, sunroof, single and double doors) appeared. That was enough to build the foundation of the corridors and rooms.
Then there was the task to model all panels, cars, parts, light sources and auxiliary elements (levers, dials and crank wheels). I made a basic set of these things and filled the corridor with them to level the void and add life to the location.
When it comes to modular assets, I definitely build everything on the grid that follows the metric measurements of UE4. In Maya, I set the units to centimeters, and then I make a grid in 1 meter increments with divisions every half meter. When preparing a model for export, I check that my rotation point is set to a point on this grid. It is necessary that it should be agreed in the editor. I also make sure that my modular elements end on a grid and converge with each other.
As soon as the modular parts library is ready, I can update it for a change. For example, add a UE4 cable system for pulling wires and cables through all the scenes to help with the planned organized chaos. To accommodate wires and cables, I made plugs that I could put anywhere in the location. The system is cool in that you attach the end of the cable to the object and install it anywhere - the cable will stretch itself.
Several custom models were created specifically for the bridge and hangar. For the bridge, for example, need a seat and console. In fact, they were made the same way as everything else (using trim sheets), but I still had to come up with some unique features.
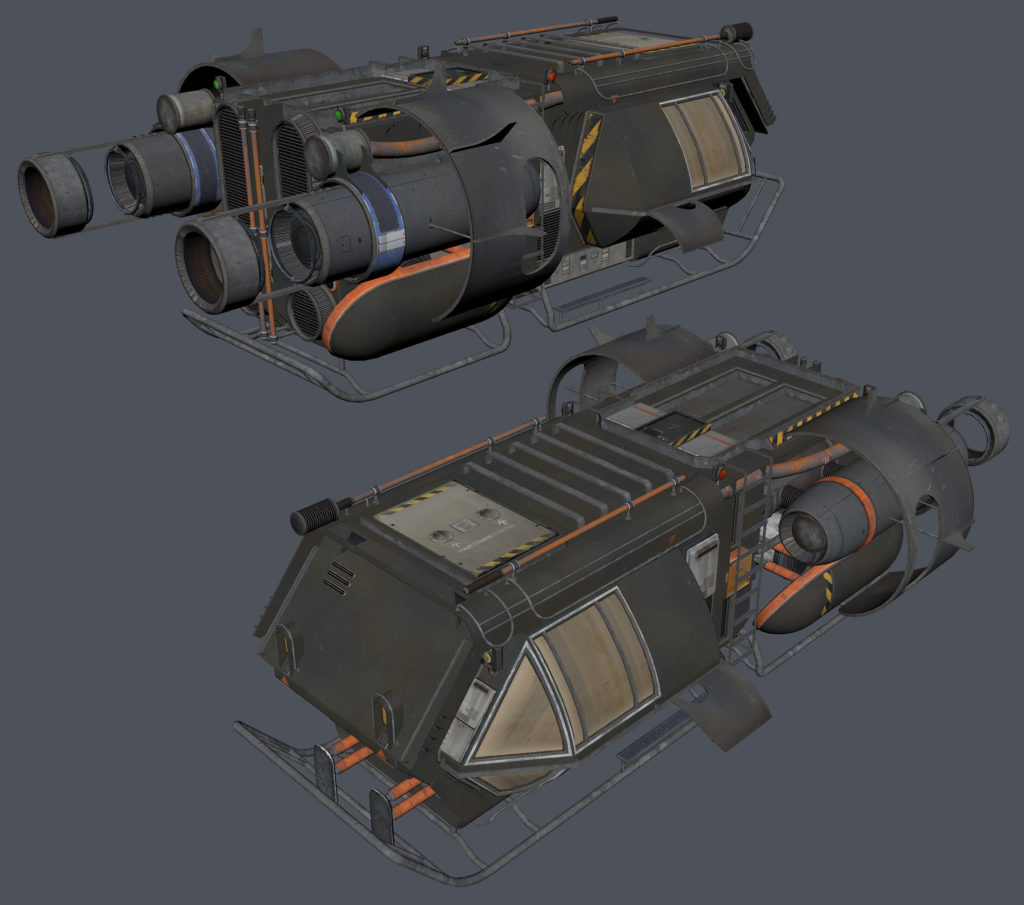
Shuttle in the hangar is also an independent object, which was zakitbashen. The main body of the shuttle is a special model made using the Blend material so that you can add a worn effect at the edges and corners.

In the project, I did not want to use a lot of smooth and glossy surfaces. I wanted all the materials to be rough, oily, rough and dirty. But they were supposed to complement the scene, and not overload it or “compete” with each other for the player's attention. Lighting the scene can help with this, but only if the materials of the surfaces are combined with each other.
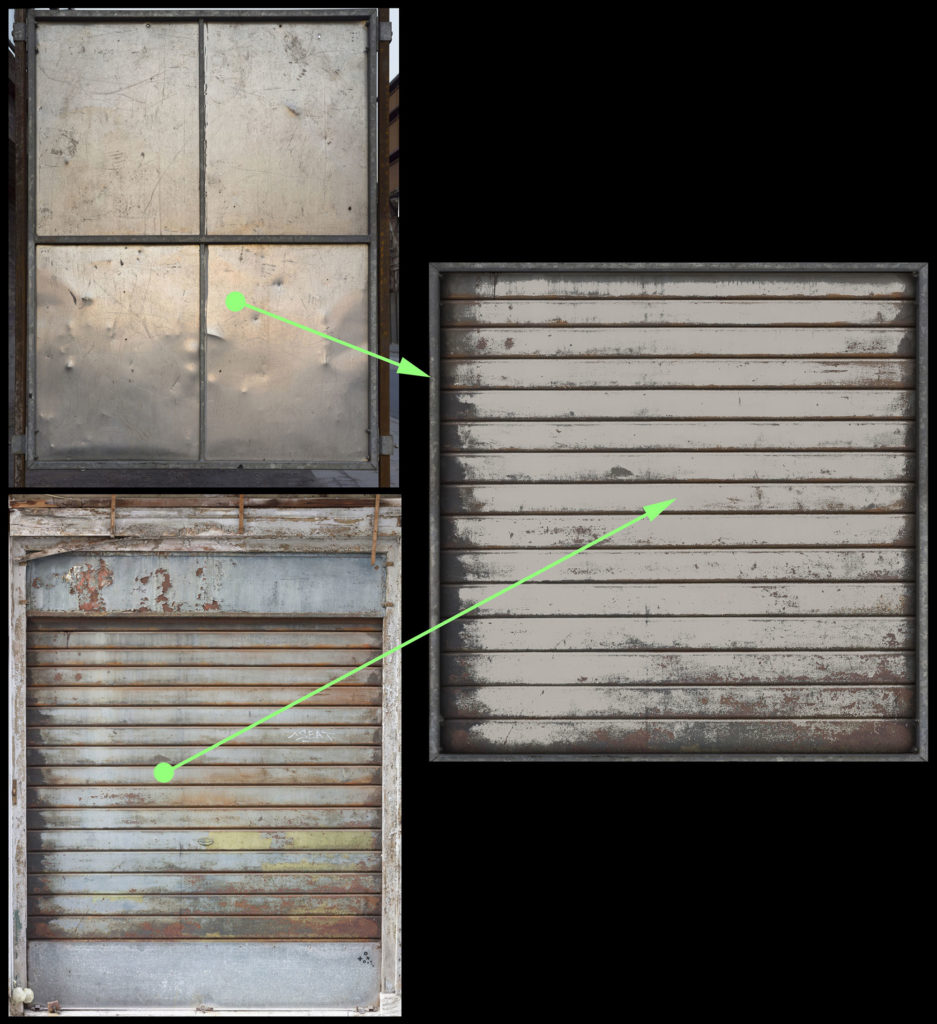
When creating materials, I like to scan things from real life. It has so many little things and details that are also free. But since for my Sci-Fi project this is not so easy to do, I decided to create materials based on photographs: first, they give the desired look, and second, I have several years of experience with this.
The method is similar to how you create material in the Substance Designer, but it is done in Photoshop using certain layers and filters. I started with the typical Sci-Fi wall material that would be used throughout the project.
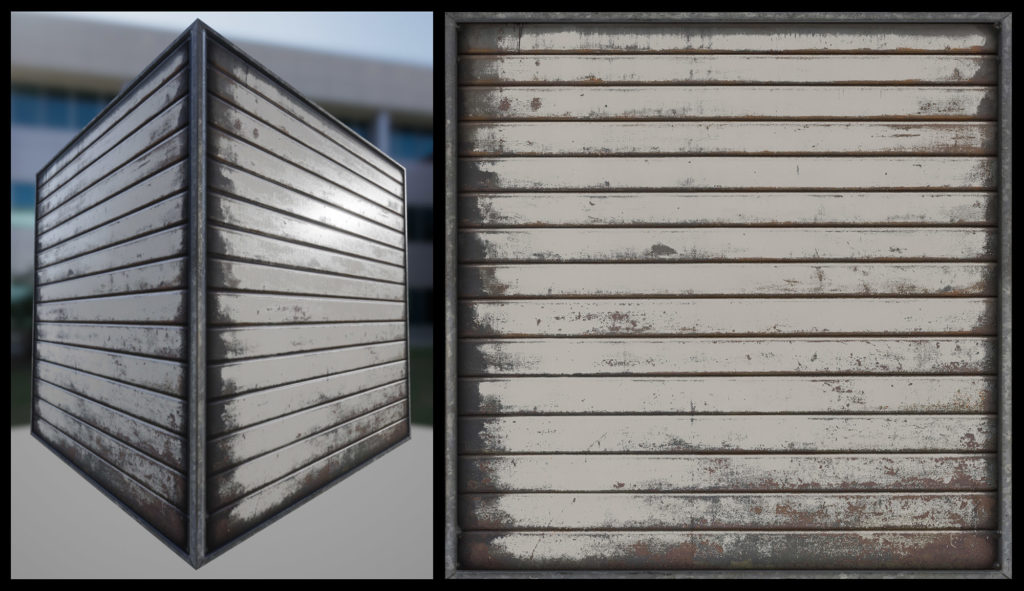
I took two images to create the first material: stainless steel to create the border of the wall and the old roller door for the main part of the wall. Then he cleaned and removed the outer shoals. Then he deleted the information about the lighting, except for ambient - he added it under the metal frame around the border. Finally, set up a histogram to remove all too dark and light values. Reduced contrast a little more.
Then he made a normal map. The step is quite simple, especially with such a wall material. It creates a simple elevation map with black and white gradients that correspond to large shapes in the base color. This is the base for the normal map that will control the overall depth of the material. To create a thin bump layer, I use a desaturated version of the base color with aggressively increased contrast. There is a feeling of plastic coating.
Keeping small details for roughness maps. To generate the normals useful plugin XNormal in Photoshop. I mix the Bump layer with the generated height layer, removing the blue channel and using the Hard Light blending mode. So you can control the strength of the bump by simply adjusting the opacity of the layer.
For a roughness map, I discolor the base color and make the necessary changes to get highlights and irregularities.
My material configured for standard PBR material is quite simple in UE4. There is one thing to save the number of cards while reducing memory. I combine maps (metallic, roughness and AO) into one structure using RGB channels. The roughness is placed in the green channel, because it helps with the compression of the texture.
When creating Sci-Fi environments, trim sheets are indispensable, especially for kitbashing . The main thing for which they are needed is the transition zones (for example, where the wall meets the floor) or to assemble the framework (to attach the object to another surface). And also to create beams, frames and pipes that help build the structure of the environment. For this particular environment, one trim sheet was made. Almost every model uses it in one form or another.
Together with trim sheets I use a lot of atlas sheets. They usually consist of elements that are not like tiles, panels, consoles, sheets of metal and others.

I also use modules to reduce monotonous work during scene creation. Something like when you constantly dig into the same editor menu or tool and ask yourself: “Why do I not have a hot key for this?”.
I like to collect the scene by hand in pieces and liven up it, but excessive modular parts do not allow me to do this without a lot of layers and a complex hierarchy. I try to adjust the zones to each other and make them work: sometimes it turns out, sometimes not.
I even have a few obsessive-compulsive symptoms when modeling. For example, to make a flat surface “ideally” flat or so that something cylindrical has a number of sides multiple of 4 (4, 8, 16, 20, 24, 36). But when creating the interior of the ship, I did not worry about its ideal form. The goal is to make it look old, habitable, as if the crew is doing everything possible to maintain it in working condition.
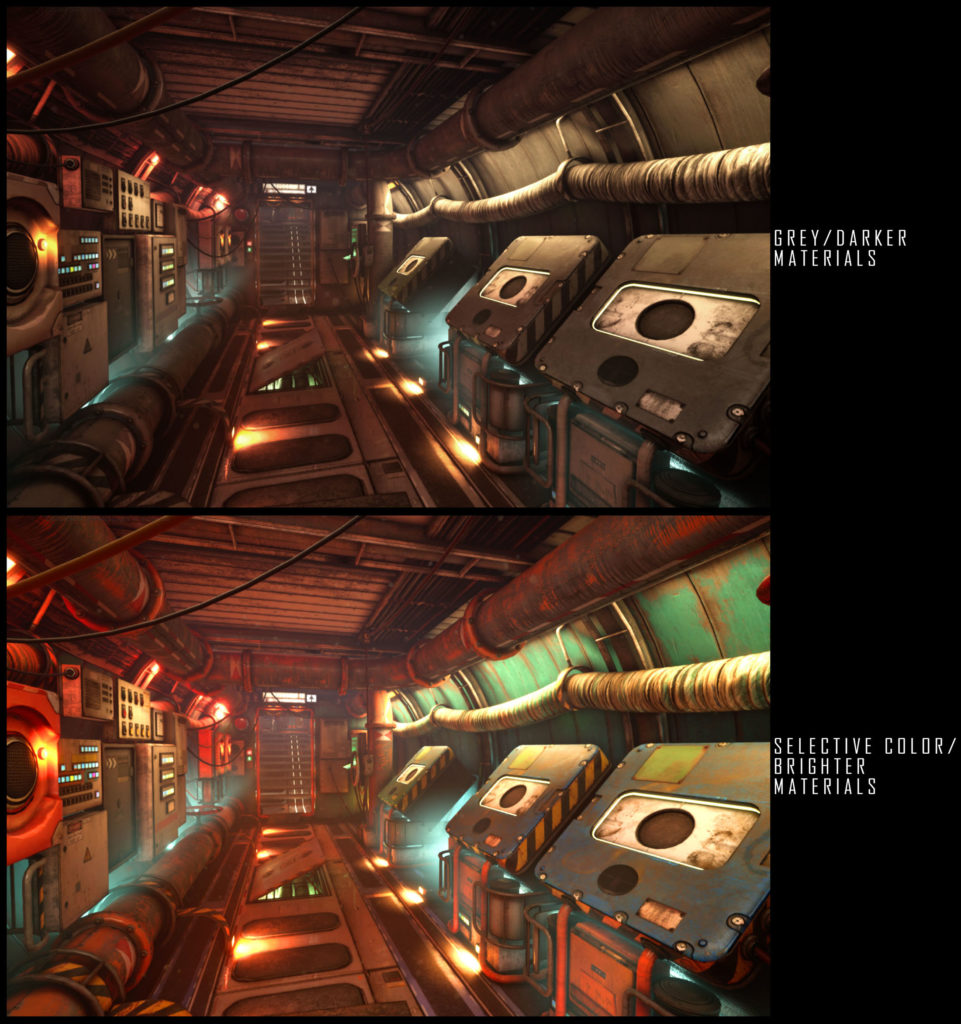
To give the atmosphere of the location, I wanted to make thick air with many particles. I unscrewed the lighting brightly enough so that the objects were not lost in the dark, but there was a feeling that the bulbs could be wiped from dust. I also wanted to add colors. In many Sci-Fi movies and games over the past few years, the environment is all so dark, brown or gray. It looks very monotonous. I really like the lighting in “Alien” and “Aliens”, but did not want to copy their style completely and carefully avoided dark or bright white surfaces.
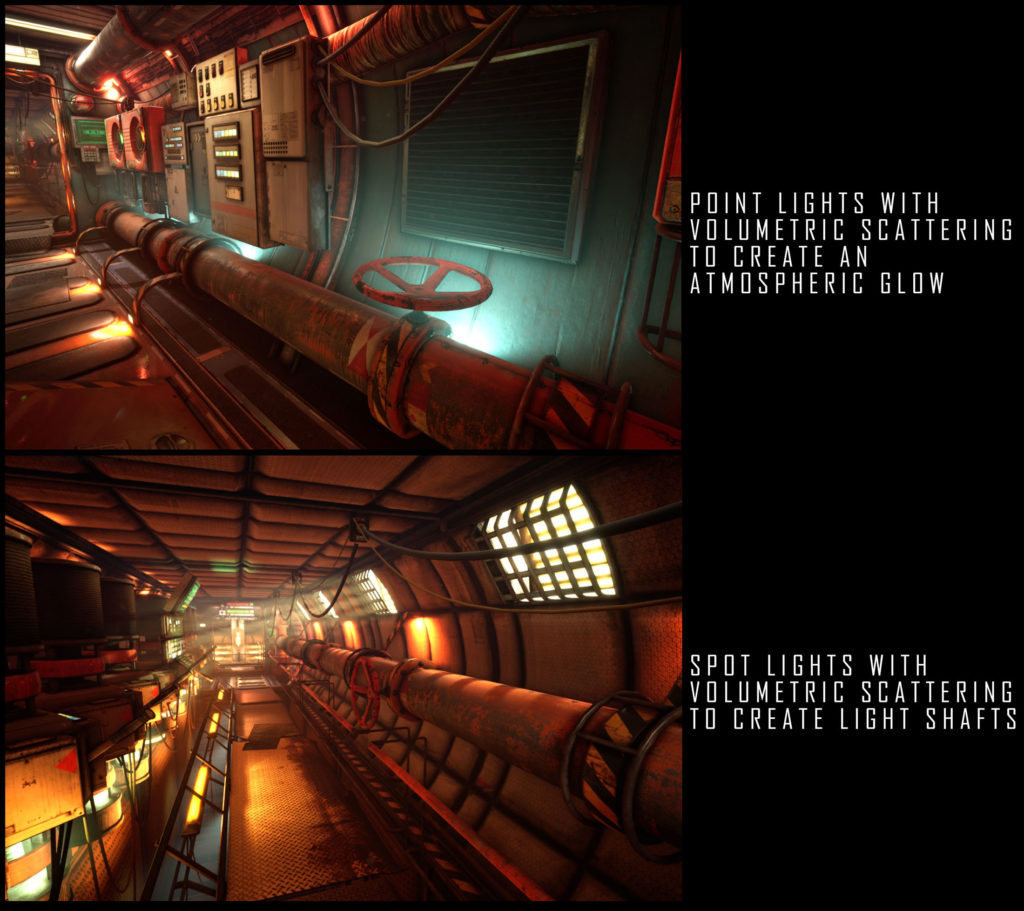
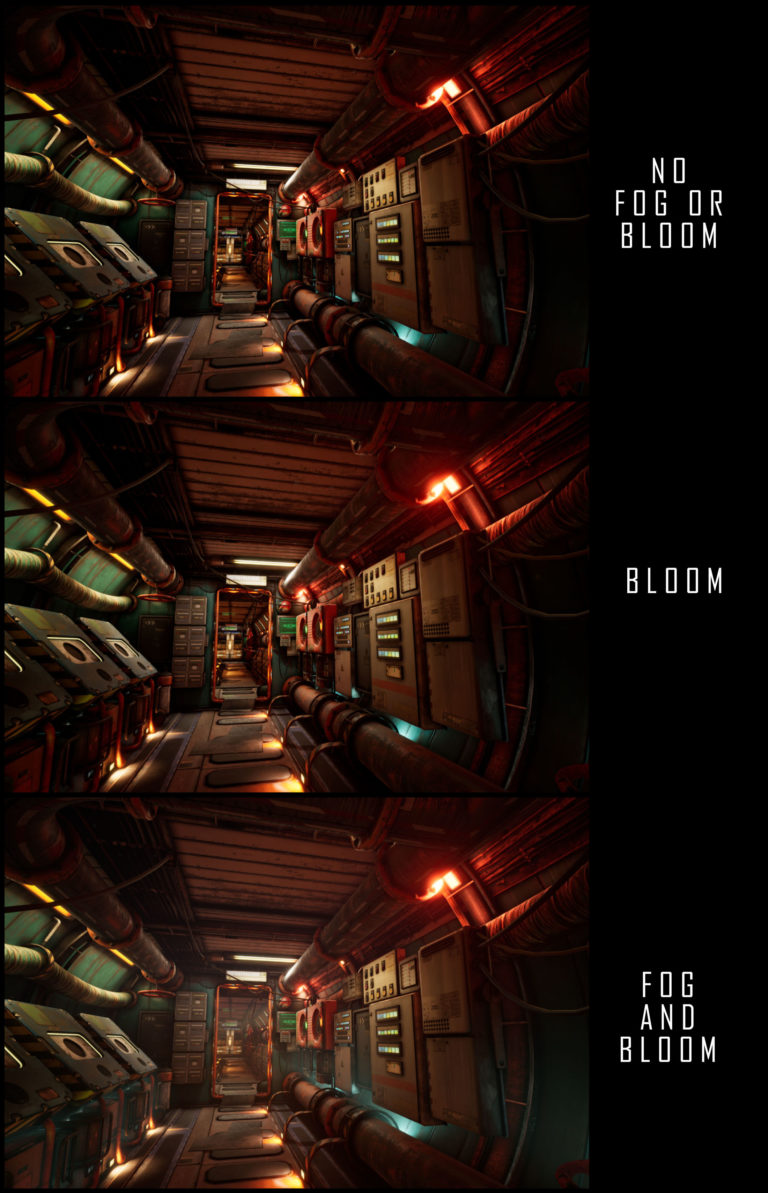
I used “volumetric” fog and lighting. Basically used only static lighting. Stationary light sources were used when it was necessary to obtain a certain volumetric scattering: Point lights to create a glow inside or behind an object and Spotlights to create rays.
One of the biggest problems is to make the “volume” work inside the ship, without affecting the starry sky beyond. On Earth, this is not a problem, because there is an atmosphere that can be mixed with the sky dome. Cosmos is another story. The solution was simple, but I had to compromise with the fog density - it has a value of View Distance, which gave a dense atmosphere.
I like to use the backlight to get a stroke on the midground objects. It adds more depth, especially in narrow spaces. And also helps complex objects not to get lost in the background.
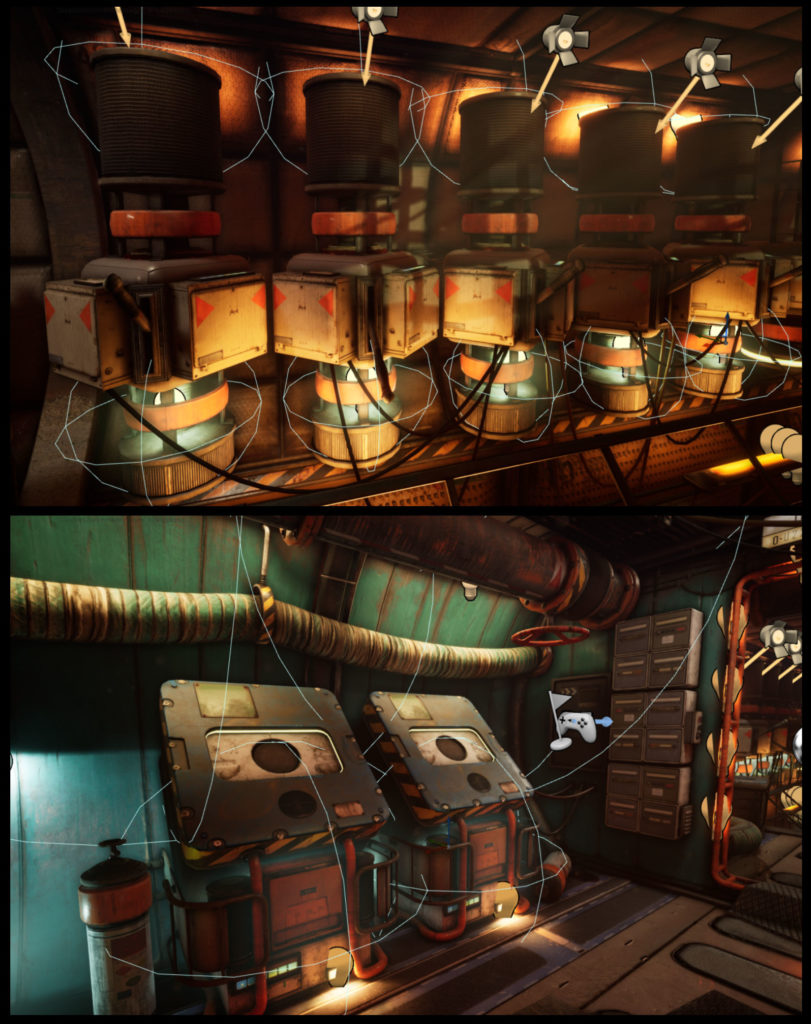
I used every type of light, except directional, because I did only interiors. Most of all, I set up the Point lights, as they fill the space with a lot of light, and there is no need to think in which direction they are pointing (they are hidden behind the midground objects to create the backlight). Rect Lights are used on almost all lamps, because they naturally distribute light from the source. Spotlights were used to light in a certain direction (for example, when passing through ventilation). And in order not to flash the scene, the value above one was not used anywhere.
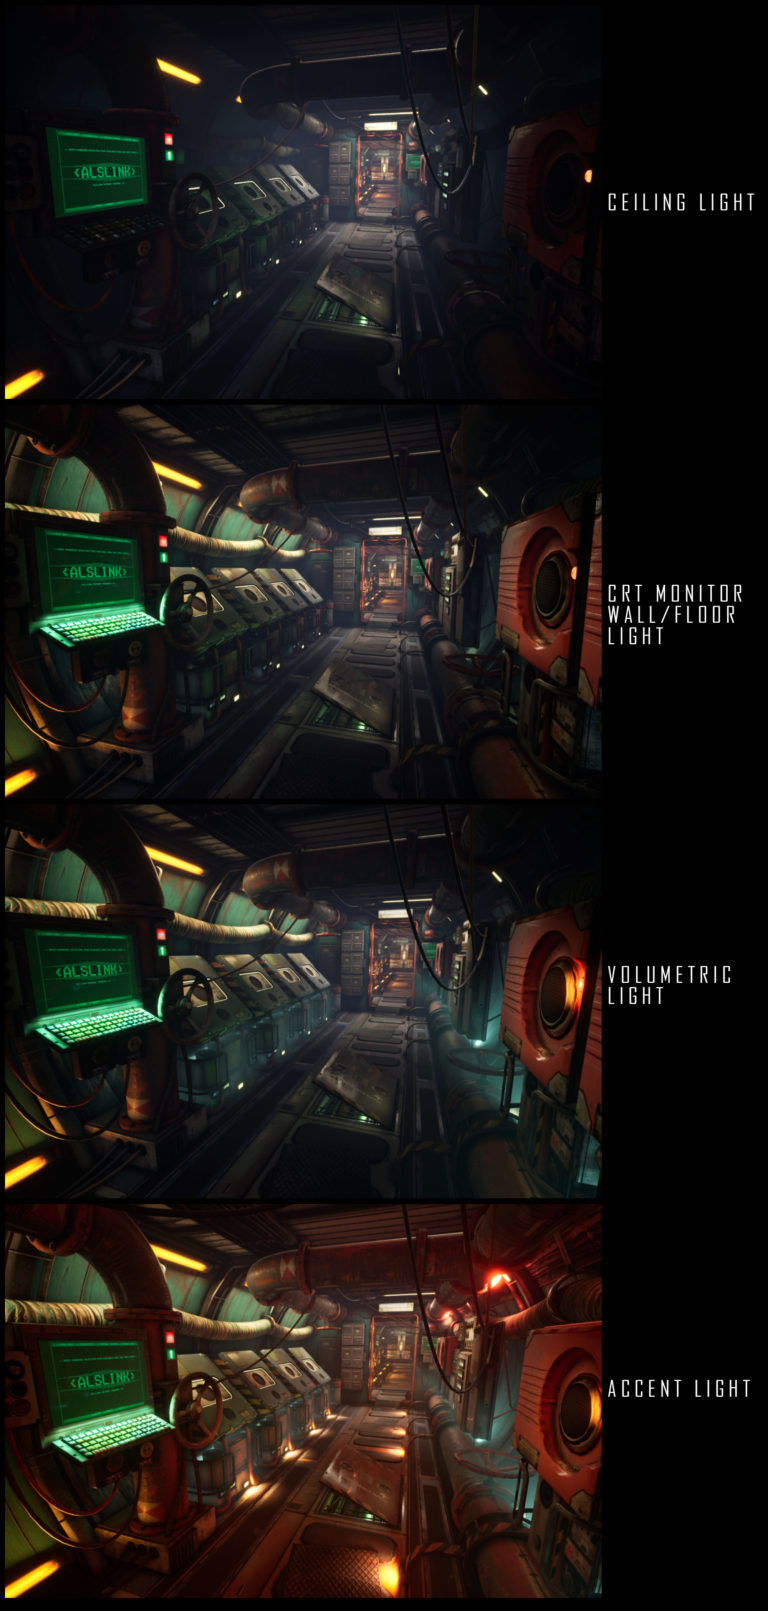
It all starts with the basic setting of light, which naturally occurs in artificial space. I add several air lights that correctly fill the space with light, and do several iterations until I am satisfied with the result. Then I set the lights in the back and in the middle to create parallax and separation.
Then I place several volumetric lights for a larger atmosphere. I wanted the light to come from inside the car. The final step is to add accents from all small light sources, including consoles and computer screens. As soon as I am satisfied with the scene as a whole, I go through the meanings and colors for the desired look.
The main thing with me when creating the atmosphere is fog and glow. As well as particles for the effect of stuck dust in the air so that it looks more natural.
In video games, the environment must have as much character as the characters themselves. It helps the narration without additional words. I like to add personal references like in Silent Hill: Homecoming. I asked each person on the design team to write a short message or a name that they would write on the wall of the prison cell. These phrases became the basis for atlas textures, which is used at the prison level.
I had several goals when creating Sci-Fi locations: coarse and worn materials, uneven and surfaces without shiny elements, complex mechanisms, no touch screens, no holograms, physical buttons and levers, a lot of wires and pipes, computer technologies of the 80s, asymmetry, small enclosed spaces, like a submarine or a warship, and orderly chaos.
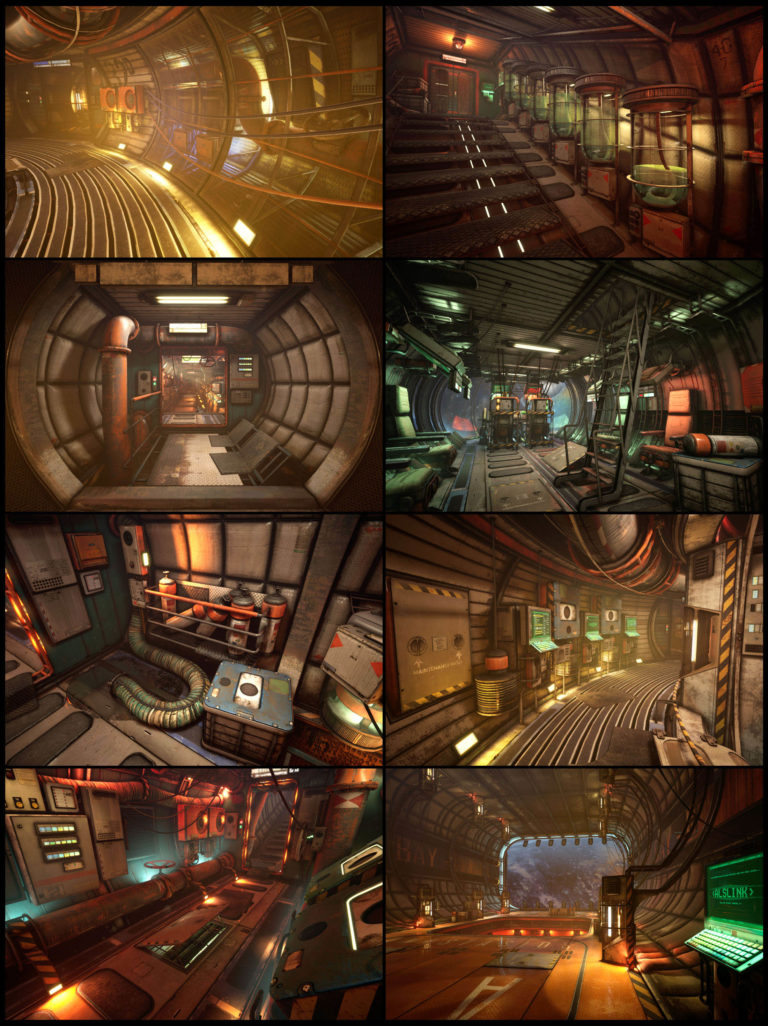
Composition - the main factor to give the scene character. While working on my own project, the conventions of game development studios do not bother me. Therefore, I have complete freedom in creating compositions and sketches. Each zone is arranged so as to get a good view from any corner or doorway. Including when considering locations separately from each other. Each space has its own character, so you will not understand that everything is built using the same set of assets.
I wanted the players to explore the ship more, because every room there is unique.
The name of the ship comes from the imitation of the Nostromo and Sulako ships from the films “Alien” and “Aliens”. I found the Greek name Anastasios (Resurrection).
It seems to fit.
Under the cat a large translation of the whole process - from modular assets and materials based on photos to the lighting and the nature of the scene. And as a teaser - that's what happened in the end:
Introduction
My name is Matt Olson , I am an environmental artist from Orange County, California. He studied art, illustration and graphic design at the University of California, Long Beach.
My career began in 1997 as a concept artist for a small company developing a science fiction MMORPG Atriarch. Most of the time, I painted aliens and alien landscapes, but still worked with Lightwave 3D. It was a great platform for learning modeling, lighting, and animation. In 2001, he started working at Collective, a small independent studio based in Newport Beach. Did Wrath: Unleashed, Getting Up, Star Wars, Silent Hill: Homecoming, Front Mission Evolved and a few more unreleased projects. For 9 years in this studio from the artist of the environment, I became the leading artist of the environment, and then art director.
Then I left the management to go back to creating art - at Turtle Rock Studios . There he worked as a senior artist on the shooter EVOLVEand several VR projects. And now we are developing an unannounced title.
Anastasios Sci-Fi Project : The Beginning
Sci-Fi is my favorite genre for working on environmental design. I like the freedom to create spaces, shapes, and shapes. This is probably why EVOLVE and Star Wars have always been favorite projects. In Sci-Fi, I wanted to dive after creating my Wild West vision for the ArtStation Challenge . There, the Wild West mixed with science fiction and it became clear that I was closer from this.
Usually during work I turn on the movie. Recently watched "Alien", "Mission" Serenity "" and 4-6 episodes of "Star Wars". "Mission" Serenity "" is where the idea to make the "lived-in" ship originally came from. "Alien" greatly influenced the atmosphere with the old school technology. I like the bulky old type of electronics with tactile switches, buttons and green CRT monitors.
It was also inspired by old submarines and sea ships, mainly because of the beautiful engineering chaos around (and to avoid copying the style from the films). I wanted all surfaces to be rough, scratched, oily, dirty and untidy. The location should have looked like it needed a good repair.
I wanted to limit myself to a typical Sci-Fi corridor, but when everything was ready, I decided to develop the idea further. The result was a whole ship interior. True, it is not finished yet (I want to add more details that would indicate the presence of people).
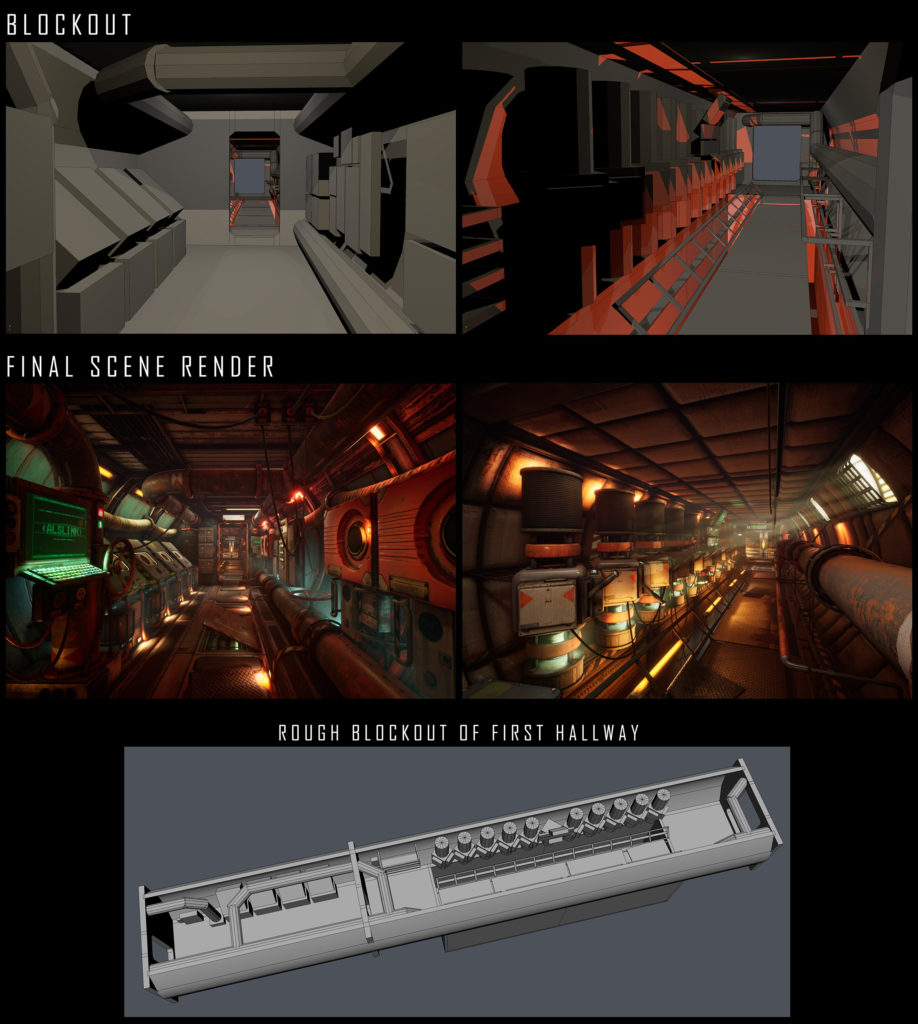
Level Prototype (Blockout)
I repeat, at first it was planned to create a small section of the corridor. The main goal: to make crowded and chaotic space, which in this case would have a clearly visible passage for people. The first block of the corridor was too wide, and I tried to make it as dense as on a submarine. Therefore, I sketched a much narrower version, but after a quick import into UE4, I realized that I had overdone it. Now he did not allow to place the camera in any place to create good screenshots. I modeled the corridor to determine the minimum and maximum distances, and then used them as standards for the rest of the ship. It is obvious that some of the rooms have become larger, especially the two hangars and a round core in the middle of the ship.
Then he made a rough blockade of the entire corridor.
When a question with a general view of the scene (no matter if it is concept art or reference) is closed, the creation of a set of textures begins (it will grow as necessary).
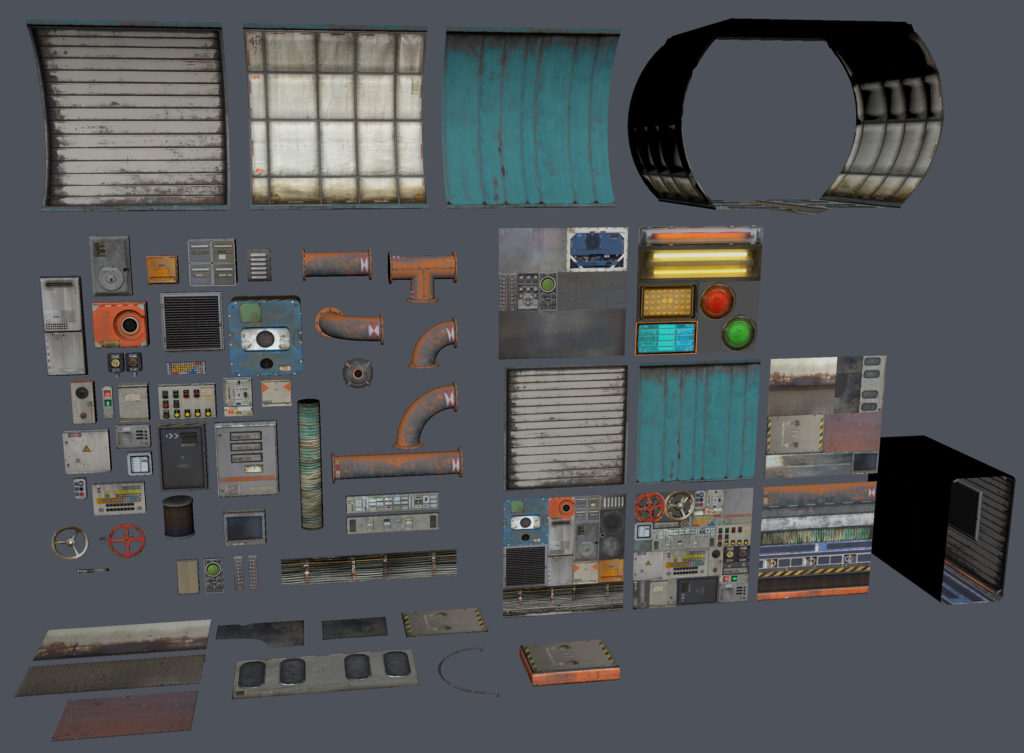
The environment is built using trim and tile textures (trim sheets and tileable texture). First I modeled the modular walls, floors and ceilings. Initially, there were three types of walls, in the end they became five. Then a modular set of pipes and modular door elements (door frames, sunroof, single and double doors) appeared. That was enough to build the foundation of the corridors and rooms.
Then there was the task to model all panels, cars, parts, light sources and auxiliary elements (levers, dials and crank wheels). I made a basic set of these things and filled the corridor with them to level the void and add life to the location.
Modular Assets
When it comes to modular assets, I definitely build everything on the grid that follows the metric measurements of UE4. In Maya, I set the units to centimeters, and then I make a grid in 1 meter increments with divisions every half meter. When preparing a model for export, I check that my rotation point is set to a point on this grid. It is necessary that it should be agreed in the editor. I also make sure that my modular elements end on a grid and converge with each other.
As soon as the modular parts library is ready, I can update it for a change. For example, add a UE4 cable system for pulling wires and cables through all the scenes to help with the planned organized chaos. To accommodate wires and cables, I made plugs that I could put anywhere in the location. The system is cool in that you attach the end of the cable to the object and install it anywhere - the cable will stretch itself.
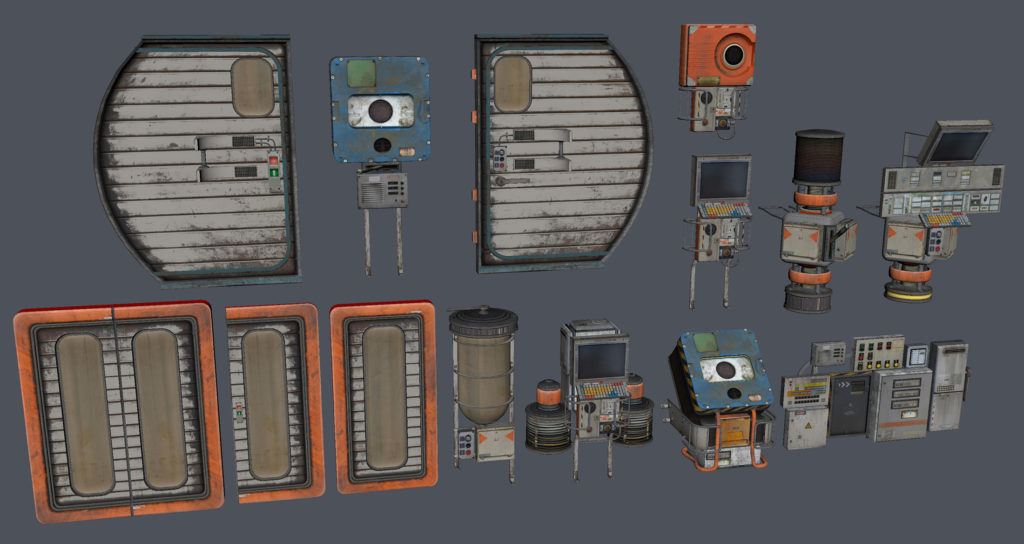
Several custom models were created specifically for the bridge and hangar. For the bridge, for example, need a seat and console. In fact, they were made the same way as everything else (using trim sheets), but I still had to come up with some unique features.
Shuttle in the hangar is also an independent object, which was zakitbashen. The main body of the shuttle is a special model made using the Blend material so that you can add a worn effect at the edges and corners.
Materials
In the project, I did not want to use a lot of smooth and glossy surfaces. I wanted all the materials to be rough, oily, rough and dirty. But they were supposed to complement the scene, and not overload it or “compete” with each other for the player's attention. Lighting the scene can help with this, but only if the materials of the surfaces are combined with each other.
When creating materials, I like to scan things from real life. It has so many little things and details that are also free. But since for my Sci-Fi project this is not so easy to do, I decided to create materials based on photographs: first, they give the desired look, and second, I have several years of experience with this.
The method is similar to how you create material in the Substance Designer, but it is done in Photoshop using certain layers and filters. I started with the typical Sci-Fi wall material that would be used throughout the project.
I took two images to create the first material: stainless steel to create the border of the wall and the old roller door for the main part of the wall. Then he cleaned and removed the outer shoals. Then he deleted the information about the lighting, except for ambient - he added it under the metal frame around the border. Finally, set up a histogram to remove all too dark and light values. Reduced contrast a little more.
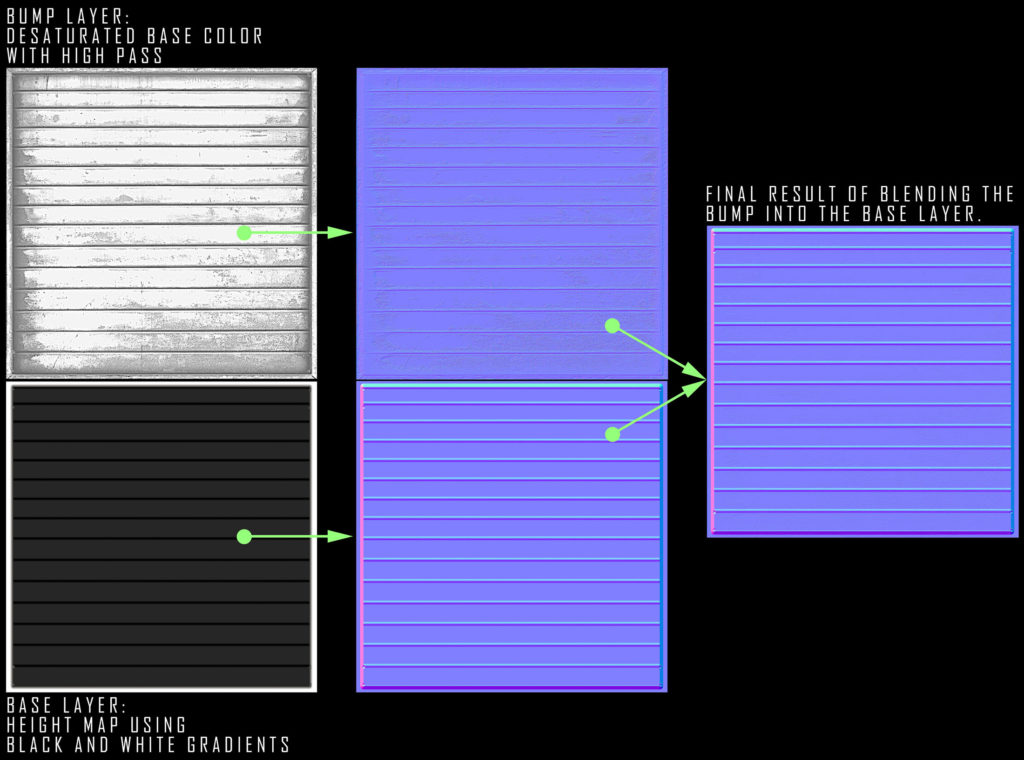
Then he made a normal map. The step is quite simple, especially with such a wall material. It creates a simple elevation map with black and white gradients that correspond to large shapes in the base color. This is the base for the normal map that will control the overall depth of the material. To create a thin bump layer, I use a desaturated version of the base color with aggressively increased contrast. There is a feeling of plastic coating.
Keeping small details for roughness maps. To generate the normals useful plugin XNormal in Photoshop. I mix the Bump layer with the generated height layer, removing the blue channel and using the Hard Light blending mode. So you can control the strength of the bump by simply adjusting the opacity of the layer.
For a roughness map, I discolor the base color and make the necessary changes to get highlights and irregularities.
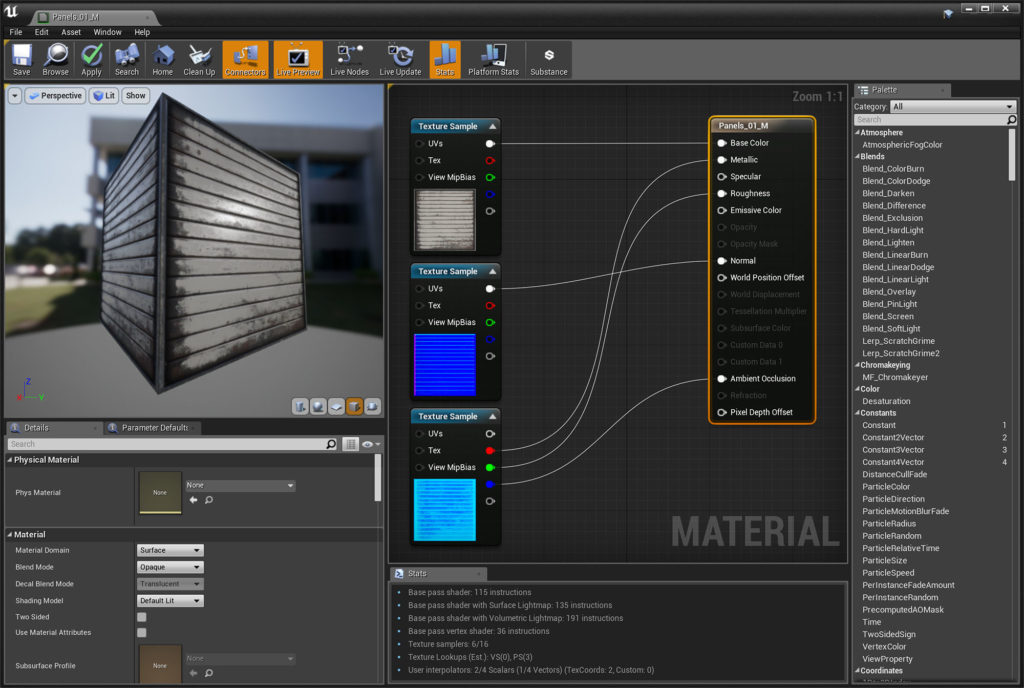
My material configured for standard PBR material is quite simple in UE4. There is one thing to save the number of cards while reducing memory. I combine maps (metallic, roughness and AO) into one structure using RGB channels. The roughness is placed in the green channel, because it helps with the compression of the texture.
Trim Sheets and Build
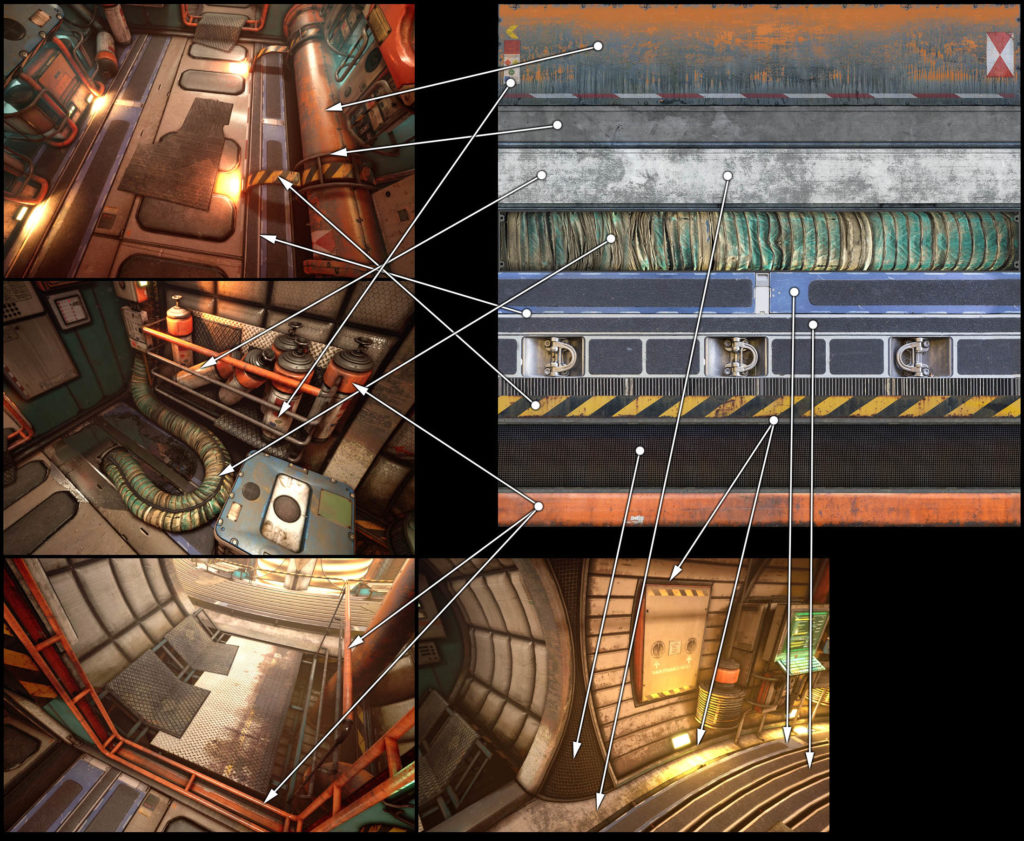
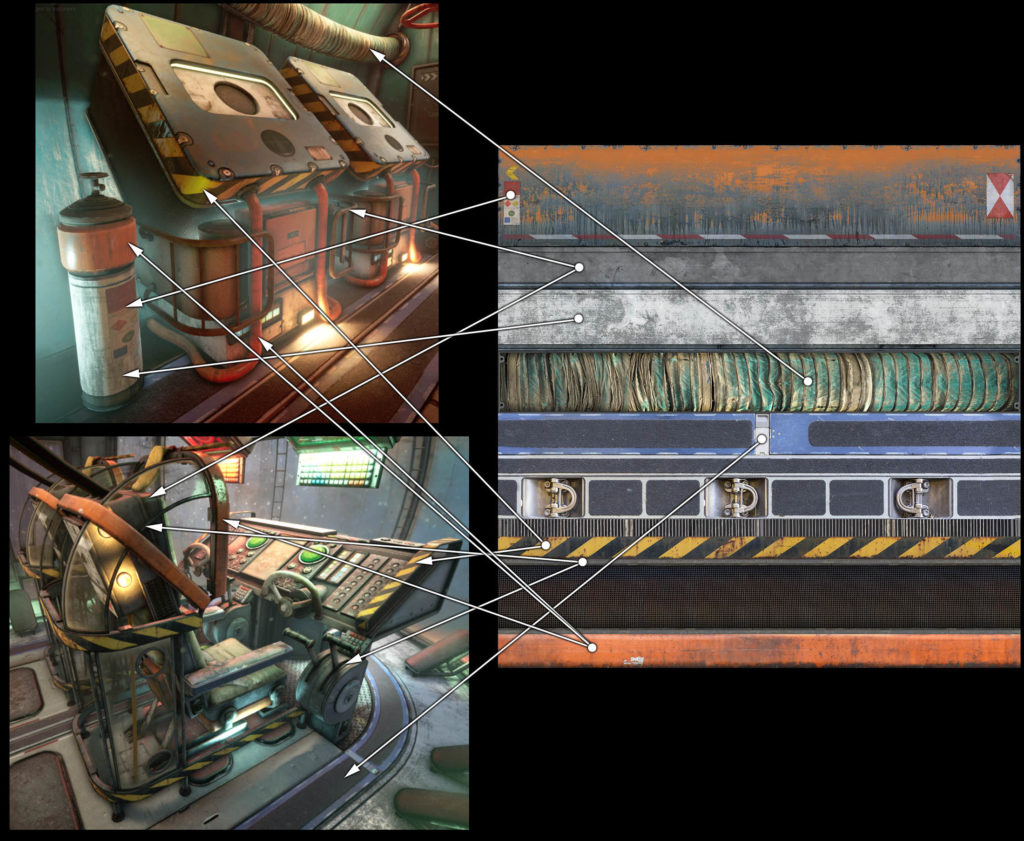
When creating Sci-Fi environments, trim sheets are indispensable, especially for kitbashing . The main thing for which they are needed is the transition zones (for example, where the wall meets the floor) or to assemble the framework (to attach the object to another surface). And also to create beams, frames and pipes that help build the structure of the environment. For this particular environment, one trim sheet was made. Almost every model uses it in one form or another.
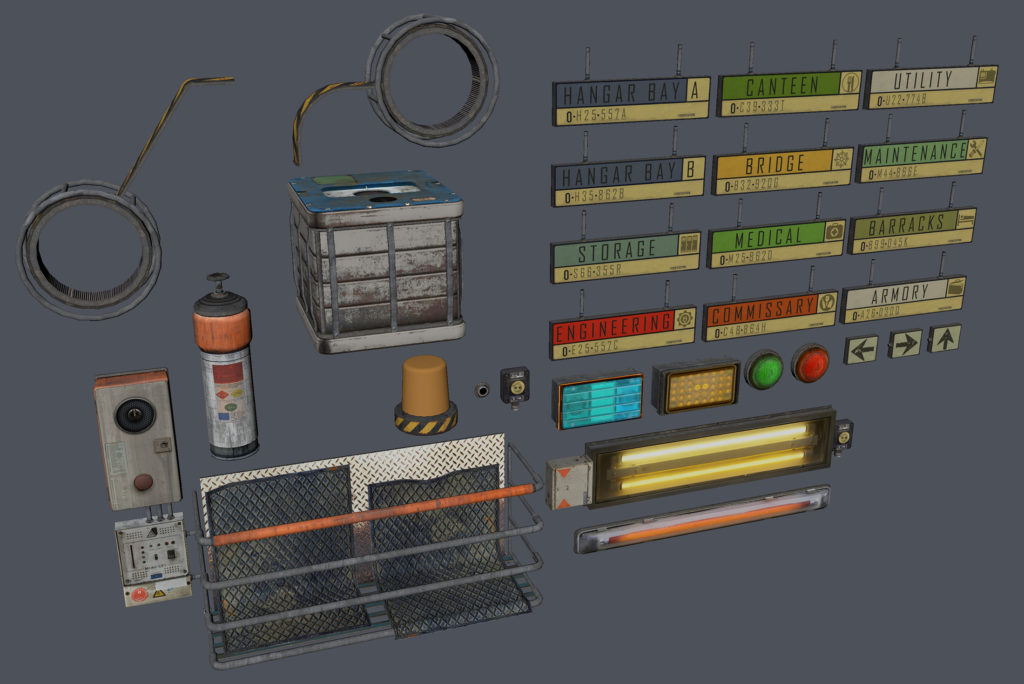
Together with trim sheets I use a lot of atlas sheets. They usually consist of elements that are not like tiles, panels, consoles, sheets of metal and others.
I also use modules to reduce monotonous work during scene creation. Something like when you constantly dig into the same editor menu or tool and ask yourself: “Why do I not have a hot key for this?”.
I like to collect the scene by hand in pieces and liven up it, but excessive modular parts do not allow me to do this without a lot of layers and a complex hierarchy. I try to adjust the zones to each other and make them work: sometimes it turns out, sometimes not.
I even have a few obsessive-compulsive symptoms when modeling. For example, to make a flat surface “ideally” flat or so that something cylindrical has a number of sides multiple of 4 (4, 8, 16, 20, 24, 36). But when creating the interior of the ship, I did not worry about its ideal form. The goal is to make it look old, habitable, as if the crew is doing everything possible to maintain it in working condition.
Lighting
To give the atmosphere of the location, I wanted to make thick air with many particles. I unscrewed the lighting brightly enough so that the objects were not lost in the dark, but there was a feeling that the bulbs could be wiped from dust. I also wanted to add colors. In many Sci-Fi movies and games over the past few years, the environment is all so dark, brown or gray. It looks very monotonous. I really like the lighting in “Alien” and “Aliens”, but did not want to copy their style completely and carefully avoided dark or bright white surfaces.
I used “volumetric” fog and lighting. Basically used only static lighting. Stationary light sources were used when it was necessary to obtain a certain volumetric scattering: Point lights to create a glow inside or behind an object and Spotlights to create rays.
One of the biggest problems is to make the “volume” work inside the ship, without affecting the starry sky beyond. On Earth, this is not a problem, because there is an atmosphere that can be mixed with the sky dome. Cosmos is another story. The solution was simple, but I had to compromise with the fog density - it has a value of View Distance, which gave a dense atmosphere.
I like to use the backlight to get a stroke on the midground objects. It adds more depth, especially in narrow spaces. And also helps complex objects not to get lost in the background.
I used every type of light, except directional, because I did only interiors. Most of all, I set up the Point lights, as they fill the space with a lot of light, and there is no need to think in which direction they are pointing (they are hidden behind the midground objects to create the backlight). Rect Lights are used on almost all lamps, because they naturally distribute light from the source. Spotlights were used to light in a certain direction (for example, when passing through ventilation). And in order not to flash the scene, the value above one was not used anywhere.
It all starts with the basic setting of light, which naturally occurs in artificial space. I add several air lights that correctly fill the space with light, and do several iterations until I am satisfied with the result. Then I set the lights in the back and in the middle to create parallax and separation.
Then I place several volumetric lights for a larger atmosphere. I wanted the light to come from inside the car. The final step is to add accents from all small light sources, including consoles and computer screens. As soon as I am satisfied with the scene as a whole, I go through the meanings and colors for the desired look.
The main thing with me when creating the atmosphere is fog and glow. As well as particles for the effect of stuck dust in the air so that it looks more natural.
Adding character to the scene
In video games, the environment must have as much character as the characters themselves. It helps the narration without additional words. I like to add personal references like in Silent Hill: Homecoming. I asked each person on the design team to write a short message or a name that they would write on the wall of the prison cell. These phrases became the basis for atlas textures, which is used at the prison level.
I had several goals when creating Sci-Fi locations: coarse and worn materials, uneven and surfaces without shiny elements, complex mechanisms, no touch screens, no holograms, physical buttons and levers, a lot of wires and pipes, computer technologies of the 80s, asymmetry, small enclosed spaces, like a submarine or a warship, and orderly chaos.
Composition - the main factor to give the scene character. While working on my own project, the conventions of game development studios do not bother me. Therefore, I have complete freedom in creating compositions and sketches. Each zone is arranged so as to get a good view from any corner or doorway. Including when considering locations separately from each other. Each space has its own character, so you will not understand that everything is built using the same set of assets.
I wanted the players to explore the ship more, because every room there is unique.
The name of the ship comes from the imitation of the Nostromo and Sulako ships from the films “Alien” and “Aliens”. I found the Greek name Anastasios (Resurrection).
It seems to fit.