Android screen stabilization
- Transfer

Have you tried reading a book or article like this on a bus or walking down the street? I bet you tried! In this case, you should have noticed that reading the text this way is not a good idea due to the constant shaking. It seems that shaking the screen is quite a serious problem and eliminating it can give a very good UX improvement. My idea is to use acceleration sensors to compensate for shaking so as SLR stabilize the sensor or lens. Technically, this is possible, so why not try to do it yourself!
Existing solutions
To get started, let's look at existing solutions. There are several interesting articles on the same topic on the Web.
- NoShake: Content Stabilization for Shaking Screens of Mobile Devices by Lin Zhong, Ahmad Rahmati, and Clayton Shepard on Screen Stabilization for iPhone (3) published in 2009. The article summarizes that screen stabilization works and gives noticeable results, but the algorithm consumes “an average of 30 % power on a 620 MHz ARM processor. ” This makes this implementation impractical for real-world use. And although modern iPhones can easily cope with this task, the authors did not provide either the source code or the assembled application so that you can try it in practice.
- Walking with your Smartphone: Stabilizing Screen Content by Kevin Jeisy. This article was published in 2014 and has a good mathematical justification. The article concludes that "using the hidden Markov model, we got good stabilization in theory." Unfortunately, neither the source code nor the compiled application was provided, so it will not work.
- Shake-Free Screen . The same question is being investigated, but there are no ready-made results to try.
These articles give a good explanation of the topic of our article, but unfortunately do not provide either source codes or compiled applications to look at it live. Let's try to reinvent the wheel and implement screen stabilization in our own way.
Theory
The acceleration sensor can be used to determine the movement of the device. But judging by the name, this sensor is still designed to determine acceleration. In order to answer the question “how to determine the displacement having acceleration”, let's look at devices with sensors:

As you can see there are three axes, respectively, the sensor gives three values at the output. Technically, the sensor consists of three sensors located on different axes, but let's take it as a whole.
Three output values indicate acceleration along the corresponding axis:
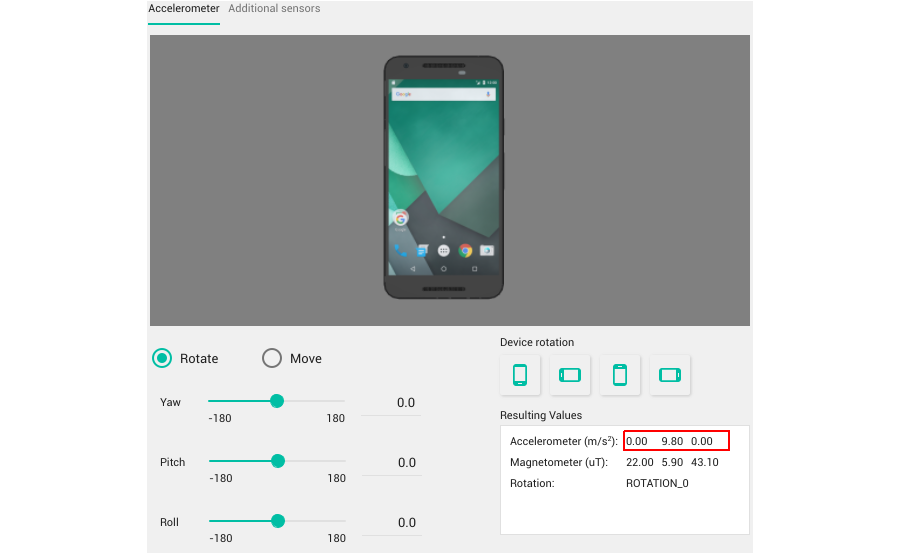
Acceleration is measured in “m / s2”. As you can see there is some acceleration along the Y axis. In fact, this is the acceleration of gravity and any rotation of the device will change all three values:
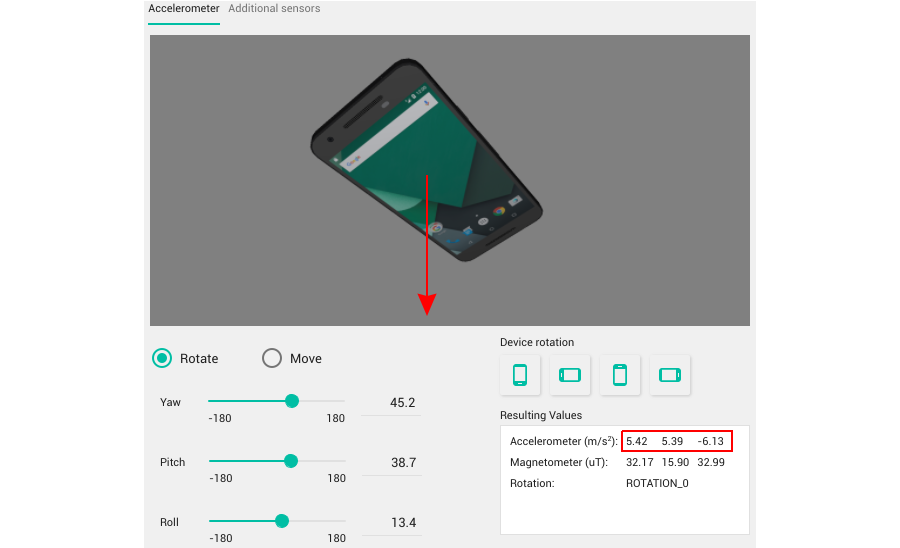
You can imagine it as a ball tied to a device with a rope. This is a fairly good explanation, because if you replace the ball with an arrow, you will get an acceleration vector.
OK, but what about the definition of displacement?
I can’t show some illustrative example, but if you move the device a little, the vector will change: in fact, it will consist of two vectors: 1) the vector of gravity as before; 2) the acceleration vector of the device due to movement along the corresponding axes. The most interesting thing for us is the “clean” displacement vector. It is simple enough to simply obtain it by subtracting the vector of gravity from the resulting vector, but how to determine the true vector of gravity? This problem can be solved in different ways, but fortunately Android has a special linear acceleration sensor that does just what we need. Under normal conditions, the output values of the sensor are 0, and only by moving the device can non-zero values be obtained. Hereits source code if interested. We are one step closer to determining the movement of a device. Let's start programming something.
Implementation
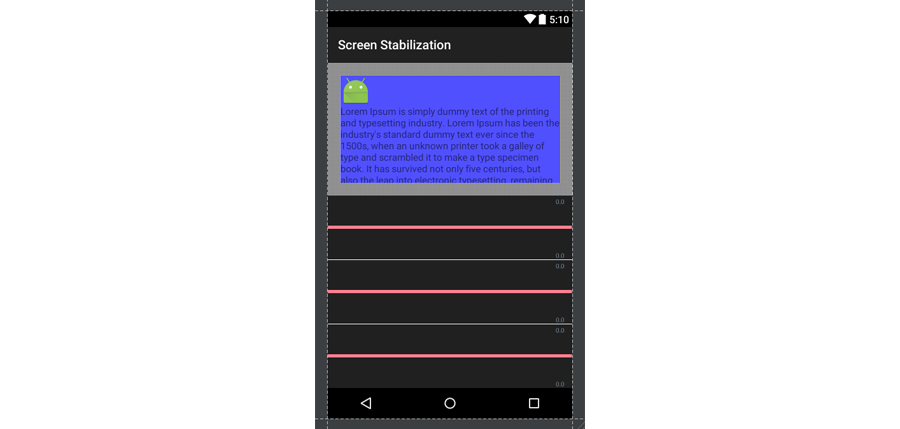
To find how to calculate the movement of the device, let's develop one simple application with one activity. This application will monitor the change in acceleration and move the special view element accordingly. It will also show raw acceleration values on the graph:
I will show only key code examples. All the code is in the GIT repository. Key things are as follows:
1. A special element that we will move. This is a blue block with text inside the container:
To move layout_sensor we will use the methods View.setTranslationX and View.setTranslationY .
We also subscribe to the event of clicking on an element to reset internal values to 0 because at first they can be very naughty:
private void reset()
{
    position[0] = position[1] = position[2] = 0;
    velocity[0] = velocity[1] = velocity[2] = 0;
    timestamp = 0;
    layoutSensor.setTranslationX(0);
    layoutSensor.setTranslationY(0);
}
2. Subscribe to the acceleration sensor events:
sensorManager = (SensorManager) getSystemService(SENSOR_SERVICE);
accelerometer = sensorManager.getDefaultSensor(Sensor.TYPE_LINEAR_ACCELERATION);
sensorManager.registerListener(sensorEventListener, accelerometer, SensorManager.SENSOR_DELAY_FASTEST);
3. And most importantly: the listener of change. Its basic implementation is:
private final float[] velocity = new float[3];
private final float[] position = new float[3];
private long timestamp = 0;
private final SensorEventListener sensorEventListener = new SensorEventListener()
{
    @Override
    public void onAccuracyChanged(Sensor sensor, int accuracy) {}
    @Override
    public void onSensorChanged(SensorEvent event)
    {
   	 if (timestamp != 0)
   	 {
   		 float dt = (event.timestamp - timestamp) * Constants.NS2S;
   		 for(int index = 0; index < 3; ++index)
   		 {
   			 velocity[index] += event.values[index] * dt;
   			 position[index] += velocity[index] * dt * 10000;
   		 }
   	 }
   	 else
   	 {
   		 velocity[0] = velocity[1] = velocity[2] = 0f;
   		 position[0] = position[1] = position[2] = 0f;
   	 }
    }
};
Let's see what happens here. The onSensorChanged method is called every time the acceleration value changes (translator's note: well, in fact, it is called by the timer, regardless of what acceleration values). First of all, you check if the timestamp variable is initialized. In this case, we simply initialize the main variables. If the method is called repeatedly, we perform calculations using the following formula:
deltaT = time() - lastTime;
velocity += acceleration * deltaT;
position += velocity * deltaT;
lastTime = time();
You should have noticed an interesting constant 10000. Think of it as some kind of magic number.
And the result:
As you can see, the current implementation has two problems:
- Drifting and creeping values
- The control does not return to 0
In fact, the solution to both problems is a common one - you need to introduce inhibition in the formula. The modified formula looks like this:
deltaT = time() - lastTime;
velocity += acceleration * deltaT - VEL_FRICTION * velocity;
position += velocity * deltaT - POS_FRICTION * position;
lastTime = time();
Good. The current implementation looks good. I would add some cosmetic improvements such as a low-pass filter for smoothing, cutting invalid values and program settings.
The finished application is in the repository in the standalone_app branch.
Aosp
We developed a basic stabilization algorithm and made a demo application that shows that screen stabilization is possible. Now we can apply our work to the device as a whole. This is not an easy task, but the more interesting it will be to solve it.
This task requires some experience in building AOSP . Google provides all the necessary documentation . In general, you need to download the Android source codes for the selected Nexus device. Build the firmware for Nexus and flash it. Do not forget to include all the necessary drivers before assembly.
Once you manage to collect the stock firmware, you can begin to develop and integrate screen stabilization.
The implementation plan is as follows:
- Find a way to shift the screen on your device
- Develop an API in AOSP internals to enable you to set the offset in a standard Android application
- Develop a service in a demo application that will process data from the acceleration sensor and set the offset using the API above. The service will start automatically when you turn on the device so that stabilization will work immediately after turning on
Now I’ll just tell you how I solved these problems.
1. The first file for research is DisplayDevice.cpp which controls the screen settings. The method to look at is void DisplayDevice :: setProjection (int orientation, const Rect & newViewport, const Rect & newFrame). The most interesting is on line 483:

where the final transformation matrix is formed from other components. All of these variables are instances of the Transform class . This class is designed to handle transformations and has several overloaded operators (for example *). To add a shift, add a new element:

If you compile and flash your device, the screen there will be shifted by translateX pixels horizontally and translateY pixels vertically. Ultimately, we need to add a new method void setTranslate (int x, int y); which will be responsible for the shift matrix.
2. The second interesting file is SurfaceFlinger.cpp . This file is key in creating an API for accessing screen options. Just add a new method:

which will call the setTranslate method for all displays. The other part looks a little strange, but I will explain it later. We need to modify the status_t method SurfaceFlinger :: onTransact (uint32_t code, const Parcel & data, Parcel * reply, uint32_t flags) by adding a new section to the switch construct:

This code is the entry point to our improvement.
3. The data processing service is quite simple: it uses an algorithm developed previously to obtain offset values. Further, these values are transmitted via IPC to SurfaceFlinger:

ServiceManager is not recognized by Android Studio because it is not available for non-system applications. System applications must be built with AOSP using the makefile build system. This will allow our application to obtain the necessary access rights in the hidden Android API. To access the SurfaceFlinger service, the application must have the rights “android.permission.ACCESS_SURFACE_FLINGER”. Only system applications can have these rights (see below). In order to be able to call our API with code 2020, the application must have the rights “android.permission.HARDWARE_TEST”. Only system applications can have these rights. And in the end, to make our application systemic, modify its manifest as follows:

Also create the corresponding makefile:

The rest of the things in the application (broadcast receiver downloads, settings, etc.) are fairly standard and I will not touch here. It remains to show how to make this application pre-installed (i.e. sewn into the firmware). Just place the source code in the {aosp} / packages / apps directory and modify the core.mk file so that it includes our application:

Final demo:
You can find detailed information and source code on GitHub
There is a ScreenStabilization application that should be placed in the {aosp} / packages / apps directory , AOSP patch files: 0001-ScreenStabilization-application-added.patch should be applied to the {aosp} / build , 0001-Translate-methods-added directory .patch should be applied to the {aosp} / frameworks / native directory .
The firmware for the Nexus 2013 Mobile is compiled in the “ userdebug ” configuration so that it is more suitable for testing. To upgrade the firmware, boot into bootloader mode by holding the “volume down” button and pressing the “power” button at the same time. Next enter:
fastboot -w update aosp_deb_screen_stabilization.zipThis procedure will delete all existing data on your device. Keep in mind that in order to flash any non-standard firmware you must unlock the bootloader with the command:
fastboot oem unlockConclusion
This article shows how to implement a simple screen stabilization algorithm and apply it to the entire device by modifying the Android source codes and assembling custom firmware. The algorithm is not perfect but sufficient for demonstration purposes. We created a modified firmware for the Nexus 2013 Mobile device, but our source code can be applied to any Nexus device and even to any AOSP system like CyanogenMod, which makes it possible to integrate screen stabilization into new devices.
PS In fact, I am also the author of the original English version of the article, which was published on blog.lemberg.co.uk , so that I can answer technical questions.