Deploy OpenSource Puppet 4 with multiple Puppet masters. Part I. Preparatory
- Tutorial
→ Deploy OpenSource Puppet 4 with multiple Puppet masters. Part II Setting Masters Puppet's
→ Deployment OpenSource Puppet 4 multi Puppet masters. Part III. Puppet-db setup with Puppet
My experience using puppet. Prior to writing this article, I worked with Open Source Puppet version 3 in a stand alone configuration, and used it to manage several hundred hosts. But the time has come to grow: the number of managed hosts has exceeded one thousand, and threatens to exceed several thousand in the near future. It was decided to deploy load balancing and increase fault tolerance by deploying Open Source Puppet version 4 with several Puppet Master servers and a separate PuppetDB server with postgresql. And also use the git repository on the git server for storing environments with end host configurations.
First, I would like to offer a brief overview of existing articles on habrahabr.
Setting up a modern Puppet server from scratch
Translation of the article “Setup of modern Puppet of the server from scratch” was done by grundic , the original of which I could only find in Google’s cache. This article was taken by me as a basis in the preparation of the publication. The details described in the original article “Setup of modern Puppet of the server from scratch”, as well as the translator’s additions to its translation, have already become a little outdated. This, as well as the desire to share a description of additional subtleties, prompted me to write my own article.
Deployment option for Linux systems based on Puppet 4. Part III: installing the Puppet Server (cfpuppetserver) This
article is part of a series where the authorandvgal describes the deployment of an entire infrastructure. In the article, the author suggests automating the puppet installation process using the cfpuppetserver package developed by the author of the article. Very interesting, but difficult for a beginner puppeteer.
Puppet under load
An interesting article from the company Badoo , containing a large number of schemes that reveal the mechanisms of Puppet 3.
How to become a puppeteer or Puppet for beginners The
article starts well, gives basic concepts about Puppet. At the end of the article, the author Aecktann promises a sequel, which, unfortunately, has not appeared in 4 years.
Puppet, a configuration management system. Two-part article: Part I , Part II
The author spanasik gives basic concepts about Puppet, and also describes how to install stand alone puppet master without other components.
General information about Puppet. Puppet agents are installed on managed nodes called nodes. At certain time intervals (30 minutes by default), puppet agents connect to Puppet servers, transmit data about the nodes (facts) on which they are installed; receive configuration descriptions for managed nodes from servers, as well as the necessary data and tools for configuring configurations.
Configurations for managed nodes are stored on puppet servers as text files. Such files are called manifests. Manifests come together in environments. Each puppet environment contains its own set of manifests. The default environment is called production. For testing, they usually use the developmement environment. Each managed node can only be in one environment at a time.
Environments containing text files with puppet manifests are usually stored in a git repository, which can be placed on a git server. Each environment will have a branch in the git repository.
To synchronize environments on each puppet server, the R10k robot is used, which is launched using the post-receive hook in the git repository. Read more about this robot in the blog of its creator .
Data transmitted by puppet agents to puppet servers can be stored locally on the servers as text files, or in the PuppetDB database. PuppetDB allows you to use the advanced features of puppet, and can also be used in third-party applications.
Various modules are used to expand the basic capabilities of Puppet., which can be downloaded from Puppet Forge , GitHub, or another source, as well as create yourself.
puppetmaster.example.com is the name of the cluster.
puppet-master01.example.com - Puppet Master node 1, Certificate Authority Service will also work on it .
puppet-master02.example.com - Puppet Master node 2.
Accordingly, you can continue puppet-masterN.example.com - Puppet Master node N. All settings made for puppet-master02.example.com are suitable for subsequent nodes.
puppet-db.example.com - PuppetDB server, postgresql server.
sgl-git.example.com is a git server for storing a git repository that contains puppet manifest environments.
Ubuntu 16.04 is installed on all servers.
aspetrenko - administrator user with rights to execute sudo (present on all servers).
gitolite3 - the user on whose behalf the git-server gitolite3 works (on the sgl-git server).
r10k - the user on whose behalf the r10k robot works (on puppet-master servers).
DNS server configuration options are described in the appropriate section of the Puppet documentation . In my case, the approach described in the Round-Robin DNS section is used . Although this is not of fundamental importance.
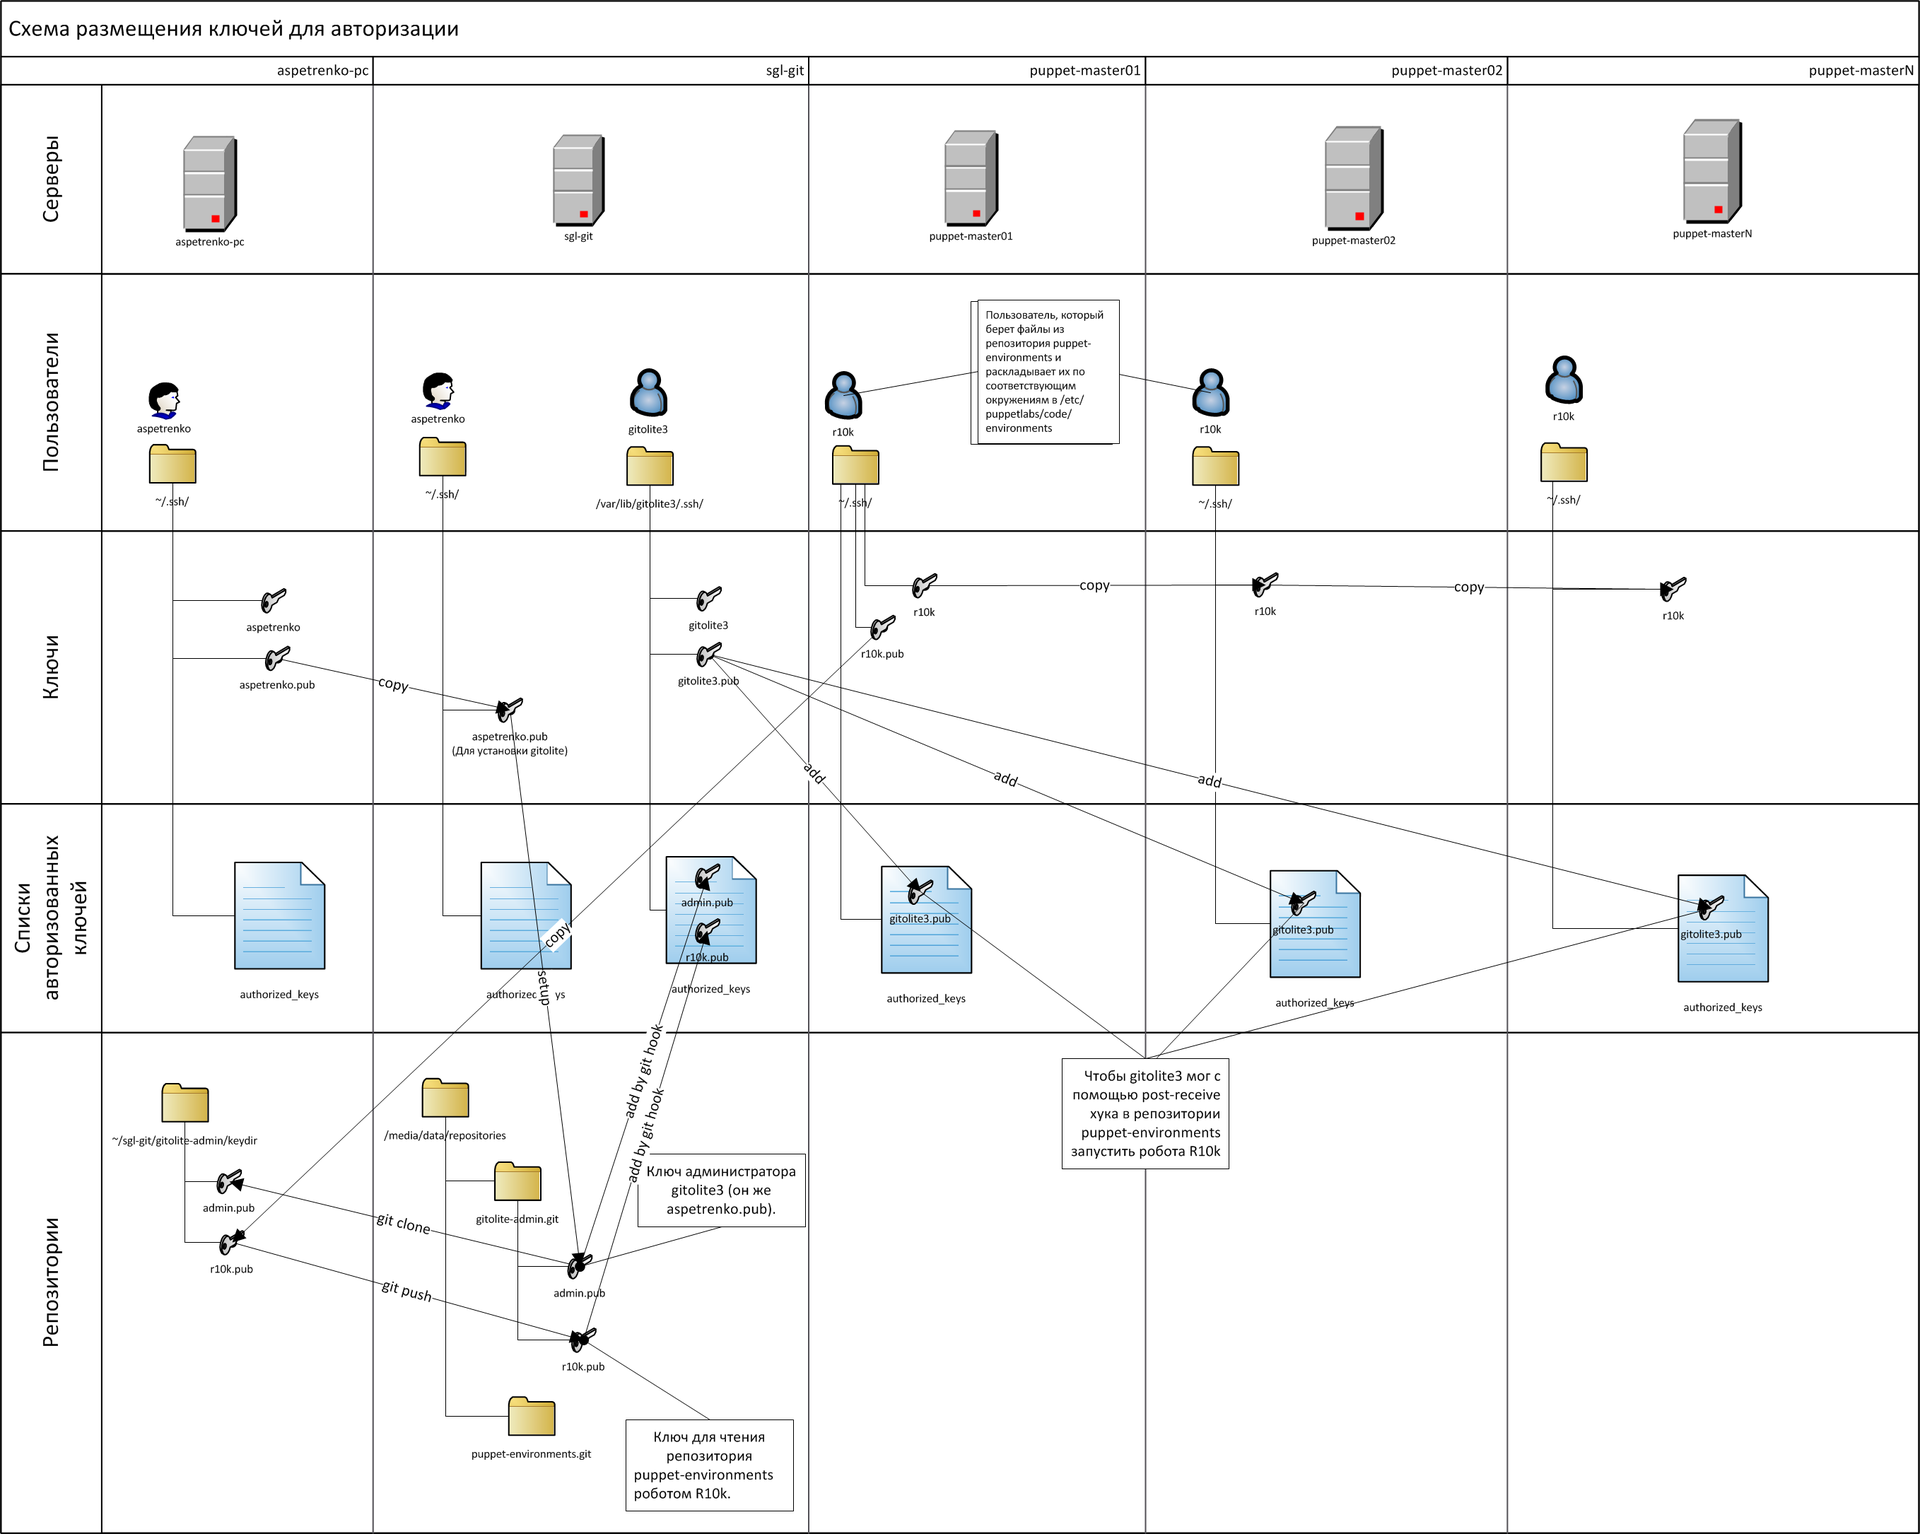
aspetrenko, aspetrenko.pub - private and public key of the administrator.
gitolite3, gitolite3.pub - keys of the gitolite3 user. The public key gitolite3.pub needs to be placed in the list of authorized keys (~ / ssh / authorized_keys) of the r10k user on each puppet-master server so that the gitolite3 user can log in and start updating the environments.
r10k, r10k.pub- keys of the user r10k. The public key r10k.pub must be placed in the gitolite3 administrative repository (the keydir directory in the gitolite-admin repository) so that the r10k robot can log in to the git server and pick up the environments from the git repository to update the environments in the local file system. Keys can be created on any computer with ssh-keygen. Keys must be created without password protection so that authorization can take place without human intervention. Create admin keys, and copy the public key to sgl-git:
It will act as the gitolite3 admin key. Create a user for r10k on the puppet-master01 and puppet-master02 servers:
And set the user r10k password:
With a password it will be more convenient during the installation process. Then you can turn off password entry and leave authorization only by key.
Create the r10k user keys on puppet-master01, and copy the private key to the puppet-master02 server:
During the installation of the git-server gitolite3, a user with the same name gitolite3 will be automatically created. You will need to add the public key of this user to the list of trusted keys of user r10k on the puppet-master01 and puppet-master02 servers so that gitolite3 can use the post-receive hook in the puppet-environments repository to launch the R10k robot.
You can read more about autization using keys, for example, here . As a result, it should turn out as in the diagram below.
More about gitolite can be read in the official documentation or Habré .
Install git and perl:
Run the gitolite installation from the Ubuntu repository:
During the installation, we indicate the absolute path to the aspetrenko.pub administrator public key. If you made a mistake, then the path to the administrator key can be specified as follows from the gitolite3 system user:
The key will be saved in the gitolite-admin administrative repository in the keydir directory under the name admin.pub.
Gitolite3 stores repositories in its home directory / var / lib / gitolite3 / repositories /. If you want to store repositories in a different place like me, you can transfer them as follows:
Add to the file /etc/gitolite3/gitolite.rc in the section "% RC = ("
And move the repositories to a new location:
You cannot directly edit git repositories in the / var / lib / gitolite3 / repositories directory. On the aspetrenko-pc computer, from where we will work with repositories on our server, we specify the ssh authorization settings for sgl-git in the ~ / .ssh / config file:
where aspetrenko is the private key of the administrator. Clone the administrative repository into our home directory:
If the server asks for a password, then access using ssh keys was configured incorrectly. As a result, we get:
Access settings for repositories are in the file gitolite-admin / conf / gitolite.conf
admin is the user whose key was specified when configuring gitolite3:
Put the public key of user r10k in the gitolite3 administrative repository:
Add the r10k.pub key to git:
Create a repository for storing puppet environments. To do this, on aspetrenko-pc, add the following lines to the gitolite-admin / conf / gitolite.conf file:
Commit the changes to git:
And send it all to sgl-git:
Using hooks, Gitolite3 will create a new empty repository on sgl-git:
Do not forget to create keys for the user gitolite3, and add the public key to the list of trusted keys for the user r10k on each server puppet-master01 and puppet-master02:
The gitolite3 private key should be in the /var/lib/gitolite3/.ssh directory.
Deploy OpenSource Puppet 4 with multiple Puppet masters. Part II Setting up Puppet Masters
→ Deployment OpenSource Puppet 4 multi Puppet masters. Part III. Puppet-db setup with Puppet
Foreword
My experience using puppet. Prior to writing this article, I worked with Open Source Puppet version 3 in a stand alone configuration, and used it to manage several hundred hosts. But the time has come to grow: the number of managed hosts has exceeded one thousand, and threatens to exceed several thousand in the near future. It was decided to deploy load balancing and increase fault tolerance by deploying Open Source Puppet version 4 with several Puppet Master servers and a separate PuppetDB server with postgresql. And also use the git repository on the git server for storing environments with end host configurations.
Prabet deployment habrahabr articles at a glance
First, I would like to offer a brief overview of existing articles on habrahabr.
Setting up a modern Puppet server from scratch
Translation of the article “Setup of modern Puppet of the server from scratch” was done by grundic , the original of which I could only find in Google’s cache. This article was taken by me as a basis in the preparation of the publication. The details described in the original article “Setup of modern Puppet of the server from scratch”, as well as the translator’s additions to its translation, have already become a little outdated. This, as well as the desire to share a description of additional subtleties, prompted me to write my own article.
Deployment option for Linux systems based on Puppet 4. Part III: installing the Puppet Server (cfpuppetserver) This
article is part of a series where the authorandvgal describes the deployment of an entire infrastructure. In the article, the author suggests automating the puppet installation process using the cfpuppetserver package developed by the author of the article. Very interesting, but difficult for a beginner puppeteer.
Puppet under load
An interesting article from the company Badoo , containing a large number of schemes that reveal the mechanisms of Puppet 3.
How to become a puppeteer or Puppet for beginners The
article starts well, gives basic concepts about Puppet. At the end of the article, the author Aecktann promises a sequel, which, unfortunately, has not appeared in 4 years.
Puppet, a configuration management system. Two-part article: Part I , Part II
The author spanasik gives basic concepts about Puppet, and also describes how to install stand alone puppet master without other components.
Introduction
General information about Puppet. Puppet agents are installed on managed nodes called nodes. At certain time intervals (30 minutes by default), puppet agents connect to Puppet servers, transmit data about the nodes (facts) on which they are installed; receive configuration descriptions for managed nodes from servers, as well as the necessary data and tools for configuring configurations.
Configurations for managed nodes are stored on puppet servers as text files. Such files are called manifests. Manifests come together in environments. Each puppet environment contains its own set of manifests. The default environment is called production. For testing, they usually use the developmement environment. Each managed node can only be in one environment at a time.
Environments containing text files with puppet manifests are usually stored in a git repository, which can be placed on a git server. Each environment will have a branch in the git repository.
To synchronize environments on each puppet server, the R10k robot is used, which is launched using the post-receive hook in the git repository. Read more about this robot in the blog of its creator .
Data transmitted by puppet agents to puppet servers can be stored locally on the servers as text files, or in the PuppetDB database. PuppetDB allows you to use the advanced features of puppet, and can also be used in third-party applications.
Various modules are used to expand the basic capabilities of Puppet., which can be downloaded from Puppet Forge , GitHub, or another source, as well as create yourself.
Server names
puppetmaster.example.com is the name of the cluster.
puppet-master01.example.com - Puppet Master node 1, Certificate Authority Service will also work on it .
puppet-master02.example.com - Puppet Master node 2.
Accordingly, you can continue puppet-masterN.example.com - Puppet Master node N. All settings made for puppet-master02.example.com are suitable for subsequent nodes.
puppet-db.example.com - PuppetDB server, postgresql server.
sgl-git.example.com is a git server for storing a git repository that contains puppet manifest environments.
About OS on servers
Ubuntu 16.04 is installed on all servers.
Users
aspetrenko - administrator user with rights to execute sudo (present on all servers).
gitolite3 - the user on whose behalf the git-server gitolite3 works (on the sgl-git server).
r10k - the user on whose behalf the r10k robot works (on puppet-master servers).
DNS setup
DNS server configuration options are described in the appropriate section of the Puppet documentation . In my case, the approach described in the Round-Robin DNS section is used . Although this is not of fundamental importance.
Ssh authentication using keys
aspetrenko, aspetrenko.pub - private and public key of the administrator.
gitolite3, gitolite3.pub - keys of the gitolite3 user. The public key gitolite3.pub needs to be placed in the list of authorized keys (~ / ssh / authorized_keys) of the r10k user on each puppet-master server so that the gitolite3 user can log in and start updating the environments.
r10k, r10k.pub- keys of the user r10k. The public key r10k.pub must be placed in the gitolite3 administrative repository (the keydir directory in the gitolite-admin repository) so that the r10k robot can log in to the git server and pick up the environments from the git repository to update the environments in the local file system. Keys can be created on any computer with ssh-keygen. Keys must be created without password protection so that authorization can take place without human intervention. Create admin keys, and copy the public key to sgl-git:
aspetrenko@aspetrenko-pc:~$ ssh-keygen -t rsa -f ~/.ssh/aspetrenko
aspetrenko@aspetrenko-pc:~$ scp ~/.ssh/aspetrenko.pub aspetrenko@sgl-git:/home/aspetrenko/.ssh/
It will act as the gitolite3 admin key. Create a user for r10k on the puppet-master01 and puppet-master02 servers:
sudo useradd -m -s /bin/bash r10kAnd set the user r10k password:
sudo passwd r10kWith a password it will be more convenient during the installation process. Then you can turn off password entry and leave authorization only by key.
Create the r10k user keys on puppet-master01, and copy the private key to the puppet-master02 server:
aspetrenko@puppet-master01:~$ sudo su - r10k
r10k@puppet-master01:~$ ssh-keygen -t rsa -f ~/.ssh/r10k
r10k@puppet-master01:~$ scp /home/r10k/.ssh/r10k r10k@puppet-master02:/home/r10k/.ssh/
During the installation of the git-server gitolite3, a user with the same name gitolite3 will be automatically created. You will need to add the public key of this user to the list of trusted keys of user r10k on the puppet-master01 and puppet-master02 servers so that gitolite3 can use the post-receive hook in the puppet-environments repository to launch the R10k robot.
You can read more about autization using keys, for example, here . As a result, it should turn out as in the diagram below.
Install and configure git server
More about gitolite can be read in the official documentation or Habré .
Install gitolite3 on sgl-git
Install git and perl:
aspetrenko@sgl-git:~$ sudo apt install git perlRun the gitolite installation from the Ubuntu repository:
aspetrenko@sgl-git:~$ sudo apt install gitolite3During the installation, we indicate the absolute path to the aspetrenko.pub administrator public key. If you made a mistake, then the path to the administrator key can be specified as follows from the gitolite3 system user:
aspetrenko@sgl-git:~$ sudo su - gitolite3
gitolite3@sgl-git:~$ $HOME/bin/gitolite setup -pk /home/aspetrenko/.ssh/aspetrenko.pub
The key will be saved in the gitolite-admin administrative repository in the keydir directory under the name admin.pub.
Gitolite3 stores repositories in its home directory / var / lib / gitolite3 / repositories /. If you want to store repositories in a different place like me, you can transfer them as follows:
Add to the file /etc/gitolite3/gitolite.rc in the section "% RC = ("
# Custom path for repos
    GL_REPO_BASE => "/media/data/repositories",
And move the repositories to a new location:
sudo mv /var/lib/gitolite3/repositories /media/data/Configure gitolite3
You cannot directly edit git repositories in the / var / lib / gitolite3 / repositories directory. On the aspetrenko-pc computer, from where we will work with repositories on our server, we specify the ssh authorization settings for sgl-git in the ~ / .ssh / config file:
host sgl-git.example.com
  HostName sgl-git.example.com
  IdentityFile ~/.ssh/aspetrenko
  User gitolite3
where aspetrenko is the private key of the administrator. Clone the administrative repository into our home directory:
aspetrenko@aspetrenko-pc:~$ mkdir sgl-git
aspetrenko@aspetrenko-pc:~$ cd sgl-git
aspetrenko@aspetrenko-pc:~/sgl-git$ git clone gitolite3@sgl-git.example.com:gitolite-admin
If the server asks for a password, then access using ssh keys was configured incorrectly. As a result, we get:
aspetrenko@aspetrenko-pc:~/sgl-git/gitolite-admin$ tree
.
├── conf
│   └── gitolite.conf
└── keydir
    └── admin.pub
2 directories, 2 files
Access settings for repositories are in the file gitolite-admin / conf / gitolite.conf
aspetrenko@aspetrenko-pc:~/sgl-git/gitolite-admin$ cat conf/gitolite.conf
repo gitolite-admin
    RW+     =   admin
repo testing
    RW+     =   @all
admin is the user whose key was specified when configuring gitolite3:
aspetrenko@aspetrenko-pc:~/sgl-git$ cat gitolite-admin/keydir/admin.pub
ssh-rsa AAAAB3NzaC1yc2EAAAADAQABAAABAQDIFC/2v1S4WvvITHAXCuVle7dLZz0zL7z4dAWXvmMcqCLepfGI1suDBby6PW04tVwHvniAW5B/5HbZ2Fr7zCoeMrhGE5Z76/DBfidhO15CZbAMPOcs3X7aP4aZFK2GfiXCt7/yunP6f3zp3i6KbsZhcSeeUmmkeQFwccJsstVJbj9ciWHrLN/UDHwT5OTBVFKBpRZGM5pT6xzvWaPNN4IRlk5AN4ClrhWf13 aspetrenko@aspetrenko-pc
Put the public key of user r10k in the gitolite3 administrative repository:
r10k@puppet-master01:~$ scp /home/r10k/.ssh/r10k.pub aspetrenko@aspetrenko-pc:/home/aspetrenko/sgl-git/gitolite-admin/keydirAdd the r10k.pub key to git:
aspetrenko@aspetrenko-pc:~/sgl-git/gitolite-admin$ git add keydir/r10k.pubCreate a repository for storing puppet environments. To do this, on aspetrenko-pc, add the following lines to the gitolite-admin / conf / gitolite.conf file:
repo puppet-environments
    RW+     =   admin
    R       =   r10k
Commit the changes to git:
aspetrenko@aspetrenko-pc:~/sgl-git/gitolite-admin$ git commit -a -m "Add puppet-environments repo"
[master 585326d] Add puppet-environments repo
 1 file changed, 3 insertions(+)
And send it all to sgl-git:
aspetrenko@aspetrenko-pc:~/sgl-git/gitolite-admin$ git push
Counting objects: 7, done.
Delta compression using up to 2 threads.
Compressing objects: 100% (3/3), done.
Writing objects: 100% (4/4), 411 bytes | 0 bytes/s, done.
Total 4 (delta 0), reused 0 (delta 0)
remote: Initialized empty Git repository in /media/data/repositories/puppet-environments.git/
To gitolite3@sgl-git:gitolite-admin
   7946dea..585326d  master -> master
Using hooks, Gitolite3 will create a new empty repository on sgl-git:
aspetrenko@sgl-git:~$ sudo ls /media/data/repositories/puppet-environments.git
branches  config  gl-conf  HEAD  hooks  info  objects  refs
Do not forget to create keys for the user gitolite3, and add the public key to the list of trusted keys for the user r10k on each server puppet-master01 and puppet-master02:
aspetrenko@sgl-git:~$ sudo su - gitolite3
gitolite3@sgl-git:~$ ssh-keygen -t rsa -f ~/.ssh/gitolite3
gitolite3@sgl-git:~$ ssh-copy-id -i ~/.ssh/gitolite3.pub r10k@puppet-master01
gitolite3@sgl-git:~$ ssh-copy-id -i ~/.ssh/gitolite3.pub r10k@puppet-master02
The gitolite3 private key should be in the /var/lib/gitolite3/.ssh directory.
Deploy OpenSource Puppet 4 with multiple Puppet masters. Part II Setting up Puppet Masters