Ceph Storage Cluster on VMWare in 10 Minutes
- Tutorial

This manual is written for those who want to try the flexibility and convenience of a distributed Ceph file storage in a virtual environment on a home PC. I’ll immediately explain that 10 minutes is the time to deploy the cluster itself (installing and configuring Ceph on virtual machines). But creating and cloning virtual machines and installing the OS will take some time.
By the end of the article, we will have a virtual cluster of three machines, and the Windows PC itself as the storage client. Next, we will drop the photos of the cats there, drop one note, then pick it up, drop the other, download the photos of the cats back, we’ll be happy.
Who else is not in the Ceph theme, you can read the introductory article Introducing Ceph in pictures and see a fashionable promo from the manufacturer.
My stand was like this:
PC settings
Processor: i5-6500
Memory: 16 GB (but in theory it should be enough 8 GB)
Disk: regular home HDD with 100 GB free space
OS: Windows 7 x64
Virtual machine parameters (all three are the same)
Processor : 1 core
Memory: 1024 MB
Subnet: 192.168.1.0/24
Disks: 4 virtual disks of 10 GB each (1 for OS, 3 for storage)
OS: Ubuntu Server 16.04.2 x64
I want to remind you that the purpose of the experiment is to try the possibilities and create a platform for further rituals. But in view of the fact that 9 virtual disks (we do not consider system disks) are on the same physical one, you should not expect any acceptable performance from this system. Performance will be extremely low, but quite sufficient for tests.
Plan
- Create a virtual machine cn1 (ceph-node-1)
- Install the OS, configure
- Make two clones (cn2 and cn3), change the IP addresses
- Raise the Ceph cluster
- Configure iSCSI-target on one of the machines
- Connect Windows as a client
- We try to upload / download / delete files, drop nodes
Create a virtual machine
The parameters of the virtual machine are indicated above. For storage I created preallocated non-split disks. VMWare subnet can take NAT with DHCP. In the future, we should get this:
192.168.1.11 - cn1 (there will also be iSCSI-target)
192.168.1.12 - cn2
192.168.1.13 - cn3
192.168.1.1 - Client (iSCSI-initiator)
Gateway / mask: 192.168.1.2 / 255.255 .255.0
OS installation and setup
This manual should work on Ubuntu Server 16.04.2, on other versions or distributions some settings will differ.
I will make all the settings from the root with a simple password. And here I must definitely shake my finger and mention that for security reasons it is better not to do this on a combat cluster.
Install the OS:
Installation
Now that the OS is installed, we boot into it and check the issued address:
ip -4 addr | grep inet
I got 192.168.1.128. We connect to it via SSH. Set the password for root:
sudo su
passwd root
Configure the network interface (at this point we will be thrown from SSH, because IP has changed):
cd /etc/network
cp interfaces interfaces.BAK
IFACE=ens32
ADDR=192.168.1.11
MASK=255.255.255.0
GW=192.168.1.2
sed -i "s/iface $IFACE inet dhcp/iface $IFACE inet static\naddress $ADDR\nnetmask $MASK\ngateway $GW\ndns-nameservers $GW/g" interfaces
ip addr flush to 192.168.1.0/24 && ip addr add $ADDR/24 dev $IFACE
How can I see this now?
По мере чтения листингов вы можете сталкиваться с не особо читаемыми однострочниками, которые призваны сократить количество ручных правок, дабы больше пользоваться прямым копипастом из статьи в терминал. Но я буду приводить расшифровки.
Кроме того, я до конца не разобрался в проблеме, но в 16 убунте имеется некий конфуз с настройкой сетевых интерфейсов (хотя на 14 замечательно работает). Призываю взрослых админов осветить эту тему в комментариях. Отсюда танцы с ip addr flush/add.
Суть проблемы в том, что при рестарте демона добавляется новый secondary адрес, а старый не удаляется, при этом ip addr delete вместо удаления конкретного, удаляет все адреса (в 14 убунте удаляет один). Никто с этим не заморачивается, потому как старый адрес никого не беспокоит, но в нашем случае с клонами старый адрес нужно удалять обязательно, иначе чуда не произойдет. Ребут машины помогает, но это плохой выход.
We are connected to the new address (192.168.1.11) and allowed to connect to the machine with the root:
su
cd /etc/ssh/
cp sshd_config sshd_config.BAK
sed -i "s/PermitRootLogin.*/PermitRootLogin yes/g" sshd_config
Decryption
В файле /etc/ssh/sshd_config ищем директиву PermitRootLogin и выставляем ей yes
Set the host name and hostnames of the neighbors:
HOSTNAME=cn1
echo$HOSTNAME > /etc/hostname
sed -i "s/127.0.1.1.*/127.0.1.1\t$HOSTNAME/g" /etc/hosts
echo"
# Ceph-nodes
192.168.1.11 cn1
192.168.1.12 cn2
192.168.1.13 cn3" >> /etc/hosts
Decryption
В файле /etc/hostname прописываем имя хоста cn1.
В файле /etc/hosts меняем имя к записи 127.0.1.1 на cn1, если при установке операционки было указано иное. Также добавляем имена ко всем нодам кластера в конец файла.
В файле /etc/hosts меняем имя к записи 127.0.1.1 на cn1, если при установке операционки было указано иное. Также добавляем имена ко всем нодам кластера в конец файла.
After changing the address, a default route may be required, without which we will not be able to deliver the necessary packages. Of the packages, you must install ntp to synchronize time on all nodes. In htop, it is convenient to look with your eyes at the Ceph daemons and their flows.
ip route add default via 192.168.1.2 dev ens32
apt update
apt install mc htop ntp -y
Everything is ready, the first machine received the axis, the necessary packages and settings, which the clones will inherit. Turn off the car:
shutdown -h now
We make clones, set up a network
At this point we make a snapshot of the machine and create two full clones indicating this snapshot. This is how the birth of cn2 and cn3 machines looks. Since the clones completely inherited the settings of the cn1 node, we have three machines with the same IP addresses. Therefore, we turn them on in turn in the reverse order, simultaneously changing the IP addresses to the correct ones.
Turn on cn3. Start the
machine, connect with root via SSH to 192.168.1.11, change the interface settings to 192.168.1.13, after which the SSH session at the old address will fall off:
HOST_ID=3
echo cn$HOST_ID > /etc/hostname
sed -i "s/127.0.1.1.*/127.0.1.1\tcn$HOST_ID/g" /etc/hosts
sed -i "s/address.*/address 192.168.1.1$HOST_ID/g" /etc/network/interfaces
ip addr flush to 192.168.1.0/24 && ip addr add 192.168.1.1$HOST_ID/24 dev ens32
Decryption
Меняем имя хоста в файле /etc/hostname, меняем имя к записи 127.0.1.1 в файле /etc/hosts, снимаем все адреса вида 192.168.1.0/24 с интерфейсов и навешиваем правильный.
Turn cn2 on.
At cn3, the correct address is already at this point, but cn2 is still 192.168.1.11, connect to it and make a similar setting for the address 192.168.1.12:
HOST_ID=2
echo cn$HOST_ID > /etc/hostname
sed -i "s/127.0.1.1.*/127.0.1.1\tcn$HOST_ID/g" /etc/hosts
sed -i "s/address.*/address 192.168.1.1$HOST_ID/g" /etc/network/interfaces
ip addr flush to 192.168.1.0/24 && ip addr add 192.168.1.1$HOST_ID/24 dev ens32
Decryption
Листинг отличается от предыдущего лишь первой строкой
Now that there are no conflicting addresses left, and the session with cn2 has fallen off,
Turn on cn1 .
We are connected to 192.168.1.11, and from now on we will do all the work on this node (including managing the remaining nodes). To do this, we will generate SSH keys and decompose them into all the nodes (this is not my whim, Ceph calls for this). In the process, you will need to enter passwords and nod your head at his questions:
# генерируем ключ cn1 с параметрами по умолчанию, включая все секретные фразы
ssh-keygen
# раскладываем ключ cn1 на все нодыfor node_id in 1 2 3; do ssh-copy-id cn$node_id; done# подключаемся с cn1 на cn2, генерируем ключ, раскладываем ключ cn2 на все ноды
ssh cn2
ssh-keygen
for node_id in 1 2 3; do ssh-copy-id cn$node_id; doneexit# возвращаемся на cn1# идем на cn3
ssh cn3
# подключаемся с cn1 на cn3, генерируем ключ, раскладываем ключ cn3 на все ноды
ssh-keygen
for node_id in 1 2 3; do ssh-copy-id cn$node_id; doneexit# возвращаемся на cn1
Thus, we brought the cluster subnet to the state that was described at the beginning of the article. All nodes have root access to their neighbors without a password * threatens with a finger * The
cluster is still not a cluster, but is ready for clustering, so to speak. However, before shooting
Raise the Ceph cluster
10 minutes went ...
We start all the machines and connect to cn1 via SSH. First, install ceph-deploy on all nodes, which is designed to simplify the installation and configuration of some cluster components. Then we will create a cluster, install the Ceph distribution on all nodes, add three monitors to the cluster (you can also have one, but then a monitor crash will be the same as a whole cluster crash) and fill the storage with disks.
# устанавливаем ceph-deploy на все ноды:for node_id in 1 2 3; do ssh cn$node_id apt install ceph-deploy -y; done# создаем каталог для конфигов Ceph:
mkdir /etc/ceph
cd /etc/ceph
# Создаем новый кластер:
ceph-deploy new cn1 cn2 cn3
# Устанавливаем дистрибутив Ceph на машины:
ceph-deploy install cn1 cn2 cn3
# Создаем мониторы, указанные при создании кластера:
ceph-deploy mon create-initial
# После перехода Ubuntu на systemd # именно демоны мониторов почему-то автоматически не добавляются в автостарт, # поэтому добавляем их в systemd руками:for node_id in 1 2 3; do ssh cn$node_id systemctl enable ceph-mon; done# Очищаем и готовим диски к добавлению в кластер:
ceph-deploy disk zap {cn1,cn2,cn3}:{sdb,sdc,sdd}
# без магии это выглядит так:# ceph-deploy disk zap cn1:sdb cn1:sdc cn1:sdd cn2:sdb cn2:sdc cn2:sdd cn3:sdb cn3:sdc cn3:sdd # Превращаем диски в OSD и создаем соответствующие демоны:
ceph-deploy osd create {cn1,cn2,cn3}:{sdb,sdc,sdd}
The cluster is almost ready, check its status with the ceph -s or ceph status command:
root@cn1:/etc/ceph# ceph -s
    cluster 0cb14335-e366-48df-b361-3c97550d6ef4
     health HEALTH_WARN
            too few PGs per OSD (21 < min 30)
     monmap e1:3 mons at {cn1=192.168.1.11:6789/0,cn2=192.168.1.12:6789/0,cn3=192.168.1.13:6789/0}
            election epoch 6, quorum 0,1,2 cn1,cn2,cn3
     osdmap e43:9osds:9 up, 9in
            flags sortbitwise,require_jewel_osds
      pgmap v107:64 pgs, 1 pools, 0 bytes data, 0 objects
            308 MB used, 45672 MB / 45980 MB avail
                  64 active+clean
The key line in this report is health, and it is in the HEALTH_WARN state. This is better than HEALTH_ERR, because this is how at least the cluster works for us, although not very. And immediately under HEALTH_WARN it is written why is it _WARN, namely: “too few PGs per OSD (21 <min 30)”, which tells us about the need to increase the number of placement groups so that there is a minimum of 21 PG per OSD. Then we multiply 9 OSD by 21 and we get 189, then we round up to the nearest power of two and we get 256. While the current number of PG = 64, which is clearly visible in the pgmap line. All of this is described in the Ceph documentation .
In this case, we satisfy the cluster requirement and do this:
PG_NUM=256
ceph osd pool set rbd pg_num $PG_NUM
ceph osd pool set rbd pgp_num $PG_NUM
We give the system a few seconds to rebuild the map and check the cluster status again:
root@cn1:/etc/ceph# ceph -s
    cluster 0cb14335-e366-48df-b361-3c97550d6ef4
     health HEALTH_OK
     monmap e1:3 mons at {cn1=192.168.1.11:6789/0,cn2=192.168.1.12:6789/0,cn3=192.168.1.13:6789/0}
            election epoch 6, quorum 0,1,2 cn1,cn2,cn3
     osdmap e50:9osds:9 up, 9in
            flags sortbitwise,require_jewel_osds
      pgmap v151:256 pgs, 1 pools, 0 bytes data, 0 objects
            319 MB used, 45661 MB / 45980 MB avail
                 256 active+clean
We see the cherished HEALTH_OK, which tells us that the cluster is healthy and ready to work.
By default, the pool replication factor is 3 (you can read about the variables size and min_size in the introductory article ). This means that each object is stored in triplicate on different disks. Let's look at it with our eyes:
root@cn1:/etc/ceph# ceph osd pool get rbd sizesize:3
root@cn1:/etc/ceph# ceph osd pool get rbd min_sizemin_size:2
Now we will reduce the size to 2, and min_size to 1 (in production it is strongly recommended not to do this! But within the virtual stand, this should increase productivity)
ceph osd pool set rbd size 2
ceph osd pool set rbd min_size 1
What's next? Next you need to try the cluster in work.
You can perform the file sharing act with the cluster in one of three well-known ways (block device, file system, and object storage). Out of the box, Windows 7 prefers traditional iSCSI, and so our method is a block device. In this case, we need to install iSCSI-target on some node (let it be cn1).
Install and configure iSCSI-target
We need not a simple target, but with support for RBD (Rados Block Device). The tgt-rbd package will work, so install it on cn1:
apt install tgt-rbd -y
# проверяем наличие поддержки rbd:
tgtadm --lld iscsi --mode system --op show | grep rbd
    rbd (bsoflags sync:direct)
# видим, что поддерживается
Ceph by default creates an rbd pool for block devices, in it we will create an rbd image:
rbd create -p rbd rbd1 --size 4096 --name client.admin --image-feature layering# где rbd - имя пула, rbd1 - имя образа, 4096 - размер в мегабайтахNow we ask the target to give the image rbd1 for any IP address, writing this in the config:
echo'<target virtual-ceph:iscsi>
    driver iscsi
    bs-type rbd
    backing-store rbd/rbd1  # Format: <pool_name>/<rbd_image_name>
    initiator-address ALL
</target>' > /etc/tgt/conf.d/ceph.conf
# сразу рестартуем таргет:
systemctl restart tgt
We look at the stopwatch: 8 minutes. They did it.
Connecting a Windows PC via iSCSI
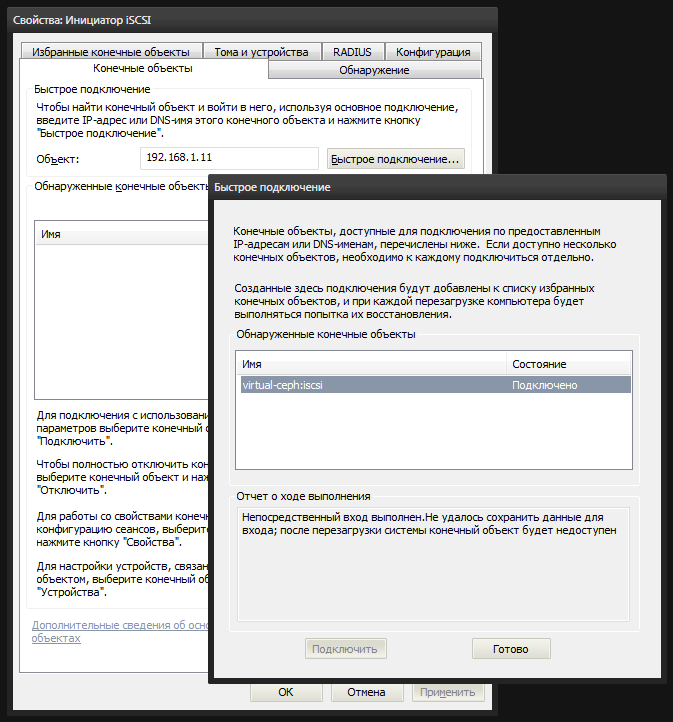
The Windows is equipped with the built-in utility iscsicpl.exe, which will help us mount the rbd1 image as a local disk. Launch and go to the tab "End objects". Enter the IP address of the cn1 node (192.168.1.11) in the “Object” field and click “Quick Connect”. If we configured everything correctly, then our iSCSI-target will be in the list. We select it and connect.
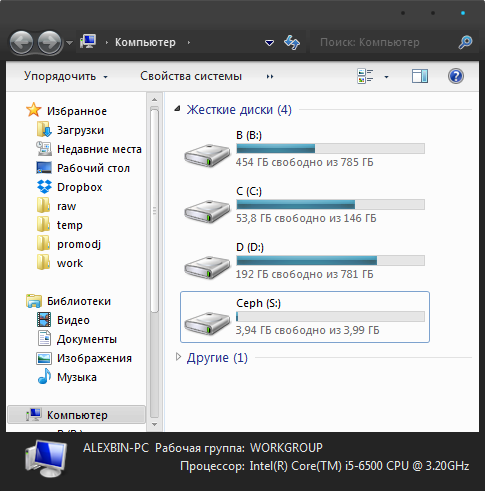
After that, an unallocated disk appears in the system. In the diskmgmt.msc disk management console, we see a new 4-gig device. You need to create a partition on it and format it by marking it as Ceph.

Now you can go into my computer and rejoice at the result.
Test
It's time to fill the cluster with photos of cats. As photos of cats, I will use 4 images of distributions of ubunta of different versions that came to hand, with a total volume of 2.8 gigabytes.
We try to upload them to our new local disk. As you may first mistakenly notice that the files are uploaded quickly, however, this is just filling buffers, from which data will gradually be written to the physical disks of the cluster. In my case, the first 3 files of 700-800 megabytes each flew away quickly, and the last one was depressed, and the speed dropped to what was expected.
If the ceph -w command is executed on the cluster node, then you can monitor the cluster status in real time. Reading / writing data, blade dump, nodes or monitors, all this is displayed in this log in real time.
You can drop and raise nodes in turn, the main thing is not to drop cn1 (because it has the only iSCSI-target without multipassing) and not drop two nodes at once. But if you increase the size back to 3, then this can be afford.
The time has come for vandalism: try dropping the cn3 node by pressing the stop button in VMWare, observing in ceph -w on cn1. First, we will see how the cluster worries that some OSDs have not responded for a long time:
osd.6192.168.1.13:6800/6812 failed (2 reporters from different host after21.000229 >= grace 20.000000)
osd.7192.168.1.13:6804/7724 failed (2 reporters from different host after21.000356 >= grace 20.000000)
osd.8192.168.1.13:6808/8766 failed (2 reporters from different host after21.000715 >= grace 20.000000)
osdmap e53: 9 osds: 6 up, 9in
For 5 minutes, the cluster will remain in a state of hope that the disks will change their minds and return. But after 5 minutes (this is the default value), the cluster will put up with the loss and begin to rebalance the data from dead OSDs, smearing the missing objects on other disks, previously marking the non-responding OSDs as outdated and correcting the placement group map:
osd.6out (down for300.042041)
osd.7out (down for300.042041)
osd.8out (down for300.042041)
Until the rebalancing is complete, ceph -s will display the status HEALTH_WARN, however the files will be available, but not without loss in performance, yes. For the reason HEALTH_WARN, this will be written:
health HEALTH_WARN
       102 pgs degraded
       102 pgs stuck unclean
       recovery 677/1420 objects degraded (47.676%)1 mons down, quorum 0,1 cn1,cn2
Continue on without me.