Backup Using Open Source Solution - Bareos
- Tutorial

Having an up-to-date backup at hand is an extremely important point, because no one is safe from unpleasant cases associated with media failure, loss of information, accidental deletion, etc. In such situations, the backup will save not only the nerves, but also relieve possible financial problems that may arise due to data loss.
Bareos - was chosen as a backup system for the following reasons:
- is open source;
- actively developing;
- has many useful features;
- can expand its functionality thanks to plugins.
Task description
Let's say we have 3 cars. Servers: Bareos, BitrixVm, Windows Server 2012 R2. For example, all this will be located within the same network, but Bareos itself, of course, allows you to back up if the machine is located outside it.
Bareos - 172.16.10.10
BitrixVM - 172.16.10.11
Windows Server - 172.16.10.12
Add a repository:
# wget http://download.bareos.org/bareos/release/latest/CentOS_7/bareos.repo -O /etc/yum.repos.d/bareos.repo
For a server with Bareos, we will use CentOS 7. A typical installation occurs:
# yum install -y bareos-client bareos-database-tools bareos-filedaemon bareos-database-postgresql bareos bareos-bconsole bareos-database-common bareos-storage bareos-director bareos-commonPostgreSQL will be used as the database. Installation is also simple:
# yum install -y postgresql-server postgresql-contribWhen installing Bareos in / etc / bareos, we have the following list of files and folders, with the exception of the ssl directory, we will move on to it a bit later:
/bareos-dir.d
/bareos-sd.d
/ssl
bareos-dir.conf
bareos-fd.conf
bareos-sd.conf
bconsole.conf
.rndpwd
After installation, prepared scripts for working with Bareos will appear in the directory / usr / lib / bareos / scripts /. Thanks to them, we will perform preliminary configuration of the database (we will create the database, tables, and rights):
su postgres -c /usr/lib/bareos/scripts/create_bareos_database
su postgres -c /usr/lib/bareos/scripts/make_bareos_tables
su postgres -c /usr/lib/bareos/scripts/grant_bareos_privileges
The important point is that the names of our machines must resolve, if not, add the appropriate lines to / etc / hosts
172.16.10.10	bareos-server
172.16.10.10	bareos-fd
172.16.10.11	bitrixvm
172.16.10.12	win-fd
bareos-server - the server itself, bareos-fd - we will also backup the server itself, i.e. at the same time, it will act as a client, then in the configuration it will be visible, bitrixvm - the name of the client speaks for itself, win-fd - a client with Windows Server 2012 R2.
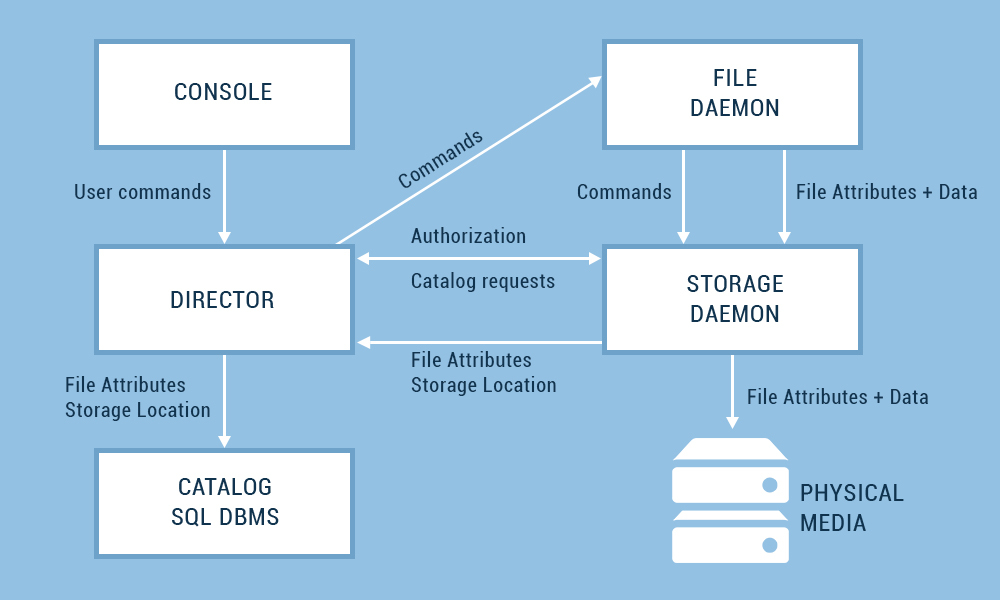
The server part for BareOS, namely the director, must be configured in the bareos-dir.conf file. The director is responsible for all operations performed.
From the main directives:
Director — описание самого директора,
Storage — устройство на которое пишем бэкапы,
Catalog — содержит информацию по выполненным Job, сохраненным файлам, клиентам, статусам,
Messages — какие сообщения будут собраны и как их доставлять,
Console — настройка консоли для управления директором,
Client — описание клиента, с которого будут сниматься резервные копии,
Pool — позволяет управлять т.н. Volume куда будут писаться данные для разных типов бэкапа (Full, Incremental, Differential), ограничить сроки хранения Volume, размеры,
FileSet — что бэкапим и дополнительные атрибуты,
Schedule — расписание,
Job — описание задачи по бэкапу.
Из официальной документации схема взаимодействия между службами:
Содержимое файла bareos-dir.conf:
Director {
#Обязательный параметр имя директора
Name = bareos-server
# Обязательный параметр для файлов запросов
QueryFile = "/usr/lib/bareos/scripts/query.sql"
# Количество одновременно выполняемых Job
Maximum Concurrent Jobs = 10
# Пароль (зачастую используется 20-40 символов, для теста ограничимся 9 знаками)
Password = «zcx@#$BGj»
# Указание какие оповещения использовать (директива Message описывается далее)
Messages = Standart
# TLS шифрование. Будет описано далее.
# TLS включено
TLS Enable = yes
TLS Require = yes
TLS Verify Peer = yes
#Разрешенные CN
TLS Allowed CN = «bareos-server»
TLS Allowed CN = "bitrixvm"
TLS Allowed CN = "win-fd"
# Location of the CA certificate
TLS CA Certificate File = /etc/bareos/ssl/ca-chain.cert.pem
# Location of the certificate
TLS Certificate = / etc / bareos / ssl / bareos-server.cert.pem
# Location of the key to the
TLS certificate Key = /etc/bareos/ssl/bareos-server.nopass.key.pem
TLS DH File = /etc/bareos/ssl/dh1024.pem
}
Storage {
Name = bareos-server-sd
# You can specify both by IP and by name, for TLS to work correctly, it is important to specify by # name
Address = bareos-server
Password = "zcx @ # $ BGj"
# Sets the name for the device where the data will be stored. The device parameters are set in the file bareos-sd.conf
Device = bareos-sd
Media Type = File
Port = 9103
TLS Enable = yes
TLS Require = yes
TLS CA Certificate File = /etc/bareos/ssl/ca-chain.cert.pem
TLS Certificate = /etc/bareos/ssl/bareos-server.cert.pem
TLS Key = /etc/bareos/ssl/bareos-server.nopass.key.pem
}
Catalog {
# All parameters for connecting to the database
Name = bareos- are set server
dbdriver = "postgresql"
dbname = "bareos"
dbuser = "bareos"
dbpassword = ""
}
Messages {
# Describes the types of messages that should be sent and logged
Name = Standart
mail = root @ localhost = all ,! Skipped,! Audit
console = all
,! Skipped,! Saved,! Audit append = "/ var / log / bareos /bareos.log "= all,! skipped,! audit
append =" /var/log/bareos/bareos-audit.log "= audit
}
Client {
# Client name for backup
Name = bareos-fd
# Directory name
Catalog = bareos -server
Enabled = yes
# Set the address name
Address = bareos-server
Password = "zcx @ # $ BGj"
Port = 9102
# TLS parameters will be described later
TLS Enable = yes
TLS Require = yes
TLS CA Certificate File = /etc/bareos/ssl/ca-chain.cert.pem
TLS Certificate = /etc/bareos/ssl/bareos-server.cert.pem
TLS Key = / etc / bareos / ssl / bareos-server. nopass.key.pem
}
Pool {
# Pool name for a full backup
Name = bareos-pool -Full
# Automatically appends a label like “bareos-client-Full-” + number #Volume to the backup file
# For example, the final name Volume after the next backup will look like bareos-client- # Full-0009
Label Format = “bareos-client-Full-”
# Pool type. According to the official documentation of BareOS, only Backup
Type Type = Backup
# Volume is currently being implemented # Volume for full backup is stored for 3 months
Volume Retention = 3 months
# after which the catalog is cleared of obsolete data
AutoPrune = yes
# Volume is overwritten
Recycle = yes
}
Pool {
# Pool name for incremental backup
Name = bareos-pool-Incremental
Pool Type = Backup
Recycle = yes
Auto Prune = yes
Volume Retention = 10 days
Label Format = “bareos-client-Incremental-”
}
Pool {
# Pool name for differential backup
Name = bareos-pool-Differential
Pool Type = Backup
Recycle = yes
Auto Prune = yes
Volume Retention = 11 days
Label Format = “bareos-client- Differential- »
}
FileSet {
# Задаем имя для набора файлов
Name = bareos-fileset
# В Include указажем какие файлы будут сохраняться. В данном случае папка /etc
Include {
File = "/etc"
}
}
Schedule {
#Имя расписания
Name = «MonthlyCycle»
# 1 раз в неделю выполняется полный бэкап
Run = Level = Full mon at 2:00
# В течении дня 5 инкрементальных бэкапов каждый час
Run = Level= Incremental hourly at 13:00
Run = Level = Incremental hourly at 14:00
Run = Level = Incremental hourly at 15:00
Run = Level = Incremental hourly at 16:00
Run = Level = Incremental hourly at 17:00
}
Job {
# Name for the task
Name = Job-Full
# Its type. It can be Backup or Restore
Type = Backup
# Backup level. Full, Differential or Incremental
Level = Incremental
# For which client Job
Client = bareos-fd is performed
# File set
FileSet = bareos-fileset
#
Schedule = “MonthlyCycle”
# Name of storage used
= Storage-bareos-server-sd
# Alerts
Messages = Standart
# Used pool
Pool = bareos-pool -Full
Full Backup Pool = bareos-pool -Full
Differential Backup Pool = bareos-pool-Differential
Incremental Backup Pool = bareos-pool-Incremental
}
Job {
Name = Job-Full-restore
Type = Restore
Client = bareos-fd
FileSet = "bareos-fileset"
Storage = bareos-server-sd
Pool = bareos-pool -Full
Messages = Standart
# Indication of the path where all the files
Where = / tmp
} get during recovery
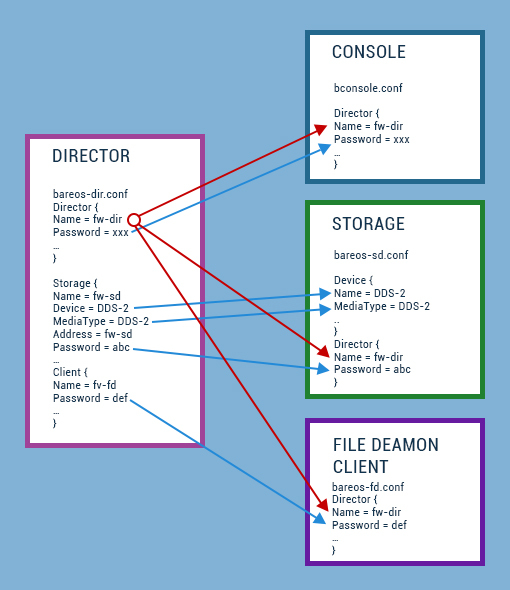
# Add two other clients as separate configuration files.
@/etc/bareos/bareos-dir.d/win.conf
@/etc/bareos/bareos-dir.d/bitrixvm.conf
It is important that there is a correspondence between the configurations:
Next, configure Storage in bareos-sd.conf:
Storage {
# Name
Name = bareos-server-sd
# Maximum number of simultaneously running Job
Maximum Concurrent Jobs = 20
# Address specified by name
SDAddress = bareos-server
SDPort = 9103
TLS Enable = yes
TLS Require = yes
TLS Verify Peer = no
TLS Allowed CN = “bareos-server”
TLS CA Certificate File = /etc/bareos/ssl/ca-chain.cert.pem
TLS Certificate = /etc/bareos/ssl/bareos-server.cert.pem
TLS Key = / etc / bareos / ssl / bareos-server.nopass.key.pem
}
Director {
# We describe the parameters of the director, which can be connected to Storage
Name = bareos-server
Password = "zcx @ # $ BGj"
TLS Enable = yes
TLS Require = yes
TLS Verify Peer = yes
TLS Allowed CN = “bareos-server”
TLS CA Certificate File = /etc/bareos/ssl/ca-chain.cert.pem
TLS Certificate = / etc / bareos / ssl /bareos-server.cert.pem
TLS Key = /etc/bareos/ssl/bareos-server.nopass.key.pem
TLS DH File = /etc/bareos/ssl/dh1024.pem
}
Device {
# We describe the storage device itself
Name = bareos-sd
Media Type = File
# Path to the device
Archive Device = / opt / backup
# Allow to automatically
label volumes LabelMedia = yes
# For simultaneous access while performing several tasks at the same time
Random Access = yes
# Automatically mount the device
AutomaticMount = yes
RemovableMedia = no
AlwaysOpen = no
}
Messages {
Name = Standard
director = bareos-server = all
}
Client settings bareos-fd.conf:
Director {
# Parameters for connecting the director
Name = bareos-server
Password = " zcx @ # $ BGj "
TLS Enable = yes
TLS Require = yes
TLS Verify Peer = yes
TLS Allowed CN =" bareos-server "
TLS CA Certificate File = /etc/bareos/ssl/ca-chain.cert.pem
TLS Certificate = /etc/bareos/ssl/bareos-server.cert.pem
TLS Key = /etc/bareos/ssl/bareos-server.nopass.key.pem
TLS DH File = /etc/bareos/ssl/dh1024.pem
}
FileDaemon {
# FileDaemon синоним Client
Name = bareos-fd
Maximum Concurrent Jobs = 20
# Отключается совместимость с Bacula. В таком случае включаются все возможности #bareos, которые включены по умолчанию.
Compatible = no
TLS Enable = yes
TLS Require = yes
TLS CA Certificate File = /etc/bareos/ssl/ca-chain.cert.pem
TLS Certificate = /etc/bareos/ssl/bareos-server.cert.pem
TLS Key = /etc/bareos/ssl/bareos-server.nopass.key.pem
}
Messages {
Name = Standard
director = bareos-server = all
}
После всех основных настроек нужно перезапустить службы bareos:
systemctl restart bareos-dir
systemctl restart bareos-sd
systemctl restart bareos-fd
In case of errors, we look at the state with the command:
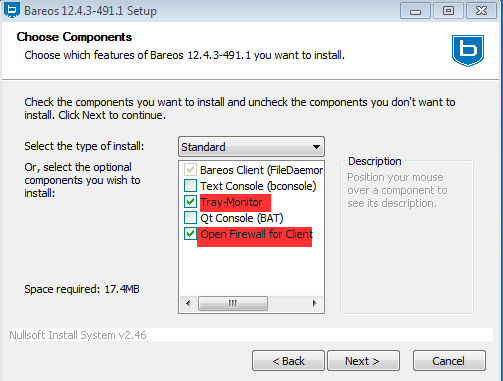
systemctl status bareos-dir.service -lLet's move on to installing the bareos client plugin for Windows. You can download it here .
Installing the plugin is also simple. From the list of offered components, we select only two indicated on the screenshot: then we set the name for the client, specify the parameters of the existing director:

We write such data:
Client Name - win-fd
Director Name - bareos-server
Password - zcx @ # $ BGj
Networks Address - bareos-server
The entered settings can always be corrected, the default configuration file is in "C: \ Program Data \ Bareos \ bareos-fd.conf".
In the hosts file, we also specify the IP for the BareOS server so that the name resolves. On the server side (bareos-server), the config for the client (win-fd) looks like this and is located on the path /etc/bareos/bareos-dir.d/win.conf:
Expand
Client {
Name = win-fd
Address = win-fd
Password = "zcx @ # $ BGj"
TLS Enable = yes
TLS Require = yes
TLS CA Certificate File = /etc/bareos/ssl/ca-chain.cert.pem
TLS Certificate = /etc/bareos/ssl/bareos-server.cert.pem
TLS Key = /etc/bareos/ssl/bareos-server.nopass.key.pem
}
Pool {
Name = win-bareos-pool-Full
Auto Prune = yes
Label Format = “bareos-client-Full-”
Pool Type = Backup
AutoPrune = yes
Recycle = yes
Volume Retention = 3 months
}
Pool {
Name = win-bareos-pool-Differential
Pool Type = Backup
AutoPrune = yes
Recycle = yes
Volume Retention = 11 days
Label Format = «win-bareos-client-Differential-»
}
Pool {
Name = win-bareos-pool-Incremental
Pool Type = Backup
AutoPrune = yes
Recycle = yes
Volume Retention = 10 days
Label Format = «win-bareos-client-Incremental-»
}
FileSet {
Name = bareos-fileset-win
Include {
File = «C:\\Users\\»
}
}
Job {
Name = Job-win-Full
Type = Backup
Level = Incremental
Client = win-fd
FileSet = bareos-fileset-win
Schedule = «MonthlyCycle»
Storage = bareos-server-sd
Messages = Standart
Pool = win-bareos-pool-Incremental
Full Backup Pool = win-bareos-pool-Full
Differential Backup Pool = win-bareos-pool-Differential
Incremental Backup Pool = bareos-pool-Incremental
}
Job {
Name = Job-win-Full-restore
Type = Restore
Client = win-fd
FileSet = «bareos-fileset-win»
Storage = bareos-server-sd
Pool = win-bareos-pool-Full
Messages = Standart
Where = «C:/tmp»
}
From the FileSet directive we see that for the Job-win-Full task we copy the users folder “C: \ Users” and in the Job-win-Full-restore task we restore it to the folder if necessary “C: \ tmp”.
There is still one client (bitrixvm) for which you need to copy the root directory and in a separate task copy the mysql database.
Let's go to the bitrixvm machine and complete the client installation:
yum install -y bareos-client bareos-common Go
to the / etc / bareos directory
/bareos-dir.d
/bareos-fd.d
/bconsole.conf
/ssl
.rndpwd
tray-monitor.d
To configure the client, go to the directory /bareos-fd.d
/client
/director
/messages
By default, after installation, the configuration is scattered into the three directories shown above, so for further convenience, we will comment the partial configurations in the directories director and messages, and make all the settings in /client/myself.conf
Expand
Client {
Name = bitrixvm
Maximum Concurrent Jobs = 20
TLS Enable = yes
TLS Require = yes
TLS CA Certificate File = /etc/bareos/ssl/ca-chain.cert.pem
TLS Certificate = /etc/bareos/ssl/bitrixvm.cert .pem
TLS Key = /etc/bareos/ssl/bitrixvm.nopass.key.pem
compatible = no
}
Director {
Name = bareos-server
Password = "zcx @ # $ BGj"
TLS Enable = yes
TLS Require = yes
TLS Verify Peer = yes
TLS Allowed CN = “bareos-server”
TLS CA Certificate File = /etc/bareos/ssl/ca-chain.cert.pem
TLS Certificate = /etc/bareos/ssl/bitrixvm.cert.pem
TLS Key = / etc /bareos/ssl/bitrixvm.nopass.key.pem
TLS DH File = /etc/bareos/ssl/dh1024.pem
}
Messages {
Name = Standard
Director = bareos-server = all,! Skipped,! Restored
Description = "Send relevant messages to the Director."
}
We enter the parameters and restart the service:
/etc/init.d/bareos-fd restartWe write the hosts address for bareos-server in the hosts
From the server side (bareos-server), the configuration for the client (bitrixvm) looks like this and is /etc/bareos/bareos-dir.d/bitrixvm.conf:
Expand
Client {
Name = bitrixvm
Address = bitrixvm
Password = "zcx @ # $ BGj"
TLS Enable = yes
TLS Require = yes
TLS CA Certificate File = /etc/bareos/ssl/ca-chain.cert.pem
TLS Certificate = / etc / bareos / ssl / bareos-server.cert.pem
TLS Key = /etc/bareos/ssl/bareos-server.nopass.key.pem
}
Pool {
Name = bitrixvm-bareos-pool-Full
Label Format = "bitrixvm-bareos- client-Full- »
Pool Type = Backup
AutoPrune = yes
Recycle = yes
Volume Retention = 3 months
}
Pool {
Name = bitrixvm-bareos-pool-Differential
Pool Type = Backup
Label Format = “bitrixvm-bareos-client-Differential-”
AutoPrune = yes
Recycle = yes
Select Job resource (1-6): = 11 days
}
Pool {
Name = bitrixvm-bareos-pool-Incremental
Pool Type = Backup
Label Format = “Bitrixvm-bareos-client-Incremental-”
AutoPrune = yes
Recycle = yes
Volume Retention = 10 days
}
Job {
Name = Job-bitrixvm-mysql
Type = Backup
Level = Full
Client = bitrixvm
FileSet = bareos-fileset-bitrixvm-mysql
Schedule = "MonthlyCycle"
Storage = bareos-server-sd
Messages = Standart
Pool = bitrixvm-bareos-pool-Incremental
Full Backup Pool = bitrixvm-bareos-pool-Full
Differential Backup Pool = bitrixvm-bareos-pool-Differential
Incremental Backup Pool = bitrixvm-bareos-pool-Incremental
RunScript {
# Run the script described in this section before executing the backup
RunsWhen = Before
# Run script if the task (Job) is not completed successfully
RunsOnFailure = Yes
RunsOnClient = Yes
#
# The command itself for the script
Command = “sh -c 'mysqldump -uroot -ppassword --opt --all-databases> /tmp/dump.sql '”
}
}
Job {
Name = Job-bitrixvm-Full
Type = Backup
Level = Full
Client = bitrixvm
FileSet = bareos-fileset-bitrixvm
Schedule = “MonthlyCycle”
Storage = bareos-server-sd
Messages = Standart
Pool = bitrixvm-bareos-pool-Incremental
Full Backup Pool = bitrixvm-bareos-pool-Full
Differential Backup Pool = bitrixvm-bareos- pool-Differential
Incremental Backup Pool = bitrixvm-bareos-pool-Incremental
}
FileSet {
Name = bareos-fileset-bitrixvm
Include {
Options {
compression = GZIP
}
File = "/"
}
}
FileSet {
Name = bareos-fileset-bitrixvm-mysql
Include {
Options {
# Set compression type
compression = GZIP
signature = MD5
}
File = "/tmp/dump.sql"
}
}
Job {
Name = Job-bitrixvm-mysql-restore
Type = Restore
Client = bitrixvm
FileSet = "bareos-fileset-bitrixvm-mysql"
Storage = bareos-server- sd
Pool = bitrixvm-bareos-pool-Full
Messages = Standart
Where = / tmp
}
Job {
Name = Job-bitrixvm-Full-restore
Type = Restore
Client = bitrixvm
FileSet = "bareos-fileset-bitrixvm"
Storage = bareos-server- sd
Pool = bitrixvm-bareos-pool-Full
Messages = Standart
Where = / tmp
}
In the RunScript section of the Command parameter, we run the mysqldump command, passing all the necessary parameters “mysqldump -uroot -ppassword --opt --all-databases> /tmp/dump.sql”.
The saved dump.sql file will then be backed up as indicated for the FileSet with the name “bareos-fileset-bitrixvm-mysql”.
Bareos uses the TLS protocol to encrypt data transfer. For each client and for the director, we must have a CA certificate, certificate and key. We will use self-signed certificates, all this can be done through openssl.
Let's go along the path of the openssl configuration file /etc/pki/tls/openssl.cnf
Generate a CA certificate:
#openssl req -config openssl.cnf -new -x509 -extensions v3_ca -keyout private/myca.key -out certs/myca.crtAfter entering the password and the rest of the data, we get two files:
/etc/pki/CA/private/myca.key
/etc/pki/CA/certs/myca.crt
We’ll tweak / check the openssl.cnf settings file so that the paths to the certificates are correctly indicated, bold that needs to be changed is highlighted.
You also need to create index.txt and serial files in the / etc / pki / CA folder:
touch /etc/pki/CA/index.txtWe immediately enter the value “01” into the serial file, the file will contain the following number for the following certificates:
echo '01' > /etc/pki/CA/serialContents of openssl.cnf:
dir = / etc / pki / CA
certs = $ dir / certs
crl_dir = $ dir / crl
database = $ dir / index.txt
#unique_subject = no
new_certs_dir = $ dir / newcerts
certificate = $ dir / certs / myca.crt
serial = $ dir / serial
crlnumber = $ dir / crlnumber
crl = $ dir / crl.pem
private_key = $ dir / private / myca.key
RANDFILE = $ dir / private / .rand
x509_extensions = usr_cert
We generate a key for the server, you will need to enter a password.
openssl genrsa -aes256 -out bareos-server.key.pem 4096We generate a certificate request. The important point is that in this paragraph when generating a certificate, you must correctly specify the Common Name (CN) so that it matches the name of the machine, otherwise errors will occur when trying to perform any task. In this example, CN = bareos-server
openssl req -config openssl.cnf -key bareos-server.key.pem -new -sha256 -out bareos-server.csr.pem We
sign CSR via CA, we get the certificate itself
openssl ca -config openssl.cnf -in bareos-server.csr.pem -out bareos-server.cert.pemWe remove the password for the key, because bareos need it passwordless
openssl rsa -in bareos-server.key.pem -out bareos-server.nopass.key.pemConvert the CA key and certificate into a single file with the .pem extension
cat /etc/pki/CA/private/myca.key /etc/pki/CA/certs/myca.cert > ca-chain.cert.pemGenerate DH Key
openssl dhparam -out dh1024.pem -5 1024Copy the bareos-server.cert.pem bareos-server.nopass.key.pem ca-chain.cert.pem dh1024.pem certificates to the / etc / bareos / ssl folder, which you must first create and install a bareos group.
For each certificate, change the group on bareos
chgrp bareos *Similar actions need to be done for each client (bitrixvm, win-fd):
openssl genrsa -aes256 -out bitrixvm.key.pem 4096
openssl req -config openssl.cnf -key bitrixvm.key.pem -new -sha256 -out bitrixvm.csr.pem
openssl ca -config openssl.cnf -in bitrixvm.csr.pem -out bitrixvm.cert.pem
openssl rsa -in bitrixvm.key.pem -out bitrixvm.nopass.key.pem
Using SCP, copy the 4 files bitrixvm.cert.pem bitrixvm.nopass.key.pem ca-chain.cert.pem dh1024.pem to the remote bitrixvm machine in the / etc / bareos / ssl folder, which you must first create and install the bareos group as for folder so for certificates.
In the bitrixvm client configuration (/etc/bareos/bareos-fd.d/client/myself.conf) in the Director section {it is necessary that client certificates are registered, but not directors. The server-side configuration (/etc/bareos/bareos-dir.d/bitrixvm.conf) in the Client {} section shows the director’s certificates. After making configuration changes, restart the services.
Creating certificates for the win-fd machine is identical.
You also need to register certificates for bconsole, a utility that allows you to manage the director in the /etc/bareos/bconsole.conf file:
Expand
Director {
Name = bareos-server
DIRport = 9101
address = bareos-server
Password = «mmm_777»
TLS Enable = yes
TLS Require = yes
TLS Verify Peer = yes
TLS Allowed CN = «bareos-server»
TLS CA Certificate File = /etc/bareos/ssl/ca-chain.cert.pem
TLS Certificate = /etc/bareos/ssl/bareos-server.cert.pem
TLS Key = /etc/bareos/ssl/bareos-server.nopass.key.pem
}
Процедура бэкапа или восстановления выглядит следующим образом. Воспользуемся утилитой bconsole, в качестве приветствия увидим *
run Покажет все возможные Job:
Развернуть
*run
A job name must be specified.
The defined Job resources are:
1: Job-Full
2: Job-Full-restore
3: Job-bitrixvm-mysql
4: Job-bitrixvm-Full
5: Job-bitrixvm-mysql-restore
6: Job-bitrixvm-Full-restore
Select Job resource (1-6): 3
Run Backup job
JobName: Job-bitrixvm-mysql
Level: Full
Client: bitrixvm
Format: Native
FileSet: bareos-fileset-bitrixvm-mysql
Pool: bitrixvm-bareos-pool-Full (From Job FullPool override)
Storage: bareos-server-sd (From Job resource)
When: 2016-10-16 11:05:16
Priority: 10
OK to run? (yes/mod/no):
# The task that left for execution receives JobId
Job queued. JobId = 75
The result of the command can be viewed either through the message command and in response we get something like this:
Expand
16-Oct 11:05 bareos-server-sd JobId 75: Volume «bitrixvm-bareos-client-Full-0011» previously written, moving to end of data.
16-Oct 11:05 bareos-server-sd JobId 75: Ready to append to end of Volume «bitrixvm-bareos-client-Full-0011» size=2086097429
16-Oct 11:05 bareos-server-sd JobId 75: Elapsed time=00:00:01, Transfer rate=319.2 K Bytes/second
16-Oct 11:05 bareos-server JobId 75: Bareos bareos-server 15.2.2 (16Nov15):
Build OS: x86_64-redhat-linux-gnu redhat CentOS Linux release 7.0.1406 (Core)
JobId: 75
Job: Job-bitrixvm-mysql.2016-10-16_11.05.38_07
Backup Level: Full
Client: «bitrixvm» 16.3.1 (01Jul16) x86_64-redhat-linux-gnu,redhat,CentOS release 6.6 (Final),CentOS_6,x86_64
FileSet: «bareos-fileset-bitrixvm-mysql» 2016-10-14 04:57:40
Pool: «bitrixvm-bareos-pool-Full» (From Job FullPool override)
Catalog: «bareos-server» (From Client resource)
Storage: «bareos-server-sd» (From Job resource)
Scheduled time: 16-Oct-2016 11:05:16
Start time: 16-Oct-2016 11:05:42
End time: 16-Oct-2016 11:05:42
Elapsed time: 0 secs
Priority: 10
FD Files Written: 1
SD Files Written: 1
FD Bytes Written: 319,187 (319.1 KB)
SD Bytes Written: 319,285 (319.2 KB)
Rate: 0.0 KB/s
Software Compression: 71.0 % (gzip)
VSS: no
Encryption: no
Accurate: no
Volume name(s): bitrixvm-bareos-client-Full-0011
Volume Session Id: 3
Volume Session Time: 1476554202
Last Volume Bytes: 2,086,417,588 (2.086 GB)
Non-fatal FD errors: 0
SD Errors: 0
FD termination status: OK
SD termination status: OK
Termination: Backup OK
Или через команду status dir
Развернуть
Terminated Jobs:
JobId Level Files Bytes Status Finished Name
====================================================================
72 Full 0 0 Error 15-Oct-16 13:39 Job-bitrixvm-Full
73 Full 49,442 515.4 M OK 15-Oct-16 14:03 Job-bitrixvm-Full
74 Incr 20 36.81 K OK 16-Oct-16 02:01 Job-Full
75 Full 1 319.1 K OK 16-Oct-16 11:05 Job-bitrixvm-mysql
Where in the status column you can view the backup status. Job number 75 was successful.
Recovery occurs by the restore command
*restoreAfter which a list of all possible options will be offered.
To select the JobIds, you have the following choices:
1: List last 20 Jobs run
2: List Jobs where a given File is saved
3: Enter list of comma separated JobIds to select
4: Enter SQL list command
5: Select the most recent backup for a client
6: Select backup for a client before a specified time
7: Enter a list of files to restore
8: Enter a list of files to restore before a specified time
9: Find the JobIds of the most recent backup for a client
10: Find the JobIds for a backup for a client before a specified time
11: Enter a list of directories to restore for found JobIds
12: Select full restore to a specified Job date
13: Cancel
We show the list of the last 20 tasks:

Click 3 and specify the JobID number, for example 75. After that, we automatically get to the console to select the files that we want to restore
cwd is: /
$
A list of all available commands can be viewed through the help command. We check what files are available in this backup, mark the necessary files with the mark command through the file indication or through *, thus selecting everything. Upon completion, we execute the done command, after which the dialogue with the system will go.
$ ls
tmp/
$ cd tmp/
cwd is: /tmp/
$ ls
dump.sql
$ mark *
1 file marked.
$ done
The job will require the following
Volume (s) Storage (s) SD Device (s)
=============================== ==============================================
bitrixvm-bareos-client- Full-0011 bareos-server-sd bareos-sd
Volumes marked with "*" are online.
1 file selected to be restored.
Select the recovery task we need (item 2)
The defined Restore Job resources are:
1: Job-Full-restore
2: Job-bitrixvm-mysql-restore
3: Job-bitrixvm-Full-restore
Select Restore Job (1-3): 2
Set the client for which we are performing recovery (2)
Defined Clients:
1: bareos-fd
2: bitrixvm
3: win-fd
Select the Client (1-3): 2
Using Catalog “bareos-server”
Run Restore job
JobName: Job-bitrixvm-mysql-restore
Bootstrap: /var/lib/bareos/bareos-server.restore.1.bsr
Where: / tmp
Replace: Always
FileSet: bareos-fileset- bitrixvm-mysql
Backup Client: bitrixvm
Restore Client: bitrixvm
Format: Native
Storage: bareos-server-sd
When: 2016-10-16 11:26:54
Catalog: bareos-server
Priority: 10
Plugin Options: * None *
OK to run ? (yes / mod / no): yes We
confirm the task through yes, with the mod command you can edit the recovery options before starting, including changing the directory for recovery. Next, the task is assigned JobId.
Job queued. JobId=76По команде status dir можно увидеть состояние восстановления. Как видим все прошло успешно. После этого можно переходить на удаленный клиент, и в папке /tmp обнаружим восстановленный файл dump.sql.
76 1 1.100 M OK 16-Oct-16 11:27 Job-bitrixvm-mysql-restoreВ заключении можно сказать, что Bareos активно развивается, имеет в своем арсенале множество полезных функций, которые остались за пределами этой статьи, а наличие плагинов, которые могут расширить функционал также оказывают положительное впечатление (резервное копирование MS SQL, плагины для хранения данных на Ceph, Gluster, бэкап LDAP).

SIM-CLOUD — Отказоустойчивое облако в Германии
Выделенные серверы в надежных дата-центрах Германии!
Любая конфигурация, быстрая сборка и бесплатная установка