Face Detection on iOS with Core Image
- Tutorial
Core Image is a powerful API built into Cocoa Touch. This is an important part of the iOS SDK. However, she is often overlooked. In this article, we will consider the possibility of face detection and how to use this technology in our iOS applications!
Face recognition in iOS appeared a long time ago, since the 5th release (around 2011), but this feature was often overlooked. The face detection API allows developers to not only recognize faces, but also check them for certain properties, such as the presence of a smile, whether a person blinks his eyes, etc.
First, we will study the technology of face detection using the Core Image framework by creating an application that recognizes the face in the photo and surrounds it with a special frame. In the second example, we will consider a more detailed method of use, by creating an application that will allow the user to take a picture, detect if a face is present, and get the coordinates of the user's face. Thus, we are going to learn as much as possible about face recognition in iOS, as well as the principle of using a powerful API, which is so often overlooked. So let's go!
Download the starter project from this link here and open it in Xcode. As you can see, a very simple controller with connected IBOutlet to ImageView.
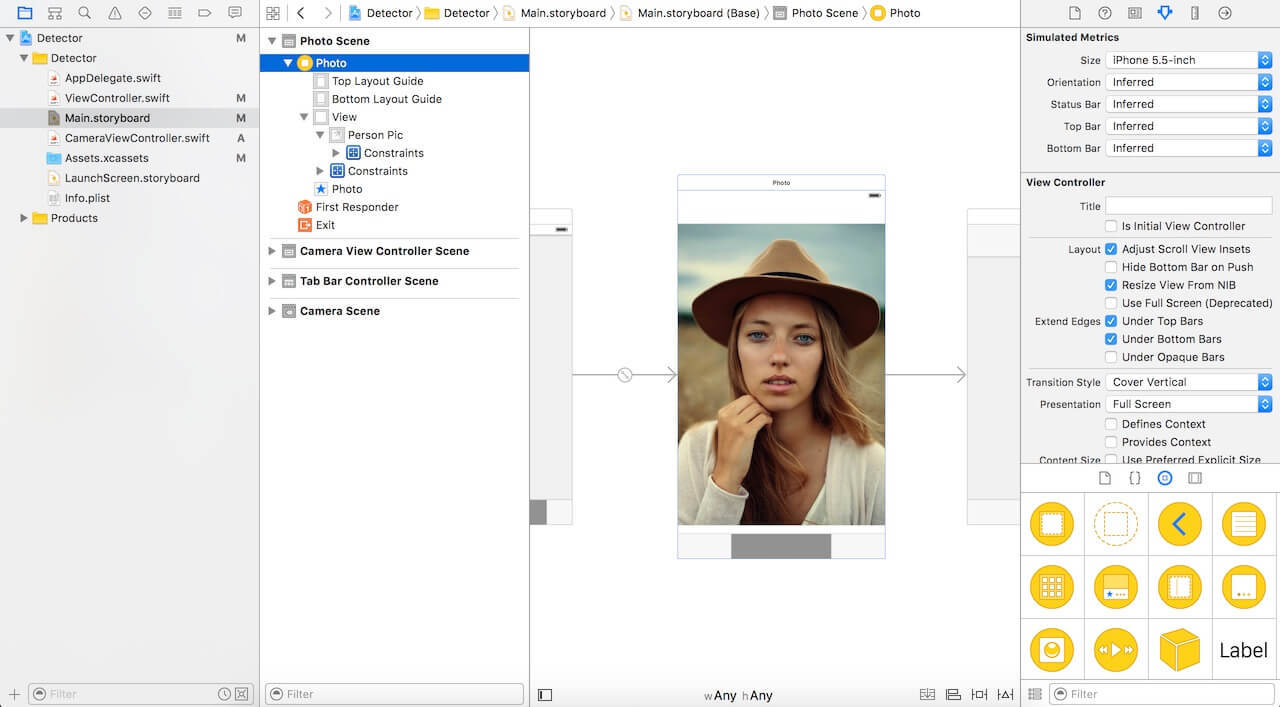
In order to start face detection using Core Image, you need to import the Core Image library. Browse to the ViewController.swift file and paste the following code at the top:
In the starter project, we have an ImageView connected to the code as an IBOutlet. Next, we need to implement a code for face recognition. Paste the following code into the project and consider it in more detail:
So what is going on here:
Call the detect () method in viewDidLoad. So paste the following line of code into the method:
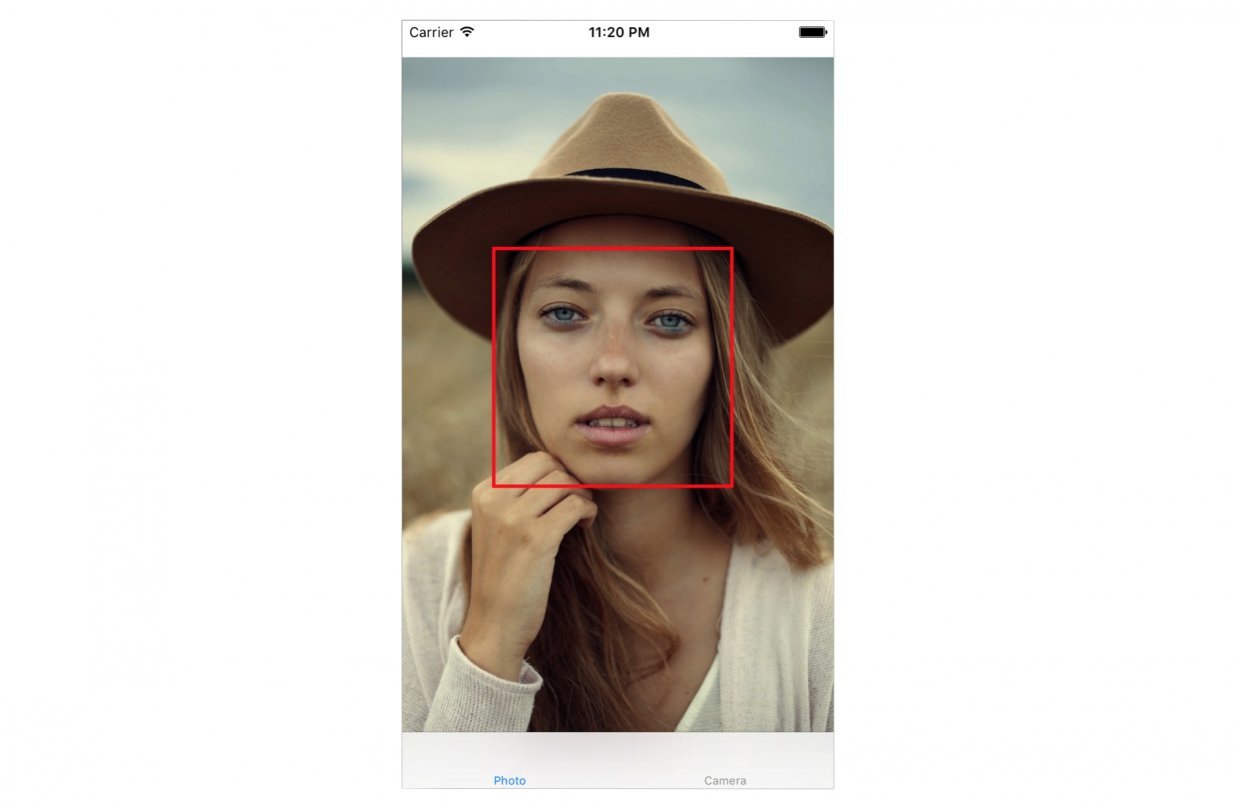
Launch the application. You will see something like this:

In the xCode console, we see the coordinates of the detected face:
There are several nuances that we did not consider in the current example:

Now replace the detect () method with the following code:
The code changes above are highlighted by comments.
Let's imagine that we have a camera application that takes photos. As soon as the photo is taken, we want to start the face recognition function to determine if the photo has a face or not. If a person is present, we can classify this photo with some tags or something like that. To do this, we need integration with the UIImagePicker class and run our face recognition code after the picture is taken.
In the starter project, I already created the CameraViewController class. Update the code to implement the camera functions:
The first few lines of this function set the UIImagePicker delegate. In the didFinishPickingMediaWithInfo method (this is the UIImagePicker delegate method), we set the image received in the method for imageView. Then we call dismiss for the picker and call the detect function.
We have not yet implemented the detect function. Paste the following code and let's take a closer look at it:
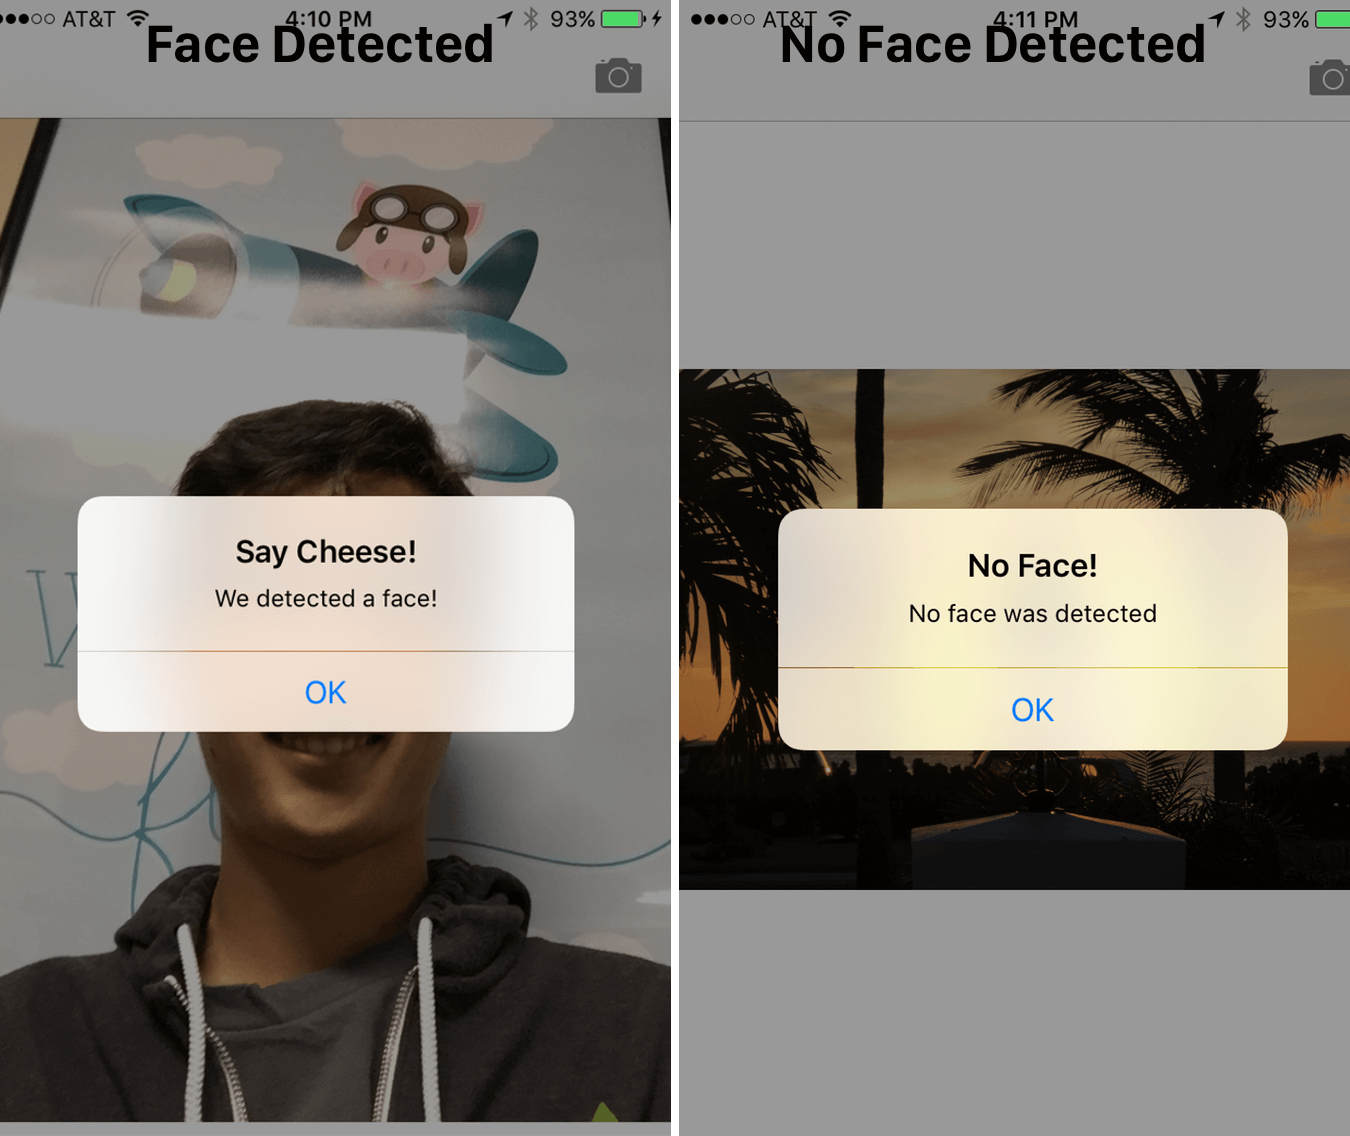
Our detect () function is very similar to its previous implementation. But this time, we use it on the captured image. When a face is detected, we display a warning message “We detected a face!” Otherwise, we display a message “No Face!”. Launch the application and test the work.
CIFaceFeature has several properties and methods that I already mentioned. For example, if you want to perform a discovery, if a person smiles, you can call .hasSmile, which returns boolean. For the experiment, you can call .hasLeftEyePosition to check if the left eye is present (let's hope so) or .hasRightEyePosition for the right eye, respectively.
We can also call hasMouthPosition to check if a mouth is present. If a mouth is present, we can access the coordinates with the mouthPosition property, as shown below:
As you can see, detecting facial features is very easy with Core Image. Besides detecting the mouth, smile, or position of the eye, we can also check whether the eye is open or closed by calling leftEyeClosed for the left eye and rightEyeClosed for the right, respectively.
In this article, we explored the face detection features using the API, the core image of the Core Image API, and how to use them in a camera application. We installed used the main UIImagePicker to take a photo and detect the face present in the image.
As you can see, face detection using the core image Core Image is a powerful API along with many applications! I hope this article will be you found this tutorial a useful and informative guide to this little-known API for iOS!
»You can download the final final draft here .
What will we do in this tutorial?
Face recognition in iOS appeared a long time ago, since the 5th release (around 2011), but this feature was often overlooked. The face detection API allows developers to not only recognize faces, but also check them for certain properties, such as the presence of a smile, whether a person blinks his eyes, etc.
First, we will study the technology of face detection using the Core Image framework by creating an application that recognizes the face in the photo and surrounds it with a special frame. In the second example, we will consider a more detailed method of use, by creating an application that will allow the user to take a picture, detect if a face is present, and get the coordinates of the user's face. Thus, we are going to learn as much as possible about face recognition in iOS, as well as the principle of using a powerful API, which is so often overlooked. So let's go!
Project setup
Download the starter project from this link here and open it in Xcode. As you can see, a very simple controller with connected IBOutlet to ImageView.
In order to start face detection using Core Image, you need to import the Core Image library. Browse to the ViewController.swift file and paste the following code at the top:
import CoreImageFace Detection Using Core Image
In the starter project, we have an ImageView connected to the code as an IBOutlet. Next, we need to implement a code for face recognition. Paste the following code into the project and consider it in more detail:
func detect() {
    guard let personciImage = CIImage(image: personPic.image!) else {
        return
    }
    let accuracy = [CIDetectorAccuracy: CIDetectorAccuracyHigh]
    let faceDetector = CIDetector(ofType: CIDetectorTypeFace, context: nil, options: accuracy)
    let faces = faceDetector.featuresInImage(personciImage)
    for face in faces as! [CIFaceFeature] {
        print("Found bounds are \(face.bounds)")
        let faceBox = UIView(frame: face.bounds)
        faceBox.layer.borderWidth = 3
        faceBox.layer.borderColor = UIColor.redColor().CGColor
        faceBox.backgroundColor = UIColor.clearColor()
        personPic.addSubview(faceBox)
        if face.hasLeftEyePosition {
            print("Left eye bounds are \(face.leftEyePosition)")
        }
        if face.hasRightEyePosition {
            print("Right eye bounds are \(face.rightEyePosition)")
        }
    }
}
So what is going on here:
- Create the personciImage variable, extract the UIImage from the UIImageView, and convert it to CIImage. CIImage is required to work with Core Image;
- Create the accuracy variable and set the CIDetectorAccuracyHigh. You can choose from CIDetectorAccuracyHigh (provides high computational accuracy) and CIDetectorAccuracyLow (uses low computational accuracy). We choose CIDetectorAccuracyHigh, because we need high accuracy;
- We define the variable faceDetector and set to the CIDetector class and pass the accuracy variable that we created earlier;
- Next, we get an array of faces, by calling the featuresInImage method, the detector finds faces in this image;
- We loop through an array of faces and transform each recognized face into CIFaceFeature;
- Create a UIView called faceBox and set its frame to the size of the frame returned from faces.first. This is necessary in order to draw a rectangle to highlight the recognized face;
- Set the border width in faceBox to 3;
- Set the border color to red;
- The background color is set transparent, view will not have a visible background;
- Finally, we add our faceBox to personPic;
- Not only can the API detect your face, the detector can also detect your left and right eyes. We will not highlight the eyes in the image. Here I just want to show you the relevant properties of CIFaceFeature.
Call the detect () method in viewDidLoad. So paste the following line of code into the method:
detect()Launch the application. You will see something like this:
In the xCode console, we see the coordinates of the detected face:
Found bounds are (177.0, 415.0, 380.0, 380.0)There are several nuances that we did not consider in the current example:
- Face detection is applied to the original image, which has a higher resolution than imageView. We set the personPic mode to aspect fit (scaling the image while maintaining the original aspect ratio). To draw a rectangle correctly, we must calculate the actual position and size of the face in the image representation;
- In addition, Core Image and UIView (or UIKit) use two different coordinate systems (see image below). We must ensure that the transformation of Core Image coordinates to UIView coordinates is implemented.
Now replace the detect () method with the following code:
func detect() {
    guard let personciImage = CIImage(image: personPic.image!) else {
        return
    }
    let accuracy = [CIDetectorAccuracy: CIDetectorAccuracyHigh]
    let faceDetector = CIDetector(ofType: CIDetectorTypeFace, context: nil, options: accuracy)
    let faces = faceDetector.featuresInImage(personciImage)
    // Добавили конвертацию координат
    let ciImageSize = personciImage.extent.size
    var transform = CGAffineTransformMakeScale(1, -1)
    transform = CGAffineTransformTranslate(transform, 0, -ciImageSize.height)
    for face in faces as! [CIFaceFeature] {
        print("Found bounds are \(face.bounds)")
        // Добавили вычисление фактического положения faceBox
        var faceViewBounds = CGRectApplyAffineTransform(face.bounds, transform)
        let viewSize = personPic.bounds.size
        let scale = min(viewSize.width / ciImageSize.width,
                        viewSize.height / ciImageSize.height)
        let offsetX = (viewSize.width - ciImageSize.width * scale) / 2
        let offsetY = (viewSize.height - ciImageSize.height * scale) / 2
        faceViewBounds = CGRectApplyAffineTransform(faceViewBounds, CGAffineTransformMakeScale(scale, scale))
        faceViewBounds.origin.x += offsetX
        faceViewBounds.origin.y += offsetY
        let faceBox = UIView(frame: faceViewBounds)
        faceBox.layer.borderWidth = 3
        faceBox.layer.borderColor = UIColor.redColor().CGColor
        faceBox.backgroundColor = UIColor.clearColor()
        personPic.addSubview(faceBox)
        if face.hasLeftEyePosition {
            print("Left eye bounds are \(face.leftEyePosition)")
        }
        if face.hasRightEyePosition {
            print("Right eye bounds are \(face.rightEyePosition)")
        }
    }
}
The code changes above are highlighted by comments.
- First, we use the affine transformation to convert the coordinates of Core Image to the coordinates of UIKit;
- Secondly, we added a code to calculate the actual position and size of our frame of the detected face.
Launch the application again. You should see a frame around your face. Congratulations, we have successfully detected a face using Core Image.
Creating a camera with face recognition function
Let's imagine that we have a camera application that takes photos. As soon as the photo is taken, we want to start the face recognition function to determine if the photo has a face or not. If a person is present, we can classify this photo with some tags or something like that. To do this, we need integration with the UIImagePicker class and run our face recognition code after the picture is taken.
In the starter project, I already created the CameraViewController class. Update the code to implement the camera functions:
class CameraViewController: UIViewController, UIImagePickerControllerDelegate, UINavigationControllerDelegate {
    @IBOutlet var imageView: UIImageView!
    let imagePicker = UIImagePickerController()
    override func viewDidLoad() {
        super.viewDidLoad()
        imagePicker.delegate = self
    }
    @IBAction func takePhoto(sender: AnyObject) {
        if !UIImagePickerController.isSourceTypeAvailable(.Camera) {
            return
        }
        imagePicker.allowsEditing = false
        imagePicker.sourceType = .Camera
        presentViewController(imagePicker, animated: true, completion: nil)
    }
    func imagePickerController(picker: UIImagePickerController, didFinishPickingMediaWithInfo info: [String : AnyObject]) {
        if let pickedImage = info[UIImagePickerControllerOriginalImage] as? UIImage {
            imageView.contentMode = .ScaleAspectFit
            imageView.image = pickedImage
        }
        dismissViewControllerAnimated(true, completion: nil)
        self.detect()
    }
    func imagePickerControllerDidCancel(picker: UIImagePickerController) {
        dismissViewControllerAnimated(true, completion: nil)
    }
}
The first few lines of this function set the UIImagePicker delegate. In the didFinishPickingMediaWithInfo method (this is the UIImagePicker delegate method), we set the image received in the method for imageView. Then we call dismiss for the picker and call the detect function.
We have not yet implemented the detect function. Paste the following code and let's take a closer look at it:
func detect() {
        let imageOptions =  NSDictionary(object: NSNumber(int: 5) as NSNumber, forKey: CIDetectorImageOrientation as NSString)
        let personciImage = CIImage(CGImage: imageView.image!.CGImage!)
        let accuracy = [CIDetectorAccuracy: CIDetectorAccuracyHigh]
        let faceDetector = CIDetector(ofType: CIDetectorTypeFace, context: nil, options: accuracy)
        let faces = faceDetector.featuresInImage(personciImage, options: imageOptions as? [String : AnyObject])
        if let face = faces.first as? CIFaceFeature {
            print("found bounds are \(face.bounds)")
            let alert = UIAlertController(title: "Say Cheese!", message: "We detected a face!", preferredStyle: UIAlertControllerStyle.Alert)
            alert.addAction(UIAlertAction(title: "OK", style: UIAlertActionStyle.Default, handler: nil))
            self.presentViewController(alert, animated: true, completion: nil)
            if face.hasSmile {
                print("face is smiling");
            }
            if face.hasLeftEyePosition {
                print("Left eye bounds are \(face.leftEyePosition)")
            }
            if face.hasRightEyePosition {
                print("Right eye bounds are \(face.rightEyePosition)")
            }
        } else {
            let alert = UIAlertController(title: "No Face!", message: "No face was detected", preferredStyle: UIAlertControllerStyle.Alert)
            alert.addAction(UIAlertAction(title: "OK", style: UIAlertActionStyle.Default, handler: nil))
            self.presentViewController(alert, animated: true, completion: nil)
        }
    }
Our detect () function is very similar to its previous implementation. But this time, we use it on the captured image. When a face is detected, we display a warning message “We detected a face!” Otherwise, we display a message “No Face!”. Launch the application and test the work.
CIFaceFeature has several properties and methods that I already mentioned. For example, if you want to perform a discovery, if a person smiles, you can call .hasSmile, which returns boolean. For the experiment, you can call .hasLeftEyePosition to check if the left eye is present (let's hope so) or .hasRightEyePosition for the right eye, respectively.
We can also call hasMouthPosition to check if a mouth is present. If a mouth is present, we can access the coordinates with the mouthPosition property, as shown below:
if (face.hasMouthPosition) {
     print("mouth detected")
}
As you can see, detecting facial features is very easy with Core Image. Besides detecting the mouth, smile, or position of the eye, we can also check whether the eye is open or closed by calling leftEyeClosed for the left eye and rightEyeClosed for the right, respectively.
In conclusion
In this article, we explored the face detection features using the API, the core image of the Core Image API, and how to use them in a camera application. We installed used the main UIImagePicker to take a photo and detect the face present in the image.
As you can see, face detection using the core image Core Image is a powerful API along with many applications! I hope this article will be you found this tutorial a useful and informative guide to this little-known API for iOS!
»You can download the final final draft here .