Magically build a project on WordPress using package managers and a file

Today I want to share with the honorable audience of Habr my approach to organizing the automatic assembly of a project on WordPress, which significantly saves time when creating new sites.
Background
And so, you make websites on WordPress, and with each new project you have to go to wordpress.org, download from there, in fact, WordPress itself + a set of plugins that you use constantly. Or you can install plugins directly from the admin panel, or even worse - copy them from the directory of the previous site. I always didn’t like it, somehow it’s not elegant, it does not satisfy aesthetic needs. In addition, it takes at least a little, but still time. Therefore, I thought about how to improve this process. I downloaded everything I needed, folded it neatly in daddy and performed “git init” and “git push”. Well, now I have a repository on Bitbucket where my assembly of WP with all necessary is stored. From this point on, at the beginning of the development process, you can run git clone and get something ready to go. The method did not please me for long - “flaws” were discovered. Namely:
- excessive use of the repository (all sources of plug-ins and the CMS itself are stored);
- the old version of everything is always stored (you can of course update periodically, but laziness);
- I want to store the SCSS / SASS / LESS sources, non-minified JS code and other important components in the same repository, which in theory should not overlap with the production version of the project;
Then I and my laziness consulted and came to the conclusion that when starting work on a new site, we are ready to spend energy on not more than entering one (maximum two) console commands for organizing everything and everything and going directly to the development process. Then laziness separately from me thought and continued: “so that everything would be stored in Git at once, and that there wouldn’t be a need to roll new versions (initially they say there should be new ones), and that it would be possible to correctly execute pull on the server (you then it’s to serve everything), and that in general everything would work by itself, and proceed quickly, but for now I’ll rest. ”
Satisfy Wishlist Laziness
Initially, I formalized the tasks into a small list:
- automate the installation of the WordPress core and the current versions of the plugins wandering from project to project;
- implement the dependence of project settings on the server environment;
- separate the source code of the client part from the project;
- automate the assembly of the client part;
- organize non-redundant storage in the Git repository.
And started to implement. To get started, I went to read the WP documentation and found a great thing there that allows you to separate the CMS core from what the developer is changing. Sketched for this occasion the following project structure:
content/
wp/
index.php
wp-config.php
WordPress core files are stored in the “wp” directory, “content” is a folder for themes, plugins, language versions, etc., “wp-config.php” is the standard WP settings file, and in “index.php”, guided by The documentation I put the following:
define('WP_USE_THEMES', true);
require( dirname( __FILE__ ) . '/wp/wp-blog-header.php' );
Launched on the server, checked, ok, it works. Now you need to make sure that the latest version of WP is downloaded. For this, I used Composer (you can read how to install it here ). All the files that I created earlier I placed in the “app” folder in order to take all the service files one level higher from the executable “index.php”. In the future, my site will be launched from this directory (do not forget to adjust the host settings for your server). And the “wp” folder was cleared of all contents. At the root of the project, I placed the file “composer.json” with the following contents:
{
  "require": {
    "php": ">=5.4",
    "johnpbloch/wordpress": "*",
  },
  "extra": {
    "wordpress-install-dir": "app/wp",
  }
}
Johnpbloch / wordpress is a WP fork suitable for installation through Composer, and wordpress-install-dir points to the installation directory of the CMS kernel. By writing in the console:
composer install
I made sure that everything works. Fresh WordPress downloaded in "app / wp". What about plugins? Everything is fine with them, thanks to the wpackagist.org project , they can also be pulled through Composer. To do this, just modify “composer.json” a bit:
{
  "repositories":[
    {
      "type":"composer",
      "url":"https://wpackagist.org"
    }
  ],
  "require": {
    "php": ">=5.4",
    "johnpbloch/wordpress": "*",
    "wpackagist-plugin/rus-to-lat-advanced": "*",
    "wpackagist-plugin/advanced-custom-fields": "*",
    "wpackagist-plugin/all-in-one-seo-pack": "*",
    "wpackagist-plugin/google-sitemap-generator": "*",
    "wpackagist-plugin/contact-form-7": "*",
    "wpackagist-plugin/woocommerce": "*",
    "wpackagist-plugin/saphali-woocommerce-lite": "*"
  },
  "extra": {
    "wordpress-install-dir": "app/wp",
    "installer-paths": {
      "app/content/plugins/{$name}/": ["vendor:wpackagist-plugin"],
      "app/content/themes/{$name}/": ["vendor:wpackagist-theme"]
    }
  }
}
In the section “repositories” the address “wpackagist” is indicated, in the section “installer-paths” the paths where plugins and themes will be installed are indicated, and in the section “require” the names of WP-plugins are added in the form “wpackagist-plugin / {{plugin_name} } ". Almost all plugins from wordpress.org are available in “wpackagist” , the availability of plugins can be found in the search on wpackagist.org .
By doing:
composer update
I saw how all the necessary plugins appeared in the app / content / plugins directory. Now you need to understand the settings, I remind you that the task is to make the database and debug settings dependent on the development environment, on the local server, on your own. To do this, squeeze them into a separate file "local-config.php":
define( 'DB_NAME', '%%DB_NAME%%' );
define( 'DB_USER', '%%DB_USER%%' );
define( 'DB_PASSWORD', '%%DB_PASSWORD%%' );
define( 'DB_HOST', '%%DB_HOST%%' ); // Probably 'localhost'
ini_set( 'display_errors', true );
define( 'WP_DEBUG_DISPLAY', true );
define( 'AUTH_KEY',         'put your unique phrase here' );
define( 'SECURE_AUTH_KEY',  'put your unique phrase here' );
define( 'LOGGED_IN_KEY',    'put your unique phrase here' );
define( 'NONCE_KEY',        'put your unique phrase here' );
define( 'AUTH_SALT',        'put your unique phrase here' );
define( 'SECURE_AUTH_SALT', 'put your unique phrase here' );
define( 'LOGGED_IN_SALT',   'put your unique phrase here' );
define( 'NONCE_SALT',       'put your unique phrase here' );
and change “wp-config.php” as follows:
if ( file_exists( dirname( __FILE__ ) . '/local-config.php' ) ) {
	define( 'WP_LOCAL_DEV', true );
	include( dirname( __FILE__ ) . '/local-config.php' );
} else {
	define( 'WP_LOCAL_DEV', false );
	define( 'DB_NAME', '%%DB_NAME%%' );
	define( 'DB_USER', '%%DB_USER%%' );
	define( 'DB_PASSWORD', '%%DB_PASSWORD%%' );
	define( 'DB_HOST', '%%DB_HOST%%' ); // Probably 'localhost'
	ini_set( 'display_errors', 0 );
	define( 'WP_DEBUG_DISPLAY', false );
	define( 'AUTH_KEY',         'put your unique phrase here' );
	define( 'SECURE_AUTH_KEY',  'put your unique phrase here' );
	define( 'LOGGED_IN_KEY',    'put your unique phrase here' );
	define( 'NONCE_KEY',        'put your unique phrase here' );
	define( 'AUTH_SALT',        'put your unique phrase here' );
	define( 'SECURE_AUTH_SALT', 'put your unique phrase here' );
	define( 'LOGGED_IN_SALT',   'put your unique phrase here' );
	define( 'NONCE_SALT',       'put your unique phrase here' );
}
Now, if the file "local-config.php" exists, the settings will be picked up from it. This file needs to be added to ".gitignor" (why do we need passwords from the database in the repository?). It's time to enter the data for accessing the database in "local-config.php", start the WordPress installation procedure and visit the admin panel.
In the admin panel, you need to visit the section “Settings -> General” and correct the addresses there, as follows:
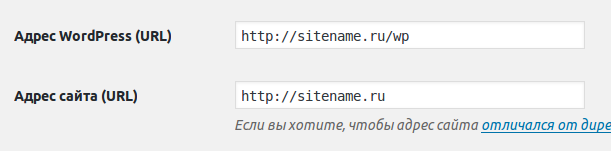
WordPress address with "/ wp" at the end, website address without "/ wp".
Great, you can use the site. I devoted the next step to user-defined styles and scripts (otherwise it’s somehow not logical, everything is going on the server itself, but can I manually download all kinds of jquery?). As a preparation, I edited the project structure:
app/
       content/
             theme/
                  mytheme/
                        build/
                        index.php
                        style.css
       wp/
       index.php
       local-config.php
       wp-config.php
src/
      fonts/
      js/
            main.js
      scss/
            style.ccss
composer.json
The src / folder contains source files for fonts, scripts, and styles. Then they are collected using gulp , minified and added to the folder “app / content / theme / mytheme / build”. As a preprocessor for CSS, I use SCSS (how to install, I think everyone knows, but if not, then here is the instruction ), for building JS - browserify . He considered it logical that the client side dependencies should be tightened with nmp. The “package.json” file turned out like this:
{
  "devDependencies": {
    "bourbon": "*",
    "bourbon-neat": "*",
    "browserify": "*",
    "fullpage.js": "*",
    "gulp": "*",
    "gulp-clean-css": "*",
    "gulp-concat": "*",
    "gulp-sass": "*",
    "gulp-sourcemaps": "*",
    "gulp-uglify": "*",
    "jquery": "*",
    "normalize-scss": "*",
    "vinyl-source-stream": "*"
  }
}
I didn’t fill out sections other than “devDependencies,” since I clearly do not plan to publish this in npm. I am writing in the console:
npm install
I wait a couple of minutes and see that all the indicated dependencies neatly ended up in "node_modules". The “gulpfile.js” file with the following contents served as the cherry on the cake:
'use strict';
var browserify = require('browserify'),
    source = require('vinyl-source-stream'),
    gulp = require('gulp'),
    sass = require('gulp-sass'),
    uglify = require('gulp-uglify'),
    cleanCSS = require('gulp-clean-css'),
    sourcemaps = require('gulp-sourcemaps'),
    sourcePath = './src/',
    buildPath = './app/content/themes/mytheme/build/';
//scss
gulp.task('scss', function () {
    return gulp.src('./src/scss/style.scss')
        .pipe(sass().on('error', sass.logError))
        .pipe(gulp.dest(buildPath + 'css'));
});
gulp.task('scss:watch', function () {
    return gulp.watch(sourcePath + 'scss/**/*.scss', ['scss']);
});
//js
gulp.task('browserify', function() {
    return browserify(sourcePath + 'js/main.js')
        .bundle()
        .pipe(source('main.js'))
        .pipe(gulp.dest(buildPath + 'js'));
});
gulp.task('browserify:watch', function () {
    return gulp.watch(sourcePath + 'js/**/*.js', ['browserify']);
});
//fonts
gulp.task('copy:fonts', function () {
    gulp.src(sourcePath + 'fonts/**/*', {base: sourcePath + 'fonts'})
        .pipe(gulp.dest(buildPath + 'fonts'));
});
//minify
gulp.task('minify:js', ['browserify'], function(){
    return gulp.src(buildPath + 'js/*.js')
        .pipe(sourcemaps.init())
        .pipe(uglify())
        .pipe(sourcemaps.write())
        .pipe(gulp.dest(buildPath + 'js'))
});
gulp.task('minify:css', ['scss'], function(){
    return gulp.src(buildPath + 'css/*.css')
        .pipe(cleanCSS({compatibility: 'ie9'}))
        .pipe(gulp.dest(buildPath + 'css'));
});
//task groups
gulp.task('default', ['copy:fonts', 'scss', 'browserify']);
gulp.task('watch', ['copy:fonts', 'scss:watch', 'browserify:watch']);
gulp.task('production', ['copy:fonts', 'scss', 'browserify', 'minify:js', 'minify:css']);
The gulp command will copy the fonts, compile SCSS, glue JS and put it all neatly into the build folder. "Gulp watch" does the same thing, but with every change to the file. "Gulp production" will additionally clean files from comments and minify.
What is the result?
As a result, the above is not necessary for you to repeat. I conveniently uploaded everything to GitHub: https://github.com/IvanZhuck/kosher_wp_seeder .
To start, you need to clone the repository and execute the following commands (after adjusting the list of plugins and dependencies, if necessary):
composer install
npm install
My laziness and I are satisfied, the projects began to start faster, and the work is more pleasant. Your questions and suggestions are waiting in the comments.