Sign Language Translator: Implementing the support vector method on Intel Edison
- Transfer
30 million people with speech problems live in the world. In order to communicate with others, they use sign language. But what if the interlocutor does not understand such a language? How to overcome the language barrier? Our story today is about the gesture recognition project. The Intel Edison board receives information from sensors mounted on a special glove, processes it using the support vector method, finds out which letter corresponds to the gesture, and sends what happened to the Android application for scoring. Intel Edison and the glove with sensors: the basis of sign language recognition
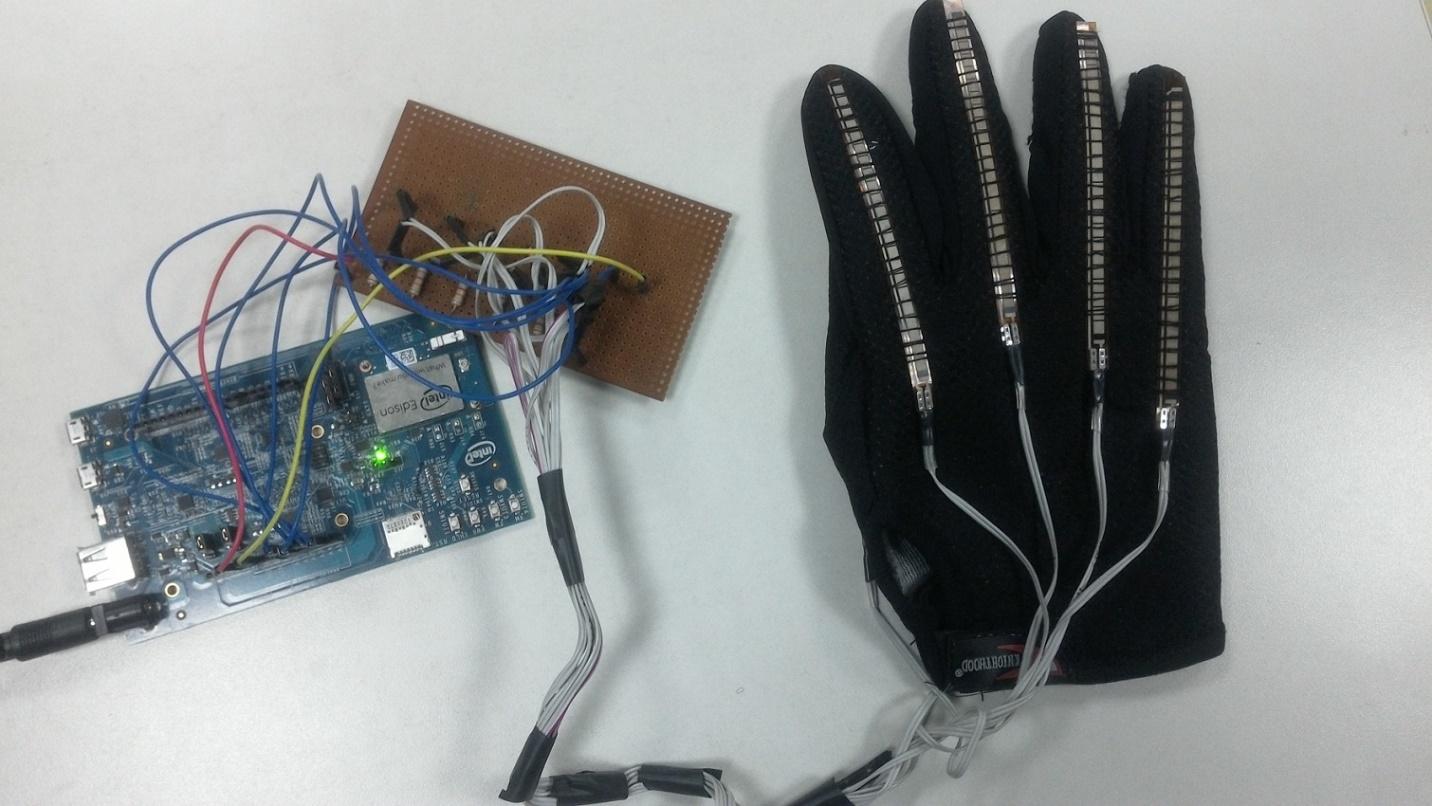
Intel Edison became the basis of our development not by chance. First of all, it has sufficient performance and RAM capacity for implementing the support vector method and real-time data processing. Secondly, Edison has a built-in Bluetooth module, which is used to communicate with an Android device. If you are eager to familiarize yourself with the software part of the project, take a look here . In the meantime, we will talk about how our system works.
On each of the five fingers of the glove that supplies the source data to the sign language recognition system, a flexible sensor is fixed. The electrical resistance of the sensors depends on their bending. Thus, the more bent the finger to which the sensor corresponds, the higher the resistance.
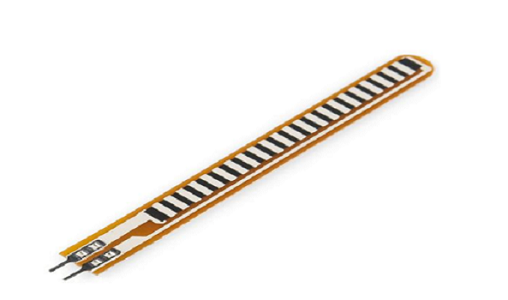
Sensor whose electrical resistance depends on bending
In particular, we use Spectra Symbol's 4.5 "unidirectional flexible sensors here. They are analog resistors that act as variable voltage dividers.
This is how the KiCad glove circuit board looks like.
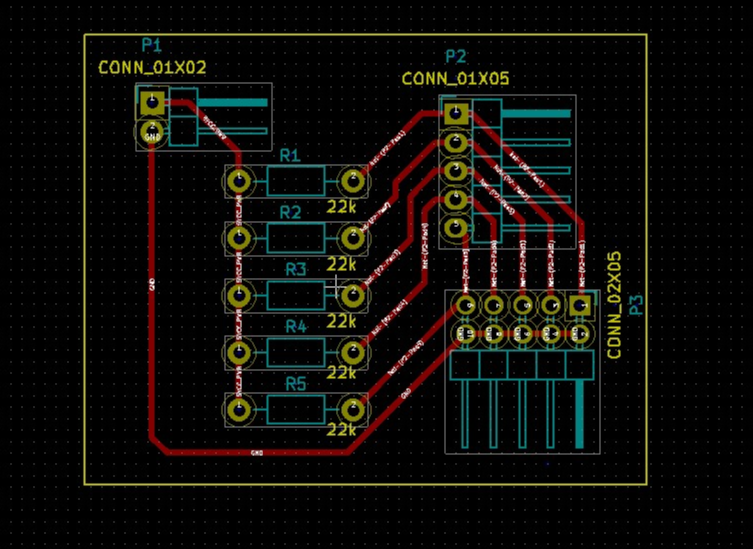
PCB for gloves
Reading sensor readings in the Intel XDK IoT Edition is done using a library for working with flexible sensors.
We need information from each of the sensors in a standardized format. Since the spread in the values of the source data is quite high, it is difficult to interpret them in this form. Preliminary processing of the data consists in the fact that first we find out the values corresponding to the minimum and maximum bending, and then use this information in order to bring the indicators to a range of values from 1.0 to 2.0. Here is how this operation, for one of the sensors, looks in the code.
After preliminary processing of the data, we transfer them to the sign language recognition system. This is a classifier based on the support vector method.
The support vector machine (SVM) method is a teacher training algorithm that analyzes the data used for classification and regression analysis. At the initial stage of work, a set of training examples, each of which belongs to one of n categories, is fed to the input of the system. Based on these data, the learning algorithm constructs a model that classifies new sets of indicators, relating them to one of the existing categories. This is a deterministic binary linear classifier. Based on the training examples, the algorithm finds the optimal hyperplane, which allows it to relate new examples to existing categories.
In the project, we use the node-svm library - a JavaScript implementation of one of the most popular LIBSVM SVM libraries. To install the library, use the following command:
Then we copy the library folder to the project directory. In addition, before using the node-svm library, you need to install some additional npm packages on which this library depends:
To install packages, use the following command:
After everything is installed, we can create a classifier and configure the kernel parameters:
Parameter C controls the relationship between SVM errors on training data and maximizing the width of the border between classes. This parameter is used at the stage of model training and indicates how much outliers will be taken into account when calculating reference vectors. The best values for the C and gamma parameters are determined using a grid search. Here we do not perform a reduction in the dimensionality of data, since each of the values (measurements) coming from the sensors is important in the classification of gestures.
The next step in our work is to build a model: to train the classifier and create a report. It takes a few seconds to learn.
The classifier is then used to analyze gestures in real time. A one-dimensional array is fed to the input of the system; at the output, we get a prediction about the gesture's belonging to a particular group. This code fragment shows how we pass sensor readings into the classifier in the form of parameters:
In addition, based on the source data, you can get the probability for each class using this command:
The character received during the classification is transferred to the Android device every time a program running on Edison receives a request to read data.
The training.ds file contains 832 lines with training data. Manually working with such a volume of information is inconvenient, therefore, we used the code below to distribute examples among classes, that is, to assign alphabet letters to gestures.
It is located in the logtrainingdata.js file:
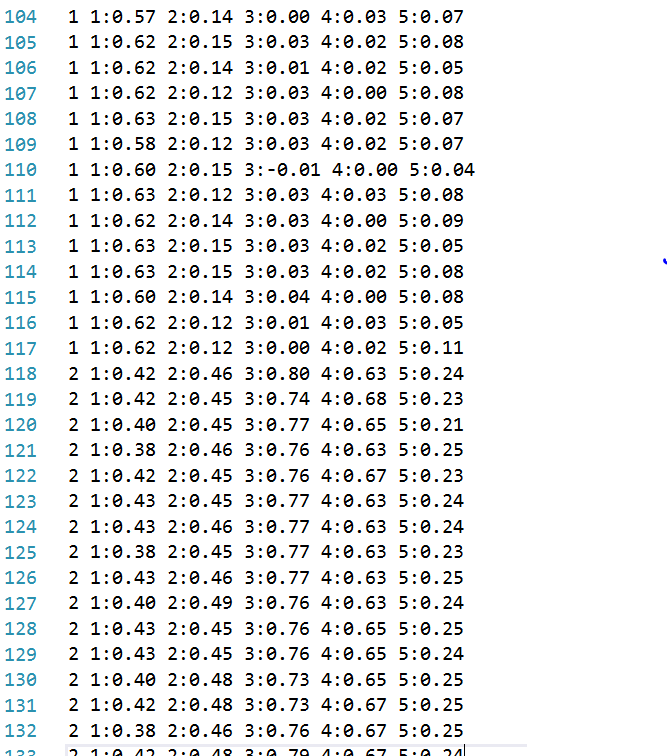
A fragment of a data file for training the system
Before an Android device can communicate with an application running on Edison, Bluetooth must be enabled on the board. It is done like this:
You can check if the Bluetooth module is working with the following command:
If everything goes as it should, the MAC address of the Edison Bluetooth adapter will be displayed in response.
Run the main program:
Now take a look at the part of the project that runs on Android.
The Android application used in our project uses the capabilities of the system to convert text to speech, and thus voices recognized gestures. The application allows the user to adjust the language, speed and tone of speech, as well as test the settings.
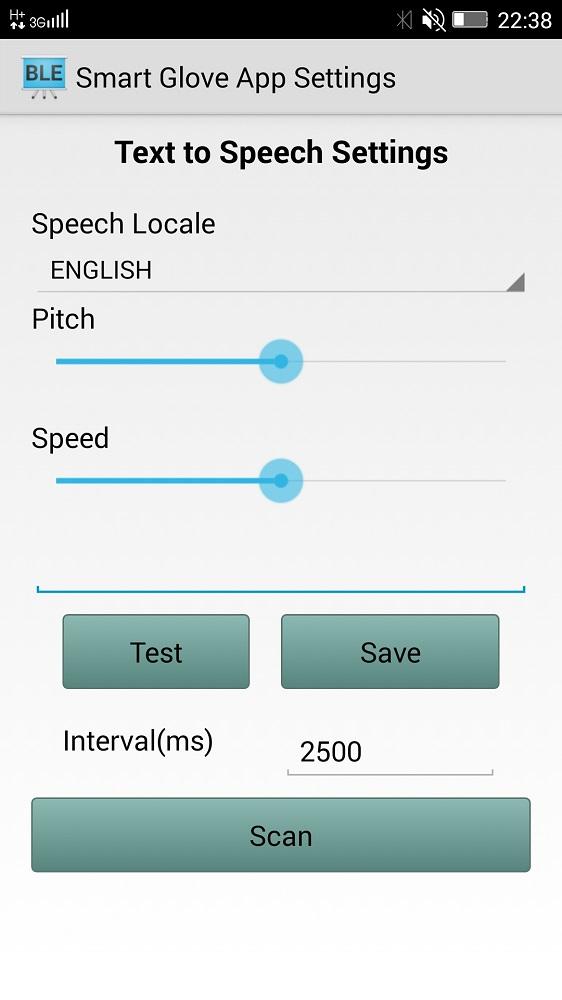
Application for voicing recognized gestures The
main button on the application screen is Scan. It serves to find and connect to an Intel Edison board. After connecting, the Android application receives data recognized by the reference vector algorithm, displays and pronounces the letter corresponding to the gesture. This is how it all looks.
We talked about how, using Intel Edison, affordable software, flexible sensors and an Android smartphone, to build a system that can help those who use sign language to expand the boundaries of communication. As you can see, based on universal components, you can very quickly create a prototype of a completely new IoT device. In the future, this is one of those “things” that can make the world a better place.
Intel Edison became the basis of our development not by chance. First of all, it has sufficient performance and RAM capacity for implementing the support vector method and real-time data processing. Secondly, Edison has a built-in Bluetooth module, which is used to communicate with an Android device. If you are eager to familiarize yourself with the software part of the project, take a look here . In the meantime, we will talk about how our system works.
Hardware
On each of the five fingers of the glove that supplies the source data to the sign language recognition system, a flexible sensor is fixed. The electrical resistance of the sensors depends on their bending. Thus, the more bent the finger to which the sensor corresponds, the higher the resistance.
Sensor whose electrical resistance depends on bending
In particular, we use Spectra Symbol's 4.5 "unidirectional flexible sensors here. They are analog resistors that act as variable voltage dividers.
This is how the KiCad glove circuit board looks like.
PCB for gloves
Reading sensor readings in the Intel XDK IoT Edition is done using a library for working with flexible sensors.
var flexSensor_lib = require('jsupm_flex');
var Flex1 = new flexSensor_lib.Flex(4);
We need information from each of the sensors in a standardized format. Since the spread in the values of the source data is quite high, it is difficult to interpret them in this form. Preliminary processing of the data consists in the fact that first we find out the values corresponding to the minimum and maximum bending, and then use this information in order to bring the indicators to a range of values from 1.0 to 2.0. Here is how this operation, for one of the sensors, looks in the code.
var ScaleMin = 1.0;
var ScaleMax = 2.0;
var flexOneMin = 280;
var flexOneMax = 400;
var flex1 = (scaleDown(Flex1.value(), flexOneMin, flexOneMax)).toFixed(2);
function scaleDown(flexval, flexMin, flexMax) {
    var new_val = (flexval - flexMin) / (flexMax - flexMin) * ((ScaleMax - ScaleMin) + ScaleMin);
    return new_val;
}
After preliminary processing of the data, we transfer them to the sign language recognition system. This is a classifier based on the support vector method.
Implementation of the support vector method
The support vector machine (SVM) method is a teacher training algorithm that analyzes the data used for classification and regression analysis. At the initial stage of work, a set of training examples, each of which belongs to one of n categories, is fed to the input of the system. Based on these data, the learning algorithm constructs a model that classifies new sets of indicators, relating them to one of the existing categories. This is a deterministic binary linear classifier. Based on the training examples, the algorithm finds the optimal hyperplane, which allows it to relate new examples to existing categories.
In the project, we use the node-svm library - a JavaScript implementation of one of the most popular LIBSVM SVM libraries. To install the library, use the following command:
npm install node-svmThen we copy the library folder to the project directory. In addition, before using the node-svm library, you need to install some additional npm packages on which this library depends:
- Stringify-object.
- Mout.
- Graceful-fs.
- Optimist
- Osenv.
- Numeric
- Q.
- underscore.
To install packages, use the following command:
npm install After everything is installed, we can create a classifier and configure the kernel parameters:
var clf = new svm.CSVC({
    gamma: 0.25,
    c: 1,
    normalize: false,
    reduce: false,
    kFold: 2 // включаем перекрёстную проверку по k блокам
});
Parameter C controls the relationship between SVM errors on training data and maximizing the width of the border between classes. This parameter is used at the stage of model training and indicates how much outliers will be taken into account when calculating reference vectors. The best values for the C and gamma parameters are determined using a grid search. Here we do not perform a reduction in the dimensionality of data, since each of the values (measurements) coming from the sensors is important in the classification of gestures.
The next step in our work is to build a model: to train the classifier and create a report. It takes a few seconds to learn.
svm.read(fileName)
    .then(function (dataset) {
        return clf.train(dataset)
            .progress(function (progress) {
                console.log('training progress: %d%', Math.round(progress*100));
            });
    })
    .spread(function (model, report) {
        console.log('SVM trained. \nReport:\n%s', so(report));
    }).done(function () {
        console.log('Training Complete.');
    });
The classifier is then used to analyze gestures in real time. A one-dimensional array is fed to the input of the system; at the output, we get a prediction about the gesture's belonging to a particular group. This code fragment shows how we pass sensor readings into the classifier in the form of parameters:
prediction = clf.predictSync([flex1, flex2, flex3, flex4, flex5]);In addition, based on the source data, you can get the probability for each class using this command:
probability= clf.predictProbabilitiesSync ([flex1, flex2, flex3, flex4, flex5]);The character received during the classification is transferred to the Android device every time a program running on Edison receives a request to read data.
Creating a training data file
The training.ds file contains 832 lines with training data. Manually working with such a volume of information is inconvenient, therefore, we used the code below to distribute examples among classes, that is, to assign alphabet letters to gestures.
It is located in the logtrainingdata.js file:
var data = "X" + " " + "1:" + f1ex1 + " " + "2:" + flex2 + " " + "3:" + flex3 + " " + "4:" + flex4 + " " + "5:" + flex5 + "\n";
//X это текущая буква алфавита, распознавать которую мы учим систему. Буквам поставлены в соответствие цифры. Например: A=0, B=1,C=2…
//присоединим данные к файлу с набором данных
fs.appendFile('training.ds', data, function(err) {
    if (err) {
        console.log(err)
    }
});
A fragment of a data file for training the system
Preparing Edison and Running the Program
Before an Android device can communicate with an application running on Edison, Bluetooth must be enabled on the board. It is done like this:
rfkill unblock bluetooth
killall bluetoothd
hciconfig hci0 up
You can check if the Bluetooth module is working with the following command:
hcitool devIf everything goes as it should, the MAC address of the Edison Bluetooth adapter will be displayed in response.
Run the main program:
node main.jsNow take a look at the part of the project that runs on Android.
Android application for voicing recognized gestures
The Android application used in our project uses the capabilities of the system to convert text to speech, and thus voices recognized gestures. The application allows the user to adjust the language, speed and tone of speech, as well as test the settings.
Application for voicing recognized gestures The
main button on the application screen is Scan. It serves to find and connect to an Intel Edison board. After connecting, the Android application receives data recognized by the reference vector algorithm, displays and pronounces the letter corresponding to the gesture. This is how it all looks.
Conclusion
We talked about how, using Intel Edison, affordable software, flexible sensors and an Android smartphone, to build a system that can help those who use sign language to expand the boundaries of communication. As you can see, based on universal components, you can very quickly create a prototype of a completely new IoT device. In the future, this is one of those “things” that can make the world a better place.