Fight for resources, part 6: cpuset or Sharing is not always right
When talking about cgroups, Red Hat users often ask the same question: “I have one application that is very sensitive in terms of delays. Is it possible with cgroups to isolate this application from the rest by linking it to certain processor cores? ”

Of course, it is possible. Otherwise, we would not choose this question as the topic of today's article.
In childhood we were often told that sharing is good and right. By and large, the way it is. But there are exceptions.
As we wrote in the first post of this series , by default Red Hat Enterprise Linux 7 behaves like a spherical good grandmother. In the sense that it tries to fairly distribute the system resources among all who ask them. However, in real life, grandmothers have pets who get more. Translated into a sysadmin, this means that there are situations when some applications or services are more important than others, so they should be given all possible attention so that they are as responsive as possible.
In Red Hat Enterprise Linux 7, this is done in two steps:
In Hat Enterprise Linux 7.4, the mechanism for working with short-lived slices, such as user sessions, has changed. As a result, they can no longer change cgroup settings on the fly, make permanent configuration changes, and create drop-in files using the systemctl set-property command. Yes, it's a shame, but the Linux development community decided so. The good news is that these changes have not affected the service. That is, if applications are started and stopped through unit files (they work as daemons), then all our examples work. In addition, it remains possible to create your own cgroups using such ancient tools as cgcreate and cgset, and then place user sessions and processes in these groups to enable CPU balls and other controls. In life, everything changes therefore, we can only adapt and invent new technology. Now turn to today's topic.
One of the most important components in the Linux kernel is the scheduler (dispatcher) of processes. If a little deeper, the process is the executable code that is part of the application or service. In fact, the process consists of a series of instructions that a computer performs when doing a particular job, whether it is watching the seals or something more serious.
These instructions are handled by the central processor, also known as the CPU. On modern computers, CPUs usually consist of several processors, which are called cores.
By default, the scheduler treats each processor core as one of the execution modules, to which it assigns new processes as they appear. In this case, the scheduler tries to more or less evenly distribute the processes that occur between the cores, taking into account the load. Unfortunately, the scheduler cannot say that this particular process will eventually generate a whole group of processes, and this group will have to be performed in isolation from other processes, in the sense that they should not have common processor cores.
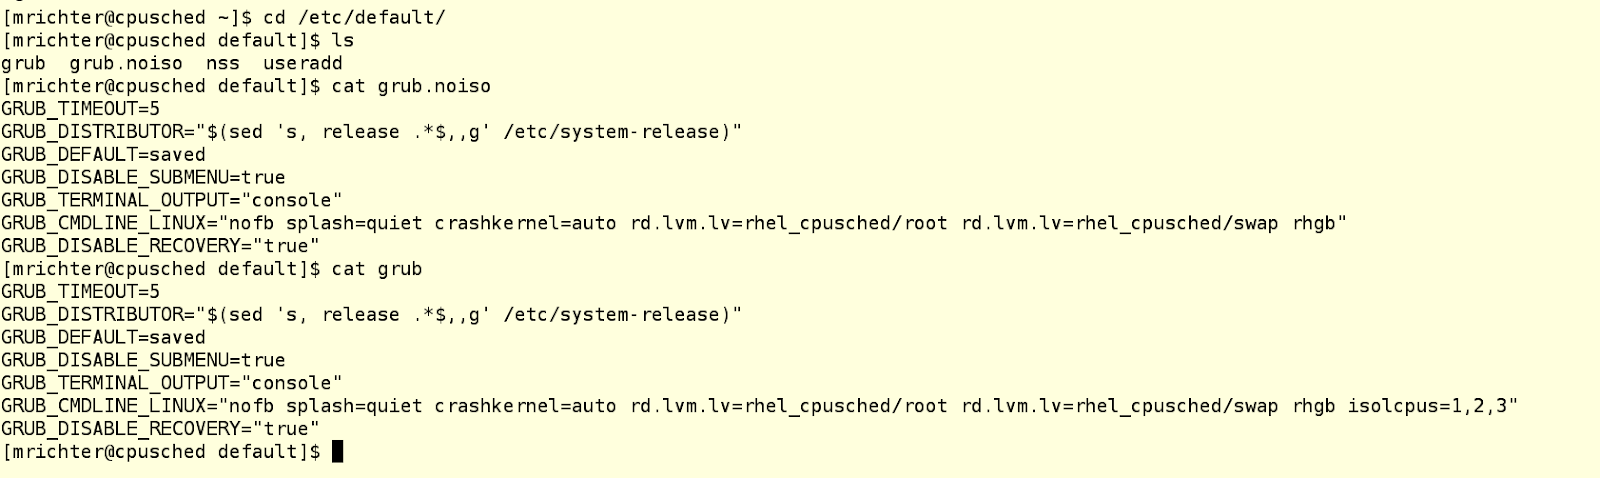
Therefore, we need to somehow tell the planner so that he does not touch a part of the processor cores, that is, do not give them any processes. And then we ourselves (or with the help of some other process) will forcibly plant on these processes, which we consider necessary, isolated from the kernel scheduler. This can be done using the isolcpus parameter in the kernel boot line in the grub configuration file. In the example below, we have a machine with four cores, on which there are two grub files: one is in / etc / default and is called grub.noiso (this is a backup copy of the default configuration), and the second one is also called grub, so that picked up grub2-mkconfig. This second file is edited to isolate kernels 1-3 from the process scheduler.
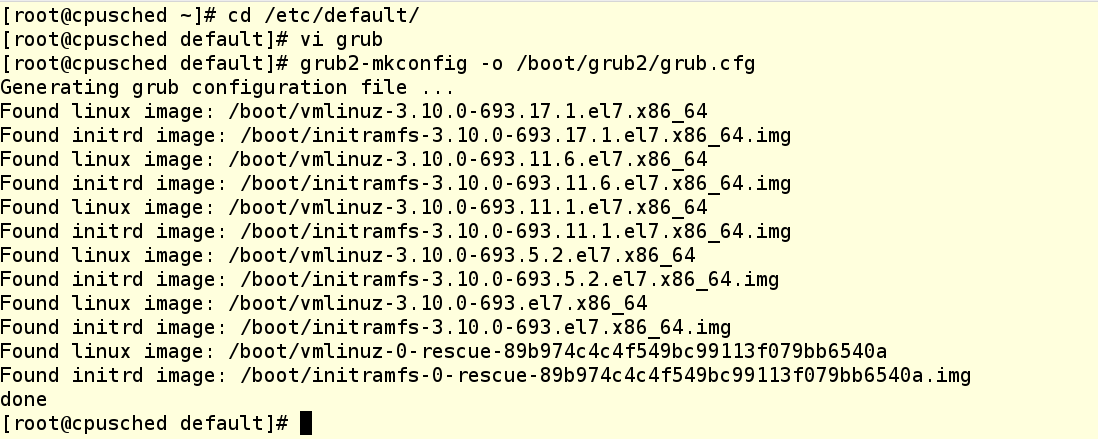
WARNING: in Red Hat Enterprise Linux 7, you never need to manually modify the grub.conf file in the / boot folder. Instead, make the necessary changes to / etc / default / grub and then rebuild the grub.conf file using an appropriate utility, for example:
When using the isolcpus parameter, you should list the released processor cores separated by commas, the numbering starts from 0. After the system is rebooted, the process scheduler will not use these cores for anything, except for certain system-level processes that MUST BE on each core. To check if our method worked, let's run several load processes and then look at loading each kernel using the top command.

As you can see, all the load processes sat down on CPU 0, instead of being evenly distributed across all four cores. So, we have entered the boot parameter correctly.
Now we come to the things that are better not to do, if you don’t understand why you are doing this, and also which are best developed in production only after thorough testing .
Why these warnings? In addition, what we are going to do is, in general, simple things using the libcgroup toolkit, which we wrote about in the last post. If you remember, this is just a set of commands for creating, modifying and destroying cgroups groups. Generally, they are part of Red Hat Enterprise Linux 6, but they can be installed on Red Hat Enterprise Linux 7, although it is possible that this possibility will disappear in the future. Briefly recall the main recommendations for using libcgroup:
With the concept of cpuset, everything is simple - this is a list of processor cores (numbering, we recall, starts with 0), accepting tasks that will be performed ONLY on these cores. These are the most common processor cores, they can either be under the control of the process scheduler (this is how the system is configured by default), or, conversely, can be isolated from the scheduler (as we did in the example above).
Let's check the / sys / fs / cgroup filesystem directory on the system from our example. As you can see, the cpuset directory already exists, since this controller is part of the kernel (although it is not under systemd control). However, there are no cgroups in it yet, so we see in this directory only the default settings.

Check that the libcgroup toolbox is installed on our machine:

If not installed, it is easy to fix with the command yum install libcgroup, even a reboot is not needed.
Now create cpuset. To do this, we will use the following commands to create a new cgroup for cpuset and set its properties:
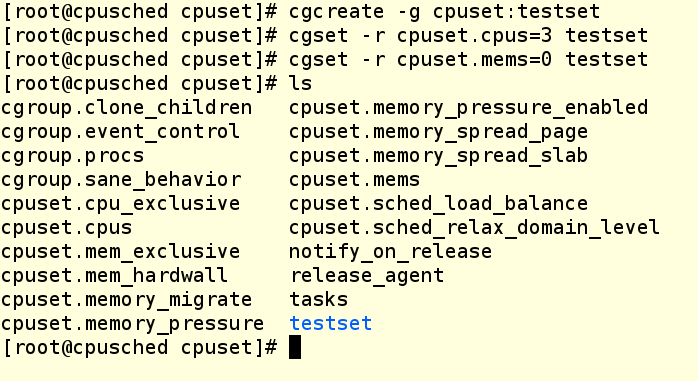
The Cgcreate command creates a cgroup named testset and places it inside the cpuset controller. Then we assign the third core of our VM to this new cpuset and allocate NUMA zone 0 to it. Even if your system does not use NUMA (and ours just does not use), you still need to prescribe the zone, otherwise you will not be able to assign tasks to the cgroup group . Now check that the testset directory has been created in the file system, and see what is inside it.
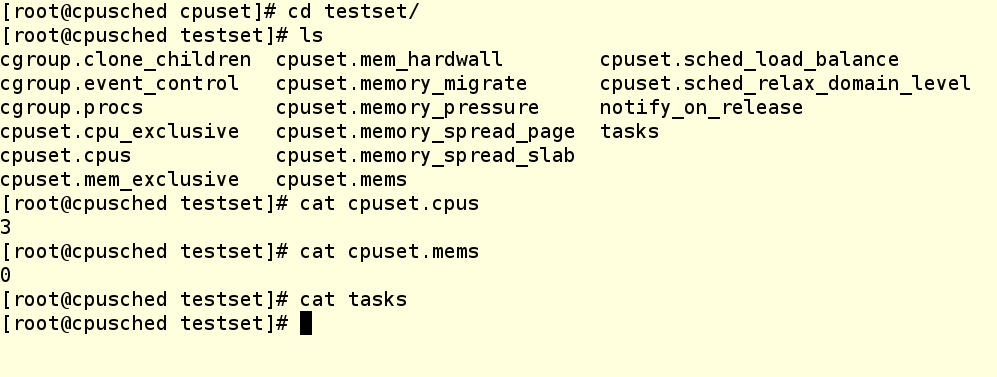
As you can see, our changes are in place, but no process is running on this cpuset yet. How to put some process here?
This can be done in several ways:
Let's see the cgexec version.

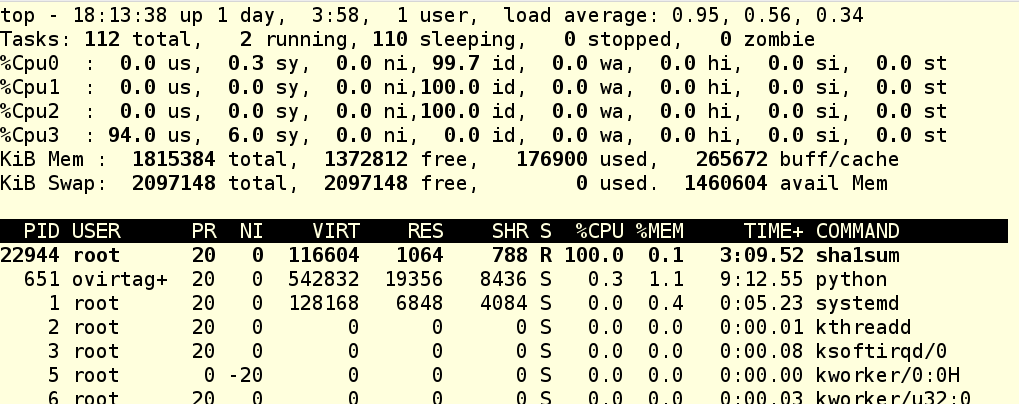
We launched foo.exe, it in turn launched a child process, which only does what actively loads the processor. The --sticky option in the cgexec command says that "any child process must remain in the same cgroup as the parent process." So this is an important option, and it must be remembered. Now we see that two processes are spinning in our cgroup, and we know their PIDs. Look top:

As you can see, CPU 3 is now loaded to the eyeballs, and the rest are cooled.
And this is what a unit file looks like for running the same application as a systemd service:
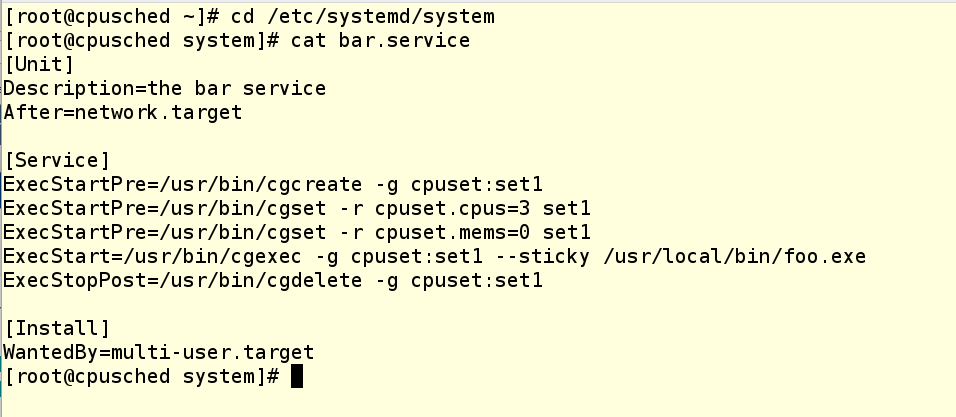
In the unit file there are three ExecStartPre commands that perform the settings that we have already managed to do with our hands. Then comes the ExecStart command, which launches the application. And when the application is stopped, the ExecStopPost command cleans up after itself, removing the cgroup.
As you can see, in the last example we created a new cgroup named set1. We did this to show that you can have several active cgroups that share the same CPU. To whom it may seem useful, but to confuse someone else.
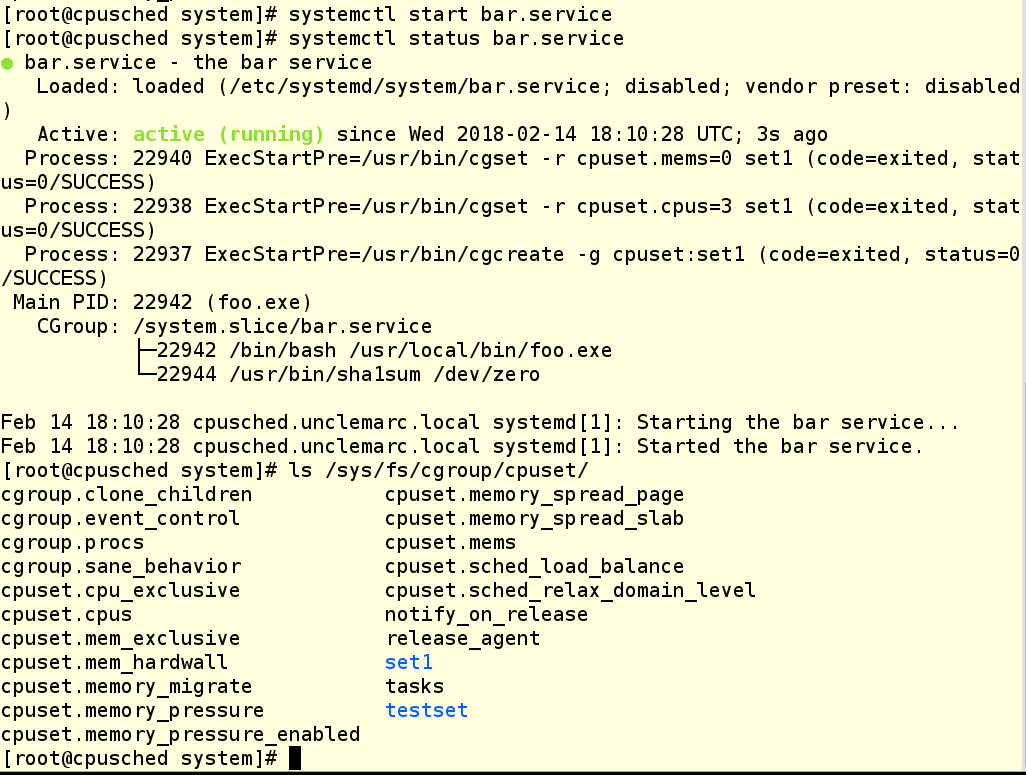
Well, does it work? It looks like yes!
And now we finish the work of our service and check that the cgroup has been destroyed:
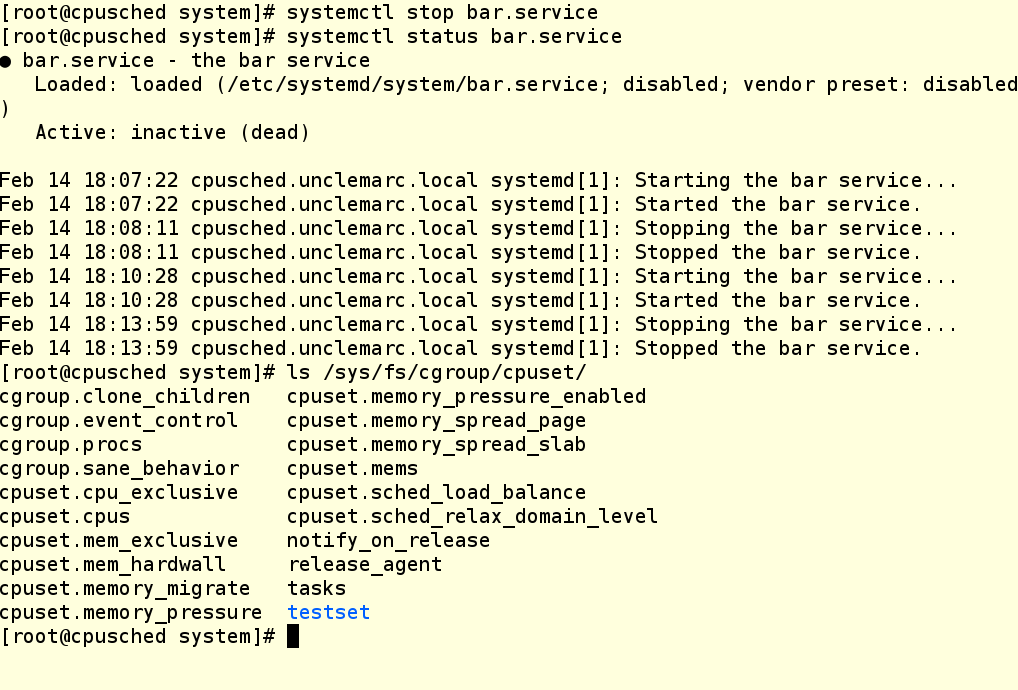
ATTENTION: cgroup groups created with cgcreate are not saved after a reboot. Therefore, the creation of such groups should be prescribed in startup scripts and unit files.
So now in your arsenal there are a couple more tools for working with cgroups. We hope they come in handy!
Other posts on cgroups from our series “Fight for resources” are available at the links:
Of course, it is possible. Otherwise, we would not choose this question as the topic of today's article.
In childhood we were often told that sharing is good and right. By and large, the way it is. But there are exceptions.
As we wrote in the first post of this series , by default Red Hat Enterprise Linux 7 behaves like a spherical good grandmother. In the sense that it tries to fairly distribute the system resources among all who ask them. However, in real life, grandmothers have pets who get more. Translated into a sysadmin, this means that there are situations when some applications or services are more important than others, so they should be given all possible attention so that they are as responsive as possible.
In Red Hat Enterprise Linux 7, this is done in two steps:
- We isolate part of the processor cores in order to transfer them to the exclusive use of such an application.
- We create cgroups groups and unit files that bind this application to isolated cores.
A small digression regarding examples from these posts.
In Hat Enterprise Linux 7.4, the mechanism for working with short-lived slices, such as user sessions, has changed. As a result, they can no longer change cgroup settings on the fly, make permanent configuration changes, and create drop-in files using the systemctl set-property command. Yes, it's a shame, but the Linux development community decided so. The good news is that these changes have not affected the service. That is, if applications are started and stopped through unit files (they work as daemons), then all our examples work. In addition, it remains possible to create your own cgroups using such ancient tools as cgcreate and cgset, and then place user sessions and processes in these groups to enable CPU balls and other controls. In life, everything changes therefore, we can only adapt and invent new technology. Now turn to today's topic.
We arrange separatism with isolcpus
One of the most important components in the Linux kernel is the scheduler (dispatcher) of processes. If a little deeper, the process is the executable code that is part of the application or service. In fact, the process consists of a series of instructions that a computer performs when doing a particular job, whether it is watching the seals or something more serious.
These instructions are handled by the central processor, also known as the CPU. On modern computers, CPUs usually consist of several processors, which are called cores.
By default, the scheduler treats each processor core as one of the execution modules, to which it assigns new processes as they appear. In this case, the scheduler tries to more or less evenly distribute the processes that occur between the cores, taking into account the load. Unfortunately, the scheduler cannot say that this particular process will eventually generate a whole group of processes, and this group will have to be performed in isolation from other processes, in the sense that they should not have common processor cores.
Therefore, we need to somehow tell the planner so that he does not touch a part of the processor cores, that is, do not give them any processes. And then we ourselves (or with the help of some other process) will forcibly plant on these processes, which we consider necessary, isolated from the kernel scheduler. This can be done using the isolcpus parameter in the kernel boot line in the grub configuration file. In the example below, we have a machine with four cores, on which there are two grub files: one is in / etc / default and is called grub.noiso (this is a backup copy of the default configuration), and the second one is also called grub, so that picked up grub2-mkconfig. This second file is edited to isolate kernels 1-3 from the process scheduler.
WARNING: in Red Hat Enterprise Linux 7, you never need to manually modify the grub.conf file in the / boot folder. Instead, make the necessary changes to / etc / default / grub and then rebuild the grub.conf file using an appropriate utility, for example:
When using the isolcpus parameter, you should list the released processor cores separated by commas, the numbering starts from 0. After the system is rebooted, the process scheduler will not use these cores for anything, except for certain system-level processes that MUST BE on each core. To check if our method worked, let's run several load processes and then look at loading each kernel using the top command.
As you can see, all the load processes sat down on CPU 0, instead of being evenly distributed across all four cores. So, we have entered the boot parameter correctly.
Bind processes to kernels with cpuset
Now we come to the things that are better not to do, if you don’t understand why you are doing this, and also which are best developed in production only after thorough testing .
Why these warnings? In addition, what we are going to do is, in general, simple things using the libcgroup toolkit, which we wrote about in the last post. If you remember, this is just a set of commands for creating, modifying and destroying cgroups groups. Generally, they are part of Red Hat Enterprise Linux 6, but they can be installed on Red Hat Enterprise Linux 7, although it is possible that this possibility will disappear in the future. Briefly recall the main recommendations for using libcgroup:
- Use systemd to control those cgroup controllers that are controlled by systemd itself (this is the CPU, memory, and block I / O).
- Use the libcgroup tools to manage all other cgroup controller controls.
- Be very careful about the unintended consequences of your actions.
With the concept of cpuset, everything is simple - this is a list of processor cores (numbering, we recall, starts with 0), accepting tasks that will be performed ONLY on these cores. These are the most common processor cores, they can either be under the control of the process scheduler (this is how the system is configured by default), or, conversely, can be isolated from the scheduler (as we did in the example above).
Let's check the / sys / fs / cgroup filesystem directory on the system from our example. As you can see, the cpuset directory already exists, since this controller is part of the kernel (although it is not under systemd control). However, there are no cgroups in it yet, so we see in this directory only the default settings.
Check that the libcgroup toolbox is installed on our machine:
If not installed, it is easy to fix with the command yum install libcgroup, even a reboot is not needed.
Now create cpuset. To do this, we will use the following commands to create a new cgroup for cpuset and set its properties:
The Cgcreate command creates a cgroup named testset and places it inside the cpuset controller. Then we assign the third core of our VM to this new cpuset and allocate NUMA zone 0 to it. Even if your system does not use NUMA (and ours just does not use), you still need to prescribe the zone, otherwise you will not be able to assign tasks to the cgroup group . Now check that the testset directory has been created in the file system, and see what is inside it.
As you can see, our changes are in place, but no process is running on this cpuset yet. How to put some process here?
This can be done in several ways:
- You can drive the PID of an existing process into the tasks file. It works, but not very beautiful.
- You can use cgexec and specify a group when starting the process. This works if the application is not a daemon; In addition, all this can be beautifully prescribed in the application launch script.
- For an application that runs as a daemon running systemd, you can create a service file.
Let's see the cgexec version.
We launched foo.exe, it in turn launched a child process, which only does what actively loads the processor. The --sticky option in the cgexec command says that "any child process must remain in the same cgroup as the parent process." So this is an important option, and it must be remembered. Now we see that two processes are spinning in our cgroup, and we know their PIDs. Look top:
As you can see, CPU 3 is now loaded to the eyeballs, and the rest are cooled.
And this is what a unit file looks like for running the same application as a systemd service:
In the unit file there are three ExecStartPre commands that perform the settings that we have already managed to do with our hands. Then comes the ExecStart command, which launches the application. And when the application is stopped, the ExecStopPost command cleans up after itself, removing the cgroup.
As you can see, in the last example we created a new cgroup named set1. We did this to show that you can have several active cgroups that share the same CPU. To whom it may seem useful, but to confuse someone else.
Well, does it work? It looks like yes!
And now we finish the work of our service and check that the cgroup has been destroyed:
ATTENTION: cgroup groups created with cgcreate are not saved after a reboot. Therefore, the creation of such groups should be prescribed in startup scripts and unit files.
So now in your arsenal there are a couple more tools for working with cgroups. We hope they come in handy!
Other posts on cgroups from our series “Fight for resources” are available at the links: