How to configure network bridge (br0) on Ubuntu Linux 14.04 and 16.04 LTS
- Transfer
This post will discuss how to configure a network bridge on a server running Ubuntu 14.04 LTS or 16.04 LTS.
A network bridge is nothing more than a simple technical way to connect to an external network through a physical interface. This is useful when using LXC / KVM / Xen / Containers virtualization and other virtual interfaces. This tutorial will show you how to configure a Linux bridge using bridge-utils (brctl) on a server with Ubuntu.
Network bridge example:
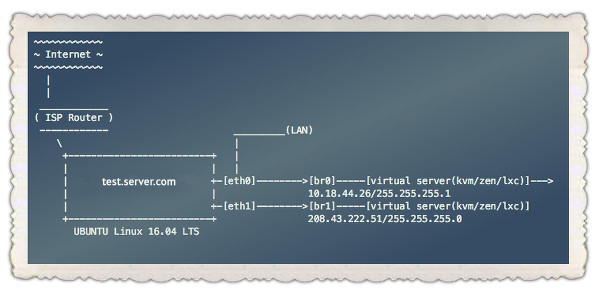
In this example, eth0 and eth1 are the physical network interface. eth0 connects to the LAN and eth1 connects directly to the provider's equipment.
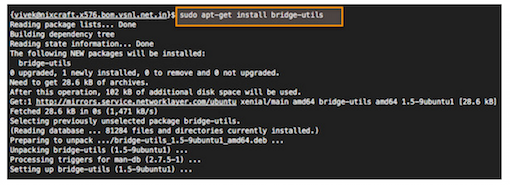
Enter the apt-get command to install bridge-utils:
or
Result:
We edit / etc / network / interfaces using a text editor such as nano, vi or any other editor you like, and enter:
Next, install eth1 and mark it as br1, enter:
Set eth0 and mark it as br0, enter:
Note about br0 and DHCP DHCP
settings:
Save and close the file.
Restart the server or network service
Now you need to restart the server or enter a command to restart the network service:
If you are using Ubuntu 14.04 LTS or an older distribution, enter:
Connectivity Testing Command
Use the ping / ip command to verify the availability of LAN and WAN interfaces:
Result:

You can now configure XEN / KVM / LXC containers to use br0 and br1 and access directly the Internet or internal LAN. Thus, there is no need to install a special routing table or create iptables, SNAT rules.
Source: www.cyberciti.biz/faq/how-to-create-bridge-interface-ubuntu-linux
A network bridge is nothing more than a simple technical way to connect to an external network through a physical interface. This is useful when using LXC / KVM / Xen / Containers virtualization and other virtual interfaces. This tutorial will show you how to configure a Linux bridge using bridge-utils (brctl) on a server with Ubuntu.
Network bridge example:
In this example, eth0 and eth1 are the physical network interface. eth0 connects to the LAN and eth1 connects directly to the provider's equipment.
Install bridge-utils
Enter the apt-get command to install bridge-utils:
$ sudo apt-get install bridge-utils
or
$ sudo apt install bridge-utils
Result:
Create a network bridge on a server with Ubuntu
We edit / etc / network / interfaces using a text editor such as nano, vi or any other editor you like, and enter:
$ sudo cp /etc/network/interfaces /etc/network/interfaces.bakup-1-july-2016
$ sudo vi /etc/network/interfaces
Next, install eth1 and mark it as br1, enter:
# br1 имеет статический IPv4 адрес, шлюз для него - роутер провайдера
auto br1
iface br1 inet static
        address 208.43.222.51
        network 255.255.255.248
        netmask 255.255.255.0
        broadcast 208.43.222.55
        gateway 208.43.222.49
        bridge_ports eth1
        bridge_stp off
        bridge_fd 0
        bridge_maxwait 0
Set eth0 and mark it as br0, enter:
auto br0
iface br0 inet static
        address 10.18.44.26
        netmask 255.255.255.192
        broadcast 10.18.44.63
        dns-nameservers 10.0.80.11 10.0.80.12
        # set static route for LAN
	post-up route add -net 10.0.0.0 netmask 255.0.0.0 gw 10.18.44.1
	post-up route add -net 161.26.0.0 netmask 255.255.0.0 gw 10.18.44.1
        bridge_ports eth0
        bridge_stp off
        bridge_fd 0
        bridge_maxwait 0
Note about br0 and DHCP DHCP
settings:
auto br0
iface br0 inet dhcp
        bridge_ports eth0
        bridge_stp off
        bridge_fd 0
        bridge_maxwait 0
Save and close the file.
Restart the server or network service
Now you need to restart the server or enter a command to restart the network service:
$ sudo systemctl restart networking
If you are using Ubuntu 14.04 LTS or an older distribution, enter:
$ sudo /etc/init.d/restart networking
Connectivity Testing Command
Use the ping / ip command to verify the availability of LAN and WAN interfaces:
# смотрим состояние br0 и br1
ip a show
# проверяем маршрутизацию
ip r
# проверяем доступность внешних ресурсов
ping -c 2 8.8.8.8
# проверяем доступность внутренней сети
ping -c 2 10.0.80.12
Result:
You can now configure XEN / KVM / LXC containers to use br0 and br1 and access directly the Internet or internal LAN. Thus, there is no need to install a special routing table or create iptables, SNAT rules.
Source: www.cyberciti.biz/faq/how-to-create-bridge-interface-ubuntu-linux