Core Data + Swift for the smallest: the necessary minimum (part 3)
- Tutorial
This is the final part of the Core Data article , the previous parts are available here: Part 1 and Part 2 .
In this article, we will turn to face the user and work on the interface part, NSFetchRequest and NSFetchedResultsController will help us in this . This part turned out to be quite large, but I see no reason to split it into several publications. More accurately, there are a lot of code and pictures under the cut.
The interface is an ambiguous thing and, depending on the requirements for the product, it can change significantly. In this article, I will not devote too much time to him, more precisely, I will devote very little (I mean following Guidelines and the like). My task in this part of the article is to show how it
Before we begin, let's give the application delegate module (
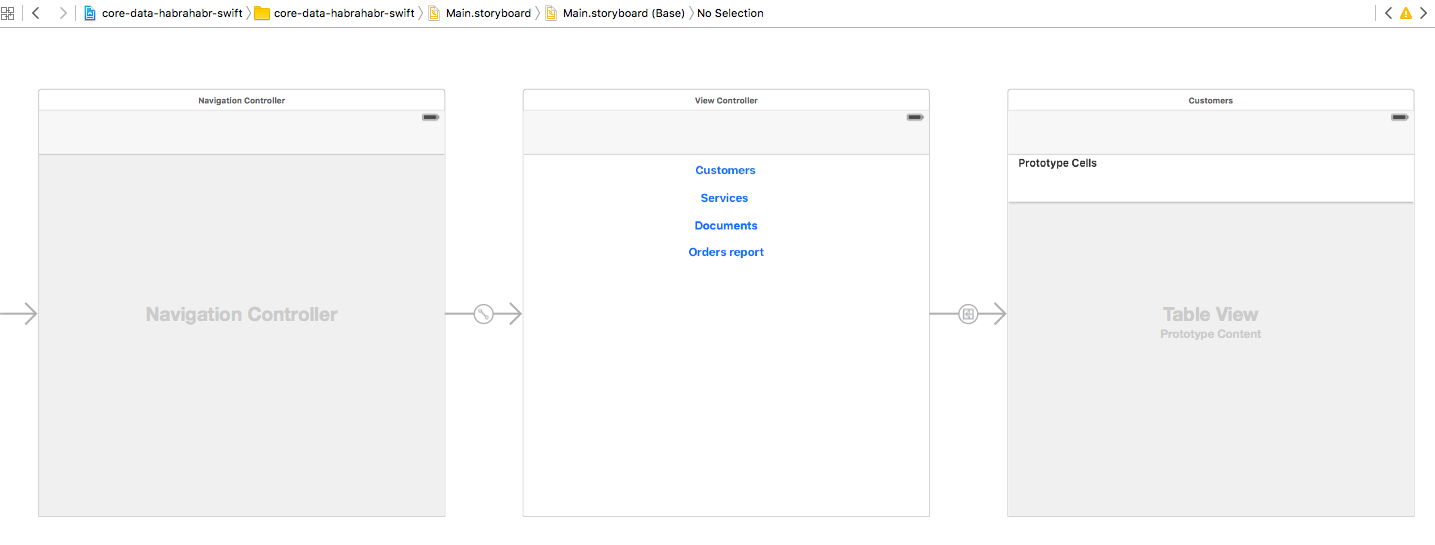
Let's start with the Storyboard:
Now you need to add your class for the Table View Controller :
It is unforgettable to specify this class created by us to our Table View Controller (
I will not use Prototype Cells here and create a “custom” class for table cells (to focus on other things), so let's set the number of such cells to zero (
Now we need to define a data source in order to implement the Table View Data Source protocol . In the last part, we met NSFetchRequestand, at first glance, it seems to be suitable for this purpose. With it, you can get a list of all objects in the form of an array, which, in fact, is what we need. But we want to not only look at the list of Customers, we want to add, delete and edit them. In this case, we will have to track all these changes manually and each time, again manually, update our list. That doesn't sound very good, right? But there is another option - NSFetchedResultsController , it is very similar to NSFetchRequest, but it not only returns an array of the objects we need at the time of the request, but also continues to monitor all the records: if some record changes, it will notify us if any records are loaded in the background through another managed context - it will tell us will also report this. We will only have to handle this event.
Let's implement the NSFetchedResultsController in our module. I will give all the code first, and then comment.
In the variable definition section, we create a fetchedResultsController object with a type
Then, when loading our View Controller (
We also need to redefine two functions to implement Table View Data Source :
Let's check! If we launch the application now and go to our menu in
Before continuing, let's optimize something a bit - creating an NSFetchedResultsController object is not concise, and we will need to create it for our other entities as well. In this case, in essence, only the name of the entity and, possibly, the name of the sort field will change. In order not to engage in “copy-paste”, let's move the creation of this object into CoreDataManager .
With this in mind, the definition of fetchedResultsController changes to the following:
Now we need to make sure that when choosing a Customer a “card” opens with all its data, which, if necessary, could be edited. To do this, let's add another View Controller (give it a title
As a type of transition between controllers, select
We will also need to call this Segue by name , let's specify the name -
We need our own class for this View Controller - everything is similar to what we did for the Table View Controller , only as the parent class we select -
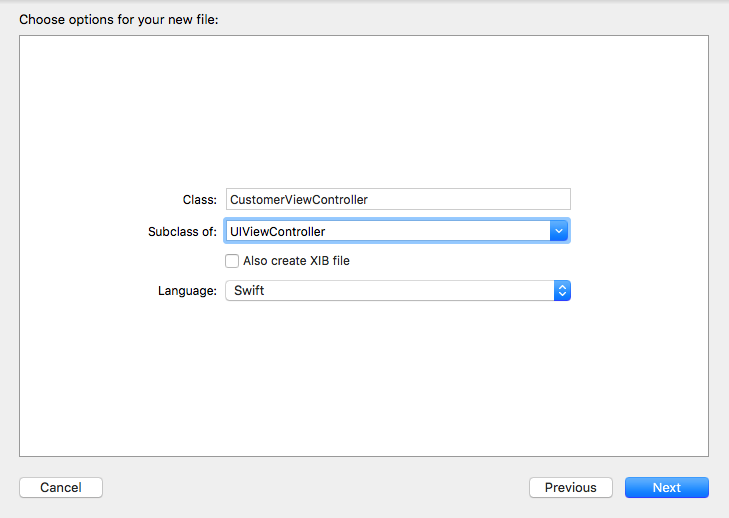
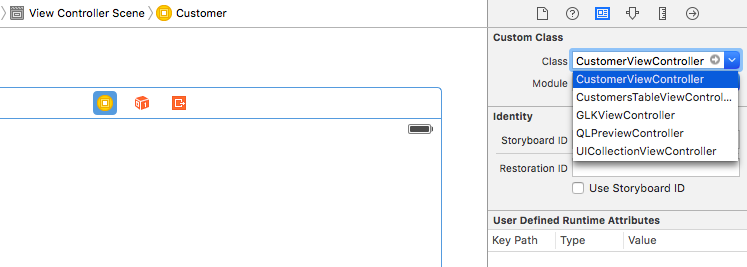
And we indicate this class for our new View Controller .
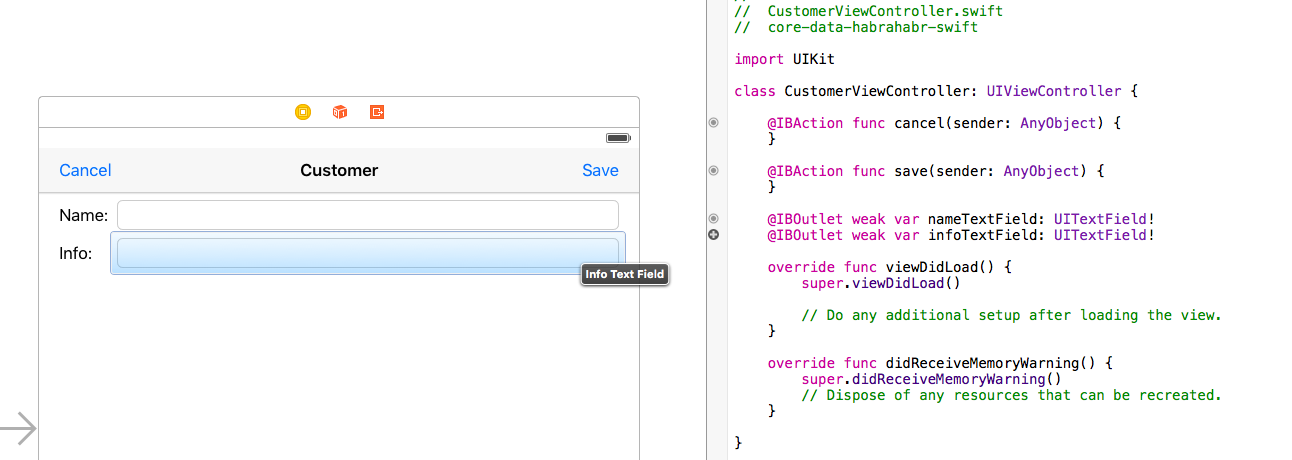
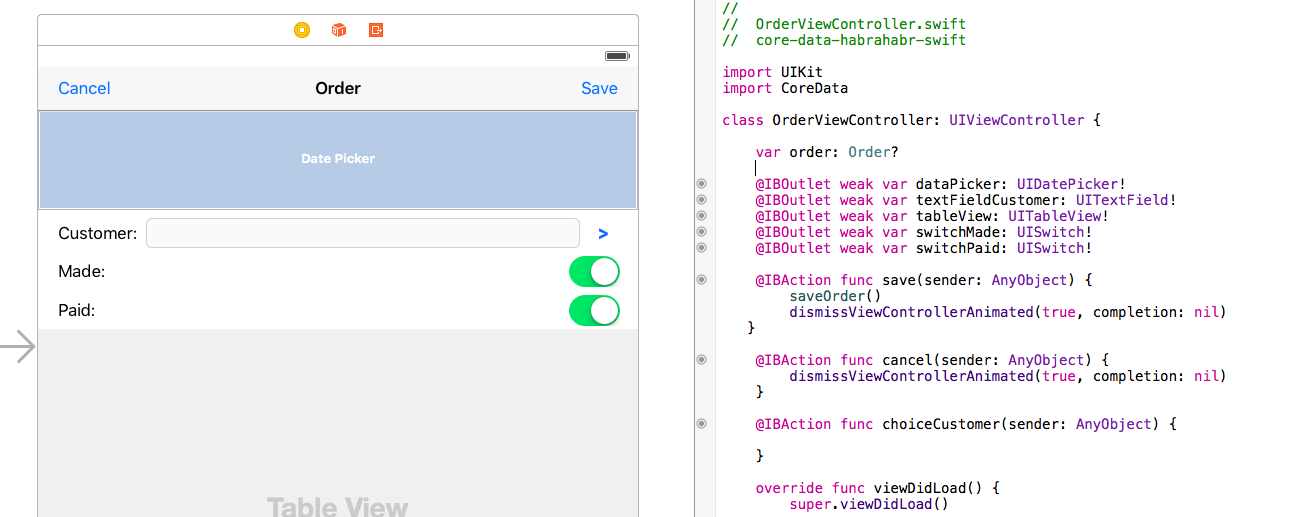
Now add the Navigation Bar with two buttons ( Save - to save changes and Cancel - to cancel). We also need two text fields for displaying and editing information ( name and info ). Let's make two Actions (for Save and Cancel) and two Outlet (for name and info).
The interface of our “card” of the Customer is ready, now we need to write some code. The logic will be as follows: upon transition to the “card” of the Customer from the list of Customers, we will transfer the customer object(Customer) based on the selected list line. When you open the "card", data from this object will be loaded into the interface elements (
Also, we need to take into account the fact that we have a required field - name . If the user tries to save the Customer with an empty name, then he will receive a critical error. To prevent this from happening, let's add a check of the correctness of the stored data: if the data is not correct, then we will show the corresponding warning and block the recording of such an object. The user must either enter the correct data or refuse to record such an object.
And the last thing we need to consider here: for sure, we will want to not only edit existing Customers, but also add new ones. We will do this as follows: in the list of Customers, add a button to create a new Customer, which will open our "card" by passing nil to it . And when saving the data of the “card” of the Customer, we will check if the customer object has not yet been created (that is, this is the input of a new Customer), then we will immediately create it.
Thus, we get about the following code.
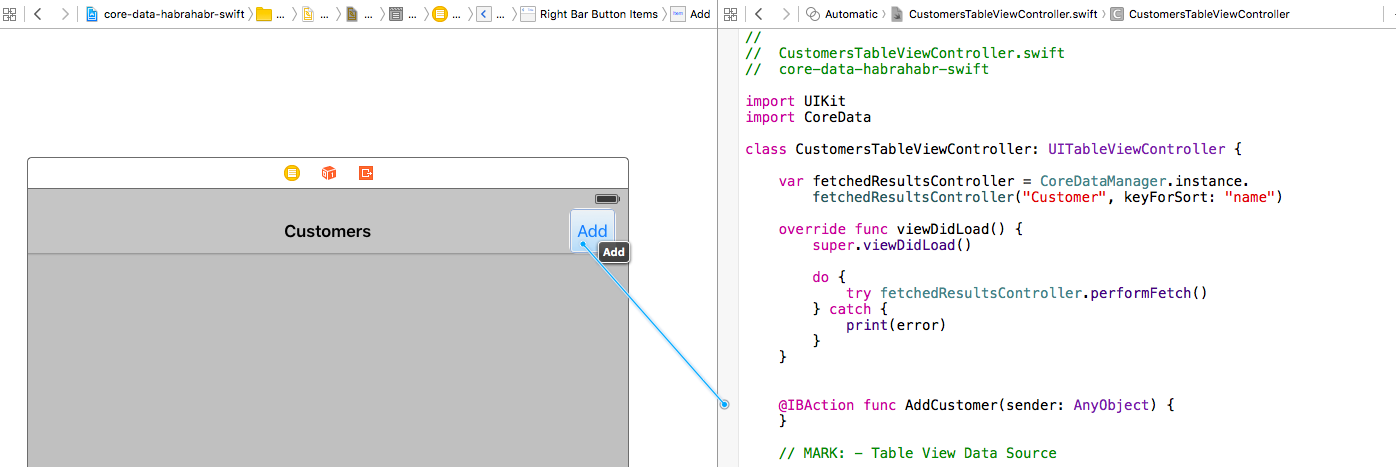
Now let's go back to the Table View Controller and add a button to create a new Customer (
This Action will open the "card" to create a new Customer, passing nil to it .
It remains to make sure that when choosing an existing Customer, his "card" opens. For this we need two procedures.
In the first procedure (when highlighting the list line) we “read” the current Customer, and in the second (when switching from the list to the “card”), we assign a link to the selected Customer’s variable of
Let's now run our application and make sure that everything works as it should.
The application works, we can enter new Customers, edit existing ones, but the information in the list is not automatically updated and we do not have a mechanism to delete an unnecessary (or mistakenly entered) Customer. Let's fix it.
Since we are using the NSFetchedResultsController here , which “knows” about all these changes, we just need to “listen” to it. To do this, implement the delegate protocolNSFetchedResultsControllerDelegate . Declare that we implement this protocol:
Declare yourself as a delegate to NSFetchedResultsController :
And add the following implementation of this protocol:
Despite the relatively large volume - it is quite simple. Here we get information about which object and how exactly has changed, and, depending on the type of change, we perform various actions:
We also have two "auxiliary" functions,
It remains only to implement the removal of the Customer. This is done quite simply, we need to redefine just one small procedure.
When a delete command arrives, we get the current object by index and pass it to the managed context for deletion. Please note that the type of object to be deleted must be
This completes the work with the directory "Customers". Let's run the application and check its operation.

As you can see, nothing super complicated, Core Data combines perfectly with standard interface elements.
The directory of services we have has the same structure and logic of work as the directory of customers. The differences are minimal, so I won’t describe everything here in detail, but simply give a brief procedure (I’m sure that you can easily do everything yourself according to this summary):
You should get something like this:

It will be a little more complicated with the document, since each document, firstly, is represented by two different entities, and, secondly, there are relationships, that is, it is necessary to somehow ensure the choice of value.
Let's start with a simple and already familiar one - we will create a Table View Controller with a list of documents and a View Controller to display the document itself (so far without details, only a blank). I will not repeat it - all according to the same algorithm as the directories.
We create two new controllers ( Table View Controller for the list of documents and View Controller for the document itself):
Add Action , create
We make a blank for the document itself:
A few notes:
This will complete the journal of documents, it remains to make the document itself. It should be noted that all three sections (our two directories and the document) turned out to be very similar (from the point of view of implementation) and the question arises of the advisability of using different classes and controllers for them instead of one universal one. This approach is also possible, but the similarity of our controllers is due to a very simple data model, in real applications, entities, as a rule, still noticeably differ and, as a result, controllers and interface solutions also look completely different.
We pass to the most interesting thing - the document. Let's reflect all the interface elements we need:
It should get something like this (the design, of course, sucks, but this is not the main thing, we have a different goal now):
Now we need to somehow organize the process of selecting the Customer: we must open the list of Customers so that the user can select the one and then transfer the selected object back to our controller so that we can use it in the document. Usually, a delegation mechanism is used for this, that is, the creation of the necessary protocol and its implementation. But we will go the other way - I will use context capture using closure here (I won’t talk in detail about the mechanism itself, since there is a good article dedicated to this very thing ). It is not much harder, if at all more difficult, but it is faster to implement and looks much more elegant.
Considering that in the future we will also need to select Services, similarly to the Customer, we could create a separate universal controller for selecting values from the list, but to save time, let's use the ready-made controllers created by us (the list of Customers and the list of Services ) To get started, let's connect the View Controller of our document with the Table View Controller of the Customer list using Segue .

And we will register the call of this transition by the Customer selection button.
Also, in order to implement context capture, we need to make small changes to our controller, which is responsible for displaying the list of contractors (
And, secondly, change the procedure for selecting the current line of the list:
Pay attention to the logic: we use the optional closure variable, if it is not defined, then the list works as usual, in the mode of adding and editing data, if defined, it means the list was called from the document to select the Customer.
Now back to the document controller to implement the closure. But before that, we define the procedures for loading and saving the document. The logic of work here will be slightly different from working with directories. As we remember, when creating a new document, we pass nil and the document object itself when opening the Viewnot yet. If when working with directories this did not bother us and we created the object itself just before writing, then for the document we will create it right away, since when editing the lines of the tabular part we will need to provide a link to a specific document. In principle, nothing prevents us from using the same approach for reference books for uniformity, but in order to demonstrate different approaches, we will leave both options.
Thus, the procedure for "reading" data into form elements will look like this:
Please note: when creating the object, I immediately assigned the current date to the document (the constructor
Now let's finally implement the closure for the Customer selection, this is done quite simply:
When switching to the Table View Controller, we define a handler according to which, when choosing a Customer, we assign it to our document object, and also display the Customer’s name on the corresponding document control.
On this mechanism, the Customer’s choice is completed, let's make sure that everything works as it should.
Now let's get down to the tabular section. Everything should be familiar here. Obviously, you need to create
But, wait a minute, if we use the
To do this, we need to add the appropriate filter to
Pay attention to this line of code:
Here we set the nested field of the object (“through the point”) as the sort key. Isn't that a great opportunity?
Now, back in
Immediately create a new View Controller to display the document row data and assign it a new class
Now let's add a Segue with the name orderToRowOfOrder (connecting the document and the just created View Controller ) and implement the delegates of the necessary protocols in our document. Everything is the same as in previous controllers, there is nothing fundamentally new here (I will give the full text of the module below).
Also, let's add a button to add rows to the tabular section of the document. There is one caveat: if earlier, when creating a new object, nil was passed , and the object itself was created in another controller, then in the case of a row in the tabular section, we somehow need to “register” a specific document in it. This can be done in different ways, depending on the logic of the program. We will make the most obvious - we will pass not nil , but an object (
Please note: since we had a specified reverse relationship between entities in the data model, we do not need to worry about creating it, it will be added automatically.

On this, work directly with the document itself has been completed. It remains to finish with the View Controller , which displays information on a document line. Here we will use exactly the same logic as when working with the document header. We will also make the choice of the Service through the capture of context by closure.
Let's start by adding a Segue with a name
And, secondly, we will change the list row selection function:
Let's go back to
Actually, that's it! This completes the work with the document, let's check everything.


Important notice!
Here we did not handle clicking on the Cancel button , which led to the following situation. If we created a new document, and then changed our mind about saving it and clicked Cancel , it will remain hanging as a “draft” in our document journal, since from the current context Core Datano one deleted it. You can return to it and continue to fill out, or you can delete it by force. But if you return to the main menu, and then open the document journal again, then there will be no drafts, since when we open the journal, we read the data from the storage. The same goes for document lines. For our program, this behavior seems logical, well, at least - acceptable. But perhaps this behavior is not at all what you want in your program. In this case, you must implement your logic for responding to such events. Do not forget that in any case, the behavior of the program should be absolutely clear and transparent for the user.
This section will be quite small (compared to the previous one). We already managed to get to know a little bit

We will consider working with
Let's start by sorting the data, look at the following definition:
Here we create a new data sorting object (
I also recall that the quality of the sorting field can specify compound fields “through the point” (we did this when we sorted the rows of the tabular part of the document). Let's add a second sorting object in order to sort documents by the name of the Customer inside the date.
Actually, that's all with sorting. The only thing I will remind you is if you are actively using sorting, do not forget to think about the advisability of indexing the fields used.
We pass to the mechanism of Predicates. It uses a fairly simple syntax that looks a bit like SQL-like queries. A predicate is created and used as follows:
A format string is passed to the constructor, followed by arguments. Depending on the format string, the number of parameters passed may vary. Let's take a closer look at the format string - it uses something like its own query language. " % K " - means the name of the field (property) of the object, " % @ " - the value of this field. Following are the arguments (the actual values that must be substituted in the selection), strictly in the same sequence. That is, this format string means the following: Order.made == true .
You can use not only the operation == , but < , > = , ! =and so on. You can also use keywords such as CONTAINS , LIKE , MATCHES , BEGINSWITH , ENDSWITH , as well as AND and OR . You can also use regular expressions. This is really a very powerful tool. I will not list all the possible options here; they are well represented in the official Apple documentation . As arguments for the field name, you can, as in
It remains only to implement the UITableViewDataSource protocol (you already know this, nothing new here) and you can check.
Everything works as it should, we got a list of documents according to the given conditions.
Using a simple application as an example, we examined all the main points of working with
I hope that I could explain quite clearly the basic techniques for working with
This project is on github
In this article, we will turn to face the user and work on the interface part, NSFetchRequest and NSFetchedResultsController will help us in this . This part turned out to be quite large, but I see no reason to split it into several publications. More accurately, there are a lot of code and pictures under the cut.
The interface is an ambiguous thing and, depending on the requirements for the product, it can change significantly. In this article, I will not devote too much time to him, more precisely, I will devote very little (I mean following Guidelines and the like). My task in this part of the article is to show how it
Core Datacan very organically fit into iOS controls. Therefore, I will use such an interface for these purposes, when using which the interaction of the controls Core Datawill look simpler and clearer. Obviously, in a real application, the interface part will need to devote much more time.Directories
Before we begin, let's give the application delegate module (
AppDelegate.swift), in which we experimented in the last part of the article, its original form.// AppDelegate.swift// core-data-habrahabr-swift
import UIKit
import CoreData
@UIApplicationMainclass AppDelegate: UIResponder, UIApplicationDelegate {
var window: UIWindow?
func application(application: UIApplication, didFinishLaunchingWithOptions launchOptions: [NSObject: AnyObject]?) -> Bool {
returntrue
}
func applicationWillTerminate(application: UIApplication) {
CoreDataManager.instance.saveContext()
}
}
Let's start with the Storyboard:
- add a few buttons to the View - we will have two directories (“Customers” and “Services”), one document (“Order”) and one report on documents
- add Navigation Controller (menu
Editor\Embed In\Navigation Controller) - add a new Table View Controller with a title (Title)
Customers - connect the added Table View Controller to the corresponding button of the main menu (
Action Segue\Show)
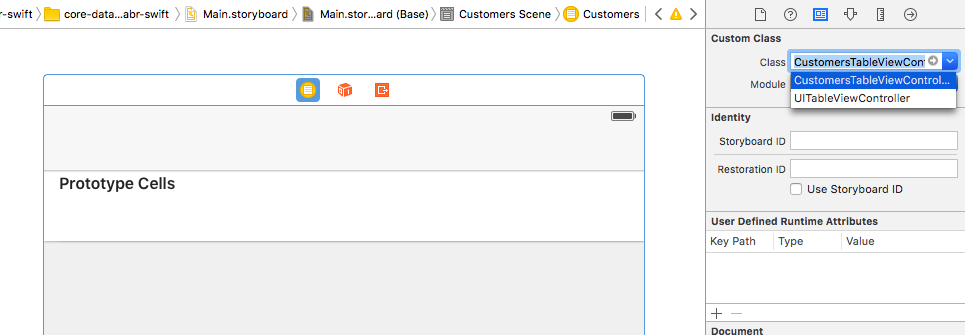
Now you need to add your class for the Table View Controller :
- menu File \ New \ File ...
- choose Cocoa Class as a template

- select as the parent class
UITableViewControllerand specify the name of our class -CustomersTableViewController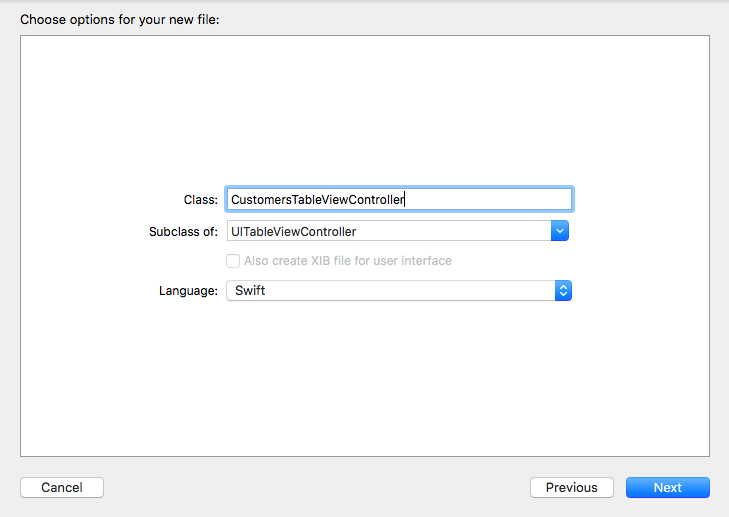
- choose where to store the file and click Create
It is unforgettable to specify this class created by us to our Table View Controller (
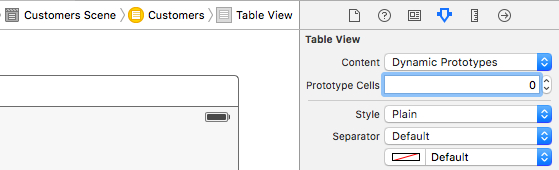
Identity Inspector\Custom Class\Class). I will not use Prototype Cells here and create a “custom” class for table cells (to focus on other things), so let's set the number of such cells to zero (
Attributes Inspector\Table View\Prototype Cells). Now we need to define a data source in order to implement the Table View Data Source protocol . In the last part, we met NSFetchRequestand, at first glance, it seems to be suitable for this purpose. With it, you can get a list of all objects in the form of an array, which, in fact, is what we need. But we want to not only look at the list of Customers, we want to add, delete and edit them. In this case, we will have to track all these changes manually and each time, again manually, update our list. That doesn't sound very good, right? But there is another option - NSFetchedResultsController , it is very similar to NSFetchRequest, but it not only returns an array of the objects we need at the time of the request, but also continues to monitor all the records: if some record changes, it will notify us if any records are loaded in the background through another managed context - it will tell us will also report this. We will only have to handle this event.
Let's implement the NSFetchedResultsController in our module. I will give all the code first, and then comment.
//  CustomersTableViewController.swift//  core-data-habrahabr-swift
import UIKit
import CoreData
class CustomersTableViewController: UITableViewController {
    var fetchedResultsController:NSFetchedResultsController = {
        let fetchRequest = NSFetchRequest(entityName: "Customer")
        let sortDescriptor = NSSortDescriptor(key: "name", ascending: true)
        fetchRequest.sortDescriptors = [sortDescriptor]
        let fetchedResultsController = NSFetchedResultsController(fetchRequest: fetchRequest, managedObjectContext: CoreDataManager.instance.managedObjectContext, sectionNameKeyPath: nil, cacheName: nil)
        return fetchedResultsController
    }()
    override func viewDidLoad() {
        super.viewDidLoad()
        do {
            try fetchedResultsController.performFetch()
        } catch {
            print(error)
        }
    }
    // MARK: - Table View Data Source
    override func tableView(tableView: UITableView, numberOfRowsInSection section: Int) -> Int {
        if let sections = fetchedResultsController.sections {
            return sections[section].numberOfObjects
        } else {
            return0
        }
    }
    override func tableView(tableView: UITableView, cellForRowAtIndexPath indexPath: NSIndexPath) -> UITableViewCell {
        let customer = fetchedResultsController.objectAtIndexPath(indexPath) as! Customer
        let cell = UITableViewCell()
        cell.textLabel?.text = customer.name
        return cell
    }
}
In the variable definition section, we create a fetchedResultsController object with a type
NSFetchedResultsController. As you can see, it is created on the basis NSFetchRequest(I created NSFetchRequest based on the “Customer” entity and set the sorting by the name of the Customer). Then we create it ourselves NSFetchedResultsController, passing in its constructor NSFetchRequestand the controlled context we need, we will not use additional constructor parameters (sectionNameKeyPath, cacheName) here. Then, when loading our View Controller (
func viewDidLoad()), we run fetchedResultsController to execute: try fetchedResultsController.performFetch()
We also need to redefine two functions to implement Table View Data Source :
- in the first function we return the number of objects in the current section (in fact, we do not use sections here, so all objects will be in one single section)
- in the second, we programmatically construct a cell for each object and return it.
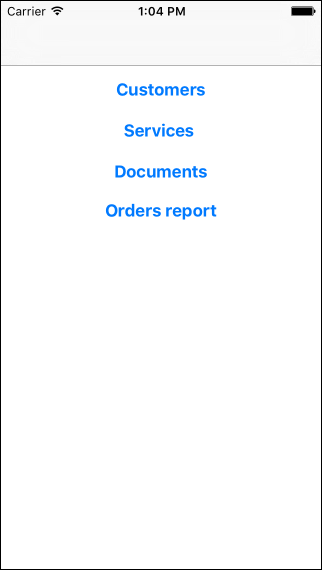
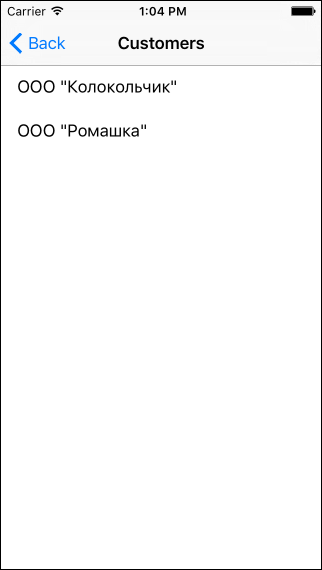
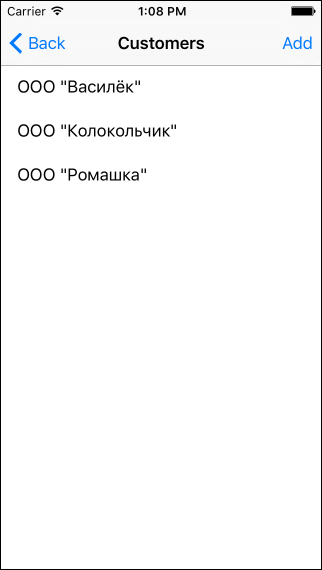
Let's check! If we launch the application now and go to our menu in
«Customers», then we will see all our customers who were added in the last part of the article. It wasn’t too complicated, right? Before continuing, let's optimize something a bit - creating an NSFetchedResultsController object is not concise, and we will need to create it for our other entities as well. In this case, in essence, only the name of the entity and, possibly, the name of the sort field will change. In order not to engage in “copy-paste”, let's move the creation of this object into CoreDataManager .
import CoreData
import Foundation
class CoreDataManager {
    // Singletonstatic let instance = CoreDataManager()
    // Entity for Name
    func entityForName(entityName: String) -> NSEntityDescription {
        returnNSEntityDescription.entityForName(entityName, inManagedObjectContext: self.managedObjectContext)!
    }
    // Fetched Results Controller for Entity Name
    func fetchedResultsController(entityName: String, keyForSort: String) -> NSFetchedResultsController {
        let fetchRequest = NSFetchRequest(entityName: entityName)
        let sortDescriptor = NSSortDescriptor(key: keyForSort, ascending: true)
        fetchRequest.sortDescriptors = [sortDescriptor]
        let fetchedResultsController = NSFetchedResultsController(fetchRequest: fetchRequest, managedObjectContext: CoreDataManager.instance.managedObjectContext, sectionNameKeyPath: nil, cacheName: nil)
        return fetchedResultsController
    }
    // MARK: - Core Data stack// ...
With this in mind, the definition of fetchedResultsController changes to the following:
var fetchedResultsController = CoreDataManager.instance.fetchedResultsController("Customer", keyForSort: "name")
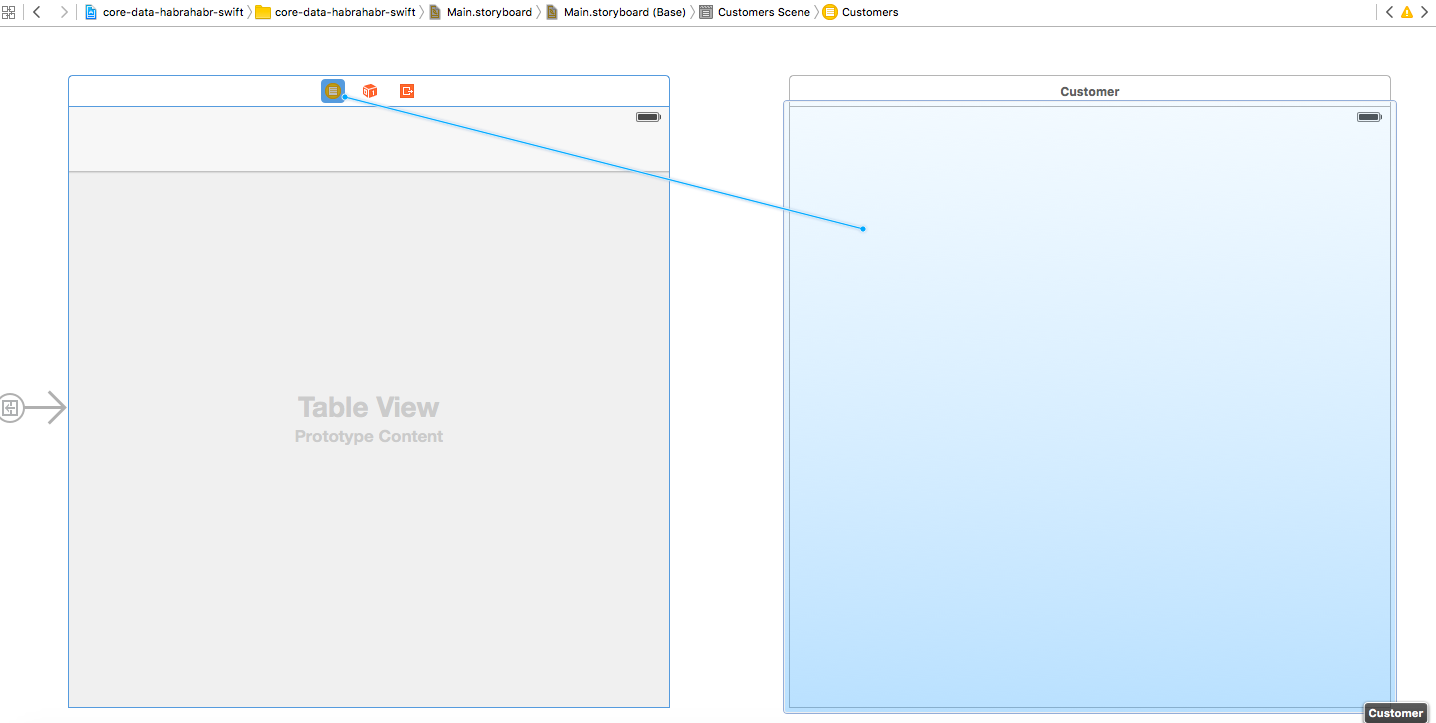
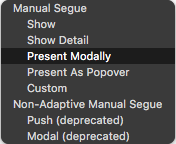
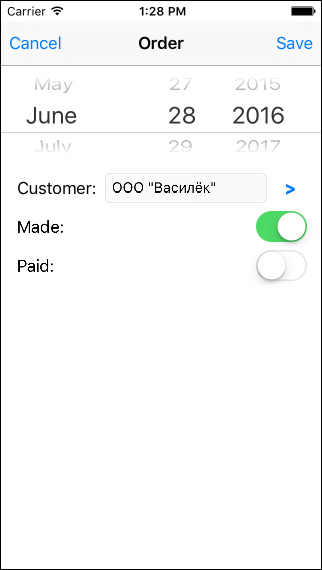
Now we need to make sure that when choosing a Customer a “card” opens with all its data, which, if necessary, could be edited. To do this, let's add another View Controller (give it a title
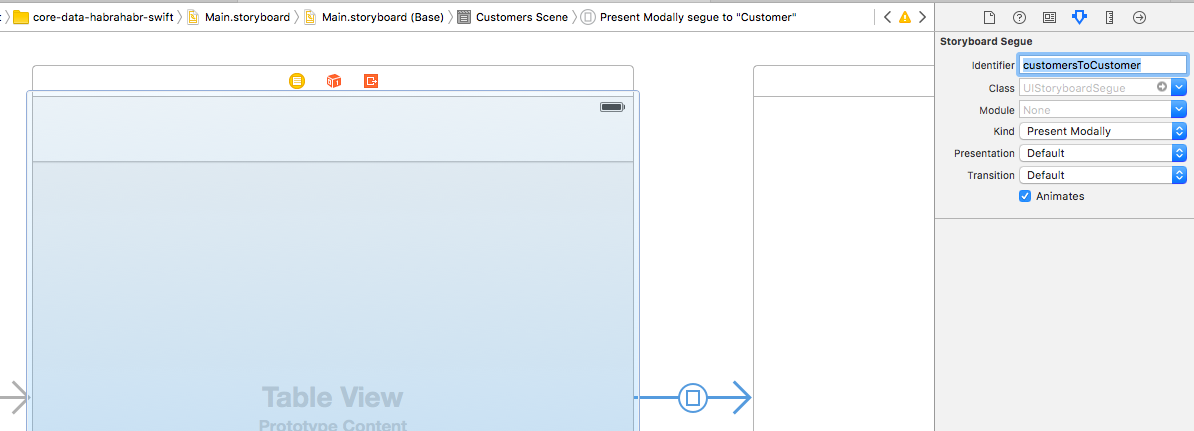
«Customer») and connect it to our Table View Controller . As a type of transition between controllers, select
Present Modally. We will also need to call this Segue by name , let's specify the name -
customersToCustomer. We need our own class for this View Controller - everything is similar to what we did for the Table View Controller , only as the parent class we select -
UIViewController, the class name - CustomerViewController.And we indicate this class for our new View Controller .
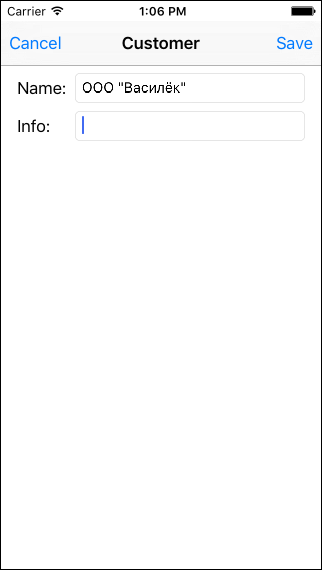
Now add the Navigation Bar with two buttons ( Save - to save changes and Cancel - to cancel). We also need two text fields for displaying and editing information ( name and info ). Let's make two Actions (for Save and Cancel) and two Outlet (for name and info).
The interface of our “card” of the Customer is ready, now we need to write some code. The logic will be as follows: upon transition to the “card” of the Customer from the list of Customers, we will transfer the customer object(Customer) based on the selected list line. When you open the "card", data from this object will be loaded into the interface elements (
name, info ), and when you save the object, on the contrary, the contents of the interface elements will be transferred to the fields of the saved object. Also, we need to take into account the fact that we have a required field - name . If the user tries to save the Customer with an empty name, then he will receive a critical error. To prevent this from happening, let's add a check of the correctness of the stored data: if the data is not correct, then we will show the corresponding warning and block the recording of such an object. The user must either enter the correct data or refuse to record such an object.
And the last thing we need to consider here: for sure, we will want to not only edit existing Customers, but also add new ones. We will do this as follows: in the list of Customers, add a button to create a new Customer, which will open our "card" by passing nil to it . And when saving the data of the “card” of the Customer, we will check if the customer object has not yet been created (that is, this is the input of a new Customer), then we will immediately create it.
Thus, we get about the following code.
//  CustomerViewController.swift//  core-data-habrahabr-swift
import UIKitclass CustomerViewController: UIViewController {
    var customer: Customer?
    @IBAction func cancel(sender: AnyObject) {
        dismissViewControllerAnimated(true, completion: nil)
    }
    @IBAction func save(sender: AnyObject) {
        if saveCustomer() {
            dismissViewControllerAnimated(true, completion: nil)
        }
    }
    @IBOutlet weak var nameTextField: UITextField!
    @IBOutlet weak var infoTextField: UITextField!
    override func viewDidLoad() {
        super.viewDidLoad()
        // Reading objectif let customer = customer {
            nameTextField.text = customer.name
            infoTextField.text = customer.info
        }
    }
    func saveCustomer() -> Bool {
        // Validation of required fieldsif nameTextField.text!.isEmpty {
            let alert = UIAlertController(title: "Validation error", message: "Input the name of the Customer!", preferredStyle: .Alert)
            alert.addAction(UIAlertAction(title: "OK", style: .Cancel, handler: nil))
            self.presentViewController(alert, animated: true, completion: nil)
            returnfalse
        }
        // Creating objectif customer == nil {
            customer = Customer()
        }
        // Saving objectif let customer = customer {
            customer.name = nameTextField.text
            customer.info = infoTextField.text
            CoreDataManager.instance.saveContext()
        }
        returntrue
    }
}
Now let's go back to the Table View Controller and add a button to create a new Customer (
Navigation Item + Bar Button Itemsimilar to the Customer’s card). And create an action for this button with the name AddCustomer. This Action will open the "card" to create a new Customer, passing nil to it .
    @IBAction func AddCustomer(sender: AnyObject) {
        performSegueWithIdentifier("customersToCustomer", sender: nil)
    }
It remains to make sure that when choosing an existing Customer, his "card" opens. For this we need two procedures.
   override func tableView(tableView: UITableView, didSelectRowAtIndexPath indexPath: NSIndexPath) {
        let customer = fetchedResultsController.objectAtIndexPath(indexPath) as? Customer
        performSegueWithIdentifier("customersToCustomer", sender: customer)
    }
    override func prepareForSegue(segue: UIStoryboardSegue, sender: AnyObject?) {
        if segue.identifier == "customersToCustomer" {
            let controller = segue.destinationViewController as! CustomerViewController
            controller.customer = sender as? Customer
        }
    }
In the first procedure (when highlighting the list line) we “read” the current Customer, and in the second (when switching from the list to the “card”), we assign a link to the selected Customer’s variable of
customerour “card” so that when it is opened we can read all the data object. Let's now run our application and make sure that everything works as it should.
The application works, we can enter new Customers, edit existing ones, but the information in the list is not automatically updated and we do not have a mechanism to delete an unnecessary (or mistakenly entered) Customer. Let's fix it.
Since we are using the NSFetchedResultsController here , which “knows” about all these changes, we just need to “listen” to it. To do this, implement the delegate protocolNSFetchedResultsControllerDelegate . Declare that we implement this protocol:
class CustomersTableViewController: UITableViewController, NSFetchedResultsControllerDelegate {
Declare yourself as a delegate to NSFetchedResultsController :
    override func viewDidLoad() {
        super.viewDidLoad()
        fetchedResultsController.delegate = selfdo {
            try fetchedResultsController.performFetch()
        } catch {
            print(error)
        }
    }
And add the following implementation of this protocol:
// MARK: - Fetched Results Controller Delegate
    func controllerWillChangeContent(controller: NSFetchedResultsController) {
        tableView.beginUpdates()
    }
    func controller(controller: NSFetchedResultsController, didChangeObject anObject: AnyObject, atIndexPath indexPath: NSIndexPath?, forChangeType type: NSFetchedResultsChangeType, newIndexPath: NSIndexPath?) {
        switch type {
        case .Insert:
            if let indexPath = newIndexPath {
                tableView.insertRowsAtIndexPaths([indexPath], withRowAnimation: .Automatic)
            }
        case .Update:
            if let indexPath = indexPath {
                let customer = fetchedResultsController.objectAtIndexPath(indexPath) as! Customer
                let cell = tableView.cellForRowAtIndexPath(indexPath)
                cell!.textLabel?.text = customer.name
            }
        case .Move:
            if let indexPath = indexPath {
                tableView.deleteRowsAtIndexPaths([indexPath], withRowAnimation: .Automatic)
            }
            if let newIndexPath = newIndexPath {
                tableView.insertRowsAtIndexPaths([newIndexPath], withRowAnimation: .Automatic)
            }
        case .Delete:
            if let indexPath = indexPath {
                tableView.deleteRowsAtIndexPaths([indexPath], withRowAnimation: .Automatic)
            }
        }
    }
    func controllerDidChangeContent(controller: NSFetchedResultsController) {
        tableView.endUpdates()
    }
Despite the relatively large volume - it is quite simple. Here we get information about which object and how exactly has changed, and, depending on the type of change, we perform various actions:
- Insert (insertion) - we insert a new line at the specified index (the line is added not just to the end of the list, but to its place in the list in accordance with the specified sorting)
- Update - object data has changed, we get a line from our list at the specified index and update information about it
- Move - the order of the lines has changed (for example, the Customer has been renamed and it is now located in accordance with the sorting in another place), delete the line from where it was and add it by the new index
- Delete - delete the row at the specified index.
We also have two "auxiliary" functions,
controllerWillChangeContentand controllerDidChangeContentwhich, respectively, inform about the beginning and end of data changes. With the help of these functions, we inform our Table Viewthat now we will change something in the data that it displays (this is necessary for its correct operation). It remains only to implement the removal of the Customer. This is done quite simply, we need to redefine just one small procedure.
override func tableView(tableView: UITableView, commitEditingStyle editingStyle: UITableViewCellEditingStyle, forRowAtIndexPath indexPath: NSIndexPath) {
        if editingStyle == .Delete {
            let managedObject = fetchedResultsController.objectAtIndexPath(indexPath) as! NSManagedObject
            CoreDataManager.instance.managedObjectContext.deleteObject(managedObject)
            CoreDataManager.instance.saveContext()
        }
    }
When a delete command arrives, we get the current object by index and pass it to the managed context for deletion. Please note that the type of object to be deleted must be
NSManagedObject. This completes the work with the directory "Customers". Let's run the application and check its operation.
As you can see, nothing super complicated, Core Data combines perfectly with standard interface elements.
Module text CustomersTableViewController.swift
//  CustomersTableViewController.swift//  core-data-habrahabr-swift
import UIKit
import CoreData
class CustomersTableViewController: UITableViewController, NSFetchedResultsControllerDelegate {
    var fetchedResultsController = CoreDataManager.instance.fetchedResultsController("Customer", keyForSort: "name")
    override func viewDidLoad() {
        super.viewDidLoad()
        fetchedResultsController.delegate = selfdo {
            try fetchedResultsController.performFetch()
        } catch {
            print(error)
        }
    }
    @IBAction func AddCustomer(sender: AnyObject) {
        performSegueWithIdentifier("customersToCustomer", sender: nil)
    }
    // MARK: - Table View Data Source
    override func tableView(tableView: UITableView, numberOfRowsInSection section: Int) -> Int {
        if let sections = fetchedResultsController.sections {
            return sections[section].numberOfObjects
        } else {
            return0
        }
    }
    override func tableView(tableView: UITableView, cellForRowAtIndexPath indexPath: NSIndexPath) -> UITableViewCell {
        let customer = fetchedResultsController.objectAtIndexPath(indexPath) as! Customer
        let cell = UITableViewCell()
        cell.textLabel?.text = customer.name
        return cell
    }
    // MARK: - Table View Delegate
    override func tableView(tableView: UITableView, commitEditingStyle editingStyle: UITableViewCellEditingStyle, forRowAtIndexPath indexPath: NSIndexPath) {
        if editingStyle == .Delete {
            let managedObject = fetchedResultsController.objectAtIndexPath(indexPath) as! NSManagedObject
            CoreDataManager.instance.managedObjectContext.deleteObject(managedObject)
            CoreDataManager.instance.saveContext()
        }
    }
    override func tableView(tableView: UITableView, didSelectRowAtIndexPath indexPath: NSIndexPath) {
        let customer = fetchedResultsController.objectAtIndexPath(indexPath) as? Customer
        performSegueWithIdentifier("customersToCustomer", sender: customer)
    }
    override func prepareForSegue(segue: UIStoryboardSegue, sender: AnyObject?) {
        if segue.identifier == "customersToCustomer" {
            let controller = segue.destinationViewController as! CustomerViewController
            controller.customer = sender as? Customer
        }
    }
    // MARK: - Fetched Results Controller Delegate
    func controllerWillChangeContent(controller: NSFetchedResultsController) {
        tableView.beginUpdates()
    }
    func controller(controller: NSFetchedResultsController, didChangeObject anObject: AnyObject, atIndexPath indexPath: NSIndexPath?, forChangeType type: NSFetchedResultsChangeType, newIndexPath: NSIndexPath?) {
        switch type {
        case .Insert:
            if let indexPath = newIndexPath {
                tableView.insertRowsAtIndexPaths([indexPath], withRowAnimation: .Automatic)
            }
        case .Update:
            if let indexPath = indexPath {
                let customer = fetchedResultsController.objectAtIndexPath(indexPath) as! Customer
                let cell = tableView.cellForRowAtIndexPath(indexPath)
                cell!.textLabel?.text = customer.name
            }
        case .Move:
            if let indexPath = indexPath {
                tableView.deleteRowsAtIndexPaths([indexPath], withRowAnimation: .Automatic)
            }
            if let newIndexPath = newIndexPath {
                tableView.insertRowsAtIndexPaths([newIndexPath], withRowAnimation: .Automatic)
            }
        case .Delete:
            if let indexPath = indexPath {
                tableView.deleteRowsAtIndexPaths([indexPath], withRowAnimation: .Automatic)
            }
        }
    }
    func controllerDidChangeContent(controller: NSFetchedResultsController) {
        tableView.endUpdates()
    }
}
Reference "Services"
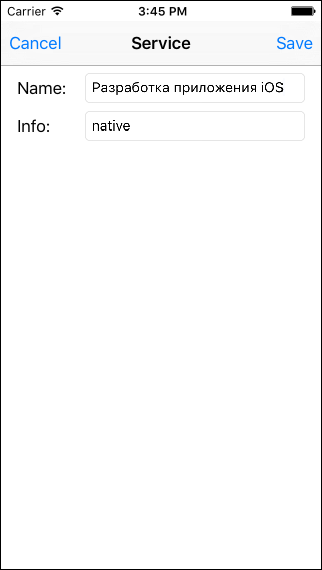
The directory of services we have has the same structure and logic of work as the directory of customers. The differences are minimal, so I won’t describe everything here in detail, but simply give a brief procedure (I’m sure that you can easily do everything yourself according to this summary):
- create a new Table View Controller and bind it to the button
«Services» - create and assign a new class for it
ServicesTableViewController(based onUITableViewController) - import (
import)CoreData, addfetchedResultsController(based on the entityService), and when the controller boots, run it to execute - we add two procedures for implementing the Table View Data Source , the first returns the number of rows, the second returns a row with information about the object at the specified index
- create a new View Controller to display the “card” of the service and place interface elements on it (everything is similar to the “card” of the customer)
- create and assign a new class
ServiceViewController(basedUIViewController) for this controller - create two Action (buttons
SaveandCancel) and two Outlet (fieldsnameandinfo) - add the necessary code (declare a variable
service, prescribe the procedures for loading and saving the object, do not forget about checking the data before recording) - add a connection between
ServicesTableViewControllerandServiceViewControllerwith the nameservicesToService(Segue \ Present Modally) - go back to
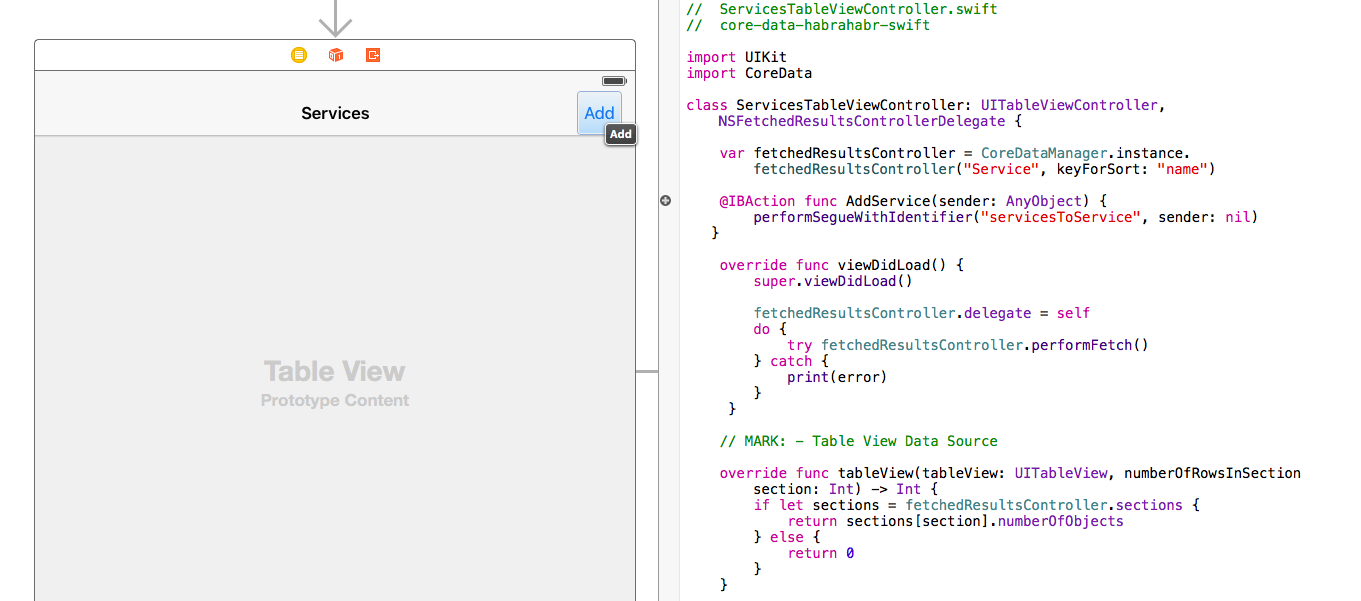
ServicesTableViewControllerand add the Add button to add a new service (Navigation Item \ Bar Button Item) and create an Action for it with the nameAddService - register the code necessary for the transition to the card of the new “service” and implement the Table View Delegate methods (go to the “card” of the selected service)
- implement protocol methods
NSFetchedResultsControllerDelegateand declare the current class as a delegate - all check!
Module text ServicesTableViewController.swift
//  ServicesTableViewController.swift//  core-data-habrahabr-swift
import UIKit
import CoreData
class ServicesTableViewController: UITableViewController, NSFetchedResultsControllerDelegate {
    var fetchedResultsController = CoreDataManager.instance.fetchedResultsController("Service", keyForSort: "name")
    @IBAction func AddService(sender: AnyObject) {
        performSegueWithIdentifier("servicesToService", sender: nil)
   }
    override func viewDidLoad() {
        super.viewDidLoad()
        fetchedResultsController.delegate = selfdo {
            try fetchedResultsController.performFetch()
        } catch {
            print(error)
        }
     }
    // MARK: - Table View Data Source
    override func tableView(tableView: UITableView, numberOfRowsInSection section: Int) -> Int {
        if let sections = fetchedResultsController.sections {
            return sections[section].numberOfObjects
        } else {
            return0
        }
    }
    override func tableView(tableView: UITableView, cellForRowAtIndexPath indexPath: NSIndexPath) -> UITableViewCell {
        let service = fetchedResultsController.objectAtIndexPath(indexPath) as! Service
        let cell = UITableViewCell()
        cell.textLabel?.text = service.name
        return cell
    }
    // MARK: - Table View Delegate
    override func tableView(tableView: UITableView, commitEditingStyle editingStyle: UITableViewCellEditingStyle, forRowAtIndexPath indexPath: NSIndexPath) {
        if editingStyle == .Delete {
            let managedObject = fetchedResultsController.objectAtIndexPath(indexPath) as! NSManagedObject
            CoreDataManager.instance.managedObjectContext.deleteObject(managedObject)
            CoreDataManager.instance.saveContext()
        }
    }
    override func tableView(tableView: UITableView, didSelectRowAtIndexPath indexPath: NSIndexPath) {
        let service = fetchedResultsController.objectAtIndexPath(indexPath) as? Service
        performSegueWithIdentifier("servicesToService", sender: service)
    }
    override func prepareForSegue(segue: UIStoryboardSegue, sender: AnyObject?) {
        if segue.identifier == "servicesToService" {
            let controller = segue.destinationViewController as! ServiceViewController
            controller.service = sender as? Service
        }
    }
    // MARK: - Fetched Results Controller Delegate
    func controllerWillChangeContent(controller: NSFetchedResultsController) {
        tableView.beginUpdates()
    }
    func controller(controller: NSFetchedResultsController, didChangeObject anObject: AnyObject, atIndexPath indexPath: NSIndexPath?, forChangeType type: NSFetchedResultsChangeType, newIndexPath: NSIndexPath?) {
        switch type {
        case .Insert:
            if let indexPath = newIndexPath {
                tableView.insertRowsAtIndexPaths([indexPath], withRowAnimation: .Automatic)
            }
        case .Update:
            if let indexPath = indexPath {
                let service = fetchedResultsController.objectAtIndexPath(indexPath) as! Service
                let cell = tableView.cellForRowAtIndexPath(indexPath)
                cell!.textLabel?.text = service.name
            }
        case .Move:
            if let indexPath = indexPath {
                tableView.deleteRowsAtIndexPaths([indexPath], withRowAnimation: .Automatic)
            }
            if let newIndexPath = newIndexPath {
                tableView.insertRowsAtIndexPaths([newIndexPath], withRowAnimation: .Automatic)
            }
        case .Delete:
            if let indexPath = indexPath {
                tableView.deleteRowsAtIndexPaths([indexPath], withRowAnimation: .Automatic)
            }
        }
    }
    func controllerDidChangeContent(controller: NSFetchedResultsController) {
        tableView.endUpdates()
    }
}
ServiceViewController.swift module text
//  ServiceViewController.swift//  core-data-habrahabr-swift
import UIKitclass ServiceViewController: UIViewController {
    @IBOutlet weak var nameTextField: UITextField!
    @IBOutlet weak var infoTextField: UITextField!
    @IBAction func cancel(sender: AnyObject) {
        dismissViewControllerAnimated(true, completion: nil)
    }
    @IBAction func save(sender: AnyObject) {
        if saveService() {
            dismissViewControllerAnimated(true, completion: nil)
        }
    }
    var service: Service?
    override func viewDidLoad() {
        super.viewDidLoad()
        // Reading objectif let service = service {
            nameTextField.text = service.name
            infoTextField.text = service.info
        }
    }
    func saveService() -> Bool {
        // Validation of required fieldsif nameTextField.text!.isEmpty {
            let alert = UIAlertController(title: "Validation error", message: "Input the name of the Service!", preferredStyle: .Alert)
            alert.addAction(UIAlertAction(title: "OK", style: .Cancel, handler: nil))
            self.presentViewController(alert, animated: true, completion: nil)
            returnfalse
        }
        // Creating objectif service == nil {
            service = Service()
        }
        // Saving objectif let service = service {
            service.name = nameTextField.text
            service.info = infoTextField.text
            CoreDataManager.instance.saveContext()
        }
        returntrue
    }
}
Xcode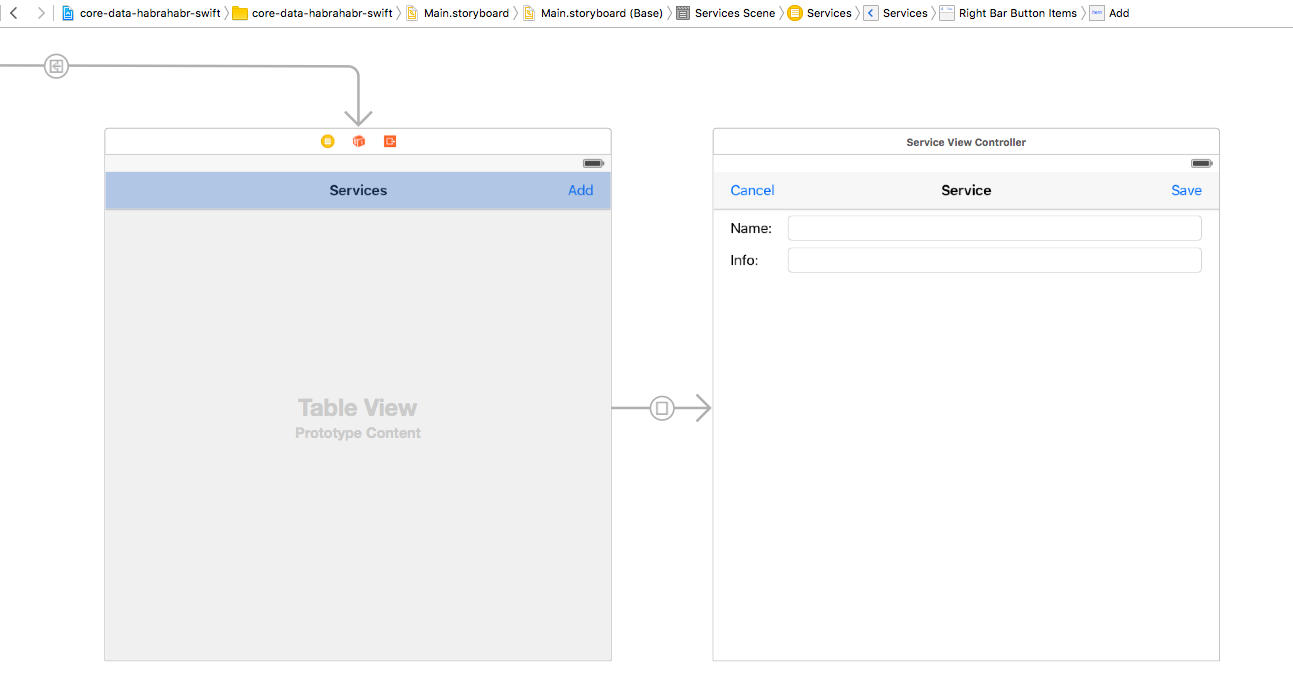
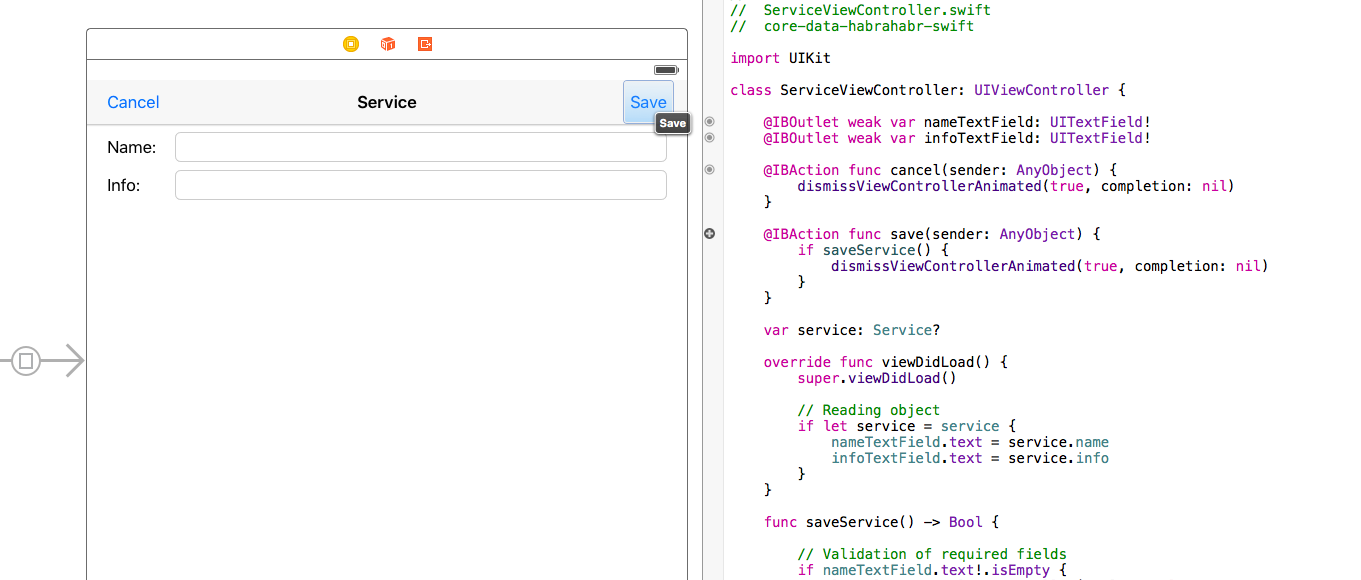
You should get something like this:
Document
It will be a little more complicated with the document, since each document, firstly, is represented by two different entities, and, secondly, there are relationships, that is, it is necessary to somehow ensure the choice of value.
Let's start with a simple and already familiar one - we will create a Table View Controller with a list of documents and a View Controller to display the document itself (so far without details, only a blank). I will not repeat it - all according to the same algorithm as the directories.
We create two new controllers ( Table View Controller for the list of documents and View Controller for the document itself):
Add Action , create
fetchedResultsControllerand implement protocols:We make a blank for the document itself:
Module text OrdersTableViewController.swift
// OrdersTableViewController.swift// core-data-habrahabr-swift
import UIKit
import CoreData
class OrdersTableViewController: UITableViewController, NSFetchedResultsControllerDelegate {
var fetchedResultsController = CoreDataManager.instance.fetchedResultsController("Order", keyForSort: "date")
@IBAction func AddOrder(sender: AnyObject) {
performSegueWithIdentifier("ordersToOrder", sender: nil)
}
override func viewDidLoad() {
super.viewDidLoad()
fetchedResultsController.delegate = selfdo {
try fetchedResultsController.performFetch()
} catch {
print(error)
}
}
// MARK: - Table View Data Source
override func tableView(tableView: UITableView, numberOfRowsInSection section: Int) -> Int {
if let sections = fetchedResultsController.sections {
return sections[section].numberOfObjects
} else {
return0
}
}
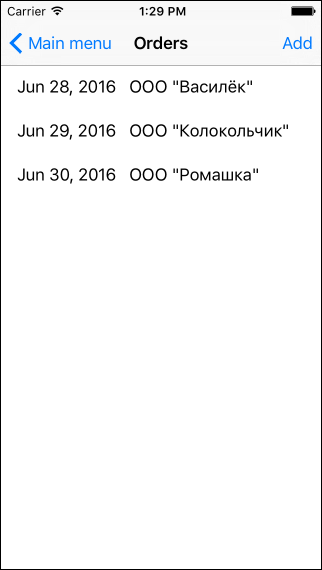
override func tableView(tableView: UITableView, cellForRowAtIndexPath indexPath: NSIndexPath) -> UITableViewCell {
let cell = UITableViewCell()
let order = fetchedResultsController.objectAtIndexPath(indexPath) as! Order
configCell(cell, order: order)
return cell
}
func configCell(cell: UITableViewCell, order: Order) {
let formatter = NSDateFormatter()
formatter.dateFormat = "MMM d, yyyy"
let nameOfCustomer = (order.customer == nil) ? "-- Unknown --" : (order.customer!.name!)
cell.textLabel?.text = formatter.stringFromDate(order.date) + "\t" + nameOfCustomer
}
// MARK: - Table View Delegate
override func tableView(tableView: UITableView, commitEditingStyle editingStyle: UITableViewCellEditingStyle, forRowAtIndexPath indexPath: NSIndexPath) {
if editingStyle == .Delete {
let managedObject = fetchedResultsController.objectAtIndexPath(indexPath) as! NSManagedObject
CoreDataManager.instance.managedObjectContext.deleteObject(managedObject)
CoreDataManager.instance.saveContext()
}
}
override func tableView(tableView: UITableView, didSelectRowAtIndexPath indexPath: NSIndexPath) {
let order = fetchedResultsController.objectAtIndexPath(indexPath) as? Order
performSegueWithIdentifier("ordersToOrder", sender: order)
}
override func prepareForSegue(segue: UIStoryboardSegue, sender: AnyObject?) {
if segue.identifier == "ordersToOrder" {
let controller = segue.destinationViewController as! OrderViewController
controller.order = sender as? Order
}
}
// MARK: - Fetched Results Controller Delegate
func controllerWillChangeContent(controller: NSFetchedResultsController) {
tableView.beginUpdates()
}
func controller(controller: NSFetchedResultsController, didChangeObject anObject: AnyObject, atIndexPath indexPath: NSIndexPath?, forChangeType type: NSFetchedResultsChangeType, newIndexPath: NSIndexPath?) {
switch type {
case .Insert:
if let indexPath = newIndexPath {
tableView.insertRowsAtIndexPaths([indexPath], withRowAnimation: .Automatic)
}
case .Update:
if let indexPath = indexPath {
let order = fetchedResultsController.objectAtIndexPath(indexPath) as! Order
let cell = tableView.cellForRowAtIndexPath(indexPath)
configCell(cell!, order: order)
}
case .Move:
if let indexPath = indexPath {
tableView.deleteRowsAtIndexPaths([indexPath], withRowAnimation: .Automatic)
}
if let newIndexPath = newIndexPath {
tableView.insertRowsAtIndexPaths([newIndexPath], withRowAnimation: .Automatic)
}
case .Delete:
if let indexPath = indexPath {
tableView.deleteRowsAtIndexPaths([indexPath], withRowAnimation: .Automatic)
}
}
}
func controllerDidChangeContent(controller: NSFetchedResultsController) {
tableView.endUpdates()
}
}
A few notes:
- when creating a
fetchedResultsControllerfield for sorting, we specify as “ date ”, that is, documents will be sorted by their date - a separate helper function is used to construct the cell
configCell - since the connection between our document and the Customer is established as one-to-one , we can access it immediately “through the dot”, which we do when constructing the text of the cell.
This will complete the journal of documents, it remains to make the document itself. It should be noted that all three sections (our two directories and the document) turned out to be very similar (from the point of view of implementation) and the question arises of the advisability of using different classes and controllers for them instead of one universal one. This approach is also possible, but the similarity of our controllers is due to a very simple data model, in real applications, entities, as a rule, still noticeably differ and, as a result, controllers and interface solutions also look completely different.
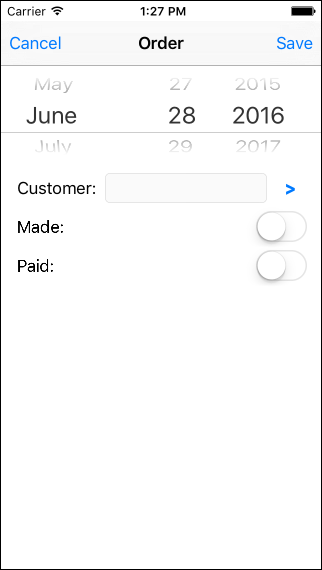
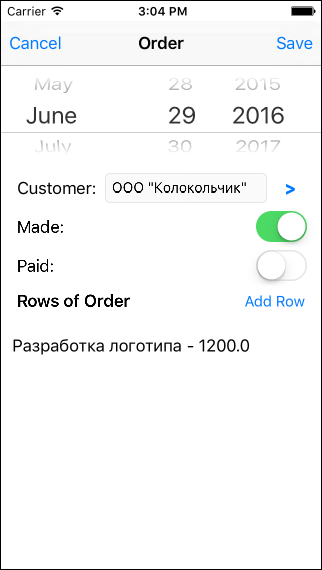
We pass to the most interesting thing - the document. Let's reflect all the interface elements we need:
- Date of the document - Date Picker is suitable for this
- Customer - will be represented by two elements: a button to select the Customer from the list and an input field (not editable) to display the selected item
- Sign of completion - use Switch
- Sign of payment - similar to the previous
- The table part is of course the Table View . We will display information on a tabular line row with one line of text, without using “custom” cells, so as not to be too distracted from the essence of the article.
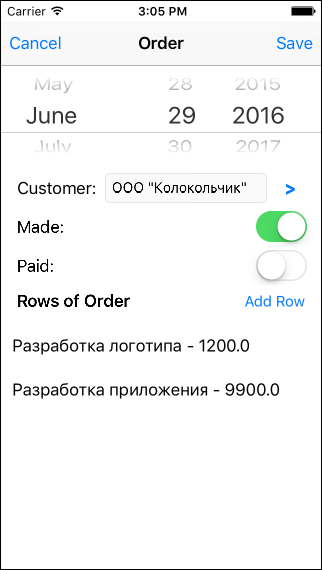
It should get something like this (the design, of course, sucks, but this is not the main thing, we have a different goal now):
Now we need to somehow organize the process of selecting the Customer: we must open the list of Customers so that the user can select the one and then transfer the selected object back to our controller so that we can use it in the document. Usually, a delegation mechanism is used for this, that is, the creation of the necessary protocol and its implementation. But we will go the other way - I will use context capture using closure here (I won’t talk in detail about the mechanism itself, since there is a good article dedicated to this very thing ). It is not much harder, if at all more difficult, but it is faster to implement and looks much more elegant.
Considering that in the future we will also need to select Services, similarly to the Customer, we could create a separate universal controller for selecting values from the list, but to save time, let's use the ready-made controllers created by us (the list of Customers and the list of Services ) To get started, let's connect the View Controller of our document with the Table View Controller of the Customer list using Segue .
And we will register the call of this transition by the Customer selection button.
    @IBAction func choiceCustomer(sender: AnyObject) {
        performSegueWithIdentifier("orderToCustomers", sender: nil)
    }
Also, in order to implement context capture, we need to make small changes to our controller, which is responsible for displaying the list of contractors (
CustomersTableViewController.swift). First, you need to add a closure variable:// CustomersTableViewController.swift// core-data-habrahabr-swift
import UIKit
import CoreData
class CustomersTableViewController: UITableViewController, NSFetchedResultsControllerDelegate {
typealias Select = (Customer?) -> ()
var didSelect: Select?
And, secondly, change the procedure for selecting the current line of the list:
    override func tableView(tableView: UITableView, didSelectRowAtIndexPath indexPath: NSIndexPath) {
        let customer = fetchedResultsController.objectAtIndexPath(indexPath) as? Customer
        if let dSelect = self.didSelect {
            dSelect(customer)
            dismissViewControllerAnimated(true, completion: nil)
        } else {
            performSegueWithIdentifier("customersToCustomer", sender: customer)
        }
    }
Pay attention to the logic: we use the optional closure variable, if it is not defined, then the list works as usual, in the mode of adding and editing data, if defined, it means the list was called from the document to select the Customer.
Now back to the document controller to implement the closure. But before that, we define the procedures for loading and saving the document. The logic of work here will be slightly different from working with directories. As we remember, when creating a new document, we pass nil and the document object itself when opening the Viewnot yet. If when working with directories this did not bother us and we created the object itself just before writing, then for the document we will create it right away, since when editing the lines of the tabular part we will need to provide a link to a specific document. In principle, nothing prevents us from using the same approach for reference books for uniformity, but in order to demonstrate different approaches, we will leave both options.
Thus, the procedure for "reading" data into form elements will look like this:
    override func viewDidLoad() {
        super.viewDidLoad()
        // Creating objectif order == nil {
            order = Order()
            order?.date = NSDate()
        }
        if let order = order {
            dataPicker.date = order.date
            switchMade.on = order.made
            switchPaid.on = order.paid
            textFieldCustomer.text = order.customer?.name
        }
    }
Please note: when creating the object, I immediately assigned the current date to the document (the constructor
NSDate()returns the current date / time). And the data recording procedure: func saveOrder() {
if let order = order {
order.date = dataPicker.date
order.made = switchMade.on
order.paid = switchPaid.on
CoreDataManager.instance.saveContext()
}
}
Now let's finally implement the closure for the Customer selection, this is done quite simply:
override func prepareForSegue(segue: UIStoryboardSegue, sender: AnyObject?) {
if segue.identifier == "orderToCustomers" {
let viewController = segue.destinationViewController as! CustomersTableViewController
viewController.didSelect = { [unowned self] (customer) inif let customer = customer {
self.order?.customer = customer
self.textFieldCustomer.text = customer.name!
}
}
}
}
When switching to the Table View Controller, we define a handler according to which, when choosing a Customer, we assign it to our document object, and also display the Customer’s name on the corresponding document control.
On this mechanism, the Customer’s choice is completed, let's make sure that everything works as it should.
Now let's get down to the tabular section. Everything should be familiar here. Obviously, you need to create
fetchedResultsControllerand implement protocols NSFetchedResultsControllerDelegate, UITableViewDataSourceand UITableViewDelegate. But, wait a minute, if we use the
fetchedResultsControllerone created similarly to the previous ones, we really get all the rows of the tabular part, but these will be the rows of all documents, and we only need the rows of the current document that the user is working with.To do this, we need to add the appropriate filter to
fetchRequest. This is done through the predicate mechanism ( NSPredicate). We will talk about it a little more at the end of the article, but for now let's just add Order.swifta class function for our document ( ) that will return the tabular part of the document in the form NSFetchedResultsController.class func getRowsOfOrder(order: Order) -> NSFetchedResultsController {
let fetchRequest = NSFetchRequest(entityName: "RowOfOrder")
let sortDescriptor = NSSortDescriptor(key: "service.name", ascending: true)
fetchRequest.sortDescriptors = [sortDescriptor]
let predicate = NSPredicate(format: "%K == %@", "order", order)
fetchRequest.predicate = predicate
let fetchedResultsController = NSFetchedResultsController(fetchRequest: fetchRequest, managedObjectContext: CoreDataManager.instance.managedObjectContext, sectionNameKeyPath: nil, cacheName: nil)
return fetchedResultsController
}
Pay attention to this line of code:
let sortDescriptor = NSSortDescriptor(key: "service.name", ascending: true)
Here we set the nested field of the object (“through the point”) as the sort key. Isn't that a great opportunity?
Now, back in
OrderViewController.swift, we need to declare a variable that will contain the table part and initialize it after the document itself is initialized when loading the View Controller .// OrderViewController.swift// core-data-habrahabr-swift
import UIKit
import CoreData
class OrderViewController: UIViewController {
var order: Order?
var table: NSFetchedResultsController?
//…
override func viewDidLoad() {
super.viewDidLoad()
// Creating objectif order == nil {
order = Order()
order?.date = NSDate()
}
if let order = order {
dataPicker.date = order.date
switchMade.on = order.made
switchPaid.on = order.paid
textFieldCustomer.text = order.customer?.name
table = Order.getRowsOfOrder(order)
table!.delegate = selfdo {
try table!.performFetch()
} catch {
print(error)
}
}
}
Immediately create a new View Controller to display the document row data and assign it a new class
RowOfOrderViewController. Add the necessary navigation and control elements, Outlet and Action , implement the procedures for reading and writing the object. Also, for the amount input field, set the numeric keypad ( Keyboard Type = Number Pad). Now let's add a Segue with the name orderToRowOfOrder (connecting the document and the just created View Controller ) and implement the delegates of the necessary protocols in our document. Everything is the same as in previous controllers, there is nothing fundamentally new here (I will give the full text of the module below).
Also, let's add a button to add rows to the tabular section of the document. There is one caveat: if earlier, when creating a new object, nil was passed , and the object itself was created in another controller, then in the case of a row in the tabular section, we somehow need to “register” a specific document in it. This can be done in different ways, depending on the logic of the program. We will make the most obvious - we will pass not nil , but an object (
RowOfOrder), which we will immediately create and set a link to our document in it. @IBAction func AddRowOfOrder(sender: AnyObject) {
if let order = order {
let newRowOfOrder = RowOfOrder()
newRowOfOrder.order = order
performSegueWithIdentifier("orderToRowOfOrder", sender: newRowOfOrder)
}
}
Please note: since we had a specified reverse relationship between entities in the data model, we do not need to worry about creating it, it will be added automatically.
Module text OrderViewController.swift
// OrderViewController.swift// core-data-habrahabr-swift
import UIKit
import CoreData
class OrderViewController: UIViewController, NSFetchedResultsControllerDelegate, UITableViewDataSource, UITableViewDelegate {
var order: Order?
var table: NSFetchedResultsController?
@IBOutlet weak var dataPicker: UIDatePicker!
@IBOutlet weak var textFieldCustomer: UITextField!
@IBOutlet weak var tableView: UITableView!
@IBAction func save(sender: AnyObject) {
saveOrder()
dismissViewControllerAnimated(true, completion: nil)
}
@IBAction func cancel(sender: AnyObject) {
dismissViewControllerAnimated(true, completion: nil)
}
@IBAction func choiceCustomer(sender: AnyObject) {
performSegueWithIdentifier("orderToCustomers", sender: nil)
}
@IBAction func AddRowOfOrder(sender: AnyObject) {
if let order = order {
let newRowOfOrder = RowOfOrder()
newRowOfOrder.order = order
performSegueWithIdentifier("orderToRowOfOrder", sender: newRowOfOrder)
}
}
override func viewDidLoad() {
super.viewDidLoad()
tableView.dataSource = self
tableView.delegate = self// Creating objectif order == nil {
order = Order()
order!.date = NSDate()
}
if let order = order {
dataPicker.date = order.date
switchMade.on = order.made
switchPaid.on = order.paid
textFieldCustomer.text = order.customer?.name
table = Order.getRowsOfOrder(order)
table!.delegate = selfdo {
try table!.performFetch()
} catch {
print(error)
}
}
}
 func saveOrder() {
        if let order = order {
            order.date = dataPicker.date
            order.made = switchMade.on
            order.paid = switchPaid.on
            CoreDataManager.instance.saveContext()
        }
    }
override func prepareForSegue(segue: UIStoryboardSegue, sender: AnyObject?) {
switch segue.identifier! {
case"orderToCustomers":
let viewController = segue.destinationViewController as! CustomersTableViewController
viewController.didSelect = { [unowned self] (customer) inif let customer = customer {
self.order?.customer = customer
self.textFieldCustomer.text = customer.name!
}
}
case"orderToRowOfOrder":
let controller = segue.destinationViewController as! RowOfOrderViewController
controller.rowOfOrder = sender as? RowOfOrder
default:
break
}
}
// MARK: - Table View Data Source
func tableView(tableView: UITableView, numberOfRowsInSection section: Int) -> Int {
if let sections = table?.sections {
return sections[section].numberOfObjects
} else {
return0
}
}
func tableView(tableView: UITableView, cellForRowAtIndexPath indexPath: NSIndexPath) -> UITableViewCell {
let rowOfOrder = table?.objectAtIndexPath(indexPath) as! RowOfOrder
let cell = UITableViewCell()
let nameOfService = (rowOfOrder.service == nil) ? "-- Unknown --" : (rowOfOrder.service!.name!)
cell.textLabel?.text = nameOfService + " - " + String(rowOfOrder.sum)
return cell
}
// MARK: - Table View Delegate
func tableView(tableView: UITableView, commitEditingStyle editingStyle: UITableViewCellEditingStyle, forRowAtIndexPath indexPath: NSIndexPath) {
if editingStyle == .Delete {
let managedObject = table?.objectAtIndexPath(indexPath) as! NSManagedObject
CoreDataManager.instance.managedObjectContext.deleteObject(managedObject)
CoreDataManager.instance.saveContext()
}
}
func tableView(tableView: UITableView, didSelectRowAtIndexPath indexPath: NSIndexPath) {
let rowOfOrder = table?.objectAtIndexPath(indexPath) as! RowOfOrder
performSegueWithIdentifier("orderToRowOfOrder", sender: rowOfOrder)
}
// MARK: - Fetched Results Controller Delegate
func controllerWillChangeContent(controller: NSFetchedResultsController) {
tableView.beginUpdates()
}
func controller(controller: NSFetchedResultsController, didChangeObject anObject: AnyObject, atIndexPath indexPath: NSIndexPath?, forChangeType type: NSFetchedResultsChangeType, newIndexPath: NSIndexPath?) {
switch type {
case .Insert:
if let indexPath = newIndexPath {
tableView.insertRowsAtIndexPaths([indexPath], withRowAnimation: .Automatic)
}
case .Update:
if let indexPath = indexPath {
let rowOfOrder = table?.objectAtIndexPath(indexPath) as! RowOfOrder
let cell = tableView.cellForRowAtIndexPath(indexPath)!
let nameOfService = (rowOfOrder.service == nil) ? "-- Unknown --" : (rowOfOrder.service!.name!)
cell.textLabel?.text = nameOfService + " - " + String(rowOfOrder.sum)
}
case .Move:
if let indexPath = indexPath {
tableView.deleteRowsAtIndexPaths([indexPath], withRowAnimation: .Automatic)
}
if let newIndexPath = newIndexPath {
tableView.insertRowsAtIndexPaths([newIndexPath], withRowAnimation: .Automatic)
}
case .Delete:
if let indexPath = indexPath {
tableView.deleteRowsAtIndexPaths([indexPath], withRowAnimation: .Automatic)
}
}
}
func controllerDidChangeContent(controller: NSFetchedResultsController) {
tableView.endUpdates()
}
}
On this, work directly with the document itself has been completed. It remains to finish with the View Controller , which displays information on a document line. Here we will use exactly the same logic as when working with the document header. We will also make the choice of the Service through the capture of context by closure.
Let's start by adding a Segue with a name
rowOfOrderToServicesthat connects the View Controller to the rows of the document and Table View Controller to the list of Services. We need to refine the Table View Controller a bit so that we can use the closure. First, add a closure variable:// ServicesTableViewController.swift// core-data-habrahabr-swift
import UIKit
import CoreData
class ServicesTableViewController: UITableViewController, NSFetchedResultsControllerDelegate {
typealias Select = (Service?) -> ()
var didSelect: Select?
// …And, secondly, we will change the list row selection function:
   override func tableView(tableView: UITableView, didSelectRowAtIndexPath indexPath: NSIndexPath) {
        let service = fetchedResultsController.objectAtIndexPath(indexPath) as? Service
        if let dSelect = self.didSelect {
            dSelect(service)
            dismissViewControllerAnimated(true, completion: nil)
        } else {
            performSegueWithIdentifier("servicesToService", sender: service)
        }
    }
Let's go back to
RowOfOrderViewControllerand implement the closure. Here everything is on the same principle as when choosing a customer. @IBAction func choiceService(sender: AnyObject) {
performSegueWithIdentifier("rowOfOrderToServices", sender: nil)
}
override func prepareForSegue(segue: UIStoryboardSegue, sender: AnyObject?) {
if segue.identifier == "rowOfOrderToServices" {
let controller = segue.destinationViewController as! ServicesTableViewController
controller.didSelect = {[unowned self] (service) inif let service = service {
self.rowOfOrder!.service = service
self.textFieldService.text = service.name
}
}
}
}
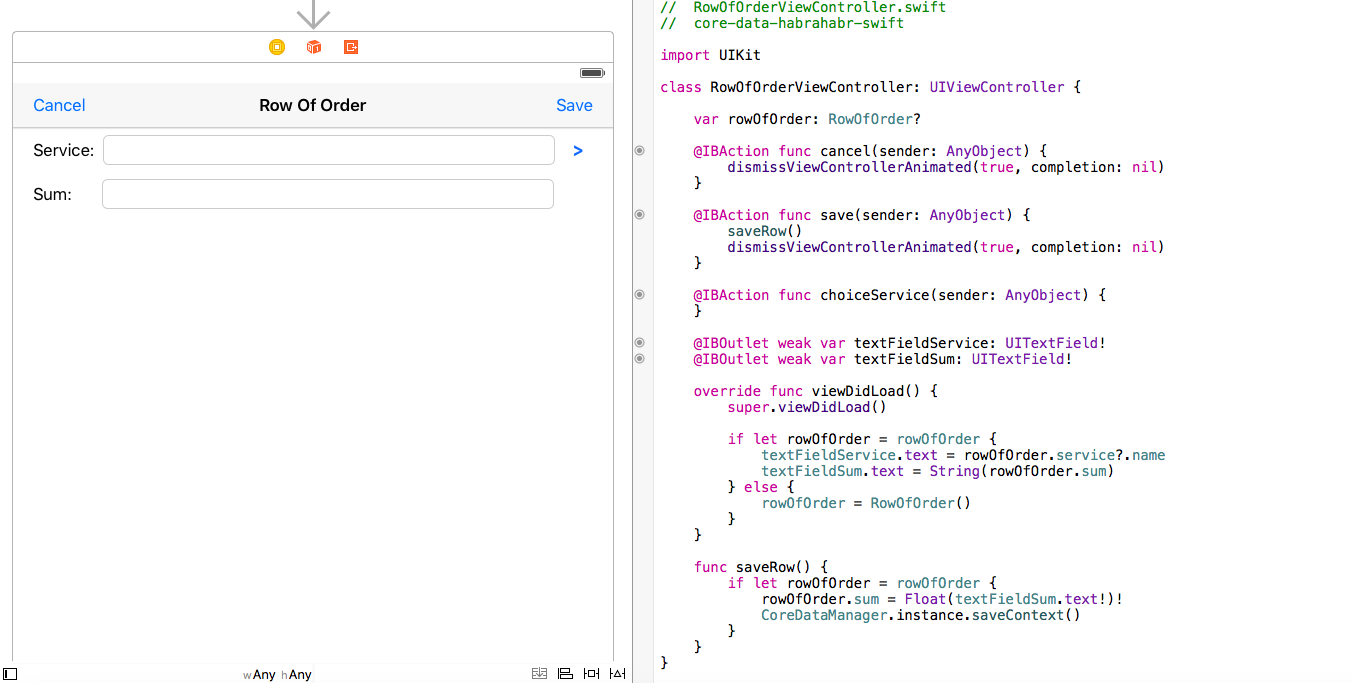
Module text RowOfOrderViewController.swift
// RowOfOrderViewController.swift// core-data-habrahabr-swift
import UIKitclass RowOfOrderViewController: UIViewController {
var rowOfOrder: RowOfOrder?
@IBAction func cancel(sender: AnyObject) {
dismissViewControllerAnimated(true, completion: nil)
}
@IBAction func save(sender: AnyObject) {
saveRow()
dismissViewControllerAnimated(true, completion: nil)
}
    @IBAction func choiceService(sender: AnyObject) {
        performSegueWithIdentifier("rowOfOrderToServices", sender: nil)
    }
    override func prepareForSegue(segue: UIStoryboardSegue, sender: AnyObject?) {
        if segue.identifier == "rowOfOrderToServices" {
            let controller = segue.destinationViewController as! ServicesTableViewController
            controller.didSelect = {[unowned self] (service) inif let service = service {
                    self.rowOfOrder!.service = service
                    self.textFieldService.text = service.name
                }
            }
        }
    }
@IBOutlet weak var textFieldService: UITextField!
@IBOutlet weak var textFieldSum: UITextField!
override func viewDidLoad() {
super.viewDidLoad()
if let rowOfOrder = rowOfOrder {
textFieldService.text = rowOfOrder.service?.name
textFieldSum.text = String(rowOfOrder.sum)
} else {
rowOfOrder = RowOfOrder()
}
}
func saveRow() {
if let rowOfOrder = rowOfOrder {
rowOfOrder.sum = Float(textFieldSum.text!)!
CoreDataManager.instance.saveContext()
}
}
}
Actually, that's it! This completes the work with the document, let's check everything.
Important notice!
Here we did not handle clicking on the Cancel button , which led to the following situation. If we created a new document, and then changed our mind about saving it and clicked Cancel , it will remain hanging as a “draft” in our document journal, since from the current context Core Datano one deleted it. You can return to it and continue to fill out, or you can delete it by force. But if you return to the main menu, and then open the document journal again, then there will be no drafts, since when we open the journal, we read the data from the storage. The same goes for document lines. For our program, this behavior seems logical, well, at least - acceptable. But perhaps this behavior is not at all what you want in your program. In this case, you must implement your logic for responding to such events. Do not forget that in any case, the behavior of the program should be absolutely clear and transparent for the user.
Document Report
This section will be quite small (compared to the previous one). We already managed to get to know a little bit
NSFetchRequest, now we ’ll take a closer look. Let's immediately create a new Table View Controller , create and assign a new class to it ( ReportTableViewControllerbased on UITableViewController). We will consider working with
NSFetchRequestan example of a simple report that will display a list sorted by date of completed, but not paid documents. To do this, we will use two powerful tools that we have NSFetchRequest:NSSortDescriptor- to sort dataNSPredicate- to set various selection conditions (filter).
Let's start by sorting the data, look at the following definition:
var fetchRequest = NSFetchRequest(entityName: "Order")
        // Sort Descriptor
        let sortDescriptor = NSSortDescriptor(key: "date", ascending: true)
        fetchRequest.sortDescriptors = [sortDescriptor]
        return fetchRequest
    }()
Here we create a new data sorting object (
NSSortDescriptor), passing it to the constructor a string containing the name of the sorting field, and indicate the desired sorting direction ( ascending: true- ascending, false- descending). Note that NSFetchRequestwe pass the sort object as an array to the object. What does it mean? Yes, that’s it - we can pass several sorting rules at the same time as an array. I also recall that the quality of the sorting field can specify compound fields “through the point” (we did this when we sorted the rows of the tabular part of the document). Let's add a second sorting object in order to sort documents by the name of the Customer inside the date.
   var fetchRequest:NSFetchRequest = {
        var fetchRequest = NSFetchRequest(entityName: "Order")
        // Sort Descriptor
        let sortDescriptor1 = NSSortDescriptor(key: "date", ascending: true)
        let sortDescriptor2 = NSSortDescriptor(key: "customer.name", ascending: true)
        fetchRequest.sortDescriptors = [sortDescriptor1, sortDescriptor2]
        return fetchRequest
    }()
Actually, that's all with sorting. The only thing I will remind you is if you are actively using sorting, do not forget to think about the advisability of indexing the fields used.
We pass to the mechanism of Predicates. It uses a fairly simple syntax that looks a bit like SQL-like queries. A predicate is created and used as follows:
// Predicate
        let predicate = NSPredicate(format: "%K == %@", "made", true)
        fetchRequest.predicate = predicate
A format string is passed to the constructor, followed by arguments. Depending on the format string, the number of parameters passed may vary. Let's take a closer look at the format string - it uses something like its own query language. " % K " - means the name of the field (property) of the object, " % @ " - the value of this field. Following are the arguments (the actual values that must be substituted in the selection), strictly in the same sequence. That is, this format string means the following: Order.made == true .
You can use not only the operation == , but < , > = , ! =and so on. You can also use keywords such as CONTAINS , LIKE , MATCHES , BEGINSWITH , ENDSWITH , as well as AND and OR . You can also use regular expressions. This is really a very powerful tool. I will not list all the possible options here; they are well represented in the official Apple documentation . As arguments for the field name, you can, as in
NSSortDescriptor, use compound fields (“point to point”). But you cannot use multiple predicates at the same time; instead, you should use a more complex condition in a single predicate. With this in mind, the final predicate definition in our report will be as follows: var fetchRequest:NSFetchRequest = {
var fetchRequest = NSFetchRequest(entityName: "Order")
// Sort Descriptor
let sortDescriptor1 = NSSortDescriptor(key: "date", ascending: true)
let sortDescriptor2 = NSSortDescriptor(key: "customer.name", ascending: true)
fetchRequest.sortDescriptors = [sortDescriptor1, sortDescriptor2]
// Predicate
let predicate = NSPredicate(format: "%K == %@ AND %K == %@", "made", true, "paid", false)
fetchRequest.predicate = predicate
return fetchRequest
}()
It remains only to implement the UITableViewDataSource protocol (you already know this, nothing new here) and you can check.
ReportTableViewController.swift module text
// ReportTableViewController.swift// core-data-habrahabr-swift
import UIKit
import CoreData
class ReportTableViewController: UITableViewController {
    var fetchRequest:NSFetchRequest = {
        var fetchRequest = NSFetchRequest(entityName: "Order")
        // Sort Descriptor
        let sortDescriptor1 = NSSortDescriptor(key: "date", ascending: true)
        let sortDescriptor2 = NSSortDescriptor(key: "customer.name", ascending: true)
        fetchRequest.sortDescriptors = [sortDescriptor1, sortDescriptor2]
        // Predicate
        let predicate = NSPredicate(format: "%K == %@ AND %K == %@", "made", true, "paid", false)
        fetchRequest.predicate = predicate
        return fetchRequest
    }()
var report: [Order]?
override func viewDidLoad() {
super.viewDidLoad()
do {
report = try CoreDataManager.instance.managedObjectContext.executeFetchRequest(fetchRequest) as? [Order]
} catch {
print(error)
}
}
// MARK: - Table View Data Source
override func numberOfSectionsInTableView(tableView: UITableView) -> Int {
return1
}
override func tableView(tableView: UITableView, numberOfRowsInSection section: Int) -> Int {
if let report = report {
return report.count
} else {
return0
}
}
override func tableView(tableView: UITableView, cellForRowAtIndexPath indexPath: NSIndexPath) -> UITableViewCell {
let cell = UITableViewCell()
if let report = report {
let order = report[indexPath.row]
let formatter = NSDateFormatter()
formatter.dateFormat = "MMM d, yyyy"
let nameOfCustomer = (order.customer == nil) ? "-- Unknown --" : (order.customer!.name!)
cell.textLabel?.text = formatter.stringFromDate(order.date) + "\t" + nameOfCustomer
}
return cell
}
}
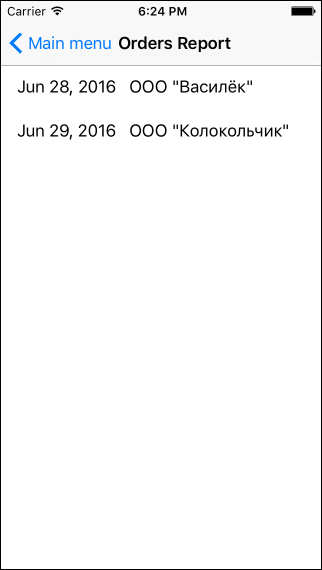
Everything works as it should, we got a list of documents according to the given conditions.
The final view of the Storyboard
Conclusion
Using a simple application as an example, we examined all the main points of working with
Core Dataand received, in a fairly short period of time, a fully functional application. Design, of course, at least needs to be improved, but this publication had a different purpose. It is worth noting once again that all direct work with data, including the organization of a data warehouse and all possible checks for consistency, is hidden “under the hood,” Core Datawe practically did not think about it, but worked with managed objects, as with ordinary OOP objects. I hope that I could explain quite clearly the basic techniques for working with
Core Data, which, in my opinion, are necessary for any iOS developer. It's great if you stopped being afraid and, at least a little, fell in love Core Data. Thanks for attention.This project is on github