The horse plowed the most, but did not become the chairman of the kolkhoz

Recently, in the mobile community, you can often hear about Flutter, React Native. It became interesting to me to understand the profit from these pieces. And how much they really change life when developing applications. As a result, 4 (identical in terms of functions performed) applications were created: native Android, native iOS, Flutter, React Native. In this article, I described what I learned from my experience and how similar elements of applications are implemented in the solutions under consideration.
Comments: the author of the article is not a professional cross-platform developer. And all that is written about is the look of a novice developer for these platforms. But I think this review will be useful for people who are already using one of the solutions in question, and who are looking to write applications for two platforms or to improve the process of interaction between iOS and Android.
As a developed application, it was decided to make a “Sport Timer”, which will help people involved in sports in performing interval training.
The application consists of 3 screens.
Timer work
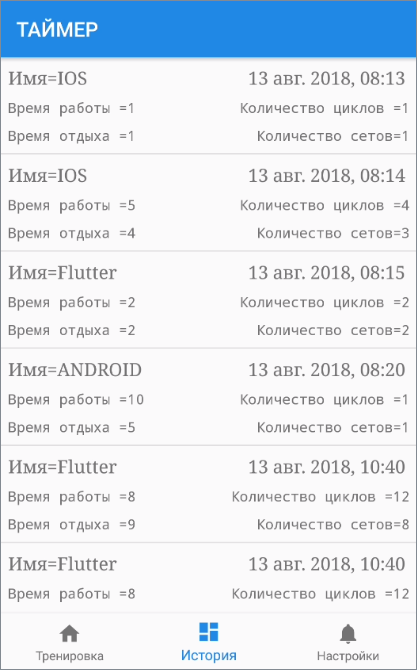
screen Training history

screen Timer settings screen
This application is interesting to me as a developer, because the following components of interest to me will be affected by its creation:
- Layout
- Custom View
- Working with UI lists
- Multithreading
- Database
- Network
- key-value storage
It is important to note that for Flutter and React Native we can create a bridge (channel) to the native part of the application and use it to implement everything what the operating system provides. But I was wondering what the frameworks give out of the box.
Choosing development tools
For a native iOS application, I chose the Xcode development environment and the Swift programming language. For native Android, Android Studio and Kotlin. React Native developed in WebStorm, the JS programming language. Flutter - Android Studio and Dart.
An interesting fact when developing on Flutter it seemed to me that right from Android Studio (the main IDE for Android development), you can run the application on an iOS device.
Project structure
The structures of native iOS and Android projects are very similar. This is a file for layout with the extensions .storyboard (iOS) and .xml (Android), dependency managers Podfile (iOS) and Gradle (Android), source code files with extensions .swift (iOS) and .kt (Android).
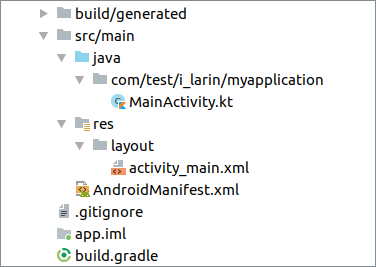
The structure of the Android project
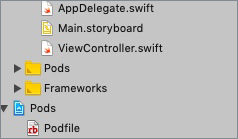
The structure of the iOS project
The Flutter and React Native structures contain the Android and iOS folders, which contain the usual native projects for Android and iOS. Flutter and React Native are connected to native projects as a library. In fact, when you start Flutter on an iOS device, the normal native iOS application starts with the Flutter library connected. For React Native and for Android, everything is the same.
Flutter and React Native also contain package.json (React Native) and pubspec.yaml (Flutter) dependency managers and source code files with the .js (React Native) and .dart (Flutter) extensions that also contain the layout.
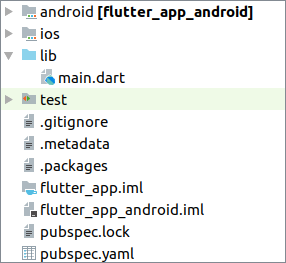
Flutter
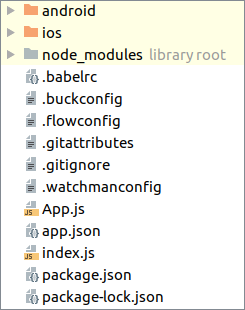
Project Structure React Native Project Structure
Layout
For native iOS and Android, there are visual editors. This greatly simplifies the creation of screens.
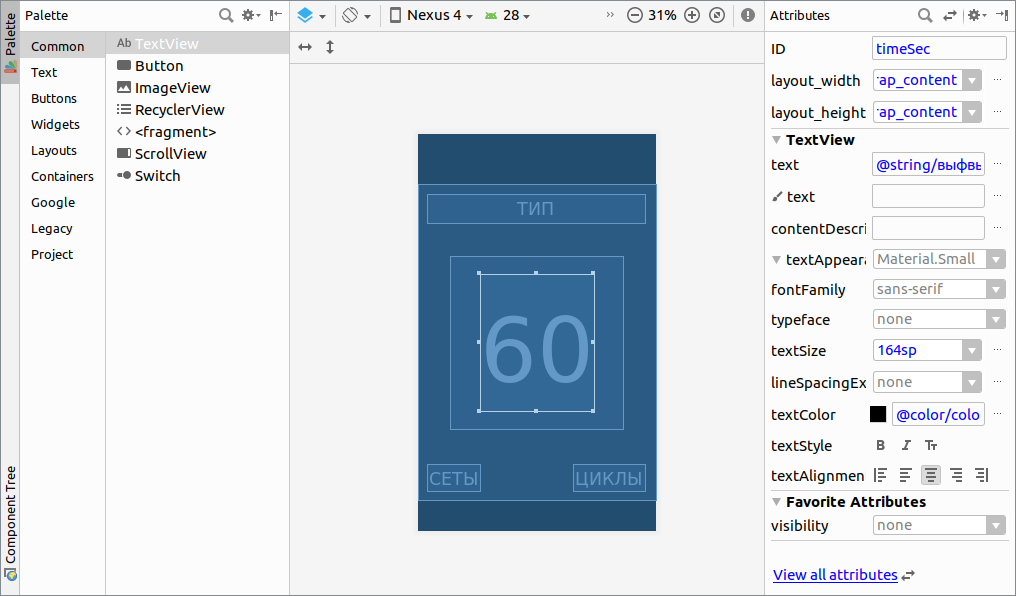
Visual editor for native Android
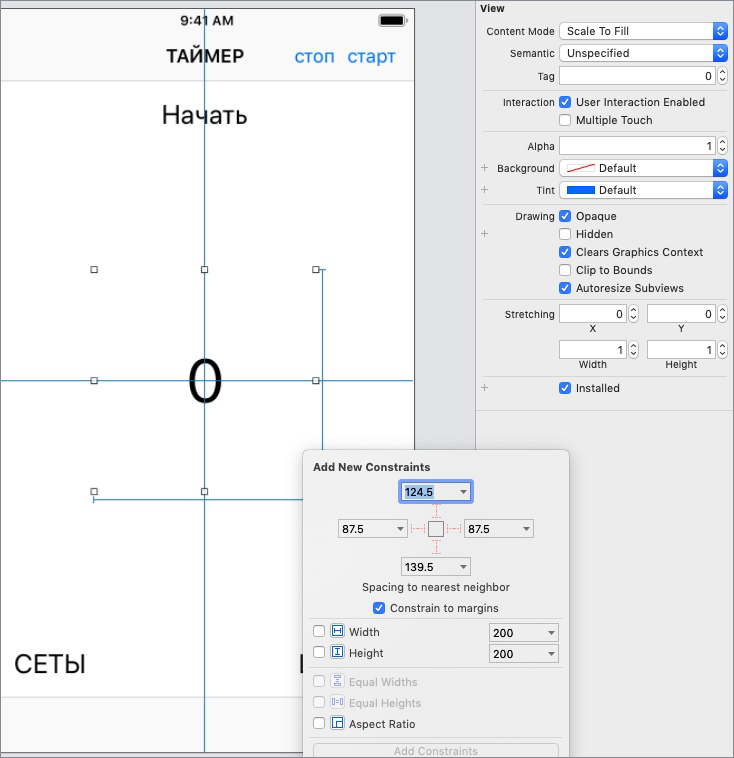
Visual editor for native iOS
For React Native and Flutter, there are no visual editors, but there is support for the hot-restart feature, which at least makes it easier to work with UI.
Flutter

hot reboot React Native hot reboot
On Android and iOS, layout is stored in separate files with the extensions .xml and .storybord, respectively. In React Native and Flutter, the layout comes directly from the code. An important point in describing the speed of ui is to note that Flutter has its own rendering mechanisms, with which the creators of the framework promise 60 fps. And React Native uses native ui elements that are built using js, which leads to their excessive nesting.
In Android and iOS, to change the View property, we use a link to it from the code and, for example, to change the background color we cause changes to the object directly. In the case of React Native and Flutter, there is another philosophy: we change the properties inside the setState call, and the view itself is redrawn depending on the changed state.
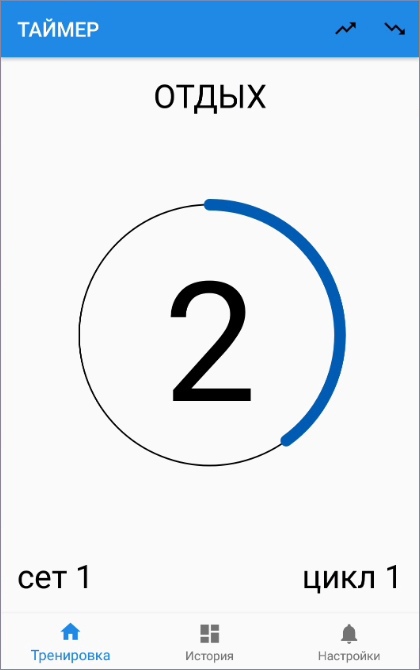
Examples of creating a timer screen for each of the selected solutions:

Screen layout of a timer on Android
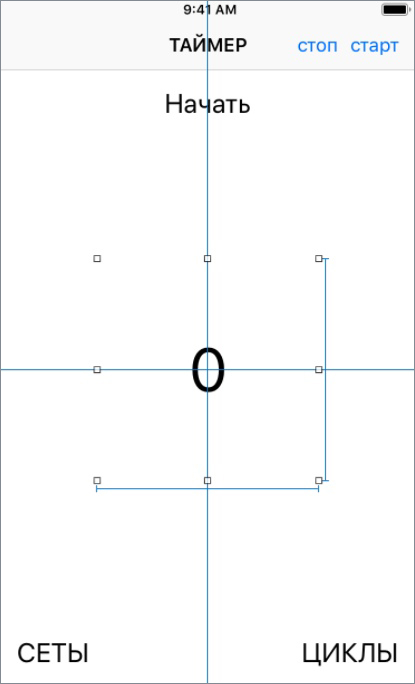
Screen layout of a timer on iOS
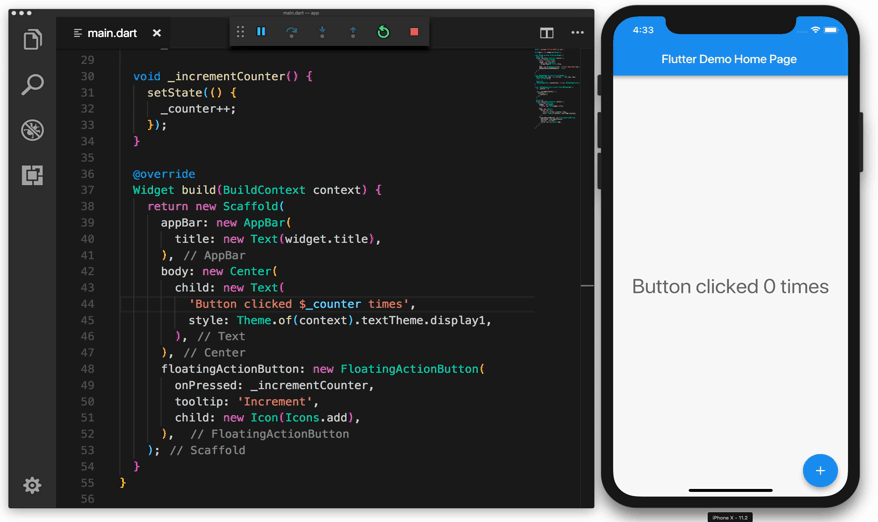
Screen layout of a timer Flutter
@overrideWidget build(BuildContext context){
    return Scaffold(
        body: Stack(
          children: <Widget>[
            new Container(
              color: color,
              child: new Column(
                mainAxisAlignment: MainAxisAlignment.spaceBetween,
                children: <Widget>[
                  Text(
                    " ${getTextByType(trainingModel.type)}",
                    style: new TextStyle(
                        fontWeight: FontWeight.bold, fontSize: 24.0),
                  ),
                  new Text(
                    "${trainingModel.timeSec}",
                    style: TextStyle(
                        fontWeight: FontWeight.bold, fontSize: 56.0),
                  ),
                  new Row(
                    mainAxisAlignment: MainAxisAlignment.spaceBetween,
                    children: <Widget>[
                      Text(
                        "СЕТЫ ${trainingModel.setCount}",
                        style: TextStyle(
                            fontWeight: FontWeight.bold, fontSize: 24.0),
                      ),
                      Text(
                        "ЦИКЛЫ ${trainingModel.cycleCount}",
                        style: TextStyle(
                            fontWeight: FontWeight.bold, fontSize: 24.0),
                      ),
                    ],
                  ),
                ],
              ),
              padding: const EdgeInsets.all(20.0),
            ),
            new Center(
              child: CustomPaint(
                painter: MyCustomPainter(
                    //0.0
                    trainingModel.getPercent()),
                size: Size.infinite,
              ),
            )
          ],
        ));
  }
Screen layout timer React Native
       render() {
        return (
            <Viewstyle={{flex:20,
                flexDirection: 'column',
                justifyContent: 'space-between',
                alignItems: 'stretch',
            }}><Viewstyle={{height:100}}><Textstyle={{textAlign: 'center', fontSize:24}}>
                        {this.state.value.type}
                    </Text></View><Viewstyle={styles.container}><CanvasTestdata={this.state.value}style={styles.center}/></View><Viewstyle={{height:120}}><Viewstyle={{flex:1}}><Viewstyle={{flex:1, padding:20,}}><Textstyle={{fontSize:24}}>
                                Сет {this.state.value.setCount}
                            </Text></View><Viewstyle={{flex:1, padding:20,}}><Textstyle={{textAlign: 'right', fontSize:24}}>
                                Цикл {this.state.value.cycleCount}
                            </Text></View></View></View></View>
        );
    }
Custom view
Getting acquainted with the solutions, it was important for me that you could create absolutely any visual component. That is, draw ui at the level of squares, circles and paths. For example, the timer indicator is such a view.

For native iOS, there were no problems, as there is access to the Layer, on which you can draw anything.
    let shapeLayer = CAShapeLayer()
    var angle = (-Double.pi / 2
        - 0.000001 + (Double.pi * 2) * percent)
    let circlePath = UIBezierPath(arcCenter: CGPoint(x: 100, y: 100),
        radius: CGFloat(95),
        startAngle: CGFloat(-Double.pi / 2),
        endAngle: CGFloat(angle),
        clockwise: true)
    shapeLayer.path = circlePath.cgPa
For native Android, you can create a class that inherits from View. And override the onDraw (Canvas canvas) method, in the parameter of which the Canvas object is on it and draw.
@OverrideprotectedvoidonDraw(Canvas canvas){
        pathCircleOne = new Path();
        pathCircleOne.addArc(rectForCircle, -90, value * 3.6F);
        canvas.drawPath(pathCircleBackground, paintCircleBackground);
    }
For Flutter, you can create a class that inherits from CustomPainter. And override the paint method (Canvas canvas, Size size), which in the parameter passes the Canvas object - that is, a very similar implementation as in Android.
@overridevoidpaint(Canvas canvas, Size size){
    Path path = Path()
      ..addArc(
          Rect.fromCircle(
            radius: size.width / 3.0,
            center: Offset(size.width / 2, size.height / 2),
          ),
          -pi * 2 / 4,
          pi * 2 * _percent / 100);
    canvas.drawPath(path, paint);
  }
For React Native, no solution was found out of the box. I think this is explained by the fact that js is only described by the view, and is built by native ui elements. But you can use the react-native-canvas library, which gives access to the canvas.
   handleCanvas = (canvas) => {
        if (canvas) {
            var modelTimer = this.state.value;
            const context = canvas.getContext('2d');
            context.arc(75, 75, 70,
                -Math.PI / 2, -Math.PI / 2 - 0.000001 - (Math.PI * 2)
                * (modelTimer.timeSec / modelTimer.maxValue), false);
        }
    }
Work with UI lists
The algorithm of work for Android, iOS, Flutter - solutions is very similar. We need to specify how many items are in the list. And give the cell number that you want to draw by the element number.
In iOS, UITableView is used to draw lists in which you need to implement DataSource methods.
func tableView(_ tableView: UITableView,
            numberOfRowsInSection section: Int) -> Int {
            return  countCell
    }
    func tableView(_ tableView: UITableView,
            cellForRowAt indexPath: IndexPath) -> UITableViewCell {
            return cell
    }
For Android, they use RecyclerView, in whose adapter we implement similar IOS methods.
classMyAdapter(privatevalmyDataset: Array<String>) :
        RecyclerView.Adapter<MyAdapter.MyViewHolder>() {
    override fun onBindViewHolder(holder: MyViewHolder, position: Int){
        holder.textView.text = myDataset[position]
    }
    override fun getItemCount()= myDataset.size
}
For flutter use ListView, in which similar methods are implemented in the builder.
new ListView.builder(
       itemCount: getCount() * 2,
       itemBuilder: (BuildContext context, int i) {
       returnnew HistoryWidget(
                 Key("a ${models[index].workTime}"), models[index]);
        },
   )
React Native uses a ListView. The implementation is similar to previous solutions. But there is no binding to the number and number of elements in the list, in the DataSource we set the list of elements. And in renderRow, we implement the creation of a cell, depending on which element has come.
<ListView
               dataSource={this.state.dataSource}
               renderRow={(data) => <HistoryItemdata={data}/>}
  />
Multithreading, asynchrony
When I started to deal with multithreading, asynchrony, I was horrified by the variety of solutions. In iOS, this is GCD, Operation, in Android, AsyncTask, Loader, Coroutine, in React Native, Promise, Async / Await, in Flutter-Future, Stream. The principles of some solutions are similar, but the implementation is still different.
He came to the rescue beloved Rx. If you are not yet in love with him, I advise you to study. It is in all the solutions I consider in the form: RxDart, RxJava, RxJs, RxSwift.
Rxjava
  Observable.interval(1, TimeUnit.SECONDS)
                .subscribe(object : Subscriber<Long>() {
                    fun onCompleted(){
                        println("onCompleted")
                    }
                    fun onError(e: Throwable){
                        println("onError -> " + e.message)
                    }
                    fun onNext(l: Long?){
                        println("onNext -> " + l!!)
                    }
                })
Rxswift
Observable<Int>.interval(1.0, scheduler: MainScheduler.instance)
.subscribe(onNext: { print($0) })
Rxdart
   Stream.fromIterable([1, 2, 3])
  .transform(new IntervalStreamTransformer(seconds: 1))
  .listen((i) => print("$i sec");
Rxjs
Rx.Observable
    .interval(500/* ms */)
    .timeInterval()
    .take(3)
.subscribe(
    function (x) {
        console.log('Next: ' + x);
    },
    function (err) {
        console.log('Error: ' + err);
    },
    function () {
        console.log('Completed');
    })
As you can see, the code looks very similar in all four languages. That in the future, if necessary, will facilitate your transition from one solution for mobile development to another.
Database
In mobile applications, the standard is SQLite database. In each of the solutions considered, a wrapper is written to work with it. Android usually uses ORM Room.
In iOS, Core Data. In Flutter, you can use the sqflite plugin.
In React Native - react-native-sqlite-storage. All of these solutions are designed differently. And to make the applications look similar, you will have to write Sqlite queries manually, without using wrappers.
It is probably better to look towards the Realm data storage library, which uses its own kernel for data storage. It is supported on iOS, Android and React Native. There is currently no support for Flutter, but Realm engineers are working in this direction.
Realm in Android
RealmResults<Item> item = realm.where(Item.class) .lessThan("id", 2) .findAll();
Realm in iOS
let item = realm.objects(Item.self).filter("id < 2")
Realm in React Native
let item = realm.objects('Item').filtered('id < 2');
Key-value store
In native iOS, UserDefaults are used. In the native Android - preferences. In React Native and Flutter, you can use libraries that are wrappers for native key-value repositories (SharedPreference (Android) and UserDefaults (iOS)).
Android
SharedPreferences sPref = getPreferences(MODE_PRIVATE);
Editor ed = sPref.edit();
ed.putString("my key'", myValue);
ed.commit();
iOS
let defaults = UserDefaults.standard
defaults.integer(forKey: "my key'")
defaults.set(myValue, forKey: "my key")
Flutter
SharedPreferences prefs = await SharedPreferences.getInstance();
prefs.getInt(my key')
prefs.setInt(my key', myValue)
React native
DefaultPreference.get('my key').then(function(value) {console.log(value)});
DefaultPreference.set('my key', myValue).then(function() {console.log('done')});
Network
There is a huge amount of solutions for working with the network in native iOS and Android. The most popular are Alamofire (iOS) and Retrofit (Android). React Native and Flutter have written their own platform-independent clients to surf the net. All customers are designed very similarly.
Android
Retrofit.Builder()
       .baseUrl("https://timerble-8665b.firebaseio.com")
       .build()
@GET("/messages.json")
fun getData(): Observable<Map<String,RealtimeModel>>
iOS
let url = URL(string: "https://timerble-8665b.firebaseio.com/messages.json")
        Alamofire.request(url, method: .get)
.responseJSON { response in …
Flutter
http.Response response = await
http.get('https://timerble-8665b.firebaseio.com/messages.json')
React native
fetch('https://timerble-8665b.firebaseio.com/messages.json')
            .then((response) => response.json())
Development time

Probably incorrect to draw any conclusions based on my development time, since I am an Android developer. But I think for the iOS developer the entrance to the Flutter and Android technology will seem easier than in React Native.
Conclusion
Starting to write an article, I knew what I would write in the output. I'll tell you what solution you liked more, which solution you should not use. But then, after talking with people who use these solutions in production, I realized that my conclusions are incorrect, because I look at everything from the side of my experience. Most importantly, I realized that for each of the solutions under consideration, there are projects for which it is ideal. And sometimes it's really more profitable for a business to do a cross-platform application, and not to plow over the development of two native ones. And if some decision is not suitable for your project, you should not think that it is bad in principle. I hope the article will be useful. Thanks for getting to the end.
Regarding the editing of the article, please write in a personal, I will gladly correct everything.