Creating maps of noise functions
- Transfer
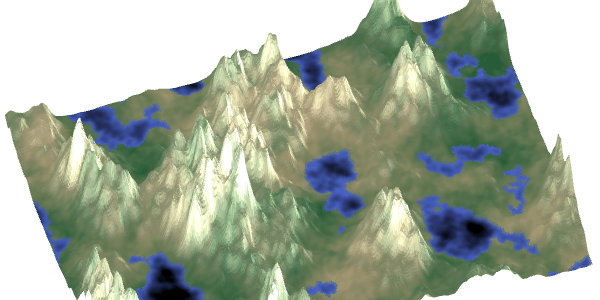
One of the most popular articles on my site is devoted to the generation of polygonal maps ( transfer to Habré). Creating such cards requires a lot of effort. But I did not start with this, but with a much simpler task, which I will describe here. This simple technique allows you to create such maps in less than 50 lines of code:
I will not explain how to draw such maps: it depends on the language, graphics library, platform, etc. I’ll just explain how to fill in an array of map data.
The standard way to generate 2D maps is to use a limited band noise function, such as a Perlin noise or simplex noise, as a building block. Here is what the noise function looks like:
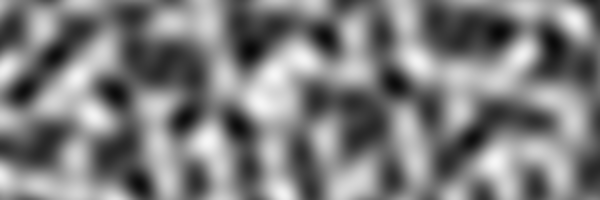
We assign each point of the map a number from 0.0 to 1.0. In this image, 0.0 is black and 1.0 is white. Here's how to set the color of each grid point in the syntax of a similar C language:
The loop will work the same way in Javascript, Python, Haxe, C ++, C #, Java, and most other popular languages, so I will show it in a C-like syntax so that you can convert it to the language you need. In the rest of the tutorial, I will show how the body of the loop (string
In some libraries, it will be necessary to shift or multiply the resulting values in order to return them in the interval from 0.0 to 1.0.
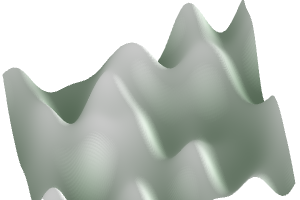
The noise itself is just a bunch of numbers. We need to give it meaning . The first thing you can think about is to bind the noise value to the height (this is called the “height map”). Let's take the noise shown above and draw it as a height:
The code remained almost the same, except for the inner loop. Now it looks like this:
Yes, that's all. These cards have remained the same, but now I will call them
We got a lot of hills, but nothing more. What's wrong?
Noise can be generated at any frequency . So far I have chosen only one frequency. Let's see how it affects.
Try changing the value of the slider (in the original article) and see what happens at different frequencies:
Here the scale just changes. At first it seems not very useful, but it is not. I have another tutorial ( translation in Habré), which explains the theory : concepts such as frequency, amplitude, octaves, pink and blue noise, and so on.
It is also sometimes useful to recall the wavelength , which is the reciprocal of frequency. With frequency doubling, the size is only halved. Doubling the wavelength all doubles. Wavelength is the distance measured in pixels / tiles / meters or any other units you have chosen for the maps. It is associated with the frequency:
To make the elevation map more interesting, we add noise with different frequencies :

Let's mix in the same map large low-frequency hills with small high-frequency hills. Move the slider (in the original article) to add small hills to the mix:
Now it is much more like the fractal relief we need! We can get hills and uneven mountains, but we still have no flat plains. For this you need something else.
The noise function gives us values between 0 and 1 (or -1 to +1, depending on the library). To create flat plains, we can raise the height to a power . Move the slider (in the original article) to get different degrees.
High values lower average heights into the plains , and low values raise average heights toward mountain peaks. We need to lower them. I use power functions because they are simpler, but you can use any curve; I have a more complicated demo .
Now that we have a realistic elevation map, let's add biomes!
Noise gives numbers, but we need a map with forests, deserts and oceans. The first thing you can do is turn small heights into water:
Wow, this already becomes like a procedurally generated world! We have water, grass and snow. But what if we need more? Let's make a sequence of water, sand, grass, forest, savannah, desert, and snow:
Elevation elevation
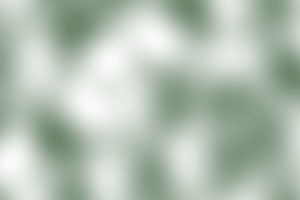
Wow, that looks great! For your game you can change the values and biomes. There will be much more jungle in Crysis; Skyrim has a lot more ice and snow. But no matter how you change the numbers, this approach is rather limited. The types of relief correspond to heights, therefore they form stripes. To make them more interesting, we need to choose biomes based on something else. Let's create a second noise map for humidity.

Above - the noise of heights; bottom - noise humidity
Now let's use the height and humidity together . In the first image shown below, the y-axis is the height (taken from the image above), and the x-axis is the humidity (the second image is higher). This gives us a compelling map:

The relief is based on two noise values.
Low heights are the oceans and coasts. Great heights are rocky and snowy. In between, we get a wide range of biomes. The code looks like this:
If necessary, you can change all these values in accordance with the requirements of your game.
If we do not need biomes, then smooth gradients (see this article ) can create colors:

For both biomes and gradients, a single noise value does not provide sufficient variability, but two is enough.
In the previous section, I used altitude as a substitute for temperature . The greater the height, the lower the temperature. However, temperatures are also influenced by geographic latitude. Let's use to control temperature and altitude, and latitude:
Near the poles (high latitudes) the climate is colder, and on the tops of the mountains (high altitudes) the climate is also colder. So far I have worked it not very hard: for the correct approach to these parameters you need a lot of fine tuning.
There is also seasonal climate change. In summer and winter, the northern and southern hemispheres become warmer and colder, but at the equator the situation does not change much. Here, too, much can be done, for example, one can model the prevailing winds and ocean currents, the influence of biomes on climate and the averaging effect of oceans on temperature.
In some projects I needed the borders of the map to be water. This turns the world into one or more islands. There are many ways to do this, but in my polygon map generator I used a fairly simple solution: I changed the height as
I am not completely satisfied with this and there is still much to explore. Should it be Manhattan or Euclidean distance? Should it depend on the distance to the center or from the distance to the edge? Should the distance be squared, or be linear, or have some other degree? Should it be addition / subtraction, or multiplication / division, or something else? In the original article try Add, a = 0.1, b = 0.3, c = 2.0 or try Multiply, a = 0.05, b = 1.00, c = 1.5. The options that suit you are dependent on your project.
Why even stick to standard math functions? As I told in my article about RPG damage ( translationon Habré), all (including me) use mathematical functions such as polynomials, exponential distributions, etc., but on the computer we can not be limited to them. We can take any forming function and use it here using the lookup table
Instead of raising the height to a power, we can use absolute value to create sharp peaks:
To add octaves, we can vary the amplitudes of the high frequencies so that only mountains get added noise:
I do not have much experience with this technique, so I need to experiment to learn how to use it well. It may also be interesting to mix pointed low-frequency noise with non-pointed high-frequency noise.
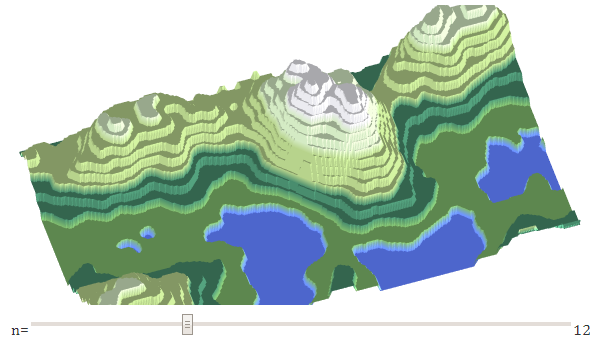
If we round the height to the next n levels, we get terraces:
This is the result of the use of the redistribution of heights in the form
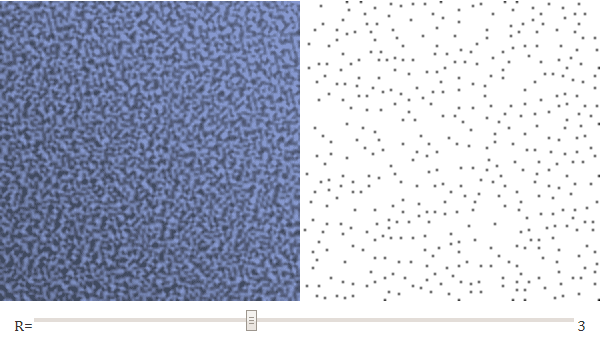
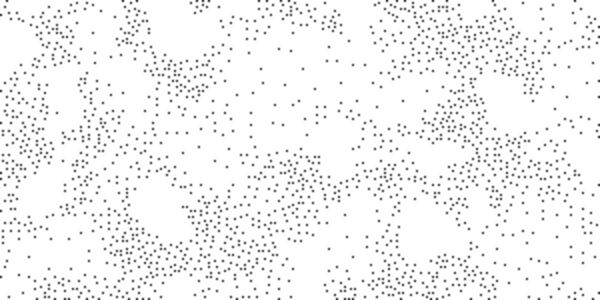
We usually used fractal noise for altitude and humidity, but it can also be used to place unevenly spaced objects, such as trees and stones. For altitude we use high amplitudes with low frequencies (“red noise”). To place objects you need to use high amplitudes with high frequencies (“blue noise”). On the left is a blue noise pattern; the right shows the places where the noise is more than the neighboring values:
By choosing different R for each biome, we can obtain a variable density of trees:
It's great that such noise can be used to place trees, but often other algorithms are more efficient and create a more even distribution: Poisson spots, Van tiles or graphical dithering.
The calculations of the biome at position (x, y) do not depend on the calculations of all other positions. This local calculation has two convenient properties: it can be calculated in parallel, and it can be used for infinite relief. Place the mouse cursor on the minimap (in the original article) on the left to generate a map on the right. You can generate any part of the map without generating (and even without storing) the entire map.
Using noise to generate terrain is a popular solution, and you can find tutorials on the Internet for many different languages and platforms. The code for generating maps in different languages is about the same. Here is the simplest loop in three different languages:
All noise libraries are quite similar to each other. Try opensimplex for Python , or libnoise for C ++ , or simplex-noise for Javascript. For most popular languages, there are many noise libraries. Or you can study how Perlin noise works or realize the noise yourself. I did not do this.
In different noise libraries for your language, application details may vary slightly (some return numbers in the range from 0.0 to 1.0, others in the range from -1.0 to +1.0), but the basic idea is the same. For a real project, you may need to wrap the function
For such a simple project, it does not matter what noise you use: Perlin noise, simplex noise, OpenSimplex noise, value noise, midpoint shift, diamond algorithm or inverse Fourier transform. Each of them has its pros and cons, but for such a map generator, they all create more or less the same output values.
Drawing a map depends on the platform and the game, so I did not implement it; This code is only needed to generate heights and biomes, the rendering of which depends on the style used in the game. You can copy, port and use it in your projects.
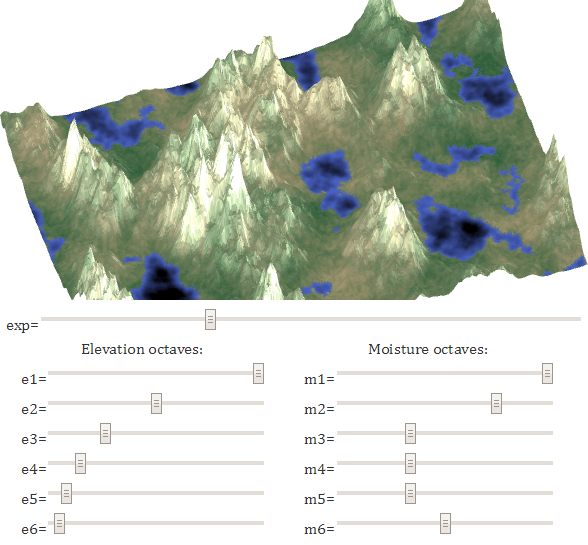
I looked at mixing the octaves, raising the power to a power and combining the height with the moisture to get a biome. Here you can explore an interactive graph that allows you to experiment with all these parameters, which shows what the code consists of:
Here is a sample code:
There is a difficulty here: for noise of heights and humidity it is necessary to use a different seed, otherwise they will be the same, and the maps will not look so interesting. In Javascript, I use the prng-parkmiller library ; in C ++, you can use two separate linear_congruential_engine objects ; in Python, you can create two separate instances of the random.Random class .
I like this approach to card generation because of its simplicity . It is fast and requires very little code to create decent results.
I do not like its limitations in this approach. Local calculations mean that each point is independent of all others. Different areas of the map are not related to each other . Each place on the map "seems" the same. There are no global restrictions here, for example, “there should be from 3 to 5 lakes on the map” or global characteristics, for example, a river flowing from the top of the highest peak to the ocean. Also, I don’t like the fact that to get a good picture you need to adjust the parameters for a long time.
Why do I recommend it? I think this is a good starting point, especially for indie games and game jams. Two of my friends wrote the initial version of Realm of the Mad God in just 30 days for a game contest . They asked me for help in making maps. I used this technique (plus a few more features that were not particularly useful) and made them a map. A few months later, after receiving feedback from players and having carefully studied the design of the game, we created a more advanced map generator based on Voronoi polygons, described here ( Habré translation ). This card generator does not use the techniques described in this article. In it, the noise for creating maps is applied quite differently.
There are many cool things you can do with the noise features. If you search the Internet, you can find options such as turbulence, billow, ridged multifractal, amplitude damping, terraced, voronoi noise, analytical derivatives, domain warping, and others. You can use this page as a source of inspiration. Here I do not consider them, my article focuses on simplicity.
This project was influenced by my previous map generation projects:
I'm a little annoyed by the fact that most of the code that game developers write to generate noise-based relief (including midpoint displacement) turns out to be the same as in sound and image filters. On the other hand, it creates quite decent results in just a few lines of code, which is why I wrote this article. This is a quick and easy reference point . I usually do not use such cards for a long time, but replace them with a more complex card generator, as soon as I learn which card types are better suited to the design of the game. For me, this is a standard pattern: to start with something extremely simple, and then replace it only after I better understand the system with which I work.
There are many moreI can mention only a few of the pieces that can be done with noise. Try Noise Studio to interactively test various features.
I will not explain how to draw such maps: it depends on the language, graphics library, platform, etc. I’ll just explain how to fill in an array of map data.
Noise
The standard way to generate 2D maps is to use a limited band noise function, such as a Perlin noise or simplex noise, as a building block. Here is what the noise function looks like:
We assign each point of the map a number from 0.0 to 1.0. In this image, 0.0 is black and 1.0 is white. Here's how to set the color of each grid point in the syntax of a similar C language:
for (int y = 0; y < height; y++) {
  for (int x = 0; x < width; x++) {
    double nx = x/width - 0.5, ny = y/height - 0.5;
    value[y][x] = noise(nx, ny);
  }
}
The loop will work the same way in Javascript, Python, Haxe, C ++, C #, Java, and most other popular languages, so I will show it in a C-like syntax so that you can convert it to the language you need. In the rest of the tutorial, I will show how the body of the loop (string
value[y][x]=…) changes as new features are added. The demo will show a complete example. In some libraries, it will be necessary to shift or multiply the resulting values in order to return them in the interval from 0.0 to 1.0.
Height
The noise itself is just a bunch of numbers. We need to give it meaning . The first thing you can think about is to bind the noise value to the height (this is called the “height map”). Let's take the noise shown above and draw it as a height:
The code remained almost the same, except for the inner loop. Now it looks like this:
elevation[y][x] = noise(nx, ny);Yes, that's all. These cards have remained the same, but now I will call them
elevation(by height), not value. We got a lot of hills, but nothing more. What's wrong?
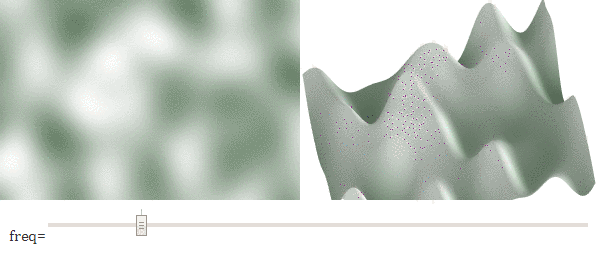
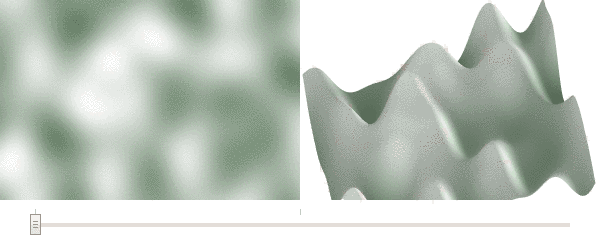
Frequency
Noise can be generated at any frequency . So far I have chosen only one frequency. Let's see how it affects.
Try changing the value of the slider (in the original article) and see what happens at different frequencies:
Here the scale just changes. At first it seems not very useful, but it is not. I have another tutorial ( translation in Habré), which explains the theory : concepts such as frequency, amplitude, octaves, pink and blue noise, and so on.
elevation[y][x] = noise(freq * nx, freq * ny);It is also sometimes useful to recall the wavelength , which is the reciprocal of frequency. With frequency doubling, the size is only halved. Doubling the wavelength all doubles. Wavelength is the distance measured in pixels / tiles / meters or any other units you have chosen for the maps. It is associated with the frequency:
wavelength = map_size / frequency.Octave
To make the elevation map more interesting, we add noise with different frequencies :
elevation[y][x] =    1 * noise(1 * nx, 1 * ny);
                +  0.5 * noise(2 * nx, 2 * ny);
                + 0.25 * noise(4 * nx, 2 * ny);
Let's mix in the same map large low-frequency hills with small high-frequency hills. Move the slider (in the original article) to add small hills to the mix:
Now it is much more like the fractal relief we need! We can get hills and uneven mountains, but we still have no flat plains. For this you need something else.
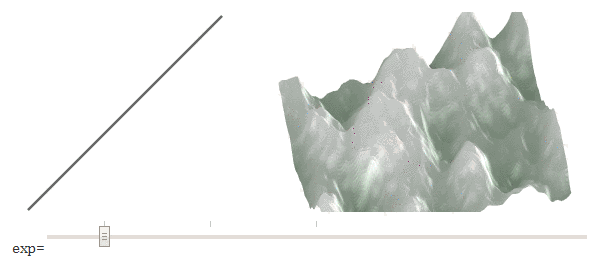
Redistribution
The noise function gives us values between 0 and 1 (or -1 to +1, depending on the library). To create flat plains, we can raise the height to a power . Move the slider (in the original article) to get different degrees.
e =    1 * noise(1 * nx, 1 * ny);
  +  0.5 * noise(2 * nx, 2 * ny);
  + 0.25 * noise(4 * nx, 4 * ny);
elevation[y][x] = Math.pow(e, exponent);
High values lower average heights into the plains , and low values raise average heights toward mountain peaks. We need to lower them. I use power functions because they are simpler, but you can use any curve; I have a more complicated demo .
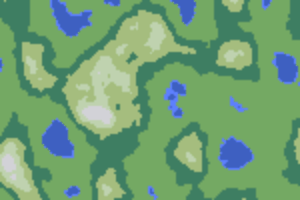
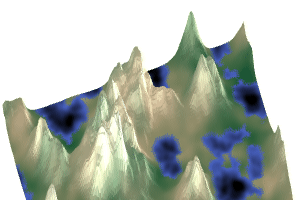
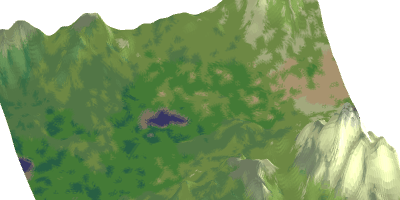
Now that we have a realistic elevation map, let's add biomes!
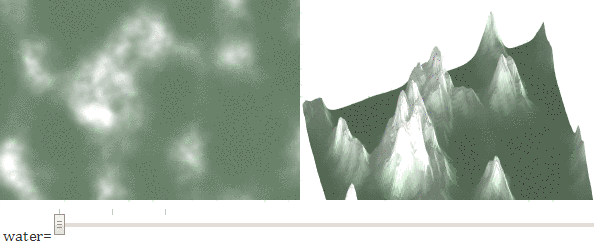
Biomes
Noise gives numbers, but we need a map with forests, deserts and oceans. The first thing you can do is turn small heights into water:
function biome(e){
    if (e < waterlevel) return WATER;
    elsereturn LAND;
}
Wow, this already becomes like a procedurally generated world! We have water, grass and snow. But what if we need more? Let's make a sequence of water, sand, grass, forest, savannah, desert, and snow:
Elevation elevation
function biome(e){
if (e < 0.1) return WATER;
elseif (e < 0.2) return BEACH;
elseif (e < 0.3) return FOREST;
elseif (e < 0.5) return JUNGLE;
elseif (e < 0.7) return SAVANNAH;
elseif (e < 0.9) return DESERT;
elsereturn SNOW;
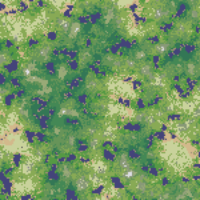
}Wow, that looks great! For your game you can change the values and biomes. There will be much more jungle in Crysis; Skyrim has a lot more ice and snow. But no matter how you change the numbers, this approach is rather limited. The types of relief correspond to heights, therefore they form stripes. To make them more interesting, we need to choose biomes based on something else. Let's create a second noise map for humidity.
Above - the noise of heights; bottom - noise humidity
Now let's use the height and humidity together . In the first image shown below, the y-axis is the height (taken from the image above), and the x-axis is the humidity (the second image is higher). This gives us a compelling map:
The relief is based on two noise values.
Low heights are the oceans and coasts. Great heights are rocky and snowy. In between, we get a wide range of biomes. The code looks like this:
function biome(e, m){
  if (e < 0.1) return OCEAN;
  if (e < 0.12) return BEACH;
  if (e > 0.8) {
    if (m < 0.1) return SCORCHED;
    if (m < 0.2) return BARE;
    if (m < 0.5) return TUNDRA;
    return SNOW;
  }
  if (e > 0.6) {
    if (m < 0.33) return TEMPERATE_DESERT;
    if (m < 0.66) return SHRUBLAND;
    return TAIGA;
  }
  if (e > 0.3) {
    if (m < 0.16) return TEMPERATE_DESERT;
    if (m < 0.50) return GRASSLAND;
    if (m < 0.83) return TEMPERATE_DECIDUOUS_FOREST;
    return TEMPERATE_RAIN_FOREST;
  }
  if (m < 0.16) return SUBTROPICAL_DESERT;
  if (m < 0.33) return GRASSLAND;
  if (m < 0.66) return TROPICAL_SEASONAL_FOREST;
  return TROPICAL_RAIN_FOREST;
}
If necessary, you can change all these values in accordance with the requirements of your game.
If we do not need biomes, then smooth gradients (see this article ) can create colors:
For both biomes and gradients, a single noise value does not provide sufficient variability, but two is enough.
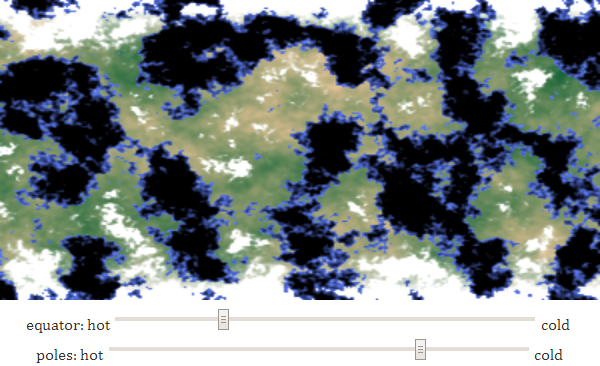
Climate
In the previous section, I used altitude as a substitute for temperature . The greater the height, the lower the temperature. However, temperatures are also influenced by geographic latitude. Let's use to control temperature and altitude, and latitude:
Near the poles (high latitudes) the climate is colder, and on the tops of the mountains (high altitudes) the climate is also colder. So far I have worked it not very hard: for the correct approach to these parameters you need a lot of fine tuning.
There is also seasonal climate change. In summer and winter, the northern and southern hemispheres become warmer and colder, but at the equator the situation does not change much. Here, too, much can be done, for example, one can model the prevailing winds and ocean currents, the influence of biomes on climate and the averaging effect of oceans on temperature.
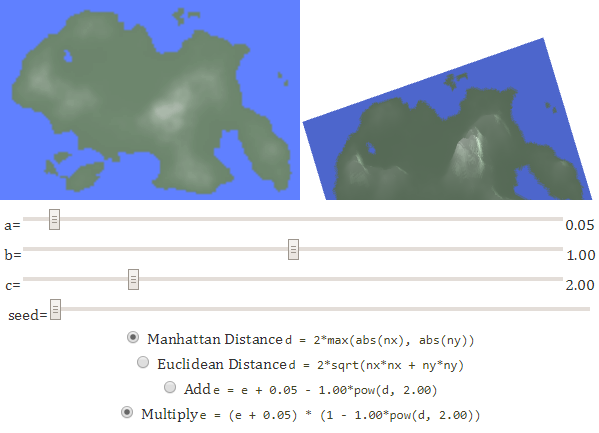
Islands
In some projects I needed the borders of the map to be water. This turns the world into one or more islands. There are many ways to do this, but in my polygon map generator I used a fairly simple solution: I changed the height as
e = e + a - b*d^c, where dis the distance from the center (on a scale of 0-1). Another option is to change e = (e + a) * (1 - b*d^c). The constant araises everything up, blowers the edges down, and ccontrols the speed of descent.I am not completely satisfied with this and there is still much to explore. Should it be Manhattan or Euclidean distance? Should it depend on the distance to the center or from the distance to the edge? Should the distance be squared, or be linear, or have some other degree? Should it be addition / subtraction, or multiplication / division, or something else? In the original article try Add, a = 0.1, b = 0.3, c = 2.0 or try Multiply, a = 0.05, b = 1.00, c = 1.5. The options that suit you are dependent on your project.
Why even stick to standard math functions? As I told in my article about RPG damage ( translationon Habré), all (including me) use mathematical functions such as polynomials, exponential distributions, etc., but on the computer we can not be limited to them. We can take any forming function and use it here using the lookup table
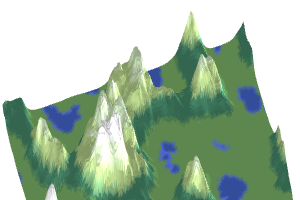
e = e + height_adjust[d]. So far I have not studied this question.Spiky noise
Instead of raising the height to a power, we can use absolute value to create sharp peaks:
function ridgenoise(nx, ny){
  return2 * (0.5 - abs(0.5 - noise(nx, ny)));
}
To add octaves, we can vary the amplitudes of the high frequencies so that only mountains get added noise:
e0 =    1 * ridgenoise(1 * nx, 1 * ny);
e1 =  0.5 * ridgenoise(2 * nx, 2 * ny) * e0;
e2 = 0.25 * ridgenoise(4 * nx, 4 * ny) * (e0+e1);
e = e0 + e1 + e2;
elevation[y][x] = Math.pow(e, exponent);
I do not have much experience with this technique, so I need to experiment to learn how to use it well. It may also be interesting to mix pointed low-frequency noise with non-pointed high-frequency noise.
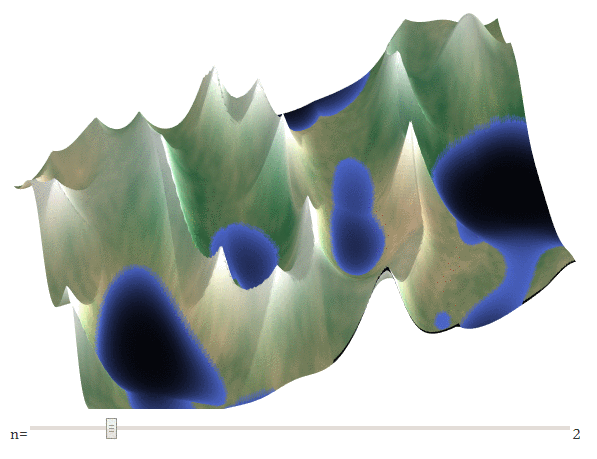
Terraces
If we round the height to the next n levels, we get terraces:
This is the result of the use of the redistribution of heights in the form
e = f(e). Above, we used e = Math.pow(e, exponent)to make mountain peaks sharper; here we use e = Math.round(e * n) / nto create terraces. If you use a non-step function, the terraces can be rounded or occur only at some heights.Tree placement
We usually used fractal noise for altitude and humidity, but it can also be used to place unevenly spaced objects, such as trees and stones. For altitude we use high amplitudes with low frequencies (“red noise”). To place objects you need to use high amplitudes with high frequencies (“blue noise”). On the left is a blue noise pattern; the right shows the places where the noise is more than the neighboring values:
for (int yc = 0; yc < height; yc++) {
  for (int xc = 0; xc < width; xc++) {
    double max = 0;
    // существуют более эффективные алгоритмыfor (int yn = yc - R; yn <= yc + R; yn++) {
      for (int xn = xc - R; xn <= xc + R; xn++) {
        double e = value[yn][xn];
        if (e > max) { max = e; }
      }
    }
    if (value[yc][xc] == max) {
      // размещаем дерево в xc,yc
    }
  }
}
By choosing different R for each biome, we can obtain a variable density of trees:
It's great that such noise can be used to place trees, but often other algorithms are more efficient and create a more even distribution: Poisson spots, Van tiles or graphical dithering.
To infinity and beyond
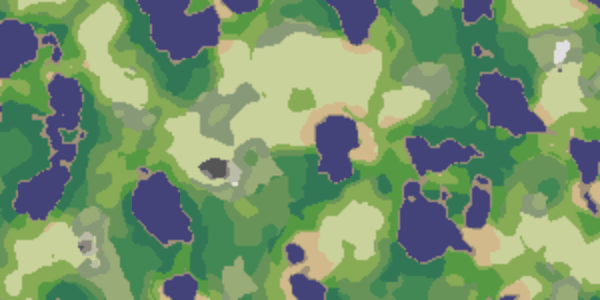
The calculations of the biome at position (x, y) do not depend on the calculations of all other positions. This local calculation has two convenient properties: it can be calculated in parallel, and it can be used for infinite relief. Place the mouse cursor on the minimap (in the original article) on the left to generate a map on the right. You can generate any part of the map without generating (and even without storing) the entire map.
Implementation
Using noise to generate terrain is a popular solution, and you can find tutorials on the Internet for many different languages and platforms. The code for generating maps in different languages is about the same. Here is the simplest loop in three different languages:
- Javascript:
let gen = new SimplexNoise(); functionnoise(nx, ny) { // Rescale from -1.0:+1.0 to 0.0:1.0return gen.noise2D(nx, ny) / 2 + 0.5; } let value = []; for (let y = 0; y < height; y++) { value[y] = []; for (let x = 0; x < width; x++) { let nx = x/width - 0.5, ny = y/height - 0.5; value[y][x] = noise(nx, ny); } } - C ++:
module::Perlin gen; doublenoise(double nx, double ny){ // Rescale from -1.0:+1.0 to 0.0:1.0return gen.GetValue(nx, ny, 0) / 2.0 + 0.5; } double value[height][width]; for (int y = 0; y < height; y++) { for (int x = 0; x < width; x++) { double nx = x/width - 0.5, ny = y/height - 0.5; value[y][x] = noise(nx, ny); } } - Python:
from opensimplex import OpenSimplex
gen = OpenSimplex()
defnoise(nx, ny):# Rescale from -1.0:+1.0 to 0.0:1.0return gen.noise2d(nx, ny) / 2.0 + 0.5
value = []
for y in range(height):
    value.append([0] * width)
    for x in range(width):
        nx = x/width - 0.5
        ny = y/height - 0.5
        value[y][x] = noise(nx, ny)
All noise libraries are quite similar to each other. Try opensimplex for Python , or libnoise for C ++ , or simplex-noise for Javascript. For most popular languages, there are many noise libraries. Or you can study how Perlin noise works or realize the noise yourself. I did not do this.
In different noise libraries for your language, application details may vary slightly (some return numbers in the range from 0.0 to 1.0, others in the range from -1.0 to +1.0), but the basic idea is the same. For a real project, you may need to wrap the function
noiseand object geninto a class, but these details are irrelevant, so I made them global.For such a simple project, it does not matter what noise you use: Perlin noise, simplex noise, OpenSimplex noise, value noise, midpoint shift, diamond algorithm or inverse Fourier transform. Each of them has its pros and cons, but for such a map generator, they all create more or less the same output values.
Drawing a map depends on the platform and the game, so I did not implement it; This code is only needed to generate heights and biomes, the rendering of which depends on the style used in the game. You can copy, port and use it in your projects.
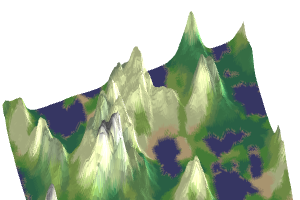
Experiments
I looked at mixing the octaves, raising the power to a power and combining the height with the moisture to get a biome. Here you can explore an interactive graph that allows you to experiment with all these parameters, which shows what the code consists of:
Here is a sample code:
var rng1 = PM_PRNG.create(seed1);
var rng2 = PM_PRNG.create(seed2);
var gen1 = new SimplexNoise(rng1.nextDouble.bind(rng1));
var gen2 = new SimplexNoise(rng2.nextDouble.bind(rng2));
function noise1(nx, ny){ return gen1.noise2D(nx, ny)/2 + 0.5; }
function noise2(nx, ny){ return gen2.noise2D(nx, ny)/2 + 0.5; }
for (var y = 0; y < height; y++) {
  for (var x = 0; x < width; x++) {
    var nx = x/width - 0.5, ny = y/height - 0.5;
    var e = (1.00 * noise1( 1 * nx,  1 * ny)
           + 0.50 * noise1( 2 * nx,  2 * ny)
           + 0.25 * noise1( 4 * nx,  4 * ny)
           + 0.13 * noise1( 8 * nx,  8 * ny)
           + 0.06 * noise1(16 * nx, 16 * ny)
           + 0.03 * noise1(32 * nx, 32 * ny));
    e /= (1.00+0.50+0.25+0.13+0.06+0.03);
    e = Math.pow(e, 5.00);
    var m = (1.00 * noise2( 1 * nx,  1 * ny)
           + 0.75 * noise2( 2 * nx,  2 * ny)
           + 0.33 * noise2( 4 * nx,  4 * ny)
           + 0.33 * noise2( 8 * nx,  8 * ny)
           + 0.33 * noise2(16 * nx, 16 * ny)
           + 0.50 * noise2(32 * nx, 32 * ny));
    m /= (1.00+0.75+0.33+0.33+0.33+0.50);
    /* draw biome(e, m) at x,y */
  }
}
There is a difficulty here: for noise of heights and humidity it is necessary to use a different seed, otherwise they will be the same, and the maps will not look so interesting. In Javascript, I use the prng-parkmiller library ; in C ++, you can use two separate linear_congruential_engine objects ; in Python, you can create two separate instances of the random.Random class .
Thoughts
I like this approach to card generation because of its simplicity . It is fast and requires very little code to create decent results.
I do not like its limitations in this approach. Local calculations mean that each point is independent of all others. Different areas of the map are not related to each other . Each place on the map "seems" the same. There are no global restrictions here, for example, “there should be from 3 to 5 lakes on the map” or global characteristics, for example, a river flowing from the top of the highest peak to the ocean. Also, I don’t like the fact that to get a good picture you need to adjust the parameters for a long time.
Why do I recommend it? I think this is a good starting point, especially for indie games and game jams. Two of my friends wrote the initial version of Realm of the Mad God in just 30 days for a game contest . They asked me for help in making maps. I used this technique (plus a few more features that were not particularly useful) and made them a map. A few months later, after receiving feedback from players and having carefully studied the design of the game, we created a more advanced map generator based on Voronoi polygons, described here ( Habré translation ). This card generator does not use the techniques described in this article. In it, the noise for creating maps is applied quite differently.
Additional Information
There are many cool things you can do with the noise features. If you search the Internet, you can find options such as turbulence, billow, ridged multifractal, amplitude damping, terraced, voronoi noise, analytical derivatives, domain warping, and others. You can use this page as a source of inspiration. Here I do not consider them, my article focuses on simplicity.
This project was influenced by my previous map generation projects:
- I used the general Perlin noise for my first Realm of the Mad God card maker . We used it for the first six months of alpha testing, and then replaced it with a map generator on Voronoi polygons , specially created for the gameplay requirements that we defined in the alpha testing process. Biomes and their colors for the article are taken from these projects.
- When studying audio signal processing, I wrote a tutorial on noise , which explains concepts such as frequency, amplitude, octaves, and noise "color". The same concepts working for sound are also applicable for noise-based map generation. At that time, I created a few raw demo of the terrain generation , but I didn’t finish them.
- Sometimes I experiment to find boundaries. I wanted to know how much code is minimally needed to create compelling maps. In this mini-project, I got to zero lines of code - everything is done by image filters (turbulence, thresholds, color gradients). It pleased me and upset me. To what extent can the generation of maps be performed by image filters? In big enough. Everything told above about the “scheme of smooth color gradients” is taken from this experiment. The noise layer is the image filter “turbulence”; octaves are images superimposed on each other; The degree tool is called “curve correction” in Photoshop.
I'm a little annoyed by the fact that most of the code that game developers write to generate noise-based relief (including midpoint displacement) turns out to be the same as in sound and image filters. On the other hand, it creates quite decent results in just a few lines of code, which is why I wrote this article. This is a quick and easy reference point . I usually do not use such cards for a long time, but replace them with a more complex card generator, as soon as I learn which card types are better suited to the design of the game. For me, this is a standard pattern: to start with something extremely simple, and then replace it only after I better understand the system with which I work.
There are many moreI can mention only a few of the pieces that can be done with noise. Try Noise Studio to interactively test various features.