How to pass cyber tests on "Checkpoint"
- Tutorial
Hello everyone, I am Nikita Curtin , curator of the Israeli IT and Security High School HackerU
This summer, the leading Israeli company in the field of information security Checkpoint , published a series of cyber tests.
The tasks were divided into six categories:
• Logic
• Web
• Programming
• Networking
• Reversing
• Surprise
Two tasks for each direction. In this post I will tell you how only four tests took place, in the following three others:
CheckpointI already managed to win respect and interest on my part, so I decided to accept these challenges. However, in view of employment, I was able to allow myself to take on only 8 of 12 tasks (from four different categories). And I managed to solve 7 of them.
Challenge officially ended by the end of September 2018.
So now, with a clear conscience, I can tell you step by step how I broke through to solving the following tasks:
• Logical challenge “PNG ++”
• Web challenge “Robots return”
• Web challenge “Diego Gallery”
• Task for programming “Careful steps”
• Problem for programming "Jigsaw"
• Networking Challenge "Ping Pong"
• Networking Challenge "Protocol"
Challenge: PNG ++
Description:
This (link to an encrypted PNG file) image was encoded using a custom cipher.
We managed to read most of this code here (link to python code).
Unfortunately, someone sluggishly spilled coffee on the entire key_transformator.py.
Could you help us decipher this image?
Python code:

Encryption logic is as follows:
1. Set the key length (key size) to 4 bytes
2. Read the bytes of the flag.png file in the “img” variable
3. Add padding to the file to the first nearest number multiple of four. Padding is equal to the number of missing bytes. For example, if the file length is 29 bytes (missing 3), add three bytes with a decimal value 3 (ASCII 0x03). Or, in other words, padding bytes cannot be empty (ASCII 0x00), because its decimal value is zero, which does not imply padding.
4. Set the start key with four random capital letters ([AZ]).
5. Do the same with all the bytes in the file, encrypting the chains of four bytes
a time. Each byte in the file is fought byte from the key
b. The key is constantly converted to another key; key_transformator.transform (key)
c is responsible for this . Encrypted bytes are added to enc_data
6. Enter enc_data (encrypted bytes) in encrypted.png
To begin with, I checked the PNG format header and found that the first eight bytes are as follows:
[137, 80, 78, 71, 13, 10, 26, 10]
I took the first eight bytes of the encrypted file and copied them with these eight bytes: The
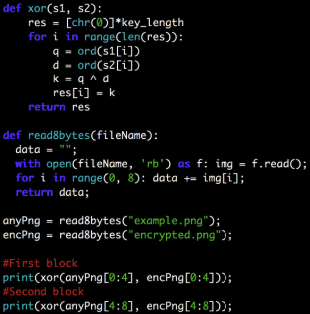
key of the first block was:
[85, 80, 82, 81]
And the second block — like this:
[86, 81, 83, 82]
Since each successive key is dynamically generated using the previous key (key = key_transformator.transform (key), I understood the algorithm: add one to each byte in the previous key:
85 -> 86
80 -> 81
82 -> 83
81 -> 82
And then I realized that in the name of the Challenge there was a nehily hint.
I wrote two “auxiliary functions”:
• “nextKey”, which recovers the next key based on the last
• • “nextChar”, which restores the next letter, and in most cases just increases by one, if it falls within the boundaries of the byte (255)
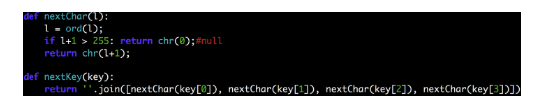
I am envelope ul source 4 bytes [85, 80 82, 81] in the letters: “UPRQ” and launched the reversal algorithm.
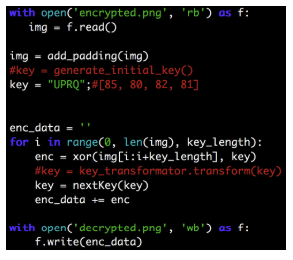
In the decrypted file the flag was specified:

Challenge: “The Return of the Robots”
Description: The
robots are cool, but trust me: their access should be limited! Check out (link)
Clicking on the link, you see a certain page dedicated to robots. Basically, everything leads to the fact that you should check for the presence of the file "robots.txt".
Adding ./robots.txt to the url we get the following:
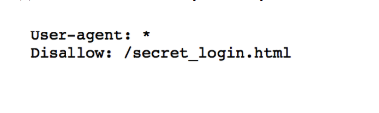
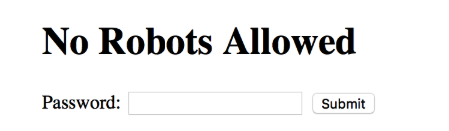
I checked ./secret_login.html and came across the registration page.
Next, I checked the source code of the form to find the confirmation of the password and saw the Javascript:

It seems that when the value is confirmed, it is sent to authorization function, which decodes the passed value using the btoa function (base64 decoding function in Javascript) and then compares it with the string: “SzMzcFQjM1IwYjB0JDB1dA ==”.
I decoded this string
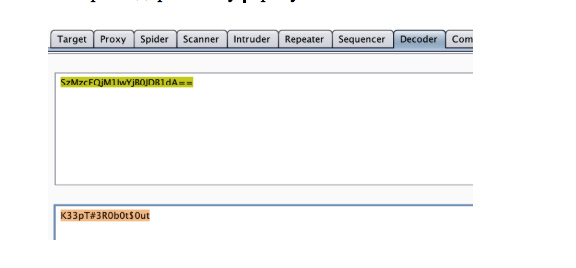
. I inserted the resulting value in the password string. Bingo!

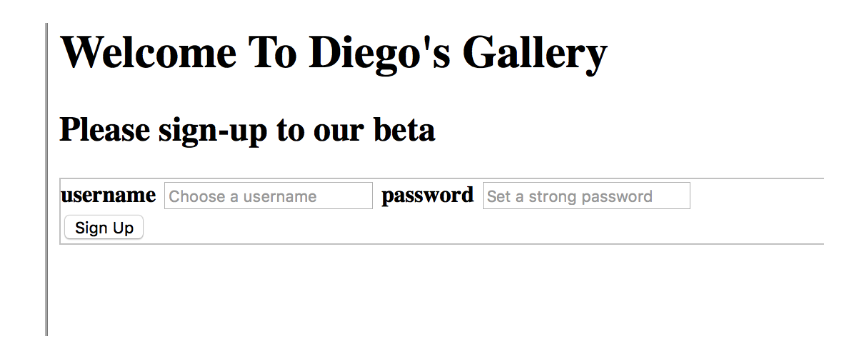
Challenge: “Diego Gallery”
Description:
Recently, I started developing a platform to manage photos of my cat and protect my flag.txt. Please check my system (link to the registration form).
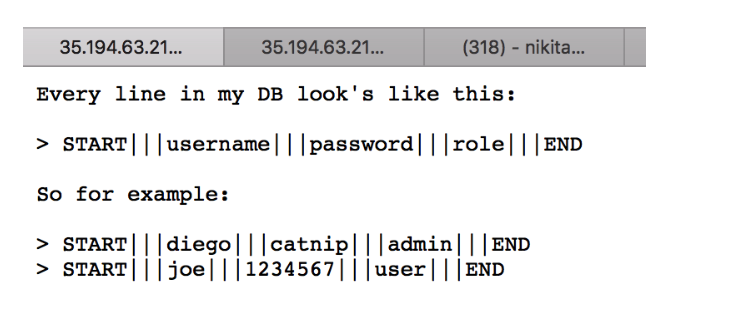
In order to avoid jambs in the security system, such as the ability to inject SQL code, I came up with my own scheme.
Her short description is available here (link to the diagram)
Registration form:
Schedule set:
After I set the test username and password, I got access to the cat's public gallery “Diego”.
Since I signed up as a regular user, I figured that it might be necessary to find a way to increase the privilege on PE (Privilege Escalation). Looking through the scheme for registered users, I saw that the difference between a normal user and the admin is contained in the third section of the scheme, divided by three lines.
Assuming that if the first value (user name) belongs to the first section, and the second (password) to the second, the system assigns the role immediately after the user logs in with current rights.
For example:
START ||| First value ||| Second value ||| user (Added by web service) ||| END
My payload was as follows:
• The first value: “niki ||| niki ||| admin ||| END \ nSTART ||| other “
• Second value:“ other ”
This probably generated the following lines of the journal:
START ||| niki ||| niki ||| admin ||| END
START ||| other ||| other ||| user ||| END
After that I was able to log in as admin and get full rights:
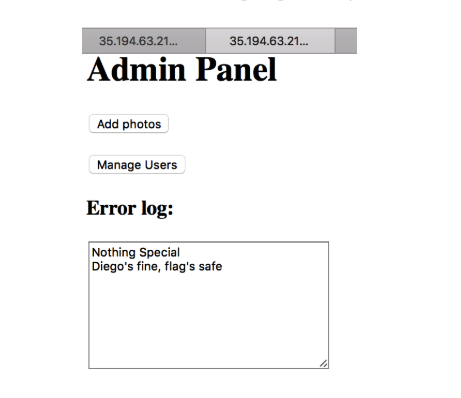
Clicking on the buttons only activates a warning that the flag is safe.
However, inside the URL you can read:
35.194.63.219/csa_2018/diegos_gallery/_nwryqcttstvs/admin-panel/index.php ? view = log.txt
Which very clearly alludes to LFI (Local File Inclusion) via URL
I tried:
35.194.63.219/csa_2018/diegos_gallery/_nwryqcttstvs/admin-panel/index.php?view=flag.txt
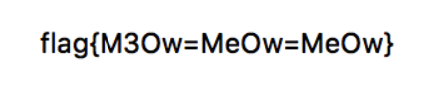
And the flag was mine.
Challenge: “Careful Steps”
Description:
This (link to file) is a bunch of archives we found. We are sure that the secret flag is hidden somewhere inside them.
We are absolutely sure that the data we are looking for is hidden in the comments section of each file.
Could you go carefully between the files and find the flag?
Good luck!
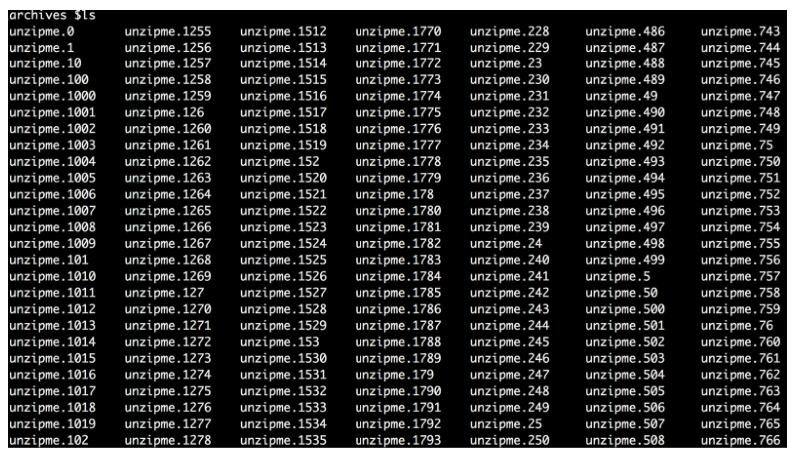
After extracting the file, you get a directory called “archives” with two thousand files inside, entitled “unzipme. [Number]”.
I used the binwalk program to check the first file. And that's what the program gave me:

Yeah, so in the comments section, we have letters and numbers. Hints again?
At first I wondered if I should link the letters with the given indexes from this zip file, and check the next file already with index 245.
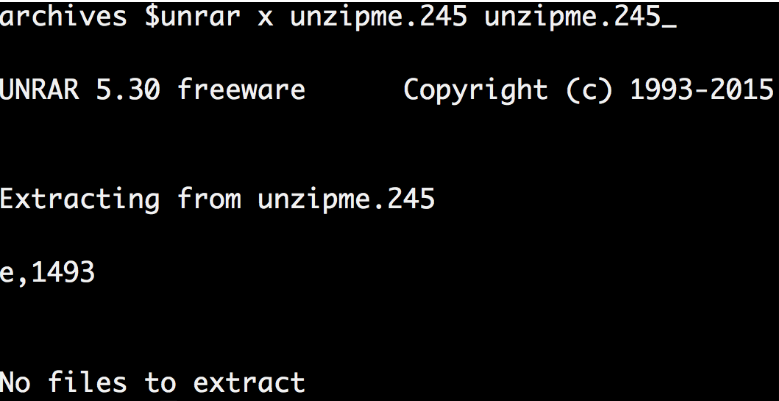
But then an unexpected one came out: the second file was not in zip, but in rar format.

So I had to “break it” to get to the comments:
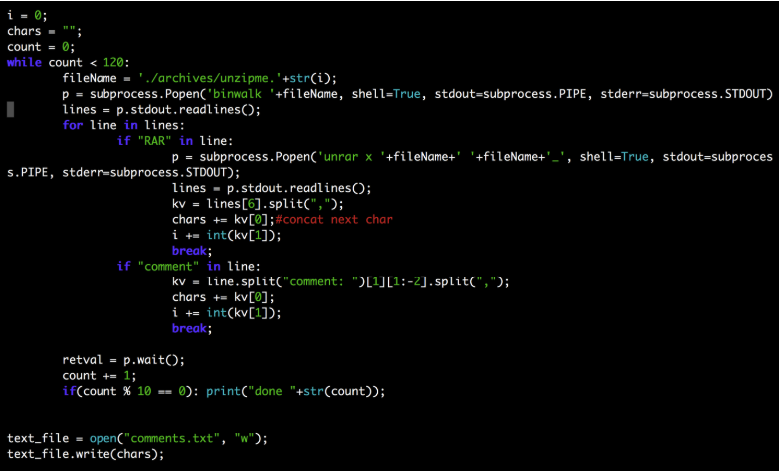
My logic was to run the file through binwalk, and if I ran across RAR, unpack it to get comments. Otherwise, see the comments section directly to understand what to do next.
My first guess: the number is the index of the file (each was numbered from 0 to 1999). However, I found that some numbers are negative, which means they cannot be an index.
The second guess is that the number is a leap, which may well be negative. For each number I needed a jump to the next file. I knew that if my code would constantly jump to the next computed file, it could create a small trap in the form of a whirl and my code would get stuck in an endless loop. So I wrote a python code with account limiting. And after several tests I found out that the number 120 would be quite enough:
And the flag was mine:
I described the other three in the next post, read, try, I will be happy for your comments
This summer, the leading Israeli company in the field of information security Checkpoint , published a series of cyber tests.
The tasks were divided into six categories:
• Logic
• Web
• Programming
• Networking
• Reversing
• Surprise
Two tasks for each direction. In this post I will tell you how only four tests took place, in the following three others:
CheckpointI already managed to win respect and interest on my part, so I decided to accept these challenges. However, in view of employment, I was able to allow myself to take on only 8 of 12 tasks (from four different categories). And I managed to solve 7 of them.
Challenge officially ended by the end of September 2018.
So now, with a clear conscience, I can tell you step by step how I broke through to solving the following tasks:
• Logical challenge “PNG ++”
• Web challenge “Robots return”
• Web challenge “Diego Gallery”
• Task for programming “Careful steps”
• Problem for programming "Jigsaw"
• Networking Challenge "Ping Pong"
• Networking Challenge "Protocol"
Challenge: PNG ++
Description:
This (link to an encrypted PNG file) image was encoded using a custom cipher.
We managed to read most of this code here (link to python code).
Unfortunately, someone sluggishly spilled coffee on the entire key_transformator.py.
Could you help us decipher this image?
Python code:
Encryption logic is as follows:
1. Set the key length (key size) to 4 bytes
2. Read the bytes of the flag.png file in the “img” variable
3. Add padding to the file to the first nearest number multiple of four. Padding is equal to the number of missing bytes. For example, if the file length is 29 bytes (missing 3), add three bytes with a decimal value 3 (ASCII 0x03). Or, in other words, padding bytes cannot be empty (ASCII 0x00), because its decimal value is zero, which does not imply padding.
4. Set the start key with four random capital letters ([AZ]).
5. Do the same with all the bytes in the file, encrypting the chains of four bytes
a time. Each byte in the file is fought byte from the key
b. The key is constantly converted to another key; key_transformator.transform (key)
c is responsible for this . Encrypted bytes are added to enc_data
6. Enter enc_data (encrypted bytes) in encrypted.png
To begin with, I checked the PNG format header and found that the first eight bytes are as follows:
[137, 80, 78, 71, 13, 10, 26, 10]
I took the first eight bytes of the encrypted file and copied them with these eight bytes: The
key of the first block was:
[85, 80, 82, 81]
And the second block — like this:
[86, 81, 83, 82]
Since each successive key is dynamically generated using the previous key (key = key_transformator.transform (key), I understood the algorithm: add one to each byte in the previous key:
85 -> 86
80 -> 81
82 -> 83
81 -> 82
And then I realized that in the name of the Challenge there was a nehily hint.
I wrote two “auxiliary functions”:
• “nextKey”, which recovers the next key based on the last
• • “nextChar”, which restores the next letter, and in most cases just increases by one, if it falls within the boundaries of the byte (255)
I am envelope ul source 4 bytes [85, 80 82, 81] in the letters: “UPRQ” and launched the reversal algorithm.
In the decrypted file the flag was specified:
Challenge: “The Return of the Robots”
Description: The
robots are cool, but trust me: their access should be limited! Check out (link)
Clicking on the link, you see a certain page dedicated to robots. Basically, everything leads to the fact that you should check for the presence of the file "robots.txt".
Adding ./robots.txt to the url we get the following:
I checked ./secret_login.html and came across the registration page.
Next, I checked the source code of the form to find the confirmation of the password and saw the Javascript:
It seems that when the value is confirmed, it is sent to authorization function, which decodes the passed value using the btoa function (base64 decoding function in Javascript) and then compares it with the string: “SzMzcFQjM1IwYjB0JDB1dA ==”.
I decoded this string
. I inserted the resulting value in the password string. Bingo!
Challenge: “Diego Gallery”
Description:
Recently, I started developing a platform to manage photos of my cat and protect my flag.txt. Please check my system (link to the registration form).
In order to avoid jambs in the security system, such as the ability to inject SQL code, I came up with my own scheme.
Her short description is available here (link to the diagram)
Registration form:
Schedule set:
After I set the test username and password, I got access to the cat's public gallery “Diego”.
Since I signed up as a regular user, I figured that it might be necessary to find a way to increase the privilege on PE (Privilege Escalation). Looking through the scheme for registered users, I saw that the difference between a normal user and the admin is contained in the third section of the scheme, divided by three lines.
Assuming that if the first value (user name) belongs to the first section, and the second (password) to the second, the system assigns the role immediately after the user logs in with current rights.
For example:
START ||| First value ||| Second value ||| user (Added by web service) ||| END
My payload was as follows:
• The first value: “niki ||| niki ||| admin ||| END \ nSTART ||| other “
• Second value:“ other ”
This probably generated the following lines of the journal:
START ||| niki ||| niki ||| admin ||| END
START ||| other ||| other ||| user ||| END
After that I was able to log in as admin and get full rights:
Clicking on the buttons only activates a warning that the flag is safe.
However, inside the URL you can read:
35.194.63.219/csa_2018/diegos_gallery/_nwryqcttstvs/admin-panel/index.php ? view = log.txt
Which very clearly alludes to LFI (Local File Inclusion) via URL
I tried:
35.194.63.219/csa_2018/diegos_gallery/_nwryqcttstvs/admin-panel/index.php?view=flag.txt
And the flag was mine.
Challenge: “Careful Steps”
Description:
This (link to file) is a bunch of archives we found. We are sure that the secret flag is hidden somewhere inside them.
We are absolutely sure that the data we are looking for is hidden in the comments section of each file.
Could you go carefully between the files and find the flag?
Good luck!
After extracting the file, you get a directory called “archives” with two thousand files inside, entitled “unzipme. [Number]”.
I used the binwalk program to check the first file. And that's what the program gave me:
Yeah, so in the comments section, we have letters and numbers. Hints again?
At first I wondered if I should link the letters with the given indexes from this zip file, and check the next file already with index 245.
But then an unexpected one came out: the second file was not in zip, but in rar format.
So I had to “break it” to get to the comments:
My logic was to run the file through binwalk, and if I ran across RAR, unpack it to get comments. Otherwise, see the comments section directly to understand what to do next.
My first guess: the number is the index of the file (each was numbered from 0 to 1999). However, I found that some numbers are negative, which means they cannot be an index.
The second guess is that the number is a leap, which may well be negative. For each number I needed a jump to the next file. I knew that if my code would constantly jump to the next computed file, it could create a small trap in the form of a whirl and my code would get stuck in an endless loop. So I wrote a python code with account limiting. And after several tests I found out that the number 120 would be quite enough:
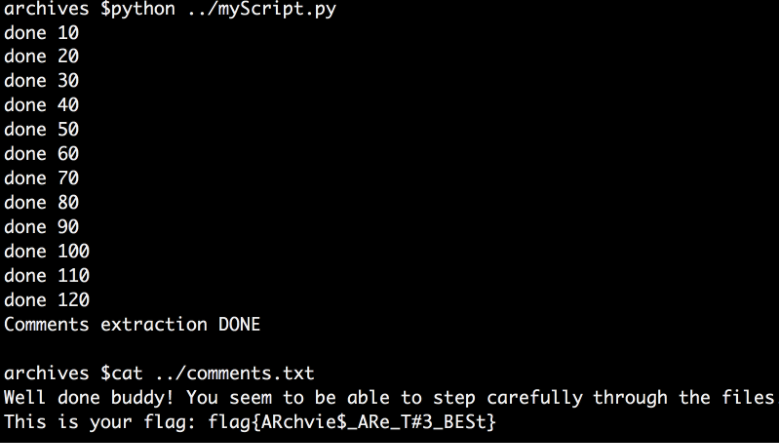
And the flag was mine:
I described the other three in the next post, read, try, I will be happy for your comments