Free Cluster (Proxmox + Nexenta)
- Tutorial
Probably many of us, solving the problem of organizing a small IT infrastructure, were faced with the problem of choosing a hypervisor. What functionality should software have and how much does it cost? But will one or another part of the solution be compatible with what is already there?
And how would it be to drive all this at the stand to make sure the right choice?
Given the rate of one well-known currency, I want something simple, no frills and, if possible, free. Especially when it comes to a small or medium-sized company (startup), limited in budget.
Of the Open-Source solutions, Proxmox is the easiest to install and configure. In order not to offend oVirt fans, etc. (this is not an advertising article), I will make a reservation that the initial requirement for ease of installation and administration, in my opinion, is still more expressed in Proxmox. Also, I repeat, we do not have a data center, but only a cluster of 2-3 nodes for a small company.
As a hypervisor, it uses KVM and LXC , respectively, it holds KVM OS (Linux, * BSD, Windows and others) with minimal loss of performance and Linux without loss.
The installation of the hypervisor is the simplest, download it from here : It is
installed in just a few clicks and the administrator password is entered.
After that, we are given a console window with an address for the web interface of the form
Next, set the second and third nodes, with a similar result.
1. Configure hosts on pve1.local:
2. Configure hosts on pve2.local:
3. By analogy, we configure hosts on pve3.local
4. On the server pve1.local, do the following:
5. On the pve2.local server, execute:
6. In the same way, we configure and add the third host pve3.local to the cluster.
Match the repository:
We comment on the unnecessary repository:
And updated (on each node, respectively):
Everything, the cluster is ready for battle!

Here, we already have a backup function out of the box (called backup), which captivates almost immediately!
Next, the question arises of choosing a common repository.
We select ISCSI (as the most budget option) Storage:
In principle, when configuring, you can restrict yourself to one interface, however, you cannot have one single point of failure in the cluster, therefore it is better to use multipath from Proxmox, or to combine interfaces from the storage itself.
Here, you can take some kind of commercial storage, disk shelf, etc.
Actually, the first test was carried out just with the solution from Infortrend .
But then again, what to do if the budget is limited simply (or it simply does not exist) ?!
The easiest way is to stuff the iron that is with the disks and make a storage out of it that allows you to achieve your goals.
As a result, we need opportunities (given the fact that the company can expand dramatically):
After some torment of choice, OpenFiler and NexentaStor remained . Of
course, I would like to use Starwind or FreeNAS ( NAS4Free ), but if one needs Windows and shamanism with ISCSI to work, then the other has the clustering function supplemented with a good file.
OpenFiler unfortunately has a meager GUI and its latest version is from 2011. So what remains is NexentaStor.
She, of course, already has an active-active operating scheme in the Nexenta cluster, if you need one in the future. Also, if there are 2 nodes (controller) in the storage, then supporting the second one is also for money! Actually, all plugins are available only in the Enterprise version.
However, what is available in the Community version covers most of the basic needs. This is 18TB of storage capacity, and ZFS with snapshots, and the ability to replicate out of the box!
First of all, you need to study the Compatibility List .
Download the distribution kit from here (registration is required to get the key for installation).
The installation procedure is as simple as possible, in its process we configure the IP address with the port for configuration in the GUI.
Further, sequentially clicking on the wizard's requests, we set the password and array in the GUI (in Nexenta it is called Volume).
Next, go to the SCSI Target section and sequentially create:
Further, in accordance with the manual :
Copy the key to each node:
There are two ways to hook up the ISCSI storage in Proxmox:
Through the ISCSI menu in the storage addition (you will have to create additional LVM) - see the manual .
Via the ZFS over ISCSI menu - see the manual .
We will go the second way, since it gives us the opportunity to create and store snapshots. Nexenta can also do this.
The configuration process in the GUI looks like this:
As a result, it turns out:
When configuring, do not confuse the pool name (in nexenta it is similar to Datastore):
Now we can choose how and what to backup.
We can make an automatic backup of VM to a remote storage directly from Proxmox:
i.e. go to the “Storage” tab and add an NFS array. This can be either an ordinary NAS storage or an xNIX server with a folder accessible via NFS (to whom it is more convenient). Then, specify the contents (backup).
Or, you can make replication using Nexenta tools:
Implemented in the GUI with the tabs Data Management -> Auto Services -> Auto-Tier Services -> Create .
Here we mean a remote repository (or just a Linux machine) with the Rsync service running. Therefore, before this we need to create a connection between the hosts.
Tabs Settings -> Network -> SSH-bind help to raise the connection.
Configurable fully through the GUI.
You can also see the status in the console:
Now check the health of the cluster.
We install VM, with Windows, with a disk in the shared storage, and try manual migration:
Works!
Great, now we check its fault tolerance, turn off the server via IPMI. We are waiting for the move. The machine automatically migrates after one and a half minutes.
What is the problem? Here you need to understand that the fencing mechanism in version 4.x has changed. Those. Whatchdog fencing is currently working, which does not have active hardware support. It will be fixed in version 4.2.
So what did we get in the end?
And we got a Production-ready cluster that supports most of the OS, with a simple management interface, the ability to multiple data backups (this is Proxmox and Nexentastor itself with snapshots and replication).
Plus, we always have the ability to scale and add features, both from Proxmox and from Nexenta (in this case you still have to buy a license).
And all this is completely free!
In my opinion, setting up all this does not require any special time expenditures or a detailed study of a variety of manuals.
Of course, a rake cannot do without some, here a comparison with ESXi + VMWare vCenter will be in favor of the latter. However, you can always ask a question on the support forum!
As a result, we got almost 100% of the functionality, most often used by the administrator of a small project (company), right out of the box. Therefore, I recommend everyone to think about whether it is worth spending money on unnecessary opportunities, if only they were licensed?
PS In the above experiment, the equipment used was:
4 x Flagman RX237.4-016LH STSS Servers consisting of:
Three out of four servers were used as nodes, one was clogged with 2TB disks and was used as storage.
In the first experiment, the ready-made Infortrend EonNAS 3016R storage system was used as a NAS . The
equipment was chosen not for performance testing, but for evaluating the concept of the solution as a whole.
It is possible that there are more optimal options for implementation. However, performance testing in different configurations was not part of the scope of this article.
Thank you for your attention, waiting for your comments!
And how would it be to drive all this at the stand to make sure the right choice?
Given the rate of one well-known currency, I want something simple, no frills and, if possible, free. Especially when it comes to a small or medium-sized company (startup), limited in budget.
What do we need?
- Hardware Compatible Hypervisor
- Cluster with admin access via web interface
- High Availability for Virtual Machines in a Cluster
- Backup and restore function out of the box
- Accessibility for understanding and work to the average administrator (yesterday’s student).
Of the Open-Source solutions, Proxmox is the easiest to install and configure. In order not to offend oVirt fans, etc. (this is not an advertising article), I will make a reservation that the initial requirement for ease of installation and administration, in my opinion, is still more expressed in Proxmox. Also, I repeat, we do not have a data center, but only a cluster of 2-3 nodes for a small company.
As a hypervisor, it uses KVM and LXC , respectively, it holds KVM OS (Linux, * BSD, Windows and others) with minimal loss of performance and Linux without loss.
So, let's go:
The installation of the hypervisor is the simplest, download it from here : It is
installed in just a few clicks and the administrator password is entered.
After that, we are given a console window with an address for the web interface of the form
172.16.2.150 : 8006(hereinafter addressing the test network).
Next, set the second and third nodes, with a similar result.
We launch a cluster:
1. Configure hosts on pve1.local:
root@pve1:~# nano /etc/hosts
127.0.0.1 localhost.localdomain localhost
172.16.2.170 pve1.local pve1 pvelocalhost
172.16.2.171 pve2.local pve2
2. Configure hosts on pve2.local:
root@pve2:~# nano /etc/hosts
127.0.0.1 localhost.localdomain localhost
172.16.2.171 pve2.local pve2 pvelocalhost
172.16.2.170 pve1.local pve1
3. By analogy, we configure hosts on pve3.local
4. On the server pve1.local, do the following:
root@pve1:~# pvecm create cluster
5. On the pve2.local server, execute:
root@pve2:~# pvecm add pve1
6. In the same way, we configure and add the third host pve3.local to the cluster.
We update all nodes:
Match the repository:
root@pve1:~# nano /etc/apt/sources.list
deb http://ftp.debian.org.ru/debian jessie main contrib
# PVE pve-no-subscription repository provided by proxmox.com, NOT recommended for production use
deb http://download.proxmox.com/debian jessie pve-no-subscription
# security updates
deb http://security.debian.org/ jessie/updates main contrib
We comment on the unnecessary repository:
root@pve1:~# nano /etc/apt/sources.list.d/pve-enterprise.list
# deb https://enterprise.proxmox.com/debian jessie pve-enterprise
And updated (on each node, respectively):
root@pve1:~# apt-get update && apt-get dist-upgrade
Everything, the cluster is ready for battle!
Here, we already have a backup function out of the box (called backup), which captivates almost immediately!
Storage:
Next, the question arises of choosing a common repository.
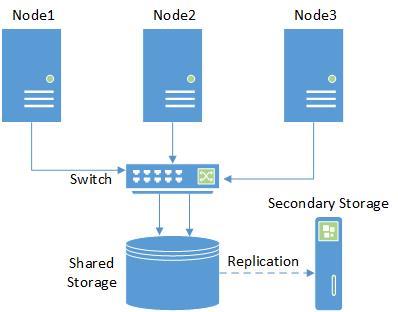
We select ISCSI (as the most budget option) Storage:
In principle, when configuring, you can restrict yourself to one interface, however, you cannot have one single point of failure in the cluster, therefore it is better to use multipath from Proxmox, or to combine interfaces from the storage itself.
Here, you can take some kind of commercial storage, disk shelf, etc.
Actually, the first test was carried out just with the solution from Infortrend .
But then again, what to do if the budget is limited simply (or it simply does not exist) ?!
The easiest way is to stuff the iron that is with the disks and make a storage out of it that allows you to achieve your goals.
As a result, we need opportunities (given the fact that the company can expand dramatically):
- Unified storage: NAS / SAN
- iSCSI target functionality
- CIFS, NFS, HTTP, FTP Protocols
- RAID 0,1,5,6,10 support
- Bare metal or virtualization installation
- 8TB + Journaled filesystems
- Filesystem Access Control Lists
- Point In Time Copy (snapshots) support
- Dynamic volume manager
- Powerful web-based management
- Block level remote replication
- High availability clustering
- Key features should be present in the Open-Cource / Community version.
After some torment of choice, OpenFiler and NexentaStor remained . Of
course, I would like to use Starwind or FreeNAS ( NAS4Free ), but if one needs Windows and shamanism with ISCSI to work, then the other has the clustering function supplemented with a good file.
OpenFiler unfortunately has a meager GUI and its latest version is from 2011. So what remains is NexentaStor.
She, of course, already has an active-active operating scheme in the Nexenta cluster, if you need one in the future. Also, if there are 2 nodes (controller) in the storage, then supporting the second one is also for money! Actually, all plugins are available only in the Enterprise version.
However, what is available in the Community version covers most of the basic needs. This is 18TB of storage capacity, and ZFS with snapshots, and the ability to replicate out of the box!
Install NexentaStor Community Edition:
First of all, you need to study the Compatibility List .
Download the distribution kit from here (registration is required to get the key for installation).
The installation procedure is as simple as possible, in its process we configure the IP address with the port for configuration in the GUI.
Further, sequentially clicking on the wizard's requests, we set the password and array in the GUI (in Nexenta it is called Volume).
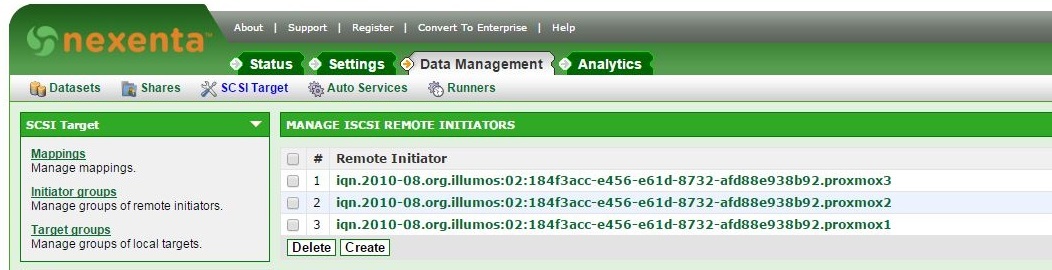
Next, go to the SCSI Target section and sequentially create:
- Target portal groups
- Targets
- Remote Initiators - for each node:
Further, in accordance with the manual :
root@pve1:~# mkdir /etc/pve/priv/zfs
root@pve1:~# ssh-keygen -f /etc/pve/priv/zfs/172.16.2.150_id_rsa
root@pve1:~# ssh-copy-id -i /etc/pve/priv/zfs/192.16.2.150_id_rsa.pub root@172.16.2.150
Copy the key to each node:
root@pve1:~# ssh -i /etc/pve/priv/zfs/172.16.2.150_id_rsa root@172.16.2.150
There are two ways to hook up the ISCSI storage in Proxmox:
Through the ISCSI menu in the storage addition (you will have to create additional LVM) - see the manual .
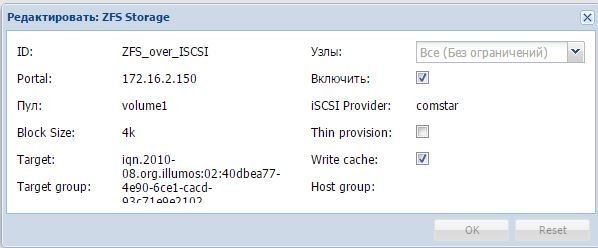
Via the ZFS over ISCSI menu - see the manual .
We will go the second way, since it gives us the opportunity to create and store snapshots. Nexenta can also do this.
The configuration process in the GUI looks like this:
As a result, it turns out:
When configuring, do not confuse the pool name (in nexenta it is similar to Datastore):
root@nexenta:~# zpool status
pool: volume1
state: ONLINE
scan: none requested
config:
NAME STATE READ WRITE CKSUM
volume1 ONLINE 0 0 0
c0t1d0 ONLINE 0 0 0
errors: No known data errors
Now we can choose how and what to backup.
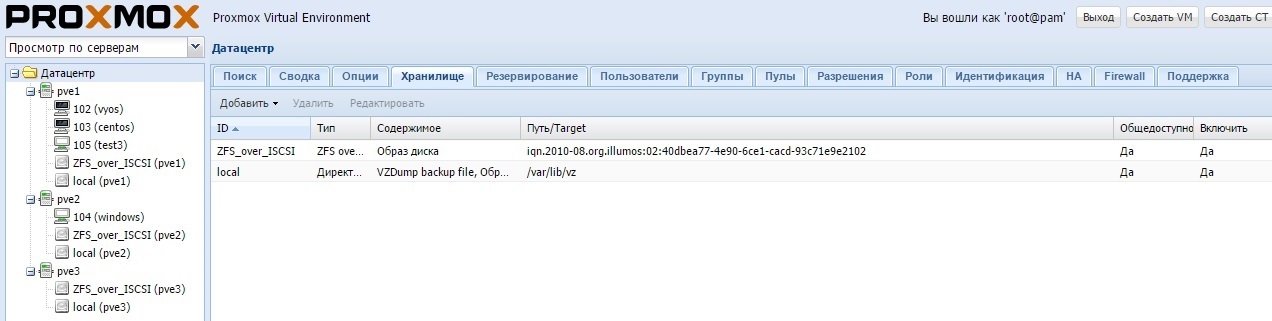
We can make an automatic backup of VM to a remote storage directly from Proxmox:
i.e. go to the “Storage” tab and add an NFS array. This can be either an ordinary NAS storage or an xNIX server with a folder accessible via NFS (to whom it is more convenient). Then, specify the contents (backup).
Or, you can make replication using Nexenta tools:
Implemented in the GUI with the tabs Data Management -> Auto Services -> Auto-Tier Services -> Create .
Here we mean a remote repository (or just a Linux machine) with the Rsync service running. Therefore, before this we need to create a connection between the hosts.
Tabs Settings -> Network -> SSH-bind help to raise the connection.
HA setup:
Configurable fully through the GUI.
- Select Data Center , click on the HA tab from above.
- Click the Groups below and create a group of hosts to which the VM can migrate.
- Next, click Resources and there we add the VM that we want.
You can also see the status in the console:
root@pve1:~# ha-manager status
quorum OK
master pve1 (active, Sun Mar 20 14:55:59 2016)
lrm pve1 (active, Sun Mar 20 14:56:02 2016)
lrm pve2 (active, Sun Mar 20 14:56:06 2016)
service vm:100 (pve1, started)
Now check the health of the cluster.
We install VM, with Windows, with a disk in the shared storage, and try manual migration:
Works!
Great, now we check its fault tolerance, turn off the server via IPMI. We are waiting for the move. The machine automatically migrates after one and a half minutes.
What is the problem? Here you need to understand that the fencing mechanism in version 4.x has changed. Those. Whatchdog fencing is currently working, which does not have active hardware support. It will be fixed in version 4.2.
Conclusion
So what did we get in the end?
And we got a Production-ready cluster that supports most of the OS, with a simple management interface, the ability to multiple data backups (this is Proxmox and Nexentastor itself with snapshots and replication).
Plus, we always have the ability to scale and add features, both from Proxmox and from Nexenta (in this case you still have to buy a license).
And all this is completely free!
In my opinion, setting up all this does not require any special time expenditures or a detailed study of a variety of manuals.
Of course, a rake cannot do without some, here a comparison with ESXi + VMWare vCenter will be in favor of the latter. However, you can always ask a question on the support forum!
As a result, we got almost 100% of the functionality, most often used by the administrator of a small project (company), right out of the box. Therefore, I recommend everyone to think about whether it is worth spending money on unnecessary opportunities, if only they were licensed?
PS In the above experiment, the equipment used was:
4 x Flagman RX237.4-016LH STSS Servers consisting of:
- X9DRi-LN4F +
- 2 x Xeon E5-2609
- 8 x 4GB DDR-III ECC
- ASR-6805 + FBWC
Three out of four servers were used as nodes, one was clogged with 2TB disks and was used as storage.
In the first experiment, the ready-made Infortrend EonNAS 3016R storage system was used as a NAS . The
equipment was chosen not for performance testing, but for evaluating the concept of the solution as a whole.
It is possible that there are more optimal options for implementation. However, performance testing in different configurations was not part of the scope of this article.
Thank you for your attention, waiting for your comments!