Android runtime permissions. Why, why, and how
Often when installing an application on Android, we had to see that it was requesting some incredible amount of permissions. For instance:

Well, if you install the application from some well-known developer that you can trust. But it is very suspicious if you install a new music player, and it needs to get your location, for example. Or, moreover, a flashlight requiring access to SMS and calls.
Some developers, in order to reduce distrust, add information about why this or that permission is needed in the description of the application on Google Play.
By the sixth version of Android, the situation has changed. Now permission needs to be requested in the process. About how this new opportunity to use and some of its pitfalls will be discussed later.
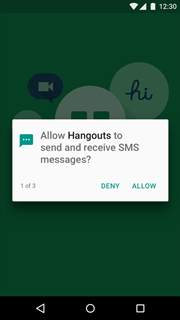
Just like this happens on iOS, when prompted, a system dialog will appear asking for permission.
The difference is that after clicking on the “Deny” button, the permission will not be completely prohibited for the application, as it happens with Apple. It can be requested again, but in this case the option “Never ask again” will appear, after selecting which “Deny” works as “Don’t allow” in iOS.
Permissions are divided into two types (there are others, but they do not interest us):
Typical permissions will be obtained by the application during installation, no confirmation from the user will be required (a bit of a controversial moment, in my opinion, it would be worth notifying the user about mandatory permissions). In the future, it will be impossible to recall them from the application. Dangerous ones should be requested during the operation of the application and can be withdrawn at any time. A list of dangerous and not very permissions can be found here .
You can see that access to the Internet is not considered dangerous. Everyone who uses advertising in their programs can breathe a sigh of relief: disabling it simply by selecting permission will fail (you can still just turn off the Internet, but the fact remains).
In order to revoke the permission that was issued earlier (or grant it if you selected “Never ask again”), go to the application settings (Settings-> Apps -> * AppName *) in the Permissions section and click on the corresponding switches. In this menu you can also see all the permissions of this program by selecting “All permissions” from the context menu. It is also possible to view which applications have a specific permission (and, accordingly, provide or select it). To do this, in the settings in the Apps section, click on the menu with the gear icon and select App permissions in the section that opens. Next, by selecting the desired resolution, you can see all the applications that need it.
Let's see how to interact with the user. Let's start directly with the permission request. With normal permissions, everything is clear, this is the task of the application installer, we are not interested in this, and how we will request dangerous permissions depends on two things.
The first one is the importance of this permission for your application, it depends on when you need to make a request. If the function is critical and without it the program will not make sense, then feel free to ask for permission right at application launch. For example, if you are developing an application for exchanging sms, then without appropriate permissions, nothing can be done with it, it loses all meaning. And if the user fails, then do not skip it further, but give the opportunity to call up the query dialog again and give instructions on what to do.
If permission requires a certain secondary function, then you do not need to ask for it right away. Do this only when the user wants to take this opportunity.
The second point is how clear it will be to a person why this permission is needed. Why does the SMS application need access to the calendar? Probably, for some cool function that will facilitate the transfer of dates from messages to the calendar and the like. But only you know about it, so first you need to explain the reason for the request and show what possibilities will give access to this permission. This applies to both primary and secondary permissions.
Once again briefly:
In the case when you still refused, an explanation of the reason next time is mandatory. And if, in addition to refusal, the user asked you to never ask for this permission using the “Never ask again” option, but is trying to use the corresponding application function, suggest that he go to your program’s settings and manually enable the necessary permissions. This is especially important if the resolution is critical for the program to work.
The logical question will be: what happens if you run your Android Marshmallow application that is not adapted for runtime permissions? The answer depends on whether you dared to change targetSdk to version 23 (we are not interested in compileSdk and buildTools in this case). If so, then I have not the best news for you: it is very likely that you will get a SecurityException. This will not necessarily be so, perhaps somewhere you will get null instead of the requested information, but the probability is far from zero. If you use targetSdk version 22 and lower, then all permissions will be issued to the application during installation, including dangerous ones, as before. This does not mean that the user can withdraw any of them after installation. At the same time, he will receive a warning that the application is not adapted for runtime permissions and may not work correctly.
But even if everything is fine with the checks and you don’t have the opportunity to implement new features, it’s worth checking over whether everything works correctly, because sometimes you can get null not where you expect it. So, for example, when using Environment.getExternalStorageDirectory () without permission from the Storage group, we get File, but list () will return us the cherished null. The documentation describes this outcome, but for a situation where File is not a directory. So the check in any case will not be superfluous.
It is possible to add permission only for Android M and higher. For this in the manifest you need to use the new tag (previously called ) Its syntax is similar to the usual. This can be useful if you want to add a feature to your existing application that requires additional permission. As you remember, if the new version of the program requires additional rights, the user must manually confirm its update. This can be avoided if the new function is not very important by disabling it for earlier versions of the system using the tag described earlier. In this case, this permission will be completely absent.
During debugging, you often have to enable / disable permissions. To go for this every time in the application settings is not very convenient. Fortunately, this can be done using adb:
And a few more useful commands, the meaning of which is clear from the name:
Let's move on to the immediate implementation (first, let's not forget to update compileSdkVersion and targetSdkVersion to version 23).
Until the moment when Marshmallow becomes the minimum version of android for your applications, it is still far away, so you need to take care of backward compatibility. Of course, you can do sdk version checks, but why, if everything is implemented for us in the support library v4 (ActivityCompat) and v13 (FragmentCompat). If you still need original methods, then finding them will not be difficult.
All examples use ActivityCompat, as they were made for activity. For fragment, you need to use FragmentCompat. If for some reason you are not using activity and fragment from the support libraries, then you need to implement the ActivityCompat.OnRequestPermissionsResultCallback or FragmentCompat.OnRequestPermissionsResultCallback interface, respectively.
Every time we want to use a method that requires dangerous permission, we need to check whether we have it. To do this, use the ContextCompat.checkSelfPermission (Context context, String permission) method, which returns one of the int values: PackageManager.PERMISSION_GRANTED if there is permission or PackageManager.PERMISSION_DENIED if it does not. The permission name is one of the constants of the Manifest.permission class.
Further, if there is permission, we perform the action we need, and if not, then we need to request it. At the same time, you can request several permissions (the user will be shown in turn a request for each of them), if necessary.
It is worth mentioning that if permissions are in the same permission group, then requesting one of them is enough, since all other elements of this group will also be available. But you don’t need to do that. Because in the future the composition of the groups may change, therefore, when requesting permissions, it is not necessary to make assumptions as to whether they are in the same group or not.
UPDas if to confirm the previous paragraph, starting with Android 8.0, permissions from one permission group are not issued immediately - each permission needs to be requested separately, but all permissions from one group will be issued automatically, without user intervention at their first request.
UPD2 the same behavior was noticed on Android 7.0 - if some of the permissions from the group are issued (I can’t say with certainty whether any of them matter), then the rest will be issued upon request immediately without showing a dialog. This can cause problems if your application explains to the user why she needs this or that permission even before his request. In real life, this rarely happens (only when using adb commands), but you should consider this when debugging an application.
For the request, the method ActivityCompat.requestPermissions (Activity activity, String [] permissions, int requestCode) is used. The permissions array accordingly contains the names of the permissions you want to request. This shows that you can simultaneously request multiple permissions. requestCode - a value by which it will be possible in the future to determine which permission request you received an answer to, similar to how we get the result from activity using startActivityForResult. By the way, if you look at the requestPermission code, you will find that this is just a special version of startActivityForResult.
As you can see, you can only directly request permissions from Activity or Fragment. If the service requires permission, you will have to start the Activity, from which you can already make a request. It’s best to show a notification containing information about the missing permission with a button to start this Activity itself.
The result of the permission request should be processed in onRequestPermissionsResult (int requestCode, @NonNull String [] permissions, @NonNull int [] grantResults). The requestCode and permissions parameters contain the data that you passed when requesting permissions. The main data here is the grantResults array, which contains information on whether permissions are received or not. Each i-th element of permissions corresponds to the i-th element of grantResults. Their possible values are similar to the result of checkSelfPermission.
The size of the grantResults array is checked to ensure that the permission request has not been interrupted (in this case, permissions and grantResults will not contain any elements). This situation should not be considered as a prohibition of permission, but as a cancellation of a request for it.
If you previously requested permission, but the user refused to provide it, you must explain to him the reason for the request. This does not need to be done if the reason you are requesting permission is absolutely clear. If there is a chance that the question “Why does the application need this?” Arises, then explaining this is highly desirable. In order to find out if an explanation should be shown there is a method shouldShowRequestPermissionRationale (@NonNull Activity activity, @NonNull String permission), which returns boolean. The explanation itself can be implemented, for example, using the Snackbar with an action button, by clicking on which a permission request is made, or a dialog box if permission is critically needed.
One of the problems may be the option “Never ask again”, which appears when you re-request permission, after the user has already refused earlier. As the name implies, when you select it, the query dialog will no longer appear. shouldShowRequestPermissionRationale will return false, and in onRequestPermissionsResult the result is PackageManager.PERMISSION_DENIED. And we will get permission only if you enable it directly through the application settings in the Permissions section.
What can be done with this? First of all, of course, tell the user that there are no necessary rights to perform the action. Further, a possible action might be a proposal to go to the settings and grant this permission manually. Not the best option, but better than nothing. This can be implemented again using the Snackbar with an action button.
Going directly to the permissions page will fail, so the best thing you can do is open your app’s settings. After this, you can, for example, show Toast with information on what needs to be done.
The example uses startActivityForResult and onActivityResult to determine that the user has returned from the activity settings back to the application and try to perform an action that could not be done without the necessary permission. In the showExtDirFilesCount method, you need to check again if there is a permission to make sure that the user still issued it.
Here a situation may arise that doesn’t particularly bother if you use Snackbar to show rationale, but it spoils the UX if you decide to use dialogs (we don’t touch on the reasons for this decision). Namely, the double appearance of rationale, before and after a permission request. How can this happen? We have only two methods by which we can judge the status of permission. The problem is that before the permission request, the situation when we have never requested this permission, and the situation when the user previously selected “Never ask again”, are absolutely identical in value. Namely, checkSeflPermission returns PERMISSION_DENIED, a shouldShowRequestPermissionRationale - false. So, we will show the dialog for opening the settings in onRequestPermissionsResult, where the value of shouldShowRequestPermissionRationale will definitely be different for these two situations. Everything is fine? Not really. In this callback, you cannot determine in any way whether rationale has been shown or not. Therefore, if you show the reason for the request, and then the user asks him not to ask about this permission anymore, after clicking on the DENY button he will get another rationale dialog inviting him to the program settings. Good programs don't do that.
What to do in such a situation? There are a couple of not-so-beautiful solutions on the network: one of them is to save information in SharedPreferences whether there is permission or not, the other is to keep a flag indicating whether rationale was shown or not inside the class. The first solution is not good because while the application does not work, the user can change the permission settings and the information in the preferences will be irrelevant. The second method is not very beautiful.
A good option (in my opinion) would be to have two requestCode for each request, one for use in rationale of the other in other cases. This method is also not ideal and not particularly beautiful, but it helps to stick to existing methods without introducing anything new.
There is another important recommendation when using runtime permissions. Do not use them. More precisely, use it, but only when the functionality that you are going to implement with their help has not been done by someone before you.
As the most illustrative example, the camera is most often recalled. Use the standard camera application (or other applications that can do this) if you just need to take a photo without any special logic. Intents will help you with this ( more ).
Thus, you can get rid of some dangerous permissions and simplify the work with the application.
The new system should attract the attention of users to the permissions issued to the program. In turn, this can reduce the number of malicious programs that were previously based on the carelessness of people (although, of course, now you can mindlessly resolve everything that the application asks for). It also increases confidence in the products of bona fide developers, reducing the number of questions that users have. Of course, developers will have to write more code to implement new features, and the methods that have to be used for this are far from ideal (developers of numerous libraries try to solve this, which I would like to talk about in the next article). But, despite these difficulties, Google took the right step by introducing this feature, since it was necessary for a user-friendly system.
Well, if you install the application from some well-known developer that you can trust. But it is very suspicious if you install a new music player, and it needs to get your location, for example. Or, moreover, a flashlight requiring access to SMS and calls.
Some developers, in order to reduce distrust, add information about why this or that permission is needed in the description of the application on Google Play.
By the sixth version of Android, the situation has changed. Now permission needs to be requested in the process. About how this new opportunity to use and some of its pitfalls will be discussed later.
general information
Just like this happens on iOS, when prompted, a system dialog will appear asking for permission.
 |  |
The difference is that after clicking on the “Deny” button, the permission will not be completely prohibited for the application, as it happens with Apple. It can be requested again, but in this case the option “Never ask again” will appear, after selecting which “Deny” works as “Don’t allow” in iOS.
Permissions are divided into two types (there are others, but they do not interest us):
- normal
- dangerous (dangerous).
Typical permissions will be obtained by the application during installation, no confirmation from the user will be required (a bit of a controversial moment, in my opinion, it would be worth notifying the user about mandatory permissions). In the future, it will be impossible to recall them from the application. Dangerous ones should be requested during the operation of the application and can be withdrawn at any time. A list of dangerous and not very permissions can be found here .
You can see that access to the Internet is not considered dangerous. Everyone who uses advertising in their programs can breathe a sigh of relief: disabling it simply by selecting permission will fail (you can still just turn off the Internet, but the fact remains).
In order to revoke the permission that was issued earlier (or grant it if you selected “Never ask again”), go to the application settings (Settings-> Apps -> * AppName *) in the Permissions section and click on the corresponding switches. In this menu you can also see all the permissions of this program by selecting “All permissions” from the context menu. It is also possible to view which applications have a specific permission (and, accordingly, provide or select it). To do this, in the settings in the Apps section, click on the menu with the gear icon and select App permissions in the section that opens. Next, by selecting the desired resolution, you can see all the applications that need it.
 |  |
User interaction
Let's see how to interact with the user. Let's start directly with the permission request. With normal permissions, everything is clear, this is the task of the application installer, we are not interested in this, and how we will request dangerous permissions depends on two things.
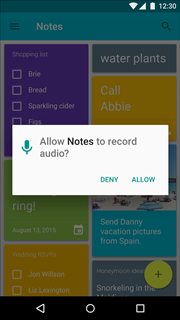
The first one is the importance of this permission for your application, it depends on when you need to make a request. If the function is critical and without it the program will not make sense, then feel free to ask for permission right at application launch. For example, if you are developing an application for exchanging sms, then without appropriate permissions, nothing can be done with it, it loses all meaning. And if the user fails, then do not skip it further, but give the opportunity to call up the query dialog again and give instructions on what to do.
If permission requires a certain secondary function, then you do not need to ask for it right away. Do this only when the user wants to take this opportunity.
 |  |
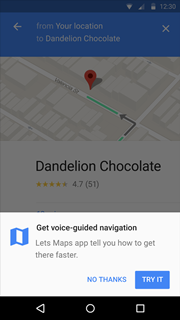
The second point is how clear it will be to a person why this permission is needed. Why does the SMS application need access to the calendar? Probably, for some cool function that will facilitate the transfer of dates from messages to the calendar and the like. But only you know about it, so first you need to explain the reason for the request and show what possibilities will give access to this permission. This applies to both primary and secondary permissions.
 |  |
Once again briefly:
- we ask for important permissions at startup, secondary permissions when using the corresponding function for the first time;
- If you understand why you need permission hard, we provide an explanation.
In the case when you still refused, an explanation of the reason next time is mandatory. And if, in addition to refusal, the user asked you to never ask for this permission using the “Never ask again” option, but is trying to use the corresponding application function, suggest that he go to your program’s settings and manually enable the necessary permissions. This is especially important if the resolution is critical for the program to work.
 |  |
The code
The logical question will be: what happens if you run your Android Marshmallow application that is not adapted for runtime permissions? The answer depends on whether you dared to change targetSdk to version 23 (we are not interested in compileSdk and buildTools in this case). If so, then I have not the best news for you: it is very likely that you will get a SecurityException. This will not necessarily be so, perhaps somewhere you will get null instead of the requested information, but the probability is far from zero. If you use targetSdk version 22 and lower, then all permissions will be issued to the application during installation, including dangerous ones, as before. This does not mean that the user can withdraw any of them after installation. At the same time, he will receive a warning that the application is not adapted for runtime permissions and may not work correctly.
But even if everything is fine with the checks and you don’t have the opportunity to implement new features, it’s worth checking over whether everything works correctly, because sometimes you can get null not where you expect it. So, for example, when using Environment.getExternalStorageDirectory () without permission from the Storage group, we get File, but list () will return us the cherished null. The documentation describes this outcome, but for a situation where File is not a directory. So the check in any case will not be superfluous.
It is possible to add permission only for Android M and higher. For this in the manifest you need to use the new tag
During debugging, you often have to enable / disable permissions. To go for this every time in the application settings is not very convenient. Fortunately, this can be done using adb:
adb shell pm grant
adb shell pm revoke
And a few more useful commands, the meaning of which is clear from the name:
adb shell pm reset-permissions
adb shell pm list permission-groups
adb shell pm list permissions
Let's move on to the immediate implementation (first, let's not forget to update compileSdkVersion and targetSdkVersion to version 23).
Until the moment when Marshmallow becomes the minimum version of android for your applications, it is still far away, so you need to take care of backward compatibility. Of course, you can do sdk version checks, but why, if everything is implemented for us in the support library v4 (ActivityCompat) and v13 (FragmentCompat). If you still need original methods, then finding them will not be difficult.
All examples use ActivityCompat, as they were made for activity. For fragment, you need to use FragmentCompat. If for some reason you are not using activity and fragment from the support libraries, then you need to implement the ActivityCompat.OnRequestPermissionsResultCallback or FragmentCompat.OnRequestPermissionsResultCallback interface, respectively.
Every time we want to use a method that requires dangerous permission, we need to check whether we have it. To do this, use the ContextCompat.checkSelfPermission (Context context, String permission) method, which returns one of the int values: PackageManager.PERMISSION_GRANTED if there is permission or PackageManager.PERMISSION_DENIED if it does not. The permission name is one of the constants of the Manifest.permission class.
@Nullable
public File[] getExternalStorageFiles() {
   if (ContextCompat.checkSelfPermission(this, Manifest.permission.READ_EXTERNAL_STORAGE)
           == PackageManager.PERMISSION_GRANTED) {
       final File externalStorage = Environment.getExternalStorageDirectory();
       if (externalStorage != null) {
           return externalStorage.listFiles();
       }
   }
   return null;
}
Further, if there is permission, we perform the action we need, and if not, then we need to request it. At the same time, you can request several permissions (the user will be shown in turn a request for each of them), if necessary.
It is worth mentioning that if permissions are in the same permission group, then requesting one of them is enough, since all other elements of this group will also be available. But you don’t need to do that. Because in the future the composition of the groups may change, therefore, when requesting permissions, it is not necessary to make assumptions as to whether they are in the same group or not.
UPDas if to confirm the previous paragraph, starting with Android 8.0, permissions from one permission group are not issued immediately - each permission needs to be requested separately, but all permissions from one group will be issued automatically, without user intervention at their first request.
UPD2 the same behavior was noticed on Android 7.0 - if some of the permissions from the group are issued (I can’t say with certainty whether any of them matter), then the rest will be issued upon request immediately without showing a dialog. This can cause problems if your application explains to the user why she needs this or that permission even before his request. In real life, this rarely happens (only when using adb commands), but you should consider this when debugging an application.
For the request, the method ActivityCompat.requestPermissions (Activity activity, String [] permissions, int requestCode) is used. The permissions array accordingly contains the names of the permissions you want to request. This shows that you can simultaneously request multiple permissions. requestCode - a value by which it will be possible in the future to determine which permission request you received an answer to, similar to how we get the result from activity using startActivityForResult. By the way, if you look at the requestPermission code, you will find that this is just a special version of startActivityForResult.
public void requestMultiplePermissions() {
   ActivityCompat.requestPermissions(this,
           new String[] {
                   Manifest.permission.READ_EXTERNAL_STORAGE,
                   Manifest.permission.READ_SMS
           },
           PERMISSION_REQUEST_CODE);
}
As you can see, you can only directly request permissions from Activity or Fragment. If the service requires permission, you will have to start the Activity, from which you can already make a request. It’s best to show a notification containing information about the missing permission with a button to start this Activity itself.
The result of the permission request should be processed in onRequestPermissionsResult (int requestCode, @NonNull String [] permissions, @NonNull int [] grantResults). The requestCode and permissions parameters contain the data that you passed when requesting permissions. The main data here is the grantResults array, which contains information on whether permissions are received or not. Each i-th element of permissions corresponds to the i-th element of grantResults. Their possible values are similar to the result of checkSelfPermission.
@Override
public void onRequestPermissionsResult(int requestCode, @NonNull String[] permissions,
                                      @NonNull int[] grantResults) {
   if (requestCode == PERMISSION_REQUEST_CODE && grantResults.length == 2) {
       if (grantResults[0] == PackageManager.PERMISSION_GRANTED) {
           showExtDirFilesCount();
       }
       if (grantResults[1] == PackageManager.PERMISSION_GRANTED) {
           showUnreadSmsCount();
       }
   }
   super.onRequestPermissionsResult(requestCode, permissions, grantResults);
}
The size of the grantResults array is checked to ensure that the permission request has not been interrupted (in this case, permissions and grantResults will not contain any elements). This situation should not be considered as a prohibition of permission, but as a cancellation of a request for it.
If you previously requested permission, but the user refused to provide it, you must explain to him the reason for the request. This does not need to be done if the reason you are requesting permission is absolutely clear. If there is a chance that the question “Why does the application need this?” Arises, then explaining this is highly desirable. In order to find out if an explanation should be shown there is a method shouldShowRequestPermissionRationale (@NonNull Activity activity, @NonNull String permission), which returns boolean. The explanation itself can be implemented, for example, using the Snackbar with an action button, by clicking on which a permission request is made, or a dialog box if permission is critically needed.
public void requestPermissionWithRationale() {
   if (ActivityCompat.shouldShowRequestPermissionRationale(this,
           Manifest.permission.READ_EXTERNAL_STORAGE)) {
       final String message = "Storage permission is needed to show files count";
       Snackbar.make(view_, message, Snackbar.LENGTH_LONG)
               .setAction("GRANT", new View.OnClickListener() {
                   @Override
                   public void onClick(View v) {
                       requestReadExtStorage();
                   }
               })
               .show();
   } else {
       requestReadExtStorage();
   }
}
Never ask again
One of the problems may be the option “Never ask again”, which appears when you re-request permission, after the user has already refused earlier. As the name implies, when you select it, the query dialog will no longer appear. shouldShowRequestPermissionRationale will return false, and in onRequestPermissionsResult the result is PackageManager.PERMISSION_DENIED. And we will get permission only if you enable it directly through the application settings in the Permissions section.
What can be done with this? First of all, of course, tell the user that there are no necessary rights to perform the action. Further, a possible action might be a proposal to go to the settings and grant this permission manually. Not the best option, but better than nothing. This can be implemented again using the Snackbar with an action button.
Going directly to the permissions page will fail, so the best thing you can do is open your app’s settings. After this, you can, for example, show Toast with information on what needs to be done.
public void showNoStoragePermissionSnackbar() {
   Snackbar.make(view_, "Storage permission isn't granted" , Snackbar.LENGTH_LONG)
           .setAction("SETTINGS", new View.OnClickListener() {
               @Override
               public void onClick(View v) {
                   openApplicationSettings();
                   Toast.makeText(getApplicationContext(),
                           "Open Permissions and grant the Storage permission",
                           Toast.LENGTH_SHORT)
                           .show();
               }
           })
           .show();
}
public void openApplicationSettings() {
   Intent appSettingsIntent = new Intent(Settings.ACTION_APPLICATION_DETAILS_SETTINGS,
           Uri.parse("package:" + getPackageName()));
   startActivityForResult(appSettingsIntent, PERMISSION_REQUEST_CODE);
}
@Override
protected void onActivityResult(int requestCode, int resultCode, Intent data) {
   if (requestCode == PERMISSION_REQUEST_CODE) {
       showExtDirFilesCount();
       return;
   }
   super.onActivityResult(requestCode, resultCode, data);
}
The example uses startActivityForResult and onActivityResult to determine that the user has returned from the activity settings back to the application and try to perform an action that could not be done without the necessary permission. In the showExtDirFilesCount method, you need to check again if there is a permission to make sure that the user still issued it.
Here a situation may arise that doesn’t particularly bother if you use Snackbar to show rationale, but it spoils the UX if you decide to use dialogs (we don’t touch on the reasons for this decision). Namely, the double appearance of rationale, before and after a permission request. How can this happen? We have only two methods by which we can judge the status of permission. The problem is that before the permission request, the situation when we have never requested this permission, and the situation when the user previously selected “Never ask again”, are absolutely identical in value. Namely, checkSeflPermission returns PERMISSION_DENIED, a shouldShowRequestPermissionRationale - false. So, we will show the dialog for opening the settings in onRequestPermissionsResult, where the value of shouldShowRequestPermissionRationale will definitely be different for these two situations. Everything is fine? Not really. In this callback, you cannot determine in any way whether rationale has been shown or not. Therefore, if you show the reason for the request, and then the user asks him not to ask about this permission anymore, after clicking on the DENY button he will get another rationale dialog inviting him to the program settings. Good programs don't do that.
What to do in such a situation? There are a couple of not-so-beautiful solutions on the network: one of them is to save information in SharedPreferences whether there is permission or not, the other is to keep a flag indicating whether rationale was shown or not inside the class. The first solution is not good because while the application does not work, the user can change the permission settings and the information in the preferences will be irrelevant. The second method is not very beautiful.
A good option (in my opinion) would be to have two requestCode for each request, one for use in rationale of the other in other cases. This method is also not ideal and not particularly beautiful, but it helps to stick to existing methods without introducing anything new.
Intent
There is another important recommendation when using runtime permissions. Do not use them. More precisely, use it, but only when the functionality that you are going to implement with their help has not been done by someone before you.
As the most illustrative example, the camera is most often recalled. Use the standard camera application (or other applications that can do this) if you just need to take a photo without any special logic. Intents will help you with this ( more ).
Thus, you can get rid of some dangerous permissions and simplify the work with the application.
Conclusion
The new system should attract the attention of users to the permissions issued to the program. In turn, this can reduce the number of malicious programs that were previously based on the carelessness of people (although, of course, now you can mindlessly resolve everything that the application asks for). It also increases confidence in the products of bona fide developers, reducing the number of questions that users have. Of course, developers will have to write more code to implement new features, and the methods that have to be used for this are far from ideal (developers of numerous libraries try to solve this, which I would like to talk about in the next article). But, despite these difficulties, Google took the right step by introducing this feature, since it was necessary for a user-friendly system.