HTML and CSS in Oracle Application Express. Part 1
- Tutorial
In this article, I would like to talk a little about how to work with HTML and CSS in apex.
I’ve already heard several times about cases when they refused to use the apex because “it’s ugly”. Usually the problem was that in the apex there is some kind of imposition by default, and all the means for working with it are hidden quite far away and do not rush into the eyes, because of which it seems that what is inherent in it by default is ceiling of his capabilities. I, like a real apex fan, just could not pass by. "Beautifully" in the apex can also be done if you know how.
I will try to make the article useful for two categories of people at once. The first is PL / SQL developers who are just starting to learn apex and web development for which there is still a dark forest. The second is web developers who have long been at the top with the layout, and who are faced with the task: "here is the apex, you need to do it beautifully." I want to warn you right away that I myself belong to the first category of apex developers.
Let's go from simple to complex. First, I’ll talk about how to slightly modify the standard components with a file, and end with global things - creating my own themes.
You can study CSS, HTML and tools for working with them for a long time, I will try to describe a certain minimum necessary for applying CSS / HTML and understanding this article:
It is advisable to familiarize yourself in advance and in general terms imagine:
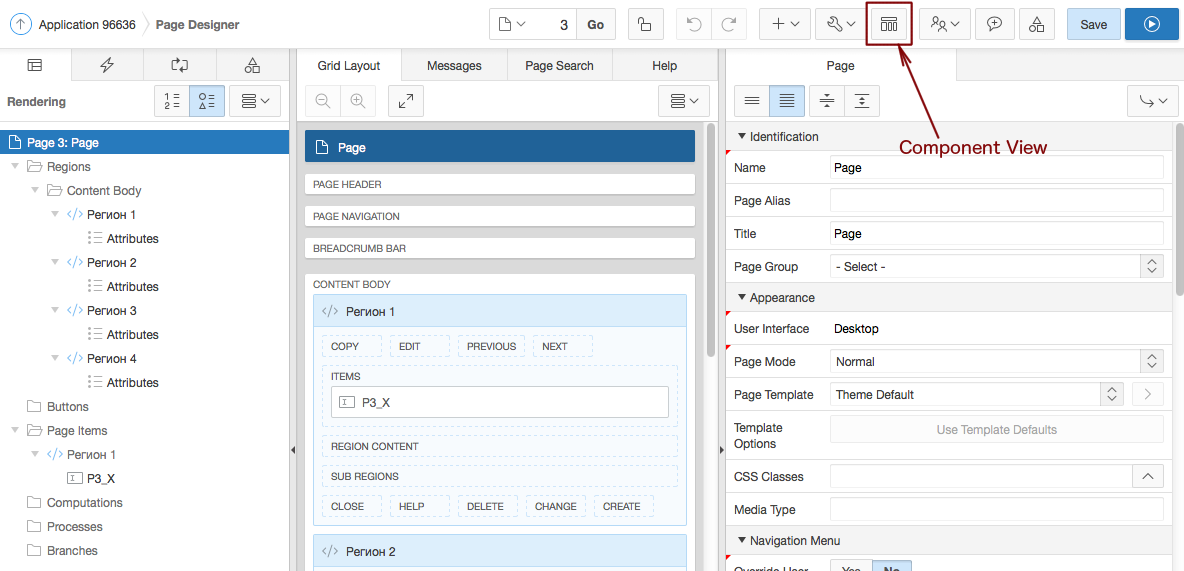
When you edit a page in apex, by default, the page is displayed in Page Designer mode. I like the Component View mode more, I prefer to work in it. You can switch to it by clicking the “Component View” button: The
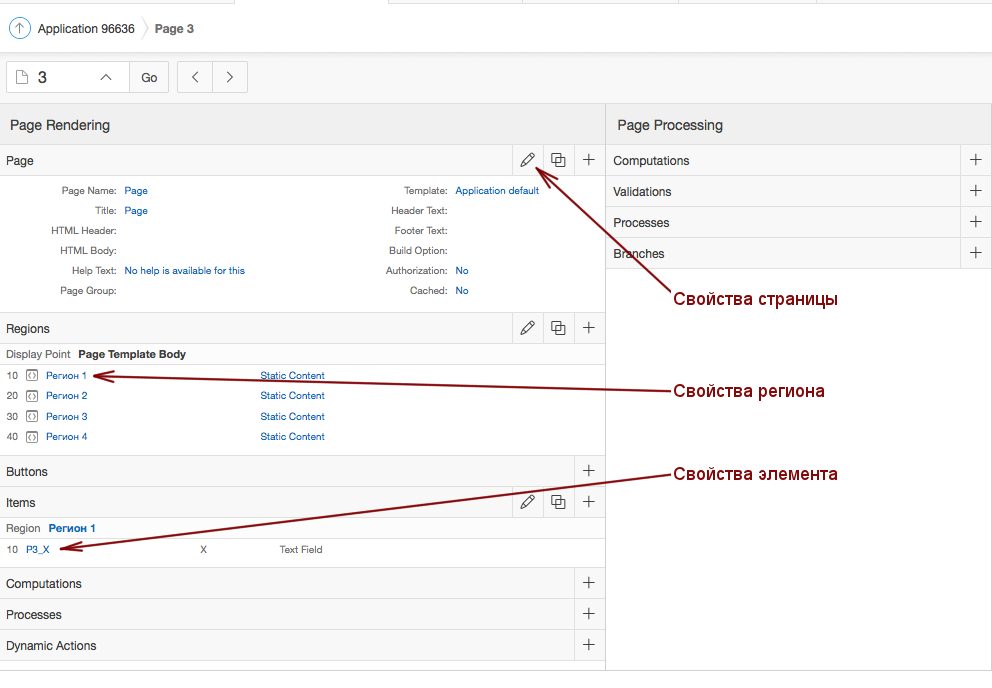
properties of the page, regions and elements are here (this is the “Component View” mode):
Create a region and an input field:
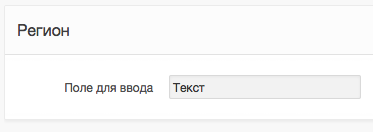
Next, go to the properties of the input field. There are two main bookmarks responsible for layout: “Grid Layout” and “Element”. The first of them is responsible for the position of the element relative to other elements and is currently more likely to be of historical interest.
I’ve already heard several times about cases when they refused to use the apex because “it’s ugly”. Usually the problem was that in the apex there is some kind of imposition by default, and all the means for working with it are hidden quite far away and do not rush into the eyes, because of which it seems that what is inherent in it by default is ceiling of his capabilities. I, like a real apex fan, just could not pass by. "Beautifully" in the apex can also be done if you know how.
I will try to make the article useful for two categories of people at once. The first is PL / SQL developers who are just starting to learn apex and web development for which there is still a dark forest. The second is web developers who have long been at the top with the layout, and who are faced with the task: "here is the apex, you need to do it beautifully." I want to warn you right away that I myself belong to the first category of apex developers.
Let's go from simple to complex. First, I’ll talk about how to slightly modify the standard components with a file, and end with global things - creating my own themes.
A little digression for PL / SQL developers
You can study CSS, HTML and tools for working with them for a long time, I will try to describe a certain minimum necessary for applying CSS / HTML and understanding this article:
- Get debugging tools, explore the capabilities of your favorite browser. For example, Firefox has a Firebug plugin, other browsers have similar tools.
- Learn the basics of HTML and CSS. I started with this tutorial. You will need one or two evenings of thoughtful reading; for the first time, reading is enough.
- It is advisable to know: what is a class and selector in CSS, how classes are applied to elements on the page.
- It’s also useful to do some training on sandbox sites, of which there are many on the Internet (google “css sandbox”).
A little digression for web developers
It is advisable to familiarize yourself in advance and in general terms imagine:
- what are the components of applications and apex pages
- what is Item (item, or element) and Region (region) and what are they for
- What is Shared Components and Where to Find Them
When you edit a page in apex, by default, the page is displayed in Page Designer mode. I like the Component View mode more, I prefer to work in it. You can switch to it by clicking the “Component View” button: The
properties of the page, regions and elements are here (this is the “Component View” mode):
Change the properties of individual elements
Create a region and an input field:
Next, go to the properties of the input field. There are two main bookmarks responsible for layout: “Grid Layout” and “Element”. The first of them is responsible for the position of the element relative to other elements and is currently more likely to be of historical interest.
Historical excursion
The fact is that in apex up to version 4.2 inclusive, table layout was used. That is, if you created a region with several elements (input fields and buttons), then the apex in the process of generating the HTML code for the page created a tag and placed all the elements inside the table. For that niche, which mainly uses apex (development of web interfaces for databases using PL / SQL developers), this was a rather convenient solution. What can I say - almost perfect. All elements were lined up in even rows, and by manipulating the attributes of the elements from the Grid Layout tab, you could simply set the position of the elements relative to each other. And do not bother with unnecessary information. Now, starting with version 5, apex uses block layout. On the one hand, this layout is now mainstream, and there are no more supporters of typesetting using tables. Apex has become a more versatile tool. But on the other hand, the apex developer now needs to learn CSS in order to control the position of elements on the page with the same ease as it was in 4.x versions. However, if you do not touch anything and leave all the properties as default, the apex arranges the elements quite decent.
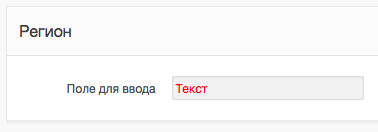
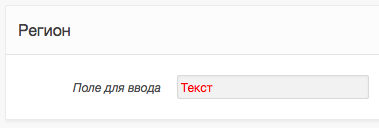
The second is responsible for the properties of the element itself. For example, we need to slightly correct its appearance. Enter the following text in the HTML Form Element Attributes field:
and we get the result:
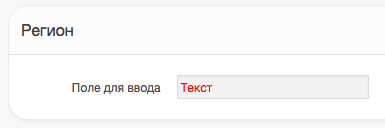
Let's look in the interior of the element. Here is its HTML code:
Here we see the style attribute entered in the "HTML Form Element Attributes" field. You can add several attributes with values to this field, and all of them will fall into the HTML code of the element.
Label design can be changed even easier. You can use HTML tags in the properties of an element on the Label tab, they will be displayed correctly. For example, enter there
The label text has become italic: The
same applies to regions. If we go into the region’s properties, we will see the same “Grid Layout” tab, for which everything said above about the “Grid Layout” tab of an individual element is true. The second important tab is called Attributes. For example, add such a code to the “Region Attributes” field (this code makes the corners rounded with a given radius):
And look at the result:
Now let's move on. In order not to rule each element by hand, you can create your own CSS-style and use it. For example, we have a page with several regions filled with plain text. By default, they look something like this:
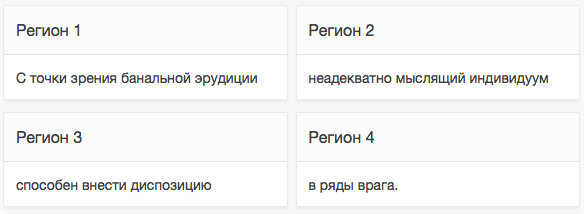
(To make the regions not located one under the other, but like in the picture, it’s enough to specify the “Start New Row” - “No” property on the second and fourth. The property is on the “Grid Layout” tab ) We
’ll go into the page properties and find the “CSS” tab. In the “Inline” field, write the following code:
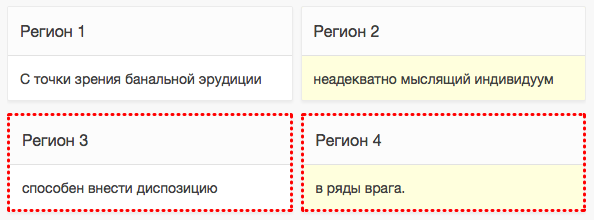
Next, let's go into the properties of the regions, and on the “Attributes” tab we will find the “Region CSS Classes” property. Here you can write the names of any CSS classes that will then be applied to the region. If you need to specify several classes, list them with a space - the way you do this in the class attribute in the HTML code of the page. When generating the page, a line from this field will be added to the HTML code in the form in which you fill it.
We will fill this property in our regions as follows: Region 2 let it get “class1”, Region 3 - “class2”, Region 4 - “class1 class2”. We start the page and get the result:
Now add our CSS classes to the page as a file. Copy the code from the previous example into a text editor and save it in a file with the name, for example, “my_css.css”. In the page properties, remove this code from the “Inline” field - there it is no longer needed. Instead, specify the path to the file in the “File URLs” field on the same tab:
Here the folder "/ i /" is a pseudo-folder with images. By default, it corresponds to the folder
(For details, see the documentation for setting up the web server).
Then you just have to copy the CSS file to this folder on the server.
If you don’t have access to files on the server (for example, you have apex hosting, you create a test application on apex.oracle.com or simply strict security rules in your organization), there is another way to upload the file. Go to the “Shared Components” section, in the “Files” section, click “Static Application Files”. You will see a list of files (if you did not upload anything there, the list will be empty). Click “Upload File” and upload the newly created file “my_css.css”. After uploading the file to the server, you will see a line with your file in the table. In the “Reference” column, you will see something like "# APP_IMAGES # my_css.css" - this is the path to the file, which should be copied to the "File URLs" field in the properties of the page on which you want to use it. Apex will write the address of this file in the page code.
Now let's look at the HTML code for the input field from the first example.
Here, “P1_INPUT_FIELD” is the name of the apex input field that I specified when I created it. Apex input fields usually get names in the following format:
These names must be unique within the page, apex simply will not allow you to create two elements with the same name on the page. These same names become the basis for HTML tag IDs. The above code contains identifiers (generated by the apex based on the name) for the field itself, its label and the div container in which they are located.
There are also identifiers for regions and buttons. Here is the HTML code for the region:
And here is the code for the button (the button was created with the straightforward name “BUTTON” and the inscription “Button”):
The ID of regions and buttons is taken from the primary key of the apex system tables, which store data on regions and buttons, respectively (this is not so convenient, because to find them out, you must first run the application and open the page, and if you recreate the region / button, then the identifier will be different). Thus, you can change the style of any element of the page from the CSS file or inline CSS, referring to it by ID.
In the next part I will talk about working with reports and creating your own templates and themes.
To be continued...
The second is responsible for the properties of the element itself. For example, we need to slightly correct its appearance. Enter the following text in the HTML Form Element Attributes field:
style="color: red"
and we get the result:
Let's look in the interior of the element. Here is its HTML code:
Here we see the style attribute entered in the "HTML Form Element Attributes" field. You can add several attributes with values to this field, and all of them will fall into the HTML code of the element.
Label design can be changed even easier. You can use HTML tags in the properties of an element on the Label tab, they will be displayed correctly. For example, enter there
Поле для вводаThe label text has become italic: The
same applies to regions. If we go into the region’s properties, we will see the same “Grid Layout” tab, for which everything said above about the “Grid Layout” tab of an individual element is true. The second important tab is called Attributes. For example, add such a code to the “Region Attributes” field (this code makes the corners rounded with a given radius):
style="border-top-left-radius: 20px; border-bottom-left-radius: 20px;"
And look at the result:
Using your own styles on the page
Now let's move on. In order not to rule each element by hand, you can create your own CSS-style and use it. For example, we have a page with several regions filled with plain text. By default, they look something like this:
(To make the regions not located one under the other, but like in the picture, it’s enough to specify the “Start New Row” - “No” property on the second and fourth. The property is on the “Grid Layout” tab ) We
’ll go into the page properties and find the “CSS” tab. In the “Inline” field, write the following code:
.class1 {
    background-color: #FFFFDD;
}
.class2 {
    border-style: dotted;
    border-width: 3px;
    border-color: red;
}
Next, let's go into the properties of the regions, and on the “Attributes” tab we will find the “Region CSS Classes” property. Here you can write the names of any CSS classes that will then be applied to the region. If you need to specify several classes, list them with a space - the way you do this in the class attribute in the HTML code of the page. When generating the page, a line from this field will be added to the HTML code in the form in which you fill it.
We will fill this property in our regions as follows: Region 2 let it get “class1”, Region 3 - “class2”, Region 4 - “class1 class2”. We start the page and get the result:
Add your file with styles
Now add our CSS classes to the page as a file. Copy the code from the previous example into a text editor and save it in a file with the name, for example, “my_css.css”. In the page properties, remove this code from the “Inline” field - there it is no longer needed. Instead, specify the path to the file in the “File URLs” field on the same tab:
/i/my_css.css
Here the folder "/ i /" is a pseudo-folder with images. By default, it corresponds to the folder
$ORACLE_HOME/apex/images
(For details, see the documentation for setting up the web server).
Then you just have to copy the CSS file to this folder on the server.
If you don’t have access to files on the server (for example, you have apex hosting, you create a test application on apex.oracle.com or simply strict security rules in your organization), there is another way to upload the file. Go to the “Shared Components” section, in the “Files” section, click “Static Application Files”. You will see a list of files (if you did not upload anything there, the list will be empty). Click “Upload File” and upload the newly created file “my_css.css”. After uploading the file to the server, you will see a line with your file in the table. In the “Reference” column, you will see something like "# APP_IMAGES # my_css.css" - this is the path to the file, which should be copied to the "File URLs" field in the properties of the page on which you want to use it. Apex will write the address of this file in the page code.
Access to an element by its ID
Now let's look at the HTML code for the input field from the first example.
Here, “P1_INPUT_FIELD” is the name of the apex input field that I specified when I created it. Apex input fields usually get names in the following format:
P<номер страницы>_<название элемента>
These names must be unique within the page, apex simply will not allow you to create two elements with the same name on the page. These same names become the basis for HTML tag IDs. The above code contains identifiers (generated by the apex based on the name) for the field itself, its label and the div container in which they are located.
There are also identifiers for regions and buttons. Here is the HTML code for the region:
Регион
And here is the code for the button (the button was created with the straightforward name “BUTTON” and the inscription “Button”):
The ID of regions and buttons is taken from the primary key of the apex system tables, which store data on regions and buttons, respectively (this is not so convenient, because to find them out, you must first run the application and open the page, and if you recreate the region / button, then the identifier will be different). Thus, you can change the style of any element of the page from the CSS file or inline CSS, referring to it by ID.
In the next part I will talk about working with reports and creating your own templates and themes.
To be continued...