Writing custom rules for the Kiuwan code analyzer
Continuing our series of notes on the Kiuwan static code analyzer.
This class of tools examines the text of programs to identify any known patterns of vulnerabilities, errors, inaccuracies, inefficient actions, and much more. Where did these templates come from, we wrote last time . For each programming language, these templates will be different due to understandable differences in the syntax, but there will also be general rules for high-quality code, such as avoiding the use of duplicate code blocks.
However, these templates and rules are not always enough to evaluate certain qualities of a written program. In each case, you may need your own defining parameter. For example, it is important for us to make sure that there are no hidden transactions of pennies in someone’s written banking program on someone’s account. Or verify that no invalid external libraries are being used. In this case, we just need to be able to get the analyzer to check not only the standard templates, but also our additional rules.

In this article, I would like to tell you how to create your own “custom” rules for analyzing the source code for Kiuwan.
Step 1. Kiuwan Rule Developer
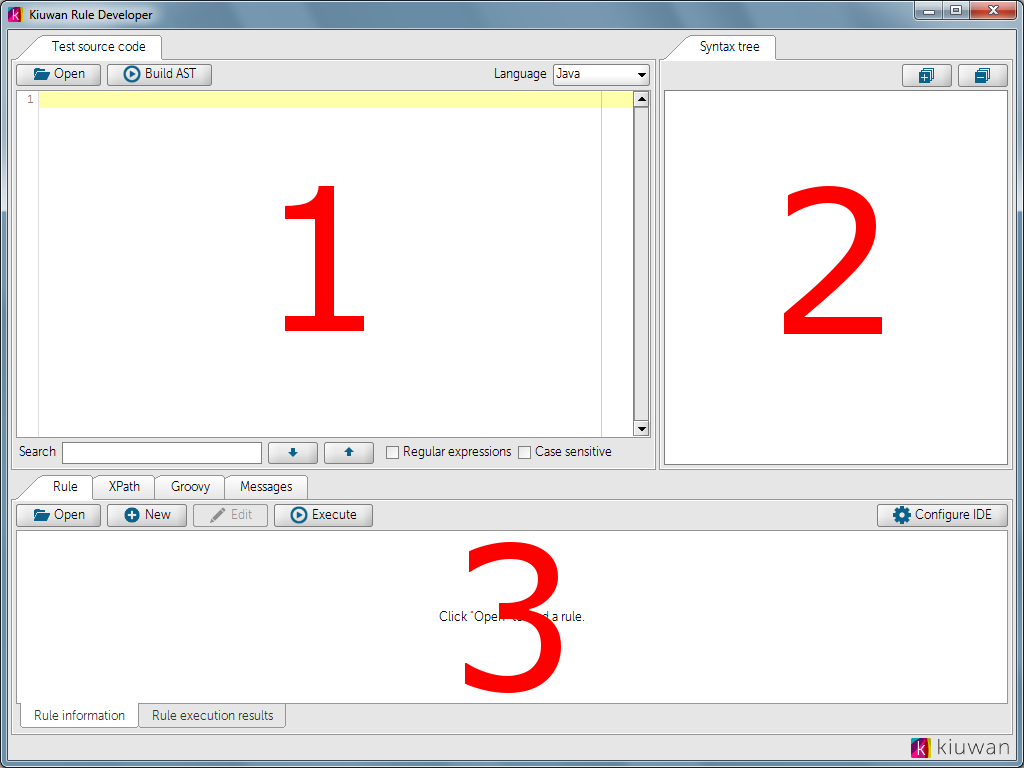
Kiuwan offers a tool for writing custom rules called Kiuwan Rule Developer. We skip the installation process, since it does not represent anything interesting. And the appearance of the utility looks like this:

Consider the interface in more detail. It consists of 3 main areas:
1. A window containing the source code on which the rule will be tested
2. AST (abstract syntax tree) - a tree that describes the source code parsed
3. The execution panel is the panel in which we can create, open and edit rules, write XPath expressions and Groovy scripts, and also watch the results of rule execution
All rules are described using the Java programming language. Therefore, we need to make friends of our development environment (in our case it will be Eclipse) with the utility. This process is simple - you just need to register the directories of the newly created rule project in Eclipse in the utility.
Step 2. Create a new rule
And now we will start the most interesting part - creating the rule itself. To do this, click the “New” button on the “Rule” tab. A new window will open in which we need to register all the details of the created rule. Required fields are marked with an asterisk.

In our simplest example, the rule will look for the use of the System.out.print and System.out.println methods in the code. Why?! Because it is more correct to use a standardized library for logging, for example, log4j.
Having completed all the fields on the “Definition” tab, we will go to the “Code examples” tab. Here we show examples of the “wrong” code and the corrected code. Actually, in the future, the “wrong” code may come in handy for testing our rule.
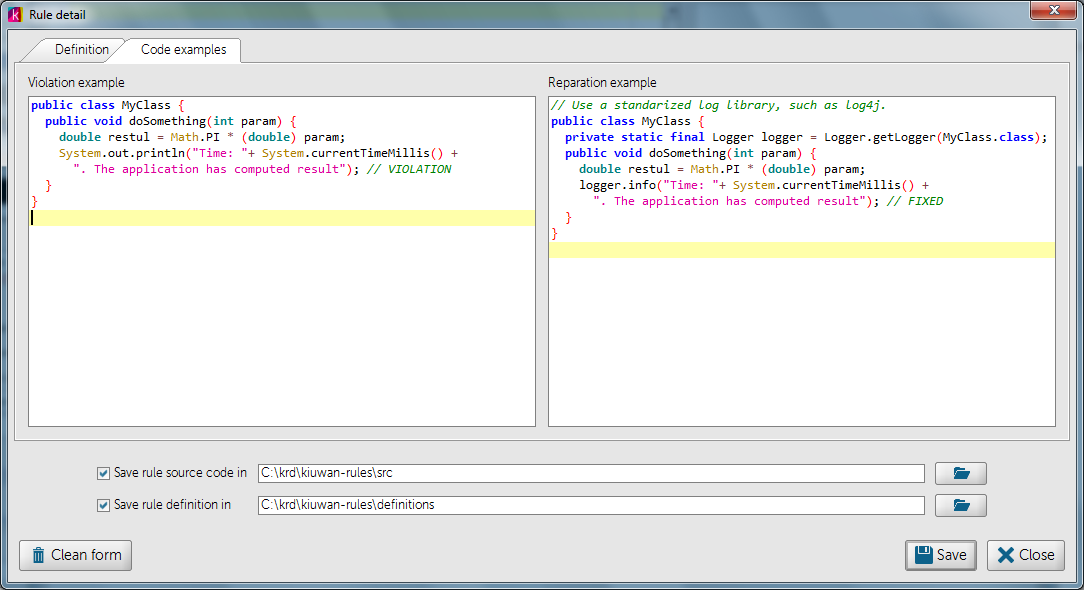
After saving, 2 files will be created:
• Rule source code template • Rule
description file in XML format
Step 3. Compile Java rule code in Eclipse
Let's go to Eclipse. We will update the project files and see the added files CheckSystemOut.java and COM.MYCOMPANY.JAVA.CHECKSYSTEMOUT.rule.xml
Opening the first file, we will see the basic code template created by the utility.
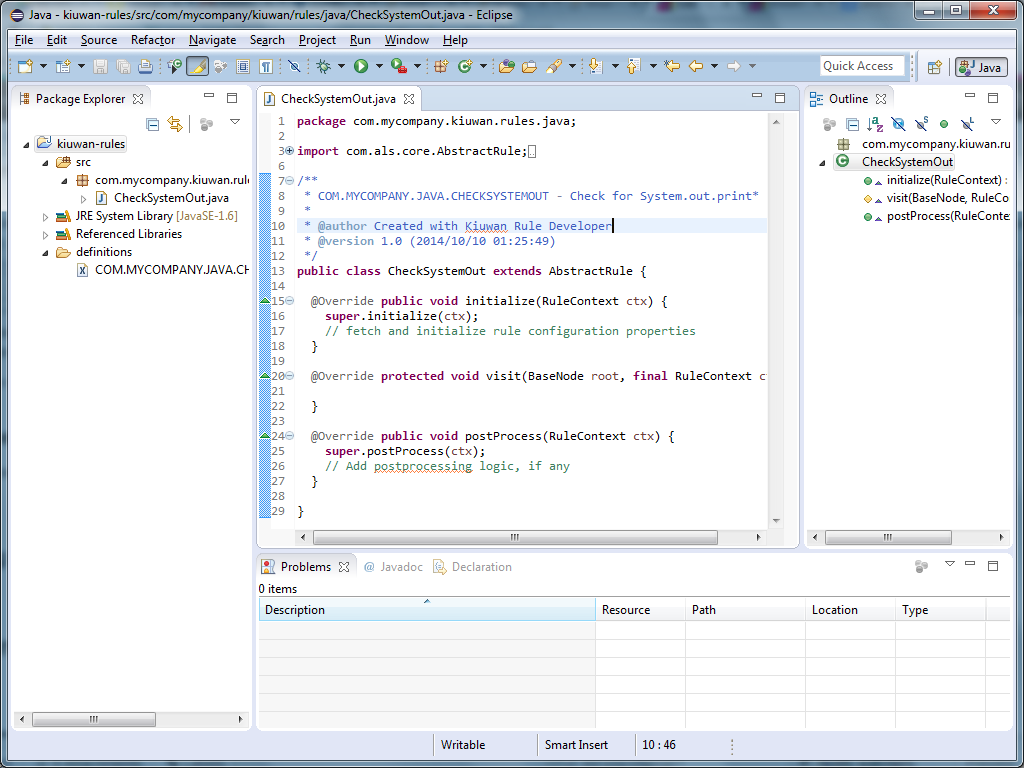
For our simple example, add some simple code. More information for writing the rules is in the articles on the Kiuwan website.
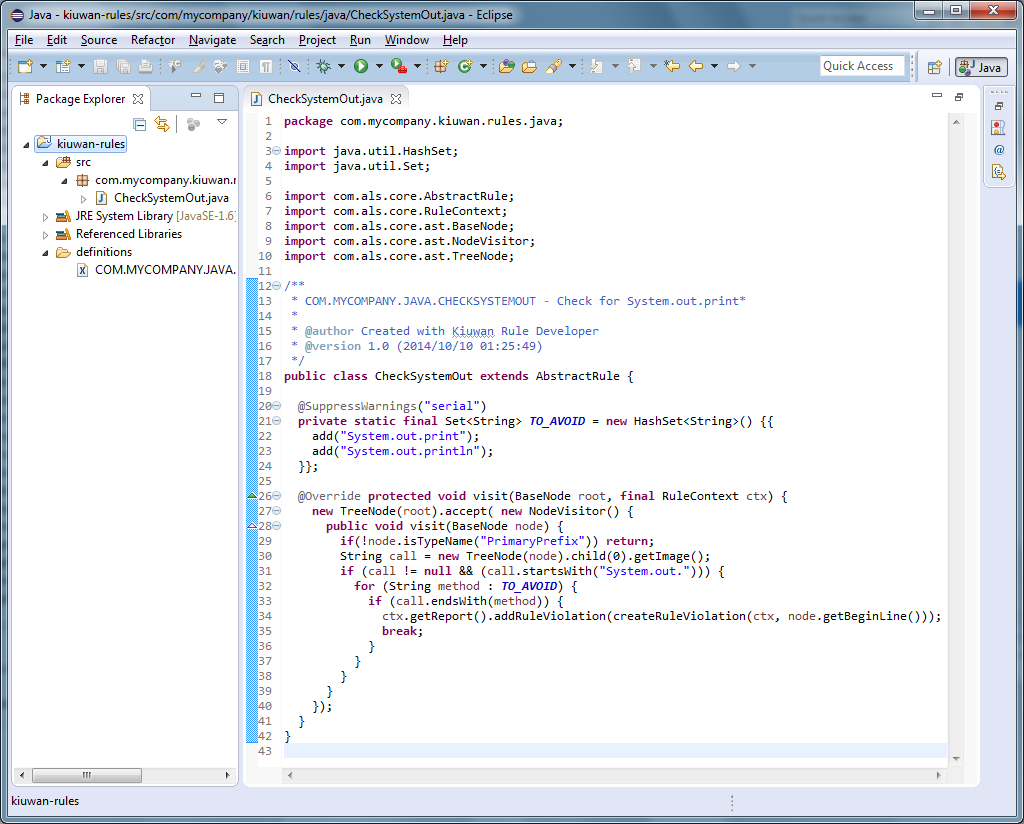
We compile the rule (I have selected automatic compilation on saving in Eclipse), and everything is almost ready.
Step 4. Test the rule.
Go back to the Kiuwan Rule Developer utility. In it we can test what we wrote. To do this, we need to take a few simple steps:
1. Paste the source code on which our rule will be tested (I will take it from the rule description)
2. Click on the “Generate AST” button. In this case, the source code will be parsed, and the AST (Abstract Syntax Tree) code structure will be created
3. Press the “Execute” button and see the results of the rule execution
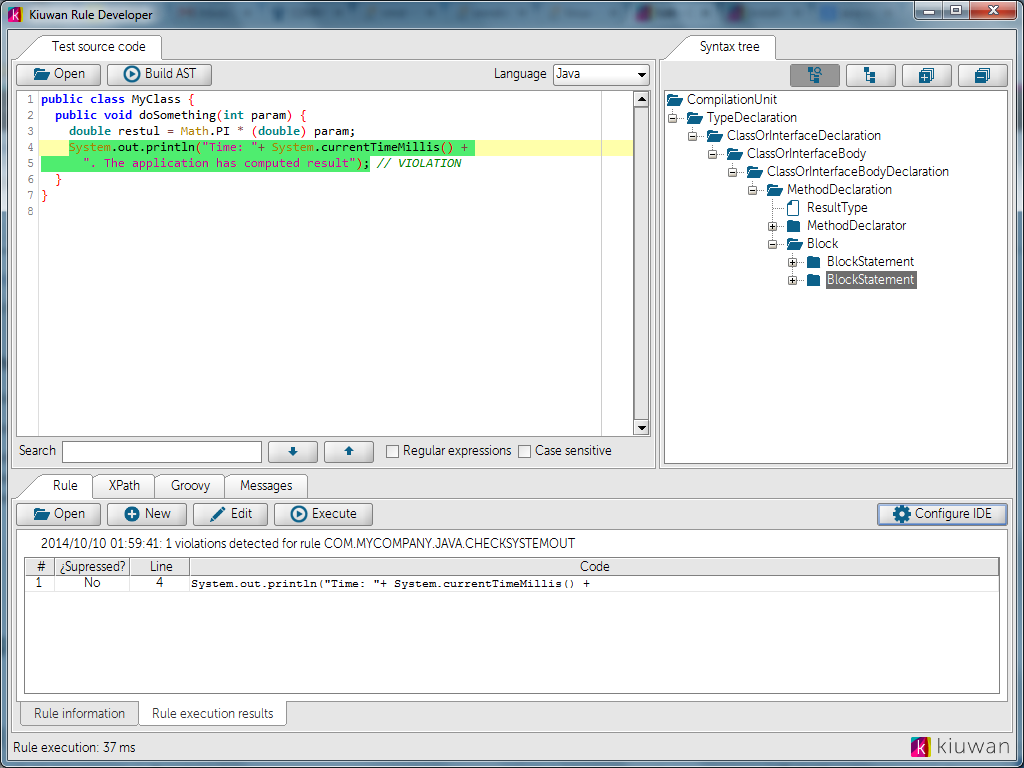
Everything, the rule is ready! It remains to install and configure the rule on the system’s web portal and load the exported jar file into the local analyzer folder. I will not dwell on these details, since this is not so interesting.
Step 5. We look at the results of the analysis
Well, now it’s worth seeing how it all works. We launch Kiuwan Local Analyzer, “set” it on the code of the project that we want to analyze, click the “Analyze” button, wait for a while and look at the results :)

By going to the defects tab we can see the result of our rule.

It is worth noting that this method of expanding your quality model is universal for any programming language supported by Kiuwan (currently more than 20).
This class of tools examines the text of programs to identify any known patterns of vulnerabilities, errors, inaccuracies, inefficient actions, and much more. Where did these templates come from, we wrote last time . For each programming language, these templates will be different due to understandable differences in the syntax, but there will also be general rules for high-quality code, such as avoiding the use of duplicate code blocks.
However, these templates and rules are not always enough to evaluate certain qualities of a written program. In each case, you may need your own defining parameter. For example, it is important for us to make sure that there are no hidden transactions of pennies in someone’s written banking program on someone’s account. Or verify that no invalid external libraries are being used. In this case, we just need to be able to get the analyzer to check not only the standard templates, but also our additional rules.
In this article, I would like to tell you how to create your own “custom” rules for analyzing the source code for Kiuwan.
Step 1. Kiuwan Rule Developer
Kiuwan offers a tool for writing custom rules called Kiuwan Rule Developer. We skip the installation process, since it does not represent anything interesting. And the appearance of the utility looks like this:
Consider the interface in more detail. It consists of 3 main areas:
1. A window containing the source code on which the rule will be tested
2. AST (abstract syntax tree) - a tree that describes the source code parsed
3. The execution panel is the panel in which we can create, open and edit rules, write XPath expressions and Groovy scripts, and also watch the results of rule execution
All rules are described using the Java programming language. Therefore, we need to make friends of our development environment (in our case it will be Eclipse) with the utility. This process is simple - you just need to register the directories of the newly created rule project in Eclipse in the utility.
Step 2. Create a new rule
And now we will start the most interesting part - creating the rule itself. To do this, click the “New” button on the “Rule” tab. A new window will open in which we need to register all the details of the created rule. Required fields are marked with an asterisk.
In our simplest example, the rule will look for the use of the System.out.print and System.out.println methods in the code. Why?! Because it is more correct to use a standardized library for logging, for example, log4j.
Having completed all the fields on the “Definition” tab, we will go to the “Code examples” tab. Here we show examples of the “wrong” code and the corrected code. Actually, in the future, the “wrong” code may come in handy for testing our rule.
After saving, 2 files will be created:
• Rule source code template • Rule
description file in XML format
Step 3. Compile Java rule code in Eclipse
Let's go to Eclipse. We will update the project files and see the added files CheckSystemOut.java and COM.MYCOMPANY.JAVA.CHECKSYSTEMOUT.rule.xml
Opening the first file, we will see the basic code template created by the utility.
For our simple example, add some simple code. More information for writing the rules is in the articles on the Kiuwan website.
We compile the rule (I have selected automatic compilation on saving in Eclipse), and everything is almost ready.
Step 4. Test the rule.
Go back to the Kiuwan Rule Developer utility. In it we can test what we wrote. To do this, we need to take a few simple steps:
1. Paste the source code on which our rule will be tested (I will take it from the rule description)
2. Click on the “Generate AST” button. In this case, the source code will be parsed, and the AST (Abstract Syntax Tree) code structure will be created
3. Press the “Execute” button and see the results of the rule execution
Everything, the rule is ready! It remains to install and configure the rule on the system’s web portal and load the exported jar file into the local analyzer folder. I will not dwell on these details, since this is not so interesting.
Step 5. We look at the results of the analysis
Well, now it’s worth seeing how it all works. We launch Kiuwan Local Analyzer, “set” it on the code of the project that we want to analyze, click the “Analyze” button, wait for a while and look at the results :)
By going to the defects tab we can see the result of our rule.
It is worth noting that this method of expanding your quality model is universal for any programming language supported by Kiuwan (currently more than 20).









