BlueZ Bracelet Control
In a research project, I needed a prototype medical bracelet. The device had to periodically measure the pulse, warning the patient about it, and send the results along with the battery level to the cloud service. A fitness bracelet with a stationary repeater instead of a smartphone could also become such a device. Therefore, before trying to assemble a prototype with my own hands, I decided to experiment with something ready. So I got a new Xiaomi mi band 1S Pulse ( review on Geektimes) with an optical heart rate sensor.
The choice of the bracelet was associated with its relatively low price, a good battery and the fact that the measurement of heart rate is initiated from a smartphone, and not started by pressing a button.
I started the experiments by examining the set of services and features available through Bluetooth 4.0 (or Bluetooth Low Energy, hereinafter referred to as BLE). It was not difficult to find something on the net , and this information helped me a lot, but it concerned the previous version, without the sensor I needed. So I started with a BLE scanner.
It turned out that Nordic Semiconductor has a suitable and, frankly, very convenient tool. This is Master Control Panel or nRF MCP for Android 4.3+. After installing the application on the tablet and running “SCAN”, I easily found the mi band and wrote down its physical address - C8: 0F: 10: 11: 1B: 6E:

By clicking on “OPEN TAB” and then on “CONNECT”, I got a set of services:

The identifier of the pulse meter turned out to be standard for such devices - 0x180D . Looking ahead, I will say that I was delighted early.
As a repeater, I used the Raspberry Pi (Model B) and the BT400 BLE-USB adapter from ASUS. BlueZ was also required - a real Swiss knife for working with Bluetooth for Linux and a couple of additional modules for Python.
Before writing code for Raspberry, I needed to make sure that all the services I needed (heart rate, battery level and vibration alert) were available in terminal mode from BlueZ.
He scanned the BLE environment and found the bracelet without any problems:
I connected to the bracelet with the connect command, running gatttool in interactive mode (key I):
An interactive connection without pairing usually lasts about 20 seconds. This is the so-called low level of privacy, it is used by default. The list of available services is displayed by the primary command:
Determine what kind of service is possible by four digits after uuid. It turned out two general services (generic), two services defined by the manufacturer (fee0 and fee1), HRM service (180d) and alert (1802).
The list of characteristics of the bracelet is displayed with the char-desc command in ascending order of handles. I found a characteristic in the list with the identifier ff0c:
handle: 0x002c, uuid: 0000ff0c-0000-1000-8000-00805f9b34fb, The
pointer 0x002c for the battery charge level was already determined for the previous version of the bracelet. I tried to read the data with the char-read-hnd command (read data by pointer):

The battery "surrendered" first. The answer is not only the charge level, this is the first byte in hex (the smartphone showed 70% on the eve), but also full charging information: the number of cycles, date of the last charge, battery status. According to the conditions of the task, I needed only a level.
The second "obeyed" the vibrating alert. According to the data from MCP, I suggested that this is an Immediate Alert, and Alert Level is the command that you need to send to the identifier 0x2A06:
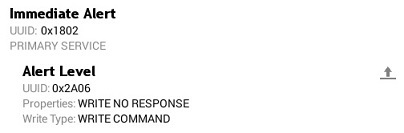
In the list of characteristics, this identifier corresponds to the line:
handle: 0x0051, uuid: 00002a06-0000-1000-8000-00805f9b34fb
Sent command to pointer 0x0051 with value 01:
The bracelet responded with two weak buzzes, the value 02 is twice 01, i.e. four signals, and 03 - two, but stronger. With a heart rate, everything turned out to be much more complicated. MCP showed the following:

Features related to this service:
The heart rate is transmitted to the smartphone in the notification or push-notification mode, it cannot be considered as the battery level. You need to enable notification by writing in the CCC (Client Characteristic Configuration) with the pointer 0x004c (the identifier for CCC is always 2902) the value 0100 and wait for the notification.
Nothing happened, the value was successfully recorded, but no notifications were received, the bracelet simply turned off after a few seconds. Running gatttool in console mode with the –listen switch also failed, gatttool simply “hung” in anticipation. A riddle, in a word.
To clarify the situation, I had to use a BLE sniffer (on a laptop with Windows 8). It was based on a flashed BLE-usb dongle on a CC2540 chip from Texas Instruments and Smart Packet Snifferthe same manufacturer. Everything you need, including the programmer, can be easily found in the form of a kit for the developer, and I freely downloaded the program and firmware from the TI website .
Important! Run the sniffer when the bracelet is in presentation mode (advertising mode), i.e. before connecting to a smartphone. Otherwise, it will be invisible. It’s also good to remove all unnecessary BLE devices away from the sniffer, and even better to shield it, it helps to figure out the log later.
This is how packets look in the sniffer in presentation mode: I
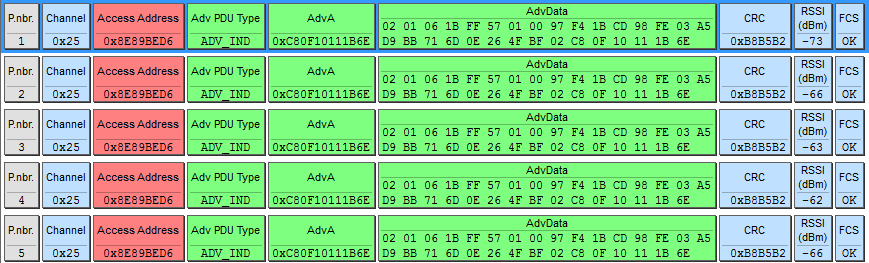
determined that this is my bracelet in the AdvA (Advertising Address) field. After establishing a connection with the smartphone, in the GATT-connection mode, the picture has changed:
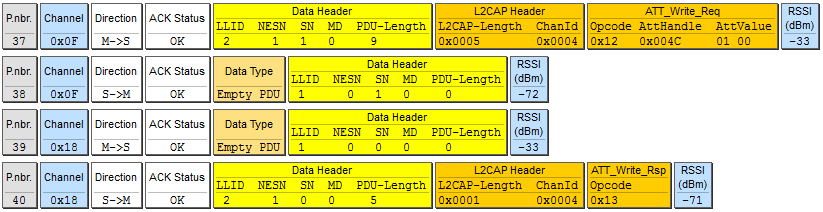
Here you can see how the value 0100 is written to the CCC with the pointer 0x004C, enabling heart rate notifications.
One of the researchers of the previous version of the bracelet wrote in his blog that not all services may be available to an anonymous device. As far as I could figure out, in some cases the device that interacts with the bracelet must transmit the correct user information to the bracelet, which is partially hashed when pairing with a smartphone.
This data, 20 bytes long, as in the previous version, is written into the characteristic with the pointer 0x0019 and does not change with each new connection. The first four bytes are the uid of the smartphone, then in the plain text the bytes of gender, age, height, weight, bytes of overwrite permission (should be 00) and 10 bytes of a hash-like sequence. I did not manage to read user info from the bracelet.
When analyzing the packages, we managed to find out the following:
In theory, in order to get the heart rate, you had to repeat all these transactions, possibly excluding the 3rd and 4th points. As it turned out, you can do without a reset. It is impossible to do this manually, the bracelet would disconnect before I could enter all the commands. So I prepared a Python script:
By the way, the number of steps taken can be read anonymously, it is readable by pointer 0x001D. The answer is four bytes, you need to read from left to right.
The script displays the battery level, sends a notification, waits and prints the heart rate. The riddle is solved, it remains to learn how to send data to the cloud service, for which I decided to use Thingspeak . This is a free service with a simple API and ready-made visualization.
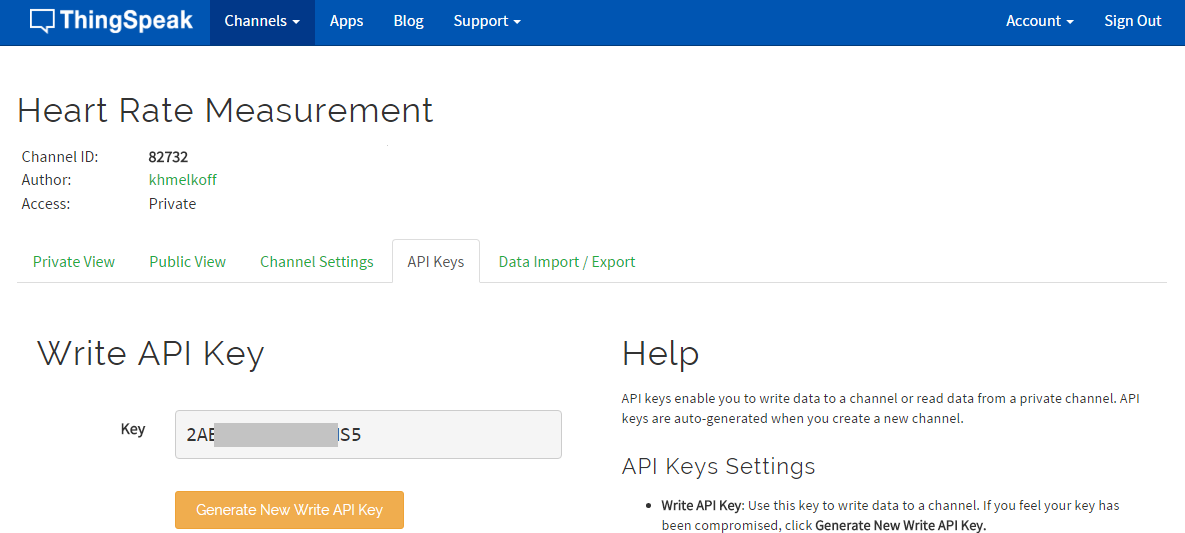
Setting up Thingspeak took no more than five minutes. You must register and enter the personal space. Next, create a new channel, specify the name, number and field labels in the channel settings. Save the settings and go to the API Keys tab. There, copy the API key for writing (Write API Key):
After that - switch to the Private View tab (if “Make Public” was not specified when setting up the channel).
Such a construction in Python is responsible for sending data to Thingspeak:
In normal operation, the console displays the data sending number, starting with one. The range of the repeater is 3-4 meters in direct line of sight, which is normal for a medical ward. However, the bracelet at such a distance is easily shielded by the palm.
I tested the resulting system during training on an exercise bike, 20 minutes. The interval between measurements is 3 minutes, the number of measurements is 8. The bracelet is prone to overestimate the pulse rate when the skin is not tightly contacted, for greater accuracy placed the sensor on the back of the wrist. Results on Thingspeak:
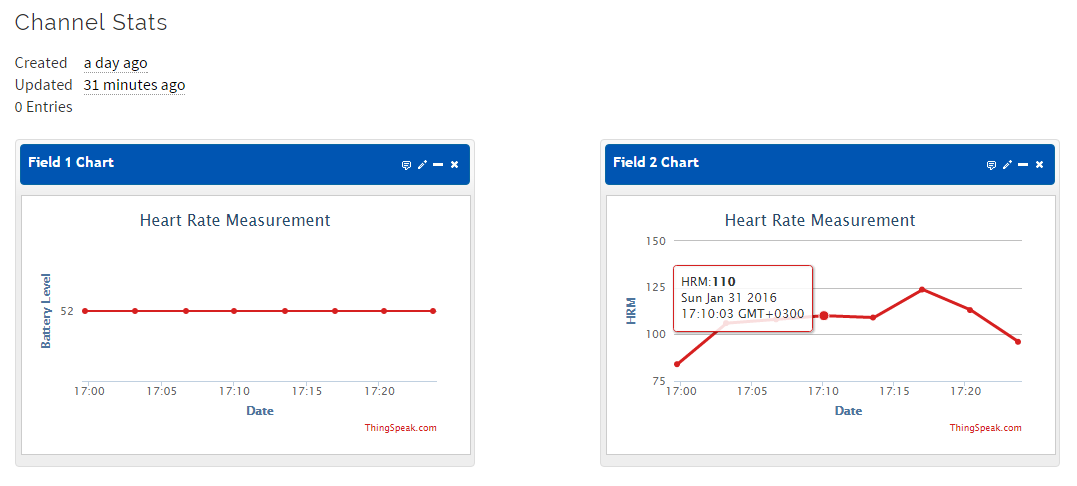
As can be seen from the graph, 8 measurements did not affect the battery charge. I think the experiment can be considered quite successful and the experience gained can be used to design your own device or, for example, look for OEM.
The choice of the bracelet was associated with its relatively low price, a good battery and the fact that the measurement of heart rate is initiated from a smartphone, and not started by pressing a button.
I started the experiments by examining the set of services and features available through Bluetooth 4.0 (or Bluetooth Low Energy, hereinafter referred to as BLE). It was not difficult to find something on the net , and this information helped me a lot, but it concerned the previous version, without the sensor I needed. So I started with a BLE scanner.
It turned out that Nordic Semiconductor has a suitable and, frankly, very convenient tool. This is Master Control Panel or nRF MCP for Android 4.3+. After installing the application on the tablet and running “SCAN”, I easily found the mi band and wrote down its physical address - C8: 0F: 10: 11: 1B: 6E:
By clicking on “OPEN TAB” and then on “CONNECT”, I got a set of services:
The identifier of the pulse meter turned out to be standard for such devices - 0x180D . Looking ahead, I will say that I was delighted early.
As a repeater, I used the Raspberry Pi (Model B) and the BT400 BLE-USB adapter from ASUS. BlueZ was also required - a real Swiss knife for working with Bluetooth for Linux and a couple of additional modules for Python.
Preparing the Raspberry Pi
For Raspberry Pi, the Raspbian image was used . After apt-get update and apt-get upgrade checked the adapter:
Отлично, мой адаптер — в первой строке. Установил BlueZ. Рекомендуется скачать последний архив кода, на момент подготовки статьи это был BlueZ 5.37, распаковать и скомпилировать. Я же удовлетворился версией 5.23, которая устанавливается через apt-get. Корректность установки можно проверить, выполнив команду gatttool –help.
Gatttool — это инструмент BlueZ для работы с GATT, общим профилем атрибутов BLE устройств. В старых версиях gatttool по умолчанию не устанавливался, нужно было «прикручивать» руками, но здесь help был доступен и значит, у меня есть почти всё необходимое для работы с браслетом. Через pip установил Pexpect для работы с BlueZ из Python. Перезагрузил Raspberry и включил адаптер. Статус адаптера проверил командой hciconfig:
Флаг DOWN показал, что адаптер выключен, включил его командой:
sudo hciconfig hci0 up
pi@raspberrypi:~ $ lsusb
Bus 001 Device 006: ID 0b05:17cb ASUSTek Computer, Inc.
Bus 001 Device 005: ID 046d:c077 Logitech, Inc.
Bus 001 Device 004: ID 04d9:1602 Holtek Semiconductor, Inc.
Отлично, мой адаптер — в первой строке. Установил BlueZ. Рекомендуется скачать последний архив кода, на момент подготовки статьи это был BlueZ 5.37, распаковать и скомпилировать. Я же удовлетворился версией 5.23, которая устанавливается через apt-get. Корректность установки можно проверить, выполнив команду gatttool –help.
Gatttool — это инструмент BlueZ для работы с GATT, общим профилем атрибутов BLE устройств. В старых версиях gatttool по умолчанию не устанавливался, нужно было «прикручивать» руками, но здесь help был доступен и значит, у меня есть почти всё необходимое для работы с браслетом. Через pip установил Pexpect для работы с BlueZ из Python. Перезагрузил Raspberry и включил адаптер. Статус адаптера проверил командой hciconfig:
pi@raspberrypi:~ $ hciconfig
hci0:	Type: BR/EDR  Bus: USB
	BD Address: 5C:F3:70:71:7E:F5  ACL MTU: 1021:8  SCO MTU: 64:1
	DOWN
	RX bytes:616 acl:0 sco:0 events:34 errors:0
	TX bytes:380 acl:0 sco:0 commands:34 errors:0
Флаг DOWN показал, что адаптер выключен, включил его командой:
sudo hciconfig hci0 up
Before writing code for Raspberry, I needed to make sure that all the services I needed (heart rate, battery level and vibration alert) were available in terminal mode from BlueZ.
He scanned the BLE environment and found the bracelet without any problems:
pi@raspberrypi:~ $ sudo hcitool -i hci0 lescan
LE Scan ...
C8:0F:10:11:1B:6E (unknown)
C8:0F:10:11:1B:6E MI1S
I connected to the bracelet with the connect command, running gatttool in interactive mode (key I):
pi@raspberrypi:~ $ sudo gatttool -i hci0 -b C8:0F:10:11:1B:6E -I
[C8:0F:10:11:1B:6E][LE]> connect
Attempting to connect to C8:0F:10:11:1B:6E
Connection successful
[C8:0F:10:11:1B:6E][LE]>
An interactive connection without pairing usually lasts about 20 seconds. This is the so-called low level of privacy, it is used by default. The list of available services is displayed by the primary command:
[C8:0F:10:11:1B:6E][LE]> primary
attr handle: 0x0001, end grp handle: 0x0009 uuid: 00001800-0000-1000-8000-00805f9b34fb
attr handle: 0x000c, end grp handle: 0x000f uuid: 00001801-0000-1000-8000-00805f9b34fb
attr handle: 0x0010, end grp handle: 0x0039 uuid: 0000fee0-0000-1000-8000-00805f9b34fb
attr handle: 0x003a, end grp handle: 0x0048 uuid: 0000fee1-0000-1000-8000-00805f9b34fb
attr handle: 0x0049, end grp handle: 0x004e uuid: 0000180d-0000-1000-8000-00805f9b34fb
attr handle: 0x004f, end grp handle: 0x0051 uuid: 00001802-0000-1000-8000-00805f9b34fb
Determine what kind of service is possible by four digits after uuid. It turned out two general services (generic), two services defined by the manufacturer (fee0 and fee1), HRM service (180d) and alert (1802).
The list of characteristics of the bracelet is displayed with the char-desc command in ascending order of handles. I found a characteristic in the list with the identifier ff0c:
handle: 0x002c, uuid: 0000ff0c-0000-1000-8000-00805f9b34fb, The
pointer 0x002c for the battery charge level was already determined for the previous version of the bracelet. I tried to read the data with the char-read-hnd command (read data by pointer):
The battery "surrendered" first. The answer is not only the charge level, this is the first byte in hex (the smartphone showed 70% on the eve), but also full charging information: the number of cycles, date of the last charge, battery status. According to the conditions of the task, I needed only a level.
The second "obeyed" the vibrating alert. According to the data from MCP, I suggested that this is an Immediate Alert, and Alert Level is the command that you need to send to the identifier 0x2A06:
In the list of characteristics, this identifier corresponds to the line:
handle: 0x0051, uuid: 00002a06-0000-1000-8000-00805f9b34fb
Sent command to pointer 0x0051 with value 01:
[C8:0F:10:11:1B:6E][LE]> char-write-cmd 0x0051 01
The bracelet responded with two weak buzzes, the value 02 is twice 01, i.e. four signals, and 03 - two, but stronger. With a heart rate, everything turned out to be much more complicated. MCP showed the following:
Features related to this service:
handle: 0x004b, uuid: 00002a37-0000-1000-8000-00805f9b34fb
handle: 0x004c, uuid: 00002902-0000-1000-8000-00805f9b34fb
handle: 0x004d, uuid: 00002803-0000-1000-8000-00805f9b34fb
handle: 0x004e, uuid: 00002a39-0000-1000-8000-00805f9b34fb
The heart rate is transmitted to the smartphone in the notification or push-notification mode, it cannot be considered as the battery level. You need to enable notification by writing in the CCC (Client Characteristic Configuration) with the pointer 0x004c (the identifier for CCC is always 2902) the value 0100 and wait for the notification.
Nothing happened, the value was successfully recorded, but no notifications were received, the bracelet simply turned off after a few seconds. Running gatttool in console mode with the –listen switch also failed, gatttool simply “hung” in anticipation. A riddle, in a word.
To clarify the situation, I had to use a BLE sniffer (on a laptop with Windows 8). It was based on a flashed BLE-usb dongle on a CC2540 chip from Texas Instruments and Smart Packet Snifferthe same manufacturer. Everything you need, including the programmer, can be easily found in the form of a kit for the developer, and I freely downloaded the program and firmware from the TI website .
Important! Run the sniffer when the bracelet is in presentation mode (advertising mode), i.e. before connecting to a smartphone. Otherwise, it will be invisible. It’s also good to remove all unnecessary BLE devices away from the sniffer, and even better to shield it, it helps to figure out the log later.
This is how packets look in the sniffer in presentation mode: I
determined that this is my bracelet in the AdvA (Advertising Address) field. After establishing a connection with the smartphone, in the GATT-connection mode, the picture has changed:
Here you can see how the value 0100 is written to the CCC with the pointer 0x004C, enabling heart rate notifications.
One of the researchers of the previous version of the bracelet wrote in his blog that not all services may be available to an anonymous device. As far as I could figure out, in some cases the device that interacts with the bracelet must transmit the correct user information to the bracelet, which is partially hashed when pairing with a smartphone.
This data, 20 bytes long, as in the previous version, is written into the characteristic with the pointer 0x0019 and does not change with each new connection. The first four bytes are the uid of the smartphone, then in the plain text the bytes of gender, age, height, weight, bytes of overwrite permission (should be 00) and 10 bytes of a hash-like sequence. I did not manage to read user info from the bracelet.
When analyzing the packages, we managed to find out the following:
- Each time you connect, all notification permissions are sent to the bracelet (CCC with identifier 2902)
- Next is the transfer of user information
- Then, according to the pointer 0x0028, the date and time are recorded
- After that, data on the battery level and the number of steps taken per day are read
- Before you receive a notification about the heart rate at the pointer 0x004E corresponding to the characteristic "heart rate control point", the sequence 0x15 0x00 0x00 is recorded (I will assume that this is a reset)
- Then 0x15 0x02 0x01 is written there, which in my case corresponds to the left hand
- After that, after 15-20 seconds, a notification arrives with a heart rate in two bytes, for example 06 40. The second byte is the heart rate in hex
In theory, in order to get the heart rate, you had to repeat all these transactions, possibly excluding the 3rd and 4th points. As it turned out, you can do without a reset. It is impossible to do this manually, the bracelet would disconnect before I could enter all the commands. So I prepared a Python script:
import sys, pexpect
from time import sleep
gatt=pexpect.spawn('gatttool -I')
gatt.logfile = open("pylog.txt", "w")
gatt.sendline('connect C8:0F:10:11:1B:6E')
gatt.expect('Connection successful')
# Check battery level
gatt.sendline('char-read-hnd 0x002c')
gatt.expect('Characteristic value.*')
batt = gatt.after
batt = int(batt.split()[2],16)
print'Battery level:', batt, '%'# Send alert
gatt.sendline('char-write-cmd 0x0051 01')
sleep(5)
# Allow notification
gatt.sendline('char-write-req 0x004c 0100')
gatt.expect('Characteristic value.*')
# Send user data
gatt.sendline('char-write-req 0x0019 F8663A5F0126B45500040049676F7200000000DC')
gatt.expect('Characteristic value.*')
# Set control point
gatt.sendline('char-write-req 0x004e 150201')
# Waiting for notificationtry:
    gatt.expect('Notification handle.*')
    hrm = gatt.after
    hrm = int(hrm.split()[6], 16)
    print'HRM:', hrm
except:
    print'Bad control point or timeout'
sys.exit(0)
By the way, the number of steps taken can be read anonymously, it is readable by pointer 0x001D. The answer is four bytes, you need to read from left to right.
The script displays the battery level, sends a notification, waits and prints the heart rate. The riddle is solved, it remains to learn how to send data to the cloud service, for which I decided to use Thingspeak . This is a free service with a simple API and ready-made visualization.
Setting up Thingspeak took no more than five minutes. You must register and enter the personal space. Next, create a new channel, specify the name, number and field labels in the channel settings. Save the settings and go to the API Keys tab. There, copy the API key for writing (Write API Key):
After that - switch to the Private View tab (if “Make Public” was not specified when setting up the channel).
Such a construction in Python is responsible for sending data to Thingspeak:
baseURL = 'https://api.thingspeak.com/update?api_key=%s'%YOUR_API_KEY
f = urllib2.urlopen(baseURL + "&field1=%s&field2=%s" % (batt, hrm))
print f.read()
f.close()
Full code
import sys, pexpect
from time import sleep
import urllib2
sample_interval = 180#sec
sample_qty = 8
api_key = 'YOUR_API_KEY'
baseURL = 'https://api.thingspeak.com/update?api_key=%s'%api_key
defgetData():try:
        gatt=pexpect.spawn('gatttool -I')
        # gatt.logfile = open("pylog.txt", "w") # for debug only
        gatt.sendline('connect C8:0F:10:11:1B:6E')
        gatt.expect('Connection successful', timeout=60)
        # Get battery level
        gatt.sendline('char-read-hnd 0x002c')
        gatt.expect('Characteristic value.*')
        batt = gatt.after
        batt = int(batt.split()[2],16)
        # Send alert
        gatt.sendline('char-write-cmd 0x0051 01')
        sleep(5)
        # Allow notification
        gatt.sendline('char-write-req 0x004c 0100')
        gatt.expect('Characteristic value.*')
        # Send user data
        gatt.sendline('char-write-req 0x0019 F8663A5F0126B45500040049676F7200000000DC')
        gatt.expect('Characteristic value.*')
        # Set control point
        gatt.sendline('char-write-req 0x004e 150201')
        # Waiting for notification
        gatt.expect('Notification handle.*', timeout=60)
        hrm = gatt.after
        hrm = int(hrm.split()[6], 16)
    except:
        hrm = 0
        batt = 0return (str(batt), str(hrm))
defmain():
    sample_count = 0whileTrue:
        try:
            batt, hrm = getData()
            f = urllib2.urlopen(baseURL + "&field1=%s&field2=%s" % (batt, hrm))
            print f.read()
            f.close()
            sample_count = sample_count + 1if (sample_count >= sample_qty): break
            sleep(sample_interval)
        except:
            print'Connection error'breakif __name__ == '__main__':
    main()
    sys.exit(0)
In normal operation, the console displays the data sending number, starting with one. The range of the repeater is 3-4 meters in direct line of sight, which is normal for a medical ward. However, the bracelet at such a distance is easily shielded by the palm.
I tested the resulting system during training on an exercise bike, 20 minutes. The interval between measurements is 3 minutes, the number of measurements is 8. The bracelet is prone to overestimate the pulse rate when the skin is not tightly contacted, for greater accuracy placed the sensor on the back of the wrist. Results on Thingspeak:
As can be seen from the graph, 8 measurements did not affect the battery charge. I think the experiment can be considered quite successful and the experience gained can be used to design your own device or, for example, look for OEM.
Useful links:
- CC2540 Tuning and BLE Sniffer Guide
- Get started with Bluetooth Low Energy
- Reverse Engineering a Bluetooth Low Energy Light Bulb
- Using GATT in Bluetooth LE on Intel Edison









