How I added a new device to SmartThings Hub, part 1
- From the sandbox
- Tutorial
In this article I want to tell you about my experience in developing the so-called Device Handler for the smart home SmartThings. The task was to add a universal device based on the Z-Wave protocol - Z-Uno , as well as the processing of child devices connected to it.
Introduction to development took me quite a lot of time, but afterenlightening a careful study of most of the documentation, further development did not require much effort. In consequence of this, it was decided to write this article in order to facilitate the work of the Russian-speaking user.
The entire development process takes place in the Groovy language SmartThings IDE web application. Testing is more convenient from a mobile device, but it is possible to create simulators of devices in the same development environment. In the case of testing the graphical shell, it is already necessary to use the SmartThings Classic mobile application ( Android , iOS ).
A connected device is a board that allows you to add control to almost any device in Z-Wave. And the connected devices can be a different number (up to 32 pieces). Accordingly, at the software level, all types of connected devices must also be processed and transferred to the application.
List of processed types:
There are two logical blocks:
I will describe in more detail the purpose and content of each block during the cycle of articles.
As you can see from the name of the method - it contains meta information.
Consider in order what is included in this block:
In this method, arguments specify three things, respectively: the name of the processor, the namespace, and the name of the author.
The body of the method can be declared the following variables:
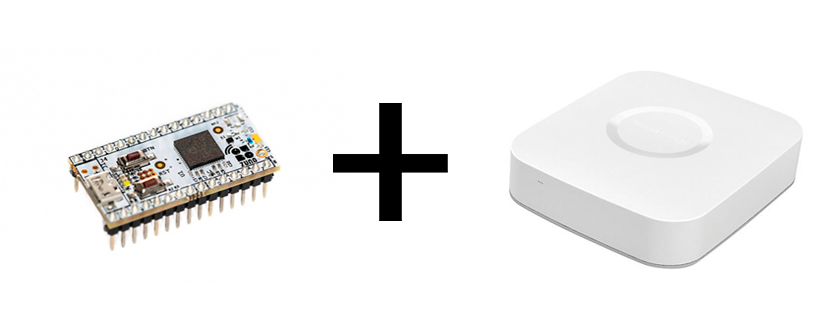
We connect our device. In our case, SmartThings V2 Hub and Z-Uno will be used .
At the moment of adding a new Z-Wave or ZigBee device, the hub will try to recognize which type of device they are trying to connect to it and will start looking for the most relevant handler. He will choose it by “Fingerprints”. If the hub does not find matches in the custom handlers, it will try to use one of the closest standard templates.
“Fingerprints” are set in the handler itself to indicate which types of devices it supports. The official documentation states that they will be different for Z-Wave devices and ZigBee devices, we will consider implementation for Z-Wave.
Z-Wave protocol devices store information about their manufacturer, device type, its capabilities, etc. During the so-called “interview” with the device, ST collects this information in the Z-Wave raw description. An example of such a line:
The value of each key is used to fill in the “Fingerprint”. A detailed description of each item can be found here . We will look at those that will be used in our handler.
In order to find this line with information, you need to go to the 'My Devices' tab and click on the device of interest to us (before this, the device must be added to the network).

mfr is a 16-bit value containing the manufacturer ID (Manufacturer ID). A list of manufacturers and their IDs can be found here .
prod - 16-bit value containing Product Type ID - unique ID of the device type.
model - a 16-bit value containing the Product ID.
inClusters- 8-bit value specifying the need for a Command Class or that. For example, if we need to specify that our handler will work with MultiChannel CC, we need to write its code 0x60. The list available for SmartThings CC can be found here .
These four keys are enough for the hub to understand exactly which device this handler belongs to. An example of how they are used by me:
A device can have more parameters, in which case it can successfully connect with this handler, however, if at least one of them does not match the declared fingerprint, the device will ignore this handler.
Smartthings recommends adding manufacturer information (mfr) and model (prod, model) to fingerprint to rule out cases where the choice of handler is not obvious. For example, when the fingerprints of one of the templates or examples used by default will match yours.
Location in code
A full cycle of articles is planned, up to release. I hope this information will help you in the development.
Introduction to development took me quite a lot of time, but after
The entire development process takes place in the Groovy language SmartThings IDE web application. Testing is more convenient from a mobile device, but it is possible to create simulators of devices in the same development environment. In the case of testing the graphical shell, it is already necessary to use the SmartThings Classic mobile application ( Android , iOS ).
A connected device is a board that allows you to add control to almost any device in Z-Wave. And the connected devices can be a different number (up to 32 pieces). Accordingly, at the software level, all types of connected devices must also be processed and transferred to the application.
List of processed types:
- Switch Binary - devices having only two positions: on / off
- Switch Multilevel - devices that can be turned off or on with a different value. For example dimer.
- Sensor Multilevel - sensors sending non-binary values. For example, a temperature sensor.
- Meter - devices like counter
- Notification - binary sensors will refer to this type. For example, a reed sensor.
- Thermostat - a separate class of commands that is responsible for working with a thermostat
Document structure
There are two logical blocks:
- Description and meta-information about the handler. This includes information about the device, how the UI and other information should be drawn. It is allocated by the method
metadata().
- Handler methods are handler logic. They are responsible for “communicating” with the device.
Separately, you can select the method parse (), which is engaged in the interpretation of commands received from the device.
I will describe in more detail the purpose and content of each block during the cycle of articles.
Metadata
As you can see from the name of the method - it contains meta information.
Consider in order what is included in this block:
Definition ()
In this method, arguments specify three things, respectively: the name of the processor, the namespace, and the name of the author.
- The name of the handler will later be used when publishing and when creating child devices.
- The namespace is used when searching for handlers by name to make sure that the correct one is found, for example, among handlers with the same name. SmartThings recommends using your nickname on github.
- The name of the author is filled with your name.
definition(name: "Your device", namespace: "yournamespace", author: "your name") {}
The body of the method can be declared the following variables:
attribute, capability, command, fingerprint. Next, we take a closer look at what it is and when it is applied.Connect and fingerprinting
We connect our device. In our case, SmartThings V2 Hub and Z-Uno will be used .
At the moment of adding a new Z-Wave or ZigBee device, the hub will try to recognize which type of device they are trying to connect to it and will start looking for the most relevant handler. He will choose it by “Fingerprints”. If the hub does not find matches in the custom handlers, it will try to use one of the closest standard templates.
“Fingerprints” are set in the handler itself to indicate which types of devices it supports. The official documentation states that they will be different for Z-Wave devices and ZigBee devices, we will consider implementation for Z-Wave.
Z-Wave protocol devices store information about their manufacturer, device type, its capabilities, etc. During the so-called “interview” with the device, ST collects this information in the Z-Wave raw description. An example of such a line:
zw:Sstype:2101mfr:0086prod:0102model:0064ver:1.04zwv:4.05lib:03cc:5E,86,72,98,84 ccOut:5Asec:59,85,73,71,80,30,31,70,7Arole:06ff:8C07ui:8C07The value of each key is used to fill in the “Fingerprint”. A detailed description of each item can be found here . We will look at those that will be used in our handler.
In order to find this line with information, you need to go to the 'My Devices' tab and click on the device of interest to us (before this, the device must be added to the network).
mfr is a 16-bit value containing the manufacturer ID (Manufacturer ID). A list of manufacturers and their IDs can be found here .
prod - 16-bit value containing Product Type ID - unique ID of the device type.
model - a 16-bit value containing the Product ID.
inClusters- 8-bit value specifying the need for a Command Class or that. For example, if we need to specify that our handler will work with MultiChannel CC, we need to write its code 0x60. The list available for SmartThings CC can be found here .
These four keys are enough for the hub to understand exactly which device this handler belongs to. An example of how they are used by me:
fingerprint mfr: "0115", prod: "0110", model: "0001", inClusters: "0x60"
fingerprint mfr: "0115", prod: "0111", inClusters: "0x60"
A device can have more parameters, in which case it can successfully connect with this handler, however, if at least one of them does not match the declared fingerprint, the device will ignore this handler.
Smartthings recommends adding manufacturer information (mfr) and model (prod, model) to fingerprint to rule out cases where the choice of handler is not obvious. For example, when the fingerprints of one of the templates or examples used by default will match yours.
Location in code
metadata {
    definition(...) {
        ...
        fingerprint mfr: "0115", prod: "0110", model: "0001", inClusters: "0x60"
        fingerprint mfr: "0115", prod: "0111", inClusters: "0x60"
    }
    ...
}
A full cycle of articles is planned, up to release. I hope this information will help you in the development.