Using JMeter to Organize Distributed Load

Posted by Roman Denisenko, Senior TestArt Engineer DataArt.
Introduction
Quite often, when testing performance, the task arises to load a too high-performance system that can easily digest a huge number of simultaneous requests. Or a situation is possible when the experimental system is very sensitive to the load source, balancing its computing power depending on the geographical location of the clients.
To generate such a load, the capabilities of one test machine is no longer enough. And then the classic question arises - how can such a load be reproduced with a minimum of costs and a maximum of result.
Fortunately, most of the modern software tools used for load testing, allows you to use additional remote agents needed to emulate distributed load. In this article, I would like to consider the possibility of creating a load cluster using an example, I think, of one of the most common programs used by testers - the great and terrible Apache JMeter.
Theory
I think many people are familiar with the capabilities of JMeter (if this is not so, I highly recommend reading some basic articles on the main functionality of this program first), so I would like to focus more on the applicability of JMeter for distributed load.
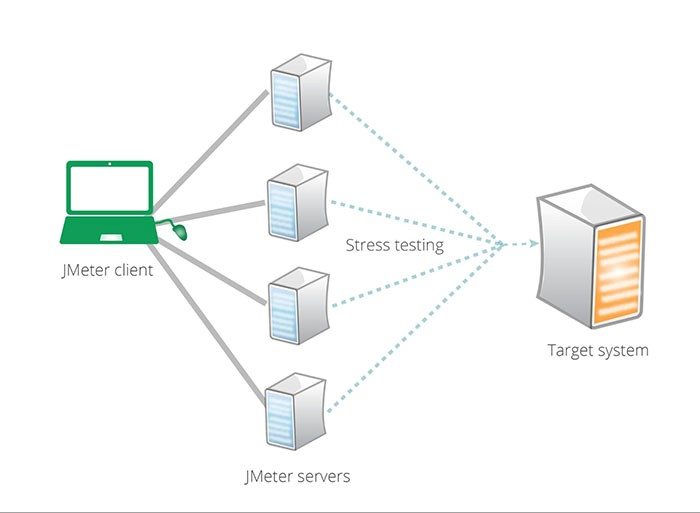
First, let's look at the terminology adopted by the creators of JMeter. And their terminology, to be honest, is rather strange. In terms of JMeter, the server that manages the load is called the “client”. Agents that receive commands from the main server and carry out the load are called “server”. Personally, my opinion is that this terminology is a little inverse, but let us leave it to the conscience of the creators. In the article I will use these very terms. The typical distributed load infrastructure created with JMeter can easily be seen in the image below.

The logic of distributed load is quite simple: the client sends the specified set of tests to each of the servers , and the servers, in turn, perform these tests and send the collected results back to the client , who summarizes the information received and displays it to the end user. Thus, the difference in how many agents we use for the load is not particularly visible, and we can work in the same way as before with one machine.
The working process:
In order to make JMeter see remote agents and be able to contact them, you should perform the following steps:
1. Download . You need to download the latest version of JMeter from the official site . The archive contains both versions - both client and server. The dependence of how JMeter starts, as a server or as a client, is determined using the keys that are transmitted when the main executable file of the program is launched. It is worth considering the most important point - the server and client versions must match!
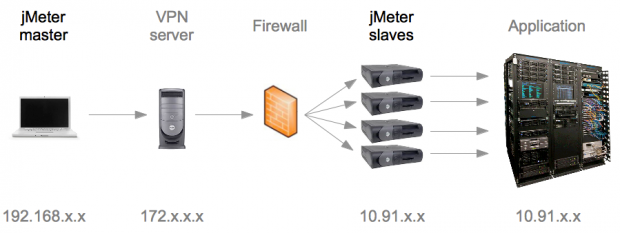
2. Installation. After that, you should unzip the downloaded archive to the machines on which we want to run the client and distributed load servers. One of the positive aspects - JMeter allows you to use an unlimited number of servers connected to one client. But there is an important limitation - all machines must be on the same subnet . For cloud solutions, this is quite easily solved using VPN connections:

3. Servers . Now you should start the distributed load server. This is done quite easily. To do this, you must run the script
bin/jmeter-server(.bat in the case of Windows) located in the root of the program folder. Note: Sometimes Java incorrectly determines the IP address of the server - in this case, you will see an exception in the jmeter-server log, which will indicate that the IP address is different from the one you want to use. Then you can assign it a different IP. To do this, start the server with the following parameter: -Djava.rmi.server.hostname = [IP].
4. The client . After starting all the servers, you need to configure the client itself, which will manage the load. To make the client find all running servers, you need to add the IP addresses of these servers to the property
remote_hostsin the bin / jmeter.properties file: remote_hosts=192.168.0.1:1099, 192.168.0.2:1098Note : port number is an additional parameter. By default, the server uses port 1099 - however, you can assign it manually.

5. Execution. The last step is pretty simple. You need to start JMeter and verify that all servers are working correctly. To do this, you can try to start the distributed load using the menu item: Run -> Remote Start All . This item allows you to start the load using all the servers indicated above. If you want to use only a specific server, select Run -> Remote Start -> [SERVER], where [SERVER] is the address of the server that was added to the property file in step 4 and started on the client machine in step 3 .
6.

Conclusion
After completing all these fairly simple steps, you can emulate any large load you want, using the power of remote servers. The desired load will be limited only by the number of free servers at your disposal and your own imagination.
useful links
jmeter.apache.org/usermanual/remote-test.htm
jmeter.apache.org/usermanual/jmeter_distributed_testing_step_by_step.pdf
gerardnico.com/wiki/jmeter/remote
www.guru99.com/jmeter-distributed-testing.html
