December 28, 2015 at 10:33
Veeam Backup: Nice Tricks
- Tutorial
On the eve of the New Year, I thought: why not make a modest but very useful gift to our readers by telling about the functions that Veeam Backup & Replication system administrators-users usually do not pay attention to, and even don’t even know about some of them? So this article was born - on how to use Veeam Backup in a non-standard way.
I'll start, perhaps, with the well-known to many VeeamZIP.

VeeamZIP is a free backup tool.
In the free Veeam Backup Free Edition it is possible to backup only one VM per VeeamZIP pass, while in the paid version of Veeam Backup & Replication VeeamZIP has no restrictions. As a result of VeeamZIP, a file is obtained that contains a full copy of the backup VM. The VeeamZIP operation is started manually from the interface (on the Virtual Machines tab - see the screenshot below), the PowerShell cmdlet ( Help , a story on the hub ) or from vSphere Web Client (if the plug-in is installed with Veeam Backup Enterprise Manager).
The main purpose of VeeamZIP: one-time creation of an independent portable backup.
When you may need:
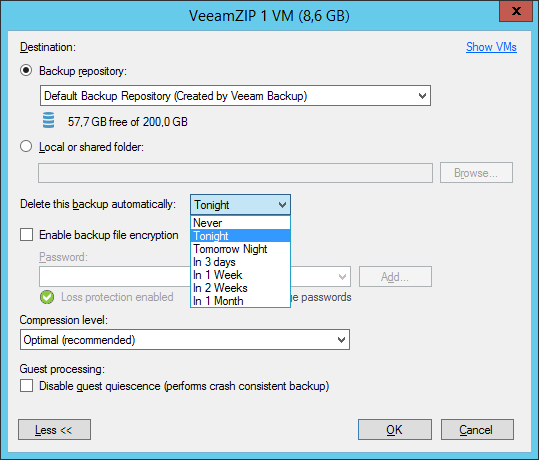
A nice bonus: you can set the retention period for the backup on disk. If you do not take it anywhere, then Veeam Backup will delete it yourself.
The Quick Migration feature is available in a free version. In the paid Veeam Backup & Replication, it is used for VM migration, after the restore operation by starting directly from the backup - Instant VM Recovery , if, for example, VMware Storage vMotion is not possible. You can also start this operation from the Virtual Machines tab .
But no one forbids using this function for normal VM transfer in a working environment! No doubt, Storage vMotion is good because it transfers VM disks without stopping their work, but it negatively affects the performance of the main storage at the time of transfer. And Quick Migration works similarly to replication in Veeam Backup & Replication, and the effect on storage systems is much less [I’ll note to myself that I need to check whether I / O Control works during this operation], but the VM will be unavailable for some time (there will be a downtime at the time of entering the VM into the pause, transfer of foreign units and the withdrawal of the machine from the pause). So here you have a choice: either a regular resource-intensive svMotion without stopping, or Veeam Quick Migration with less impact on productivity, but suspension.
In general, the Virtual Machines tab is a very useful section.
Here you can easily find the necessary VMs and, by clicking on the right mouse button, add them to existing tasks or create new ones with them. This is often simpler and more visual than opening an editing task each time and adding new VMs for backup through its properties.

Who remembers Veeam FastSCP for VMware? Once upon a time, this was the only good way to copy data to datastores, for example, if these are ISO-shniki or ready-made VMs, disk images. Console scp copied very slowly, and FastSCP was really fast and free. Then it was abolished in favor of the free edition of Veeam Backup. But! The copy function was and remains in Veeam Backup & Replication.
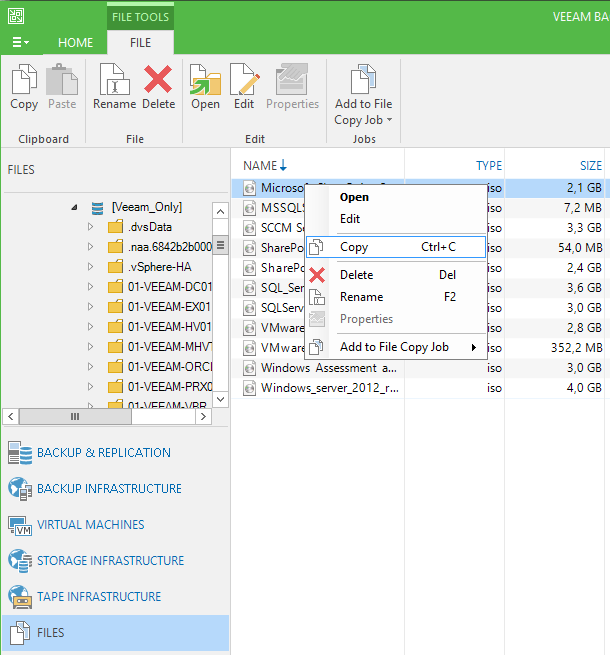
So, go to the Files tab in the console(You generally open it, tell me honestly? No? Well, in vain!). There we can find the necessary files on any of the servers registered in the Veeam console: VMware, Linux, Windows (including Hyper-V hosts, of course) - and copy them anywhere within the same registered servers via Copy-Paste or Drag'n ' Drop (Note that from Linux to Windows, and vice versa, it is also possible.)
In addition, you can also copy according to the schedule using the File Copy Job. Although there is no explicit one-time delayed execution, you can solve this by a workaround - through the command line and the Windows scheduler:
The process of copying itself, speaking of Windows / Linux, occurs from within the OS. So feel free to add physical hosts to the Veeam Backup & Replication console when you need to copy something from / to them too.
Copying occurs as is, i.e., without compression and deduplication. Want to compress files for archiving? Probably then the tapes are best suited. They have built-in archiving, and Veeam Backup & Replication has integration with tapes and its type of job File to Tape Job.
There is a built-in text editor on this tab!

And he understands text files in Unix format:

So if you need to edit a vmx file (VM configuration on the VMware platform) or any other configuration file inside Linux (and Windows too), then you can safely use this tool. By the “Save” command, the file will be saved in the same place from where it was opened (that is, you do not need to copy it to your disk at all, edit it and then upload it back).
I’ll remind those who don’t know, but those who forgot, I’ll tell you.
vPower is a Veeam technology designed to gain access to VM data in a backup without the need for full retrieval (unzipping and rehydrating all data back). It builds on the Veeam Instant VM Recovery feature for quick recovery of access to a failed VM, as well as other features, including virtual laboratories, file recovery for “other operating systems” (not Windows), etc.
The VMware vSphere platform uses its own built-in NFS server (vPower NFS). The principle of his work is as follows. Veeam Backup & Replication registers new NFS storage on the ESXi host. Then, when restoring the VM, it extracts small VM files from the backup - vmx, nvram and others. In this case, instead of disk files (vmdk), link files to them are created. Next, Veeam Backup registers the VM in vSphere and gives a command to load it (if the corresponding option is enabled). When the hypervisor accesses the VM disk file for a block of data, Veeam Backup & Replication extracts the block from the backup and gives it to the hypervisor. This is how the VM boots and then works from the backup.
And how else can this be used, if not to start the VM? Well, for example, to present a disk of a backup VM to another machine. In this use case, there are several points to keep in mind:
A few more important points:
In such a tricky way, you can quickly restore access to the disk and use it instead of restoring a separate vmdk disk with a connection to another VM. You know that Veeam Backup also has such a recovery method (restore and reconnect as a new SCSI disk), right?
What else can you do with vPower NFS? Move on!
Usually, adding VeeamBackup NFS is done 1 time per ESXi host during the operations described above. During repeated operations, it is re-checked that this connection exists, and if you manually delete this connection (unmount datastore), Veeam Backup & Replication will reconnect it. (Veeam Backup itself does not, of its own free will, delete these discs - in order to reduce the time during the next process.) Disconnecting it, in principle, does not make much sense, and once connected, it can help in other matters. So, it can be used as (suddenly!) NFS ball :) For example, you can put an ISO-shnik there or migrate VMs between ESXi hosts that are not connected by a common storage.
Convenient: reconfigure the vPower NFS folder to a convenient, accessible place for you on the repository server (the default location is in

Then it will be easier to put something into this folder from the side of the Windows machine. And you can also share the folder for easy access from the outside. (Here came the idea: check how VMware Workstation will work with such a drive.)
Connect NFS to all hosts - this can be done manually by starting the Instant VM Recovery process on each host , and then canceling the recovery (to me it’s not very convenient for me, especially with a large number of hosts). Another option is to add NFS with server data in the VMware console on each host, as shown here (but this is also done manually):

You can do the same through the cmdlet
Well, if you want to remove all NFS datastores left from Veeam Backup & Replication, then there is a script for this purpose .
Sometimes we don’t even think that the software that we use every day has features that we don’t pay attention to - and they can help us in other, not quite “our” everyday tasks.
Everyone knows that in system administration, routine tasks take up most of the time. Think about how to automate them using the tools that you already have at your fingertips, and you will probably find how to use existing programs for their not quite intended purpose. Think, so to speak, different ...
I'll start, perhaps, with the well-known to many VeeamZIP.
Veeamzip
VeeamZIP is a free backup tool.
In the free Veeam Backup Free Edition it is possible to backup only one VM per VeeamZIP pass, while in the paid version of Veeam Backup & Replication VeeamZIP has no restrictions. As a result of VeeamZIP, a file is obtained that contains a full copy of the backup VM. The VeeamZIP operation is started manually from the interface (on the Virtual Machines tab - see the screenshot below), the PowerShell cmdlet ( Help , a story on the hub ) or from vSphere Web Client (if the plug-in is installed with Veeam Backup Enterprise Manager).
The main purpose of VeeamZIP: one-time creation of an independent portable backup.
When you may need:
- Archiving old VMs; test or decommissioning service. In this case, make a VeeamZIP file and delete the VM in production.
- Transfer / send VM to the developer in order to test at his stand; a full copy is required for subsequent replication setup (seeding); it is necessary to transfer prepared VMs to branches or hand over “for repair” to contractors / for inspection by security guards, etc., etc.
- Preservation of various VM options, for example, various software versions (as in the joke: “Here is the skeleton of Alexander the Great when he was five ... But the skeleton of the seven-year-old Macedonian ...”).
- Creating an unscheduled copy before the changes, if Quick Backup does not fit - for example, the task says to store 3 daily restore points, and you need to keep the copy for a longer period.
- Come up with your option.
A nice bonus: you can set the retention period for the backup on disk. If you do not take it anywhere, then Veeam Backup will delete it yourself.
Quick migration
The Quick Migration feature is available in a free version. In the paid Veeam Backup & Replication, it is used for VM migration, after the restore operation by starting directly from the backup - Instant VM Recovery , if, for example, VMware Storage vMotion is not possible. You can also start this operation from the Virtual Machines tab .
But no one forbids using this function for normal VM transfer in a working environment! No doubt, Storage vMotion is good because it transfers VM disks without stopping their work, but it negatively affects the performance of the main storage at the time of transfer. And Quick Migration works similarly to replication in Veeam Backup & Replication, and the effect on storage systems is much less [I’ll note to myself that I need to check whether I / O Control works during this operation], but the VM will be unavailable for some time (there will be a downtime at the time of entering the VM into the pause, transfer of foreign units and the withdrawal of the machine from the pause). So here you have a choice: either a regular resource-intensive svMotion without stopping, or Veeam Quick Migration with less impact on productivity, but suspension.
In general, the Virtual Machines tab is a very useful section.
Virtual Machines Tab
Here you can easily find the necessary VMs and, by clicking on the right mouse button, add them to existing tasks or create new ones with them. This is often simpler and more visual than opening an editing task each time and adding new VMs for backup through its properties.
Do you miss FastSCP?
Who remembers Veeam FastSCP for VMware? Once upon a time, this was the only good way to copy data to datastores, for example, if these are ISO-shniki or ready-made VMs, disk images. Console scp copied very slowly, and FastSCP was really fast and free. Then it was abolished in favor of the free edition of Veeam Backup. But! The copy function was and remains in Veeam Backup & Replication.
So, go to the Files tab in the console(You generally open it, tell me honestly? No? Well, in vain!). There we can find the necessary files on any of the servers registered in the Veeam console: VMware, Linux, Windows (including Hyper-V hosts, of course) - and copy them anywhere within the same registered servers via Copy-Paste or Drag'n ' Drop (Note that from Linux to Windows, and vice versa, it is also possible.)
In addition, you can also copy according to the schedule using the File Copy Job. Although there is no explicit one-time delayed execution, you can solve this by a workaround - through the command line and the Windows scheduler:
- Create a copy job File Copy Job without including a schedule for execution.
- On the last screen of the wizard, copy the command line to complete the task.

Useful: there are the same lines for other types of tasks. - Go to the Windows scheduler and create a new task for a single run, specify the desired time and paste the copied line from step 2.

The process of copying itself, speaking of Windows / Linux, occurs from within the OS. So feel free to add physical hosts to the Veeam Backup & Replication console when you need to copy something from / to them too.
Copying occurs as is, i.e., without compression and deduplication. Want to compress files for archiving? Probably then the tapes are best suited. They have built-in archiving, and Veeam Backup & Replication has integration with tapes and its type of job File to Tape Job.
And about the Files tab
There is a built-in text editor on this tab!
And he understands text files in Unix format:
So if you need to edit a vmx file (VM configuration on the VMware platform) or any other configuration file inside Linux (and Windows too), then you can safely use this tool. By the “Save” command, the file will be saved in the same place from where it was opened (that is, you do not need to copy it to your disk at all, edit it and then upload it back).
Tricks with vPower
I’ll remind those who don’t know, but those who forgot, I’ll tell you.
vPower is a Veeam technology designed to gain access to VM data in a backup without the need for full retrieval (unzipping and rehydrating all data back). It builds on the Veeam Instant VM Recovery feature for quick recovery of access to a failed VM, as well as other features, including virtual laboratories, file recovery for “other operating systems” (not Windows), etc.
The VMware vSphere platform uses its own built-in NFS server (vPower NFS). The principle of his work is as follows. Veeam Backup & Replication registers new NFS storage on the ESXi host. Then, when restoring the VM, it extracts small VM files from the backup - vmx, nvram and others. In this case, instead of disk files (vmdk), link files to them are created. Next, Veeam Backup registers the VM in vSphere and gives a command to load it (if the corresponding option is enabled). When the hypervisor accesses the VM disk file for a block of data, Veeam Backup & Replication extracts the block from the backup and gives it to the hypervisor. This is how the VM boots and then works from the backup.
And how else can this be used, if not to start the VM? Well, for example, to present a disk of a backup VM to another machine. In this use case, there are several points to keep in mind:
- During recovery (be sure to restore to a new location, you do not want to overwrite the existing VM!) DO NOT enable the Connect VM to network ( Power on VM ) and Power on VM automatically (automatically turn on the VM) options .
- After the recovery process is completed, the current state in the log will be indicated as Waiting for user to start migration .
- In the vSphere console, to the desired working VM, start adding a new disk.
- Choose an existing one.
- Find the desired drive presented from the VM backup on the dataset [VeeamBackup_ <server name>].
- And confirm its addition.
- Inside the VM, initialize, if necessary, and use this disk.
- Profit!
A few more important points:
- It is desirable to perform recovery on the host where the target VM is located, to which you want to attach the disk. Otherwise, you may not see the vPower NFS storage - in case the host has never been restored.
- Do not try to attach the disk to the same VM with which this vPower NFS service is running (i.e., to the Veeam repository) - get an error.
- If you write something to such a disk, the data will not get into the backup copy. New data will be saved to disk if you do not cancel Instant VM Recovery. After the migration of such disks, the data is stored in it permanently.
- Storage vMotion for the VM to which such a disk is attached will help transfer this disk to the main working storage (in this case, it will migrate with the new data).
- And do not forget then to unregister the initially "restored" VM (that is, make Stop publishing for Instant VM Recovery).
In such a tricky way, you can quickly restore access to the disk and use it instead of restoring a separate vmdk disk with a connection to another VM. You know that Veeam Backup also has such a recovery method (restore and reconnect as a new SCSI disk), right?
What else can you do with vPower NFS? Move on!
Here you have a ball
Usually, adding VeeamBackup NFS is done 1 time per ESXi host during the operations described above. During repeated operations, it is re-checked that this connection exists, and if you manually delete this connection (unmount datastore), Veeam Backup & Replication will reconnect it. (Veeam Backup itself does not, of its own free will, delete these discs - in order to reduce the time during the next process.) Disconnecting it, in principle, does not make much sense, and once connected, it can help in other matters. So, it can be used as (suddenly!) NFS ball :) For example, you can put an ISO-shnik there or migrate VMs between ESXi hosts that are not connected by a common storage.
Convenient: reconfigure the vPower NFS folder to a convenient, accessible place for you on the repository server (the default location is in
%ProgramData%) Then it will be easier to put something into this folder from the side of the Windows machine. And you can also share the folder for easy access from the outside. (Here came the idea: check how VMware Workstation will work with such a drive.)
Connect NFS to all hosts - this can be done manually by starting the Instant VM Recovery process on each host , and then canceling the recovery (to me it’s not very convenient for me, especially with a large number of hosts). Another option is to add NFS with server data in the VMware console on each host, as shown here (but this is also done manually):
You can do the same through the cmdlet
New-Datastore(from powercli ). For example, like this:Get-VMHost | New-Datastore -Nfs -Name VeeamBackup_vbr.domain.local -Path "/VeeamBackup_vbr.domain.local" -NfsHost vbr.domain.local
Well, if you want to remove all NFS datastores left from Veeam Backup & Replication, then there is a script for this purpose .
And instead of a conclusion - New Year's wish
Sometimes we don’t even think that the software that we use every day has features that we don’t pay attention to - and they can help us in other, not quite “our” everyday tasks.
Everyone knows that in system administration, routine tasks take up most of the time. Think about how to automate them using the tools that you already have at your fingertips, and you will probably find how to use existing programs for their not quite intended purpose. Think, so to speak, different ...