JAMstack: How to create your blog using Gatsby + Contentful + Netlify
Have you heard of the new JAMstack approach? The ability to write web applications on your favorite framework, manage content from the admin panel, and get fully valid HTML pages based on the latest SEO, PWA and a11y recommendations.
Interesting? Then here is a list of issues addressed in this article:
- What is this new stack and why is it needed?
- How to run a basic application using gatsby?
- Working with Contentful and creating the first chunk of data.
- How to connect Contentful and Gatsby using GraphQL?
- Set up automatic deployment using Netlify
JAMstack
As you know: “Everything new is a long forgotten old one” and this is another confirmation - the fashion for static sites is back. What was the internet ten years ago? It was PHP server rendering, which substituted the data from the database into HTML templates and sent it to the client.

This approach has been replaced by JavaScript frameworks, which in recent years are represented by the holy trinity of the web React Angular Vue.Amen. What was the fundamental difference? In the speed and responsiveness of the interface, because now all the logic of the site was on the client, and for any mouse movement you can call a beautiful animation with changing content, sending requests to the API.

What's next? JAM offers:
- no server-side rendering, and generally remove the server as such
- no client-side rendering down
<div id=”root”></div> - compile the site into plain HTML code, once, at the time of the content change
- placing the site on any file hosting
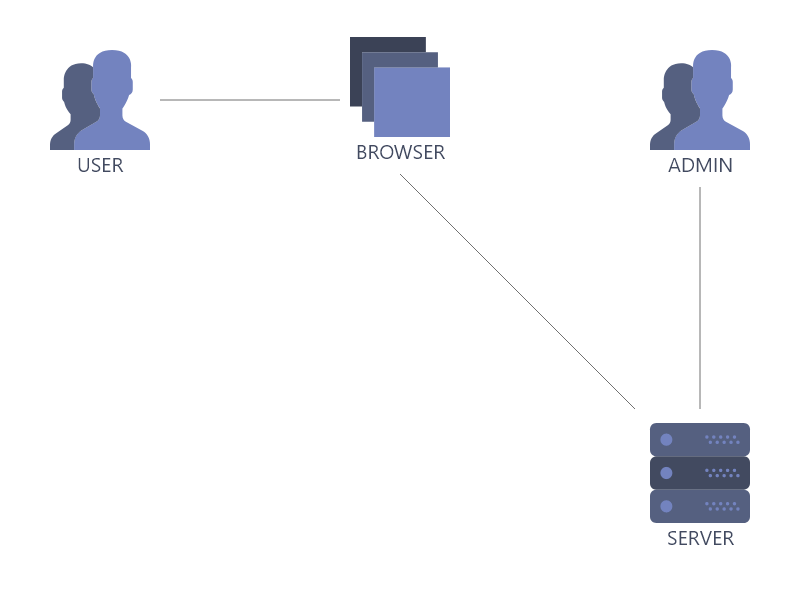
The client always receives a pre-rendered page with a fully valid layout and the question of performance now concerns only the speed of the Internet connection (but of course you should not forget about the coefficient of the developer’s hands-onness).
Tools
JAM is just an approach, the means for which the market is already enough, but as you know, nails can be driven with anything, but I would prefer a hammer.

List of the best tools for 2019:
Gatsby is a static site generator from React + GraphQL applications. Why is it such a choice, and not Angular or Vue, I find it difficult to answer, but most likely the matter is in evil statistics, which says that in spite of all disputes, React is the most popular framework of the last three years (do not throw stones at me in the comments, for this statement actually paid me). For a more visual representation, it create-react-appcompiles the code in a JavaScript build, for further rendering when the page is launched, Gatsby generates full-fledged HTML pages with valid layout that are shown as they are, even with JS turned off.
Contentful - content management system on static pages. This is WordPress , which does not save the connection between the templates and the data in the database, but instead changes the data directly in the HTML files.
Netlify is a very easy-to-use deployment system that allows you to associate most of the popular file hosts with a JAM application, and even on the HTTPS protocol.
From theory to practice
Now that you have decided on the tools, you can proceed.
Contentful
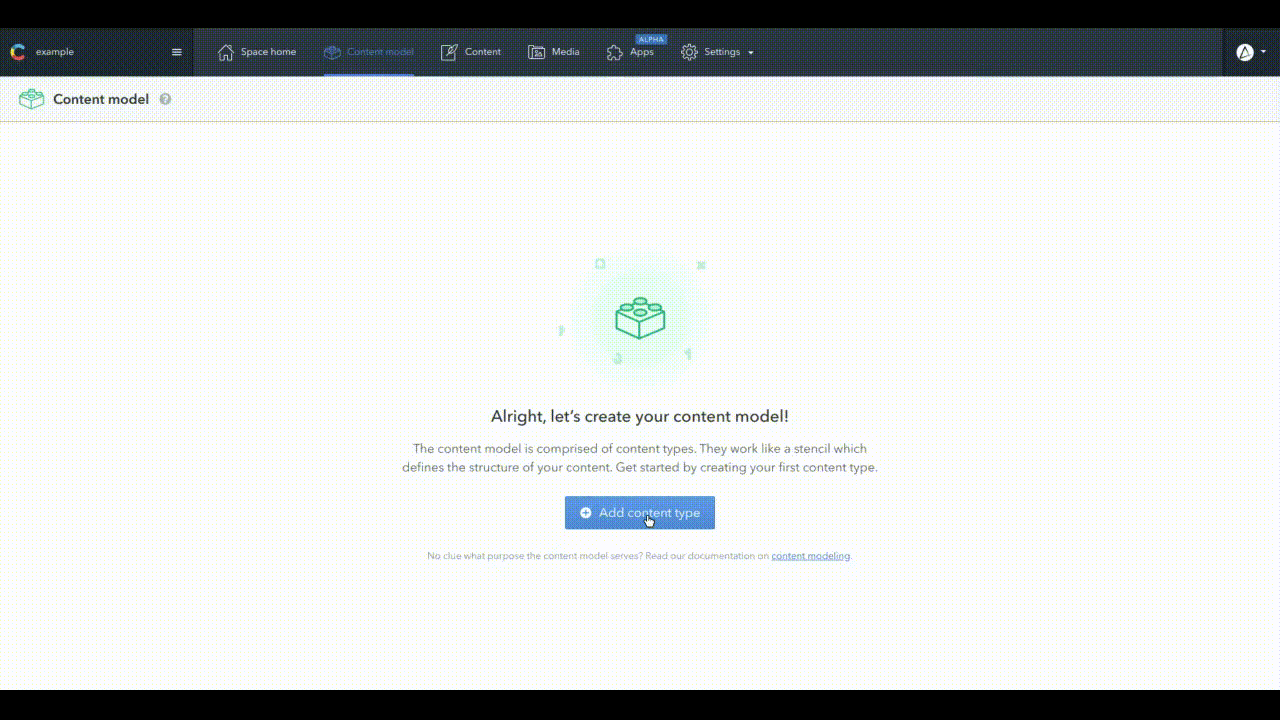
We create an account and see that by default the service generates an exemplary project, which I recommend to delete immediately, as in my subjective opinion it interferes more than helps to understand. Create a new free project, without generating examples.
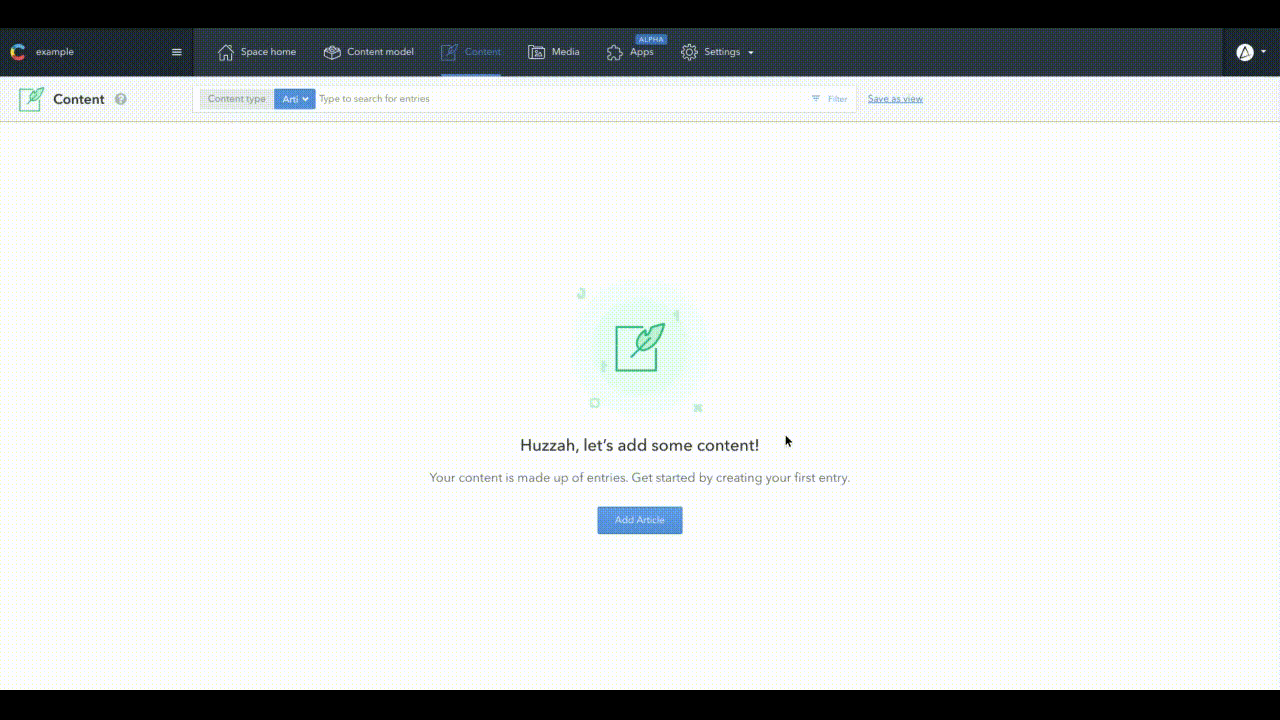
The content management system is based on two entities - the Content model , which describes the structure and types of data, and the Content itself . First, create a simple model for our blog. Content model consists of data types, for example for a blog data types are: Article , Person .
Of course, you can choose any level of abstraction that you like, for example, you can abolish Person and specify information about the author inside the Article , as _Article.author name
  article/
  ├── title (Short text)
  ├── text (Long text)
  ├── banner (Single media)
  └── publishedAt (Date & Time)
  person/
  ├── fullName (Short text)
  └── avatar (Single media)
Further, using already created data types, we add content, for texts it is possible to use SaganIpsum for Unsplash pictures .
Gatsby
Open a terminal and create a working environment
## Установка
npm install --global gatsby-cli
## Создание проекта
gatsby new personal-blog
## Для любителей минимализма можно установить Hello World проект
## gatsby new minimal-gatsby https://github.com/gatsbyjs/gatsby-starter-hello-world
## Переходим в папку
cd personal-blog personal-blog/
├── gatsby-browser.js
├── gatsby-config.js
├── gatsby-node.js
├── gatsby-ssr.js
├── LICENSE
├── node_modules
├── package.json
├── README.md
└── src
├── components
│ ├── header.js
│ ├── image.js
│ ├── layout.css
│ ├── layout.js
│ └── seo.js
├── images
│ ├── gatsby-astronaut.png
│ └── gatsby-icon.png
└── pages
├── 404.js
├── index.js
└── page-2.js## Запуск проекта с hot-reloading
gatsby developWhat happened? React + GraphQL application collected using Gatsby , which means that any old project that is rendered for a long time can be transferred to a static HTML site and get a speed increase several times.
Gatsby + contentful
## Установка дополнительных пакетов
npm install gatsby-source-contentful dotenv
Create a .env file in the application root with the following contents:
/* 12-и значный ключ из Contentful → Settings → API keys → Example key 1→ Space ID */
CONTENTFUL_SPACE_ID=xxxxxxxxxxxx
/* 64-х значный ключ из Contentful → Settings → API keys → Example key 1→ Content Delivery API - access token */
CONTENTFUL_ACCESS_TOKEN=xxxxxxxxxxxxxxxxxxxxxxxxxxxxxxxxxxxxxxxxxxxxxxxxxxxxxxxxxxxxxxxx
Extending the configuration in gatsby-config.js :
if (process.env.NODE_ENV === "development") {
  require("dotenv").config();
}
module.exports = {
  /* other settings */
  plugins: [
    /* other plugins */
    {
      resolve: `gatsby-source-contentful`,
      options: {
        spaceId: process.env.CONTENTFUL_SPACE_ID,
        accessToken: process.env.CONTENTFUL_ACCESS_TOKEN,
      },
    }
  ]
}
Restart the Gatsby server and if the console does not show any errors, then the connection with Contentful is established and you can proceed further.
Gatsby + GraphQL + Contentful
If you are not familiar with GraphQL, then do not worry because it is quite simple. Our site is now located at:
But for the time being we will leave it and open the second tab:
http: // localhost: 8000 / ___ graphql
Before us is Graphite IDE right in the browser. It is very convenient to build queries and test them. Click on the Docs in the upper right corner to expand the sidebar with the documentation, but the surprise is not the GraphQL documentation, it is the documentation of your API. Expand the Query list to see all available schemas for queries, with their data types.
The schemes of interest to us have something like the following name:
contentful your datatype - one instance of
allContentful your datatype - list of instances
- contentfulrticle
- contentfulerson
- allContentfulArticle
- allContentfulPerson
Using the left panel we will construct the correct request for our data (try autocompletion, very convenient).
  {
    contentfulPerson {
      fullName
      avatar {
        file {
          url
        }
      }
    }
    allContentfulArticle {
      edges {
        node {
          title
          text {
            text
          }
          banner {
            file {
              url
            }
          }
          publishedAt
        }
      }
    }
  }
What can be noted from the query structure:
- to get the URL for the file, you need to contact the path
typeName.file.url - to get the text from the Long text type, go along the way
typeName.typeName - To get a list of instances of a particular type, use the following path.
allContentfulName.edges
We transfer the query schema to the project and render it as normal data in a React application. It is generally accepted Best Practice to use a <StaticQuery />component from the gatsby package that is already installed in the project.
  import React from "react"
  import { StaticQuery, graphql } from "gatsby"
  import Layout from "../components/layout"
  import Article from "../components/article"
  const IndexPage = () => (
    <Layout>
      <StaticQuery
        query={graphql`
          {
            allContentfulArticle {
              edges {
                node {
                  id
                  title
                  text {
                    text
                  }
                  banner {
                    file {
                      url
                    }
                  }
                  publishedAt
                }
              }
            }
          }
        `}
        render={({
          allContentfulArticle: {
            edges
          }
        }) => (
          edges.map(({ node }) => (
            <Article key={node.id} content={node} />
          ))
        )}
      />
    </Layout>
  )
  export default IndexPage
How it works? The queryschema of the request is passed to GraphQL , and to renderour favorite JSX. Use destructuring to make the code more readable.
  import React from "react"
  const Article = ({
    content: {
      title,
      text,
      banner: {
        file: {
          url
        }
      },
      publishedAt
    }
  }) => (
    <div>
      <h2>{title}</h2>
      <img src={url} alt={title}/>
      <p>
        {text}
      </p>
      <h5>{publishedAt}</h5>
    </div>
  )
  export default Article
Now, when it became clear how to get and render the data, you can start developing, but since this article is not about how to make a site on a reactor, we will skip this moment and imagine that the site is ready.
Let's place our project on GitHub, from where it can be deployed in the next step.
  ## Находясь в папке с проектом инициализируем пустой репозиторий
  git init
  ## Сделаем первый коммит
  git add .
  git commit -m “initial commit”
  ## Создаем репозиторий на GitHub и подключаем
  git remote add origin git@github.com:yourname/my-repository-name.git
  ## Публикуем изменения
  git push origin master
Configuring Netlify
We create an account using the service on which you plan to host projects. I chose GitHub, so after successful authorization we set up a new project by clicking on New site from Git . We connect our repository, and Netlify will automatically determine that this is a Gatsby project and will set up all the scripts for building.
Select the desired branch, and do not forget about environment variables. To do this, open the Advanced settings menu and add the contents of the local .env file and confirm the settings.
A couple of minutes of magic and a site on the site:
https://tender-liskov-ce3ad0.netlify.com
It remains to add a hook to update the content. Go to settings:
Deploy settings → Build hooks → Add build hook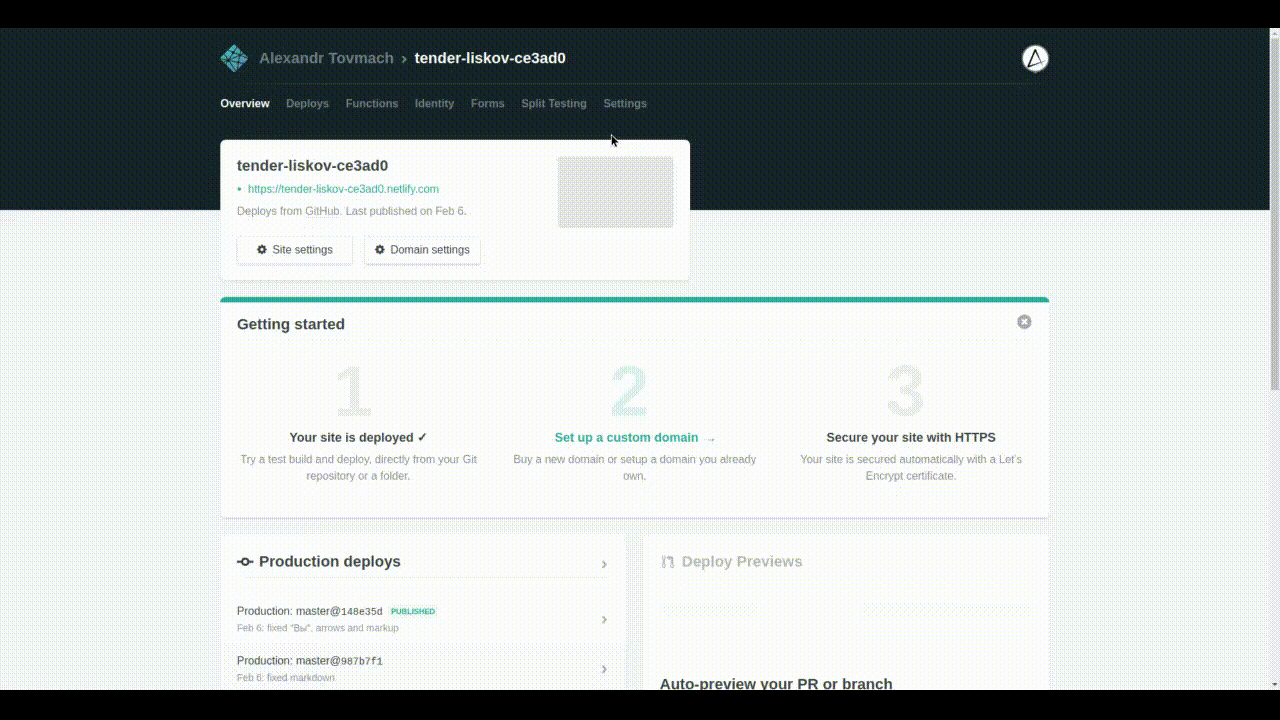
Set any clear name, for example "Contentful hook" , select the branch with which we will build and confirm. The result will be a link, copy and go to the Contentful panel :
Settings → Webhooks
We are looking for a template for Netlify on the right side panel and in two clicks we connect two systems. We try to change the content and see how new data appear on the site.
Total
JAM-stack combines the solution of the problems of previous approaches and seems to claim to seize power and worldwide popularity, but is it a revolution? There is nothing new and special, but this is the most advanced methodology of the last two years, there, in a foreign land , but what about us? We just started to translate projects from WordPress to React, and this is definitely progress, but can we not take a stance, as the legendary Indian outsourcing, should we take more decisive steps?