Proxmox 4.0: The root partition on ZFS RAID1 or how to increase fault tolerance if the server has only 2 disks
The task turned up for me - to launch Proxmox and several virtual machines on a server with only 2 disks. At the same time, it was necessary to ensure, at least, some reliability and ease of fixing problems associated with the failure of one of the disks. Further in the note is a detailed description of testing the solution at the stand.
I believe that the reader of this article can independently install Proxmox on the node and will not consider installing and configuring the hypervisor itself. Consider only the settings regarding ZFS RAID1 and testing the failure of one of the drives.
The hardware on which the project was to be deployed was a Supermicro node, apparently performed by 2 node in 1U with a pseudo-raid integrated into the Intel chipset which is not supported in Proxmox. In this regard, we will try to test the solution offered “out of the box” in version 4.0. At least kill me - I don’t remember whether there was such an installation option in Proxmox 3.6, maybe it was, but it was not saved in memory due to the lack of demand for such a configuration. In the test rack, we found a similar server and I set about checking the solution provided by the guys from Proxmox Server Solutions.
As I warned, I will not show the installation completely, I will focus only on important points.
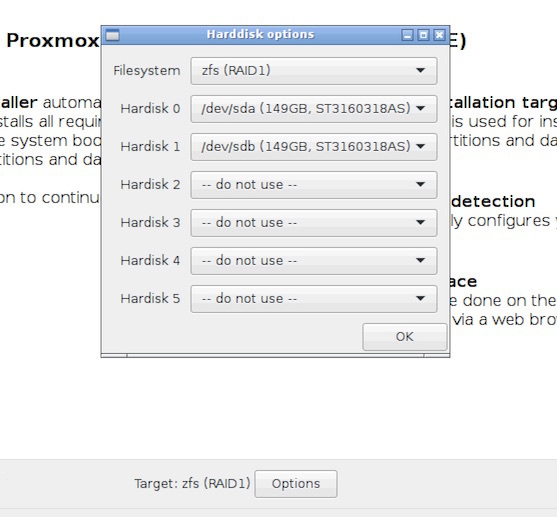
We select zfs RAID1:
The server is test and there is no subscription to the commercial repository. In /etc/apt/sources.list we connect the free one:
In /etc/apt/sources.list.d/pve-enterprise.list we comment on the commercial one.
Well, suddenly you forget:
We look at what the installer cut on the disks (I give only a part of the output):
Take a look at our array:
By default, the Proxmox installer installed the bootloader on both partitions - great!
We simulate a hard drive failure as follows:
- turn off the server;
- pull out one of the baskets;
- turn on the server.
The server is perfectly loaded on any of the remaining disks, the array works in DEGRADED mode and kindly tells which disk we need to change and how to do it:
If you put the ejected disk back into place, it perfectly "gets" back into the mirror:
We stage the replacement of a disk with a new one. I just took another basket with the same drive from the old server. We put the basket on a hot one for greater credibility:
We have a conditionally faulty drive / dev / sdb and, given the same capacity and geometry, copy the 1: 1 partition table from a working drive / dev / sda
Generate unique UUIDs for / dev / sdb
We put the bootloader on the replaced disk and update GRUB:
It remains only to replace the failed disk in the array with a freshly installed one, but here one problem pops up, generated by the method of addressing the disks in the array used in the installer. Namely, the disks are included in the array at the physical address and the zpool replace rpool / dev / sdb2 command will show us such a fig:
Which is completely logical, you cannot change a failed disk to / dev / sdb2 since the bad disk is / dev / sdb2 , and why do we need to repeat the installer flaw? Bind the drive by UUID, I generally forgot the time when the drives were nailed with nails of the form / dev / sdXX - our UUID is everything:
We were warned about the need to wait for the end of synchronization before rebooting. Check the status of the array:
For general purposes, we will include sda2 in the array using the UUID:
While I copied the previous 2 commands from the console to the editor, the array was already synchronized:
When there is no hardware Raid-controller it is quite convenient to apply the placement of the root partition on zfs RAID1, which is available in Proxmox 4.0 “out of the box”. Of course, the option of transferring / boot and the root to the mirrors created by mdadm tools always remains, which has also been used by me many times and still does not work on several servers, but the considered option is simpler and offered by the developers of the product “out of the box”.
There were a few questions, so far, hands only reached an autoexpand performance check. 160Gb test drives have been replaced with 500Gb.
After replacing the first disk:
After replacing the second:
All manipulations occur online, without rebooting the server and stopping virtual machines.
I made instructions for the classic installation of Proxmox on soft raid1, there are many such instructions, but the 4th version has its own small details. Who cares - we read
Introductory
I believe that the reader of this article can independently install Proxmox on the node and will not consider installing and configuring the hypervisor itself. Consider only the settings regarding ZFS RAID1 and testing the failure of one of the drives.
The hardware on which the project was to be deployed was a Supermicro node, apparently performed by 2 node in 1U with a pseudo-raid integrated into the Intel chipset which is not supported in Proxmox. In this regard, we will try to test the solution offered “out of the box” in version 4.0. At least kill me - I don’t remember whether there was such an installation option in Proxmox 3.6, maybe it was, but it was not saved in memory due to the lack of demand for such a configuration. In the test rack, we found a similar server and I set about checking the solution provided by the guys from Proxmox Server Solutions.
Installation
As I warned, I will not show the installation completely, I will focus only on important points.
We select zfs RAID1:
The server is test and there is no subscription to the commercial repository. In /etc/apt/sources.list we connect the free one:
deb http://download.proxmox.com/debian jessie pve-no-subscription
In /etc/apt/sources.list.d/pve-enterprise.list we comment on the commercial one.
Well, suddenly you forget:
root@pve1:~# apt-get update && apt-get upgrade
We look at what the installer cut on the disks (I give only a part of the output):
root@pve1:~# fdisk -l /dev/sd*
Disk /dev/sda: 149.1 GiB, 160041885696 bytes, 312581808 sectors
Units: sectors of 1 * 512 = 512 bytes
Sector size (logical/physical): 512 bytes / 512 bytes
I/O size (minimum/optimal): 512 bytes / 512 bytes
Disklabel type: gpt
Disk identifier: 758FA29C-4F49-4315-BA0C-F3CCC921FA01
Device         Start       End   Sectors  Size Type
/dev/sda1         34      2047      2014 1007K BIOS boot
/dev/sda2       2048 312565389 312563342  149G Solaris /usr & Apple ZFS
/dev/sda9  312565390 312581774     16385    8M Solaris reserved 1
Disk /dev/sdb: 149.1 GiB, 160041885696 bytes, 312581808 sectors
Units: sectors of 1 * 512 = 512 bytes
Sector size (logical/physical): 512 bytes / 512 bytes
I/O size (minimum/optimal): 512 bytes / 512 bytes
Disklabel type: gpt
Disk identifier: 3CD4B489-A51D-4354-8018-B1391F52B08D
Device         Start       End   Sectors  Size Type
/dev/sdb1         34      2047      2014 1007K BIOS boot
/dev/sdb2       2048 312565389 312563342  149G Solaris /usr & Apple ZFS
/dev/sdb9  312565390 312581774     16385    8M Solaris reserved 1
Take a look at our array:
root@pve1:~# zpool status rpool
  pool: rpool
 state: ONLINE
  scan: none requested
config:
        NAME        STATE     READ WRITE CKSUM
        rpool       ONLINE       0     0     0
          mirror-0  ONLINE       0     0     0
            sda2    ONLINE       0     0     0
            sdb2    ONLINE       0     0     0
errors: No known data errors
By default, the Proxmox installer installed the bootloader on both partitions - great!
Testing
We simulate a hard drive failure as follows:
- turn off the server;
- pull out one of the baskets;
- turn on the server.
The server is perfectly loaded on any of the remaining disks, the array works in DEGRADED mode and kindly tells which disk we need to change and how to do it:
root@pve1:~# zpool status rpool
  pool: rpool
 state: DEGRADED
status: One or more devices could not be used because the label is missing or
        invalid.  Sufficient replicas exist for the pool to continue
        functioning in a degraded state.
action: Replace the device using 'zpool replace'.
   see: http://zfsonlinux.org/msg/ZFS-8000-4J
  scan: none requested
config:
        NAME                      STATE     READ WRITE CKSUM
        rpool                     DEGRADED     0     0     0
          mirror-0                DEGRADED     0     0     0
            14981255989033513363  FAULTED      0     0     0  was /dev/sda2
            sda2                  ONLINE       0     0     0
errors: No known data errors
If you put the ejected disk back into place, it perfectly "gets" back into the mirror:
root@pve1:~# zpool status rpool
  pool: rpool
 state: ONLINE
status: One or more devices has experienced an unrecoverable error.  An
        attempt was made to correct the error.  Applications are unaffected.
action: Determine if the device needs to be replaced, and clear the errors
        using 'zpool clear' or replace the device with 'zpool replace'.
   see: http://zfsonlinux.org/msg/ZFS-8000-9P
  scan: resilvered 1.29M in 0h0m with 0 errors on Wed Dec  2 08:37:46 2015
config:
        NAME        STATE     READ WRITE CKSUM
        rpool       ONLINE       0     0     0
          mirror-0  ONLINE       0     0     0
            sda2    ONLINE       0     0     3
            sdb2    ONLINE       0     0     0
errors: No known data errors
We stage the replacement of a disk with a new one. I just took another basket with the same drive from the old server. We put the basket on a hot one for greater credibility:
root@pve1:~# fdisk -l /dev/sdb
Disk /dev/sdb: 149.1 GiB, 160041885696 bytes, 312581808 sectors
Units: sectors of 1 * 512 = 512 bytes
Sector size (logical/physical): 512 bytes / 512 bytes
I/O size (minimum/optimal): 512 bytes / 512 bytes
Disklabel type: gpt
Disk identifier: 38BE38AC-00D9-4680-88FC-0876378526BC
Device      Start       End   Sectors   Size Type
/dev/sdb1      40    409639    409600   200M EFI System
/dev/sdb2  411648 312580095 312168448 148.9G Microsoft basic data
We have a conditionally faulty drive / dev / sdb and, given the same capacity and geometry, copy the 1: 1 partition table from a working drive / dev / sda
root@pve1:~# sgdisk -R /dev/sdb /dev/sda
The operation has completed successfully.
Generate unique UUIDs for / dev / sdb
root@pve1:~# sgdisk -G /dev/sdb
The operation has completed successfully.
We put the bootloader on the replaced disk and update GRUB:
root@pve1:~# grub-install --recheck /dev/sdb
Installing for i386-pc platform.
Installation finished. No error reported.
root@pve1:~# update-grub
Generating grub configuration file ...
Found linux image: /boot/vmlinuz-4.2.3-2-pve
Found initrd image: /boot/initrd.img-4.2.3-2-pve
Found linux image: /boot/vmlinuz-4.2.2-1-pve
Found initrd image: /boot/initrd.img-4.2.2-1-pve
Found memtest86+ image: /ROOT/pve-1@/boot/memtest86+.bin
Found memtest86+ multiboot image: /ROOT/pve-1@/boot/memtest86+_multiboot.bin
done
root@pve1:~# update-initramfs -u
update-initramfs: Generating /boot/initrd.img-4.2.3-2-pve
It remains only to replace the failed disk in the array with a freshly installed one, but here one problem pops up, generated by the method of addressing the disks in the array used in the installer. Namely, the disks are included in the array at the physical address and the zpool replace rpool / dev / sdb2 command will show us such a fig:
root@pve1:~# zpool replace rpool /dev/sdb2
cannot replace /dev/sdb2 with /dev/sdb2: /dev/sdb2 is busy
Which is completely logical, you cannot change a failed disk to / dev / sdb2 since the bad disk is / dev / sdb2 , and why do we need to repeat the installer flaw? Bind the drive by UUID, I generally forgot the time when the drives were nailed with nails of the form / dev / sdXX - our UUID is everything:
root@pve1:~# zpool replace rpool /dev/disk/by-partuuid/cf590df4-72b7-4cfc-a965-001ffe56d0c9
Make sure to wait until resilver is done before rebooting.
We were warned about the need to wait for the end of synchronization before rebooting. Check the status of the array:
root@pve1:~# zpool status rpool
  pool: rpool
 state: ONLINE
status: One or more devices is currently being resilvered.  The pool will
        continue to function, possibly in a degraded state.
action: Wait for the resilver to complete.
  scan: resilver in progress since Wed Dec  2 18:07:01 2015
        92.8M scanned out of 920M at 8.44M/s, 0h1m to go
        92.5M resilvered, 10.09% done
config:
        NAME                                      STATE     READ WRITE CKSUM
        rpool                                     ONLINE       0     0     0
          mirror-0                                ONLINE       0     0     0
            sda2                                  ONLINE       0     0     0
            cf590df4-72b7-4cfc-a965-001ffe56d0c9  ONLINE       0     0     0  (resilvering)
errors: No known data errors
For general purposes, we will include sda2 in the array using the UUID:
root@pve1:~# zpool detach rpool /dev/sda2
root@pve1:~# zpool attach rpool /dev/disk/by-partuuid/cf590df4-72b7-4cfc-a965-001ffe56d0c9 /dev/disk/by-partuuid/8263d908-e9a8-4ace-b01e-0044fa519037
Make sure to wait until resilver is done before rebooting.
While I copied the previous 2 commands from the console to the editor, the array was already synchronized:
root@pve1:~# zpool status rpool
  pool: rpool
 state: ONLINE
  scan: resilvered 920M in 0h1m with 0 errors on Wed Dec  2 18:36:37 2015
config:
        NAME                                      STATE     READ WRITE CKSUM
        rpool                                     ONLINE       0     0     0
          mirror-0                                ONLINE       0     0     0
            cf590df4-72b7-4cfc-a965-001ffe56d0c9  ONLINE       0     0     0
            8263d908-e9a8-4ace-b01e-0044fa519037  ONLINE       0     0     0
errors: No known data errors
Conclusion
When there is no hardware Raid-controller it is quite convenient to apply the placement of the root partition on zfs RAID1, which is available in Proxmox 4.0 “out of the box”. Of course, the option of transferring / boot and the root to the mirrors created by mdadm tools always remains, which has also been used by me many times and still does not work on several servers, but the considered option is simpler and offered by the developers of the product “out of the box”.
Addition
There were a few questions, so far, hands only reached an autoexpand performance check. 160Gb test drives have been replaced with 500Gb.
After replacing the first disk:
root@testve1:~# zpool list
NAME    SIZE  ALLOC   FREE  EXPANDSZ   FRAG    CAP  DEDUP  HEALTH  ALTROOT
rpool   149G  69.3G  79.7G      317G    28%    46%  1.00x  ONLINE  -
After replacing the second:
root@testve1:~# zpool list
NAME    SIZE  ALLOC   FREE  EXPANDSZ   FRAG    CAP  DEDUP  HEALTH  ALTROOT
rpool   465G  69.3G   396G         -     9%    14%  1.00x  ONLINE  -
All manipulations occur online, without rebooting the server and stopping virtual machines.
I made instructions for the classic installation of Proxmox on soft raid1, there are many such instructions, but the 4th version has its own small details. Who cares - we read