Kubernetes tips & tricks: access to dev sites
We continue a series of articles with practical instructions on how to facilitate the life of exploitation and developers in their daily work with Kubernetes. All of them are collected from our experience in solving problems from clients and have improved over time, but still do not pretend to be ideal - consider them more like ideas and preparations, offer your solutions and improvements in the comments.

This time, two topics will be considered, conditionally related to one topic: user access to the dev-environment.
We are often faced with the task of closing the entire dev-circuit (dozens / hundreds of applications) behind basic auth or behind the white list, so that search bots or just very third-party people cannot get there.
Usually, to restrict access to each Ingress and application, separate basic auth secrets need to be created . Managing them is very problematic when recruited from a dozen applications. Therefore, we organized a centralized access control.
For this, nginx was created with a configuration of this type:
Further, in the application Ingress, we simply add an annotation:
Thus, when accessing the application, the request goes to the service

In the case of using such a service, a single repository is enough in which a list of all accesses is stored and through which we can conveniently configure our “single authorization center”. Its distribution to new applications is made by the simple addition of annotations.
... whether it’s Redis, RabbitMQ, PostgreSQL or the favorite PHP developer Xdebug.
Very often, transferring applications to Kubernetes, to ensure better security, we have to close access from the outside altogether. And then the developers, who are used to “going with their IDE” to the base or in Xdebug, have serious difficulties.
To solve this problem, we use VPN directly in the Kubernetes cluster. The general scheme looks like this: when connecting to a VPN server running in K8s, in the OpenVPN configuration file, we push the DNS server address, which also lives in K8s. OpenVPN configures VPN in such a way that when a resource is requested within Kubernetes, it first goes to the Kubernetes DNS server - for example, for the address of the service
During the operation of this solution, we have managed to expand it repeatedly. In particular:
In the continuation of a series of articles with practical recipes of the company “Flant” on the operation of Kubernetes, I will cover topics such as the allocation of individual nodes for specific tasks (why and how?) And setting up for large loads of services like php-fpm / gunicorn running in containers. Subscribe to our blog in order not to miss updates!
Other K8s series tips & tricks:
Read also in our blog:

This time, two topics will be considered, conditionally related to one topic: user access to the dev-environment.
1. How do we close dev-contours from unnecessary users?
We are often faced with the task of closing the entire dev-circuit (dozens / hundreds of applications) behind basic auth or behind the white list, so that search bots or just very third-party people cannot get there.
Usually, to restrict access to each Ingress and application, separate basic auth secrets need to be created . Managing them is very problematic when recruited from a dozen applications. Therefore, we organized a centralized access control.
For this, nginx was created with a configuration of this type:
location / {
  satisfy any;
  auth_basic"Authentication or whitelist!";
  auth_basic_user_file /etc/nginx/htpasswd/htpasswd;
  allow10.0.0.0/8;
  allow175.28.12.2/32;
  deny  all;
  try_files FAKE_NON_EXISTENT @return200;
}
location@return200 {
  return200 Ok;
}
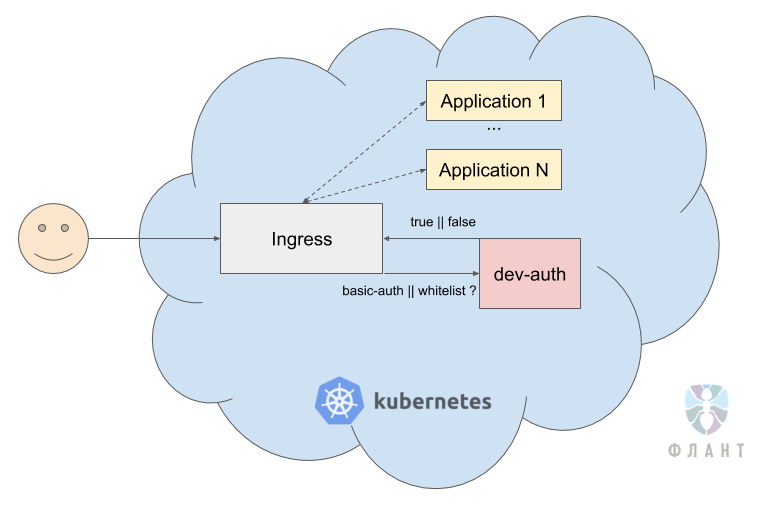
Further, in the application Ingress, we simply add an annotation:
ingress.kubernetes.io/auth-url: "http://dev-auth.dev-auth-infra.svc.cluster.local"Thus, when accessing the application, the request goes to the service
dev-auth, which checks whether the correct basic auth is entered or the client is included in whitelist. If one of the conditions is met, the request is confirmed and passes to the application. 
In the case of using such a service, a single repository is enough in which a list of all accesses is stored and through which we can conveniently configure our “single authorization center”. Its distribution to new applications is made by the simple addition of annotations.
2. How do we provide access to applications inside Kubernetes in a dev environment?
... whether it’s Redis, RabbitMQ, PostgreSQL or the favorite PHP developer Xdebug.
Very often, transferring applications to Kubernetes, to ensure better security, we have to close access from the outside altogether. And then the developers, who are used to “going with their IDE” to the base or in Xdebug, have serious difficulties.
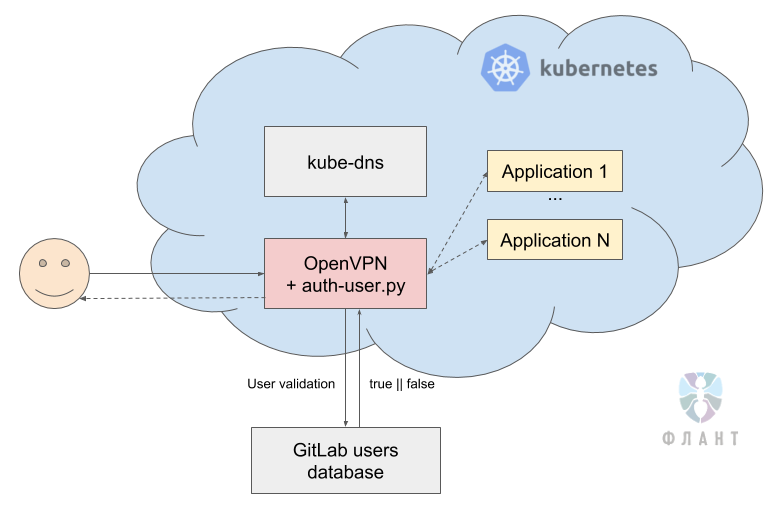
To solve this problem, we use VPN directly in the Kubernetes cluster. The general scheme looks like this: when connecting to a VPN server running in K8s, in the OpenVPN configuration file, we push the DNS server address, which also lives in K8s. OpenVPN configures VPN in such a way that when a resource is requested within Kubernetes, it first goes to the Kubernetes DNS server - for example, for the address of the service
redis.production.svc.cluster.local. DNS in Kubernetes resolved it to 10.244.1.15 and requests for this IP address go through OpenVPN directly to the Kubernetes cluster. During the operation of this solution, we have managed to expand it repeatedly. In particular:
- Since we did not find a simple and adequate (for our case) admin panel to account for access to the VPN , we had to create our own simple interface - after all, the official chart provides only for launching console commands for issuing certificates.
The resulting admin panel (see also on Docker Hub ) looks very ascetic:
You can start new users or revoke old certificates:
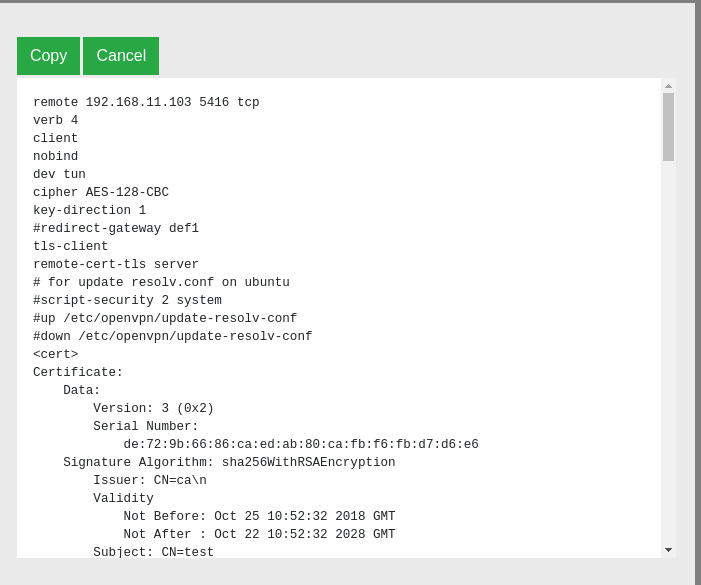
You can also see the config for this client:
- We added authorization in VPN based on users in GitLab , where the password is checked and whether the user is active in GitLab. This is for cases when the client wants to manage users who can connect to dev VPN only on the basis of GitLab, and without using additional admins - in a sense, it turns out “SSO for the poor”. The basis was already mentioned ready-made chart .
To do this, we wrote a Python script that, when the user connects to OpenVPN, using a login and password, compares the hash in the GitLab database and checks its status (is it active).
Here is the script itself:#!/usr/bin/env python3# pip3 install psycopg2-binary bcryptimport bcrypt import sys import os import psycopg2 import yaml with open("/etc/openvpn/setup/config.yaml", 'r') as ymlfile: cfg = yaml.load(ymlfile) defget_user_info(username=''):try: connect_str = "dbname=%s user=%s host=%s password=%s" % (cfg['db'], cfg['user'], cfg['host'], cfg['pass']) # use our connection values to establish a connection conn = psycopg2.connect(connect_str) # create a psycopg2 cursor that can execute queries cursor = conn.cursor() # create a new table with a single column called "name" cursor.execute("""SELECT encrypted_password,state FROM users WHERE username='%s';""" % username) # run a SELECT statement - no data in there, but we can try it rows = cursor.fetchall() print(rows) return(rows[0]) except Exception as e: print("Uh oh, can't connect. Invalid dbname, user or password?") print(e) defcheck_user_auth(): username = os.environ['username'] password = bytes(os.environ['password'], 'utf-8') # hashed = bcrypt.hashpw(password, bcrypt.gensalt()) user_info = get_user_info(username=username) user_encrypted_password = bytes(user_info[0], 'utf-8') user_state = Trueif user_info[1] == 'active'elseFalseif bcrypt.checkpw(password, user_encrypted_password) and user_state: print("It matches!") sys.exit(0) else: print("It does not match :(") sys.exit(1) defmain(): check_user_auth() if __name__ == '__main__': main()
And in the OpenVPN config, we simply specify the following: Thus, if the client has an employee left, he was simply deactivated in GitLab, after which he will not be able to connect to VPN either.auth-user-pass-verify /etc/openvpn/auth-user.py via-env
script-security 3
client-cert-not-required
Instead of conclusion
In the continuation of a series of articles with practical recipes of the company “Flant” on the operation of Kubernetes, I will cover topics such as the allocation of individual nodes for specific tasks (why and how?) And setting up for large loads of services like php-fpm / gunicorn running in containers. Subscribe to our blog in order not to miss updates!
PS
Other K8s series tips & tricks:
- " Personalized error pages in NGINX Ingress ";
- " Transfer of resources working in a cluster under the management of Helm 2 ";
- " On the allocation of sites and the load on the web application ";
- " Accelerate the bootstrap of large databases. "
Read also in our blog:
- “ 11 ways to (not) become a victim of hacking at Kubernetes ”;
- “ Build and heat applications in Kubernetes using dapp and GitLab CI ”;
- “ Monitoring and Kubernetes ” (review and video of the report) ;
- " Our experience with Kubernetes in small projects " (video of the report, which includes an introduction to the technical device Kubernetes) .
