Two-factor authentication of Cisco AnyConnect clients. FreeRadius and Google Authenticator
In a previous article, I looked at setting up two-factor user authentication to connect to corporate resources through Cisco AnyConnect based on Active Directory and Microsoft Azure Multi-Factor Authentication Server (MFAS). Today I suggest you consider using FreeRadius and Google Authenticator.
Of the advantages of this option, we can only note that this solution is free.
By cons include:
- Integration with AD. Of course, you can integrate FreeRadius with AD through LDAP, but the architecture of this solution provides for storing user profiles locally on the FreeRadius server.
- Only one type of authentication is Time-Based One Time Password (TOTP).
- The non-obviousness of the need to use the second factor (explanation in the article).
Component Installation
To install FreeRaduis, I used Debian Jessie 8.0 in a virtual machine.
Due to the fact that TOTP will be used for authorization, the time on the server must be correct. The best way to synchronize time is to install NTP.
sudo apt-get update
sudo apt-get install ntp
sudo apt-get install build-essential libpam0g-dev freeradius libqrencode3 git
cd ~
git clone https://code.google.com/p/google-authenticator/
cd google-authenticator/libpam/
make
make install
addgroup radius-off
Configure FreeRadius
Since FreeRadius must have access to .google_authenticator tokens in all user directories, it must have root privileges . To grant rights, edit the file /etc/freeradius/radusd.conf .
We find the lines:
user = freerad
group = freerad
user = root
group = root
Next, edit / etc / freeradius / users . We must add the previously created radius-off group to the Deny access for a group of users section.
After the lines:
# Deny access for a group of users.
#
# Note that there is NO 'Fall-Through' attribute, so the user will not
# be given any additional resources.
#
DEFAULT         Group == "radius-disabled", Auth-Type := Reject
Reply-Message = "Your account has been disabled."
DEFAULT        Auth-Type := PAM
Now edit / etc / freeradius / sites-enabled / default .
We find:
#  Pluggable Authentication Modules.
#  pam
Edit /etc/pam.d/radiusd . We tell FreeRadius to authenticate users on the principle of a local unix password + Google Authenticator code.
Here we have to comment out all the lines that begin with @:
#@include common-auth
#@include common-account
#@include common-password
#@include common-session
auth requisite pam_google_authenticator.so forward_pass
auth required pam_unix.so use_first_pass
Client 192.168.110.6 {
secret = Password
shortname = ASA
}
User setting
Create a user:
adduser mfatest
cd /home/mfatest/
su mfatest
google-authenticator

After that, you need to restart the FreeRadius service:
sudo service freeradius restart
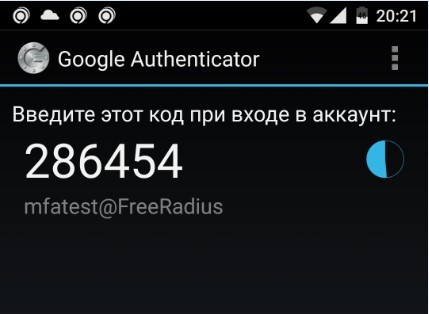
The Google Authenticator app (links for iOS and Android ) must be installed on the mobile device .
Scan the QR code using the Google Authenticator application. As a result, the mfatest account is tied to your mobile device.
Test authentication:
radtest localhost 18120 testing123
- localhost 18120 testing123 - these are the parameters of the standard local radius client.
The result is:
radtest mfatest Pass_123731923 localhost 18120 testing123
If everything is set up correctly, you should get something like:

Configure CISCO ASA
On ASA, I recommend setting up AnyConnect VPN gateway with local authentication. Make sure that the connection is working, and then proceed to configure authentication through Radius.
Configure RADIUS:
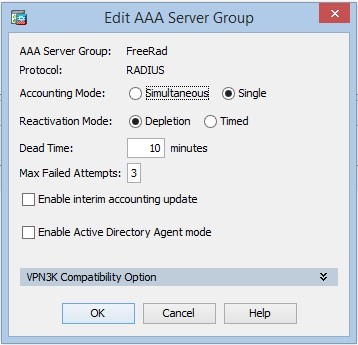
- Go to Configuration / Remote Access VPN / AAA / Local Users / AAA Server Groups and create a group:
- Add the server to the group:
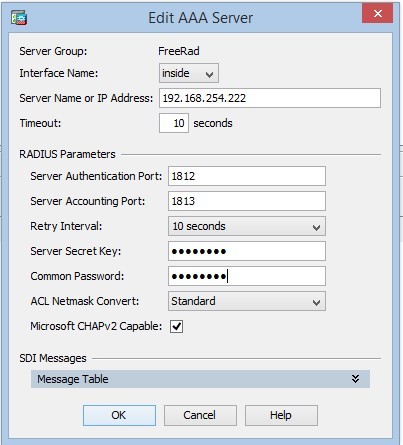
Where Server Name or IP Address is the address of our FreeRadius, Server Secret Key is the key that we configured for the client. - Testing a bunch with a RADIUS server:
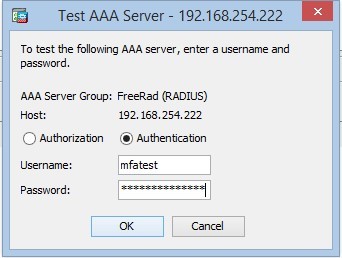
Where Password is the user password + code from Google Authenticator
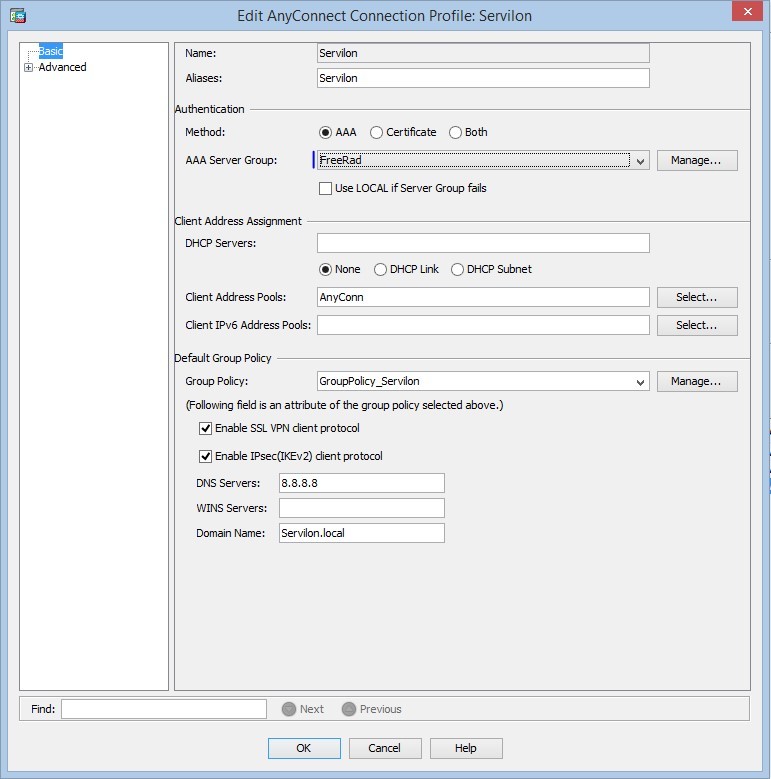
With a successful test, on the previously configured “AnyConnect Connection Profiles”, we change the authentication from local to FreeRad group:
This is where the settings are completed. To make sure everything works, initiate a test connection.

This is where the non-obviousness that I spoke of appears. FreeRadius does not use step-by-step authentication, it does not know how (at least I did not find) to request the code for Google Authentication separately. Therefore, for successful authentication, as in the tests, we enter the password + code in the Password line. For an inexperienced user, this can become an obstacle to the comfortable use of the service.
This scheme is universal and can be implemented for any services that support authentication using the Radius protocol.
The rest of our articleshttp://servilon.ru/stati/