Preparing ASP.NET 5 Issue # 6: Continuous Deployment with Visual Studio Team Services - Complete Guide
- Tutorial
Following the wonderful announcements from the Connect 2015 conference, we continue to acquaint you with scenarios for using new technologies and services to organize the continuous development and testing of your applications.
We recently talked about implementing continuous development and testing processes using Visual Studio Team Services (formerly Visual Studio Online). The article describes in detail how to organize the development process based on Scrum based on Git repositories in Visual Studio Team Services and, through integration with Visual Studio, provide a continuous process of testing and code development (Continuous Integration & Testing).
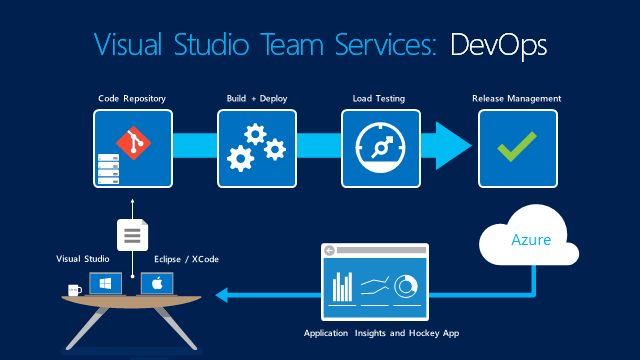
В этой статье мы рассмотрим следующий шаг в построении полного цикла DevOps – обеспечение непрерывного развертывания (Continuous Deployment) с помощью новых возможностей настраиваемых шаблонов сборки и публикации проектов в Visual Studio Team Services. Мы будем использовать проект на базе ASP.NET 5 и увидим как для таких проектов обеспечить полный цикл от редактирования кода до автоматической сборки и развертывания в облаке Azure (может быть любым местом).
It is assumed that you have already created a Visual Studio Team Services account. If this is not the case, refer to the online registration guide .
To begin with, from the download page of the new collector component, install the Windows agent, which will allow you to collect Windows, Azure and other Visual Studio projects, as well as Java and Android projects. To install, you need to go to the address:
https: // {your_account} .visualstudio.com / _admin / _AgentPool
and download the agent locally. After installation (say, in the C: \ Agent folder), you must run C: \ Agent \ ConfigureAgent.cmd as administrator. Read the other steps and details here .
Creating a Visual Studio Team Services Project
In Visual Studio Team Services, create a team project, in my case, VsoCdDemo (Figure 1).
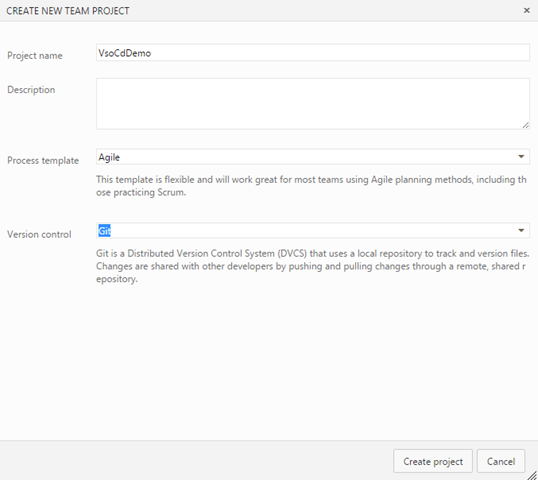
Fig. 1. - Creating a team project in Visual Studio Team Services
Connecting Visual Studio Team Services in Visual Studio 2015
In Visual Studio 2015, in the Team Explorer panel, connect to your team project (Figure 2)

Fig. 2. - Choosing a team project
After connecting, you will be prompted to clone the still empty repository of the team project (Figure 3).

Fig. 3. - Team Explorer panel in Visual Studio 2015
Creating a project in Visual Studio 2015
In Visual Studio 2015, create an ASP.NET 5 Web Application project, when creating, uncheck “Host in the cloud” (Figure 4).

Fig. 4. - Creating an ASP.NET 5 Web Application project in Visual Studio 2015
The project will be created and in the background the recovery process of the assemblies on which it depends will automatically start. Run the project locally to make sure the build is working fine. You can make the first commit and send the code to the server. To do this, right-click on the solution in the Solution Explorer panel and select Commit. Enter the description of the commit (Figure 5) and click the Commit and Push action in the drop-down menu,

Fig. 5. - Perform commit and push to the repository
after the commit to the action of a push you can see your code in the repository Visual Studio Team Services by clicking on the Code tab (see Figure 6).
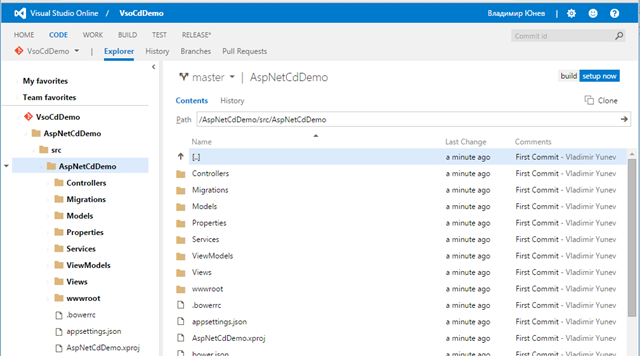
Fig. 6. - The contents of the repository in Visual Studio Team Services
It's time to set up the process of continuous assembly and publication in Azure (or any other place).
In Visual Studio Team Services, go to the Build tab and click the Actions button (green plus). In the window, select Visual Studio as the assembly definition template (Figure 7).

Fig. 7. - Assembly definition templates
In the next window (Figure 8), make sure that the correct repository type is selected, the repository itself, and by clicking on the Manage link, make sure that you have the correct Assembly Agent configured. Important! Point out the need to enable continuous integration - then after each check-in code our assembly and publication process will start.
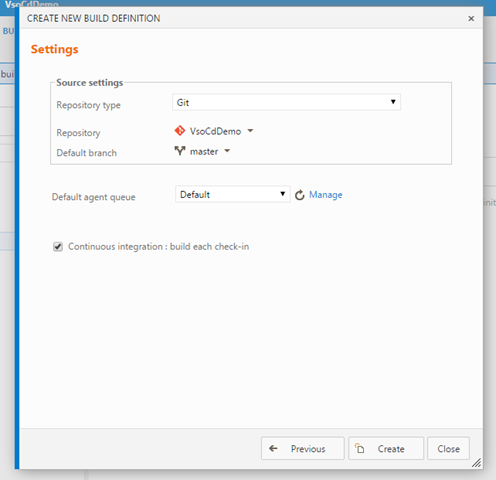
Fig. 8 - Configuring the assembly template
As a result, you will receive the following customized assembly order of your project (Figure 9). The following steps are predefined in it: Visual Studio Build to build the solution, the testing step to run the tests, the step of publishing symbol files and the step of publishing the assembly results.
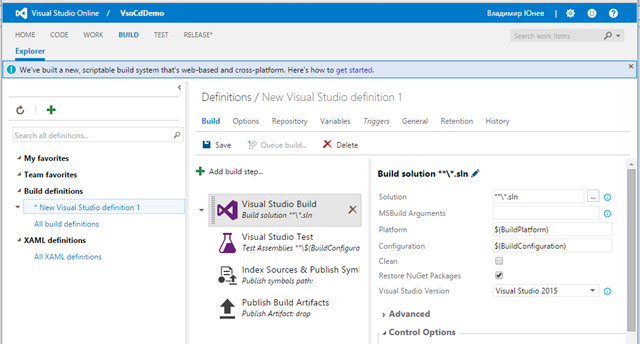
Fig. 9. - Working with the steps of the assembly and publishing process
For us, the value is only the first step - Visual Studio Build, we will configure the remaining three steps in our own way, so that you can delete or turn them off.
Let's try to assemble our project, for this select the first step and fill in the assembly parameters (Figure 10):
- select your project file as the solution for the assembly;
- specify additional assembly arguments (consider the name of your project):
/ t: Build, FileSystemPublish / p: PublishConfiguration = $ (BuildConfiguration) / p: PublishOutputPathNoTrailingSlash = $ (Build.SourcesDirectory) \ AspNetCdDemo \ artifacts \ bin \ $ (BuildConfiguration Publish
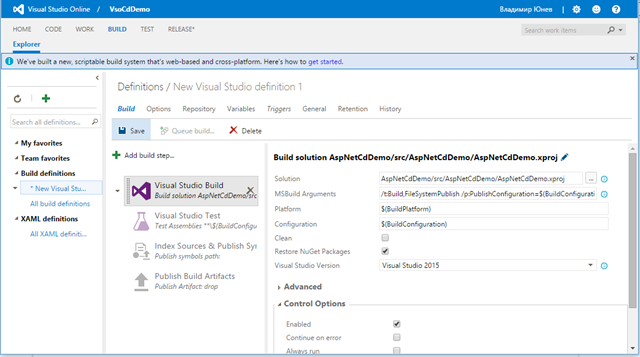
Fig. 10. - Setting the build step
Click on Save and then on Queue Build to start the build. You will get access to the collector execution command console, in which the assembly will take place. Alas, our decision will not be able to get together and you will see the following error (Figure 11).
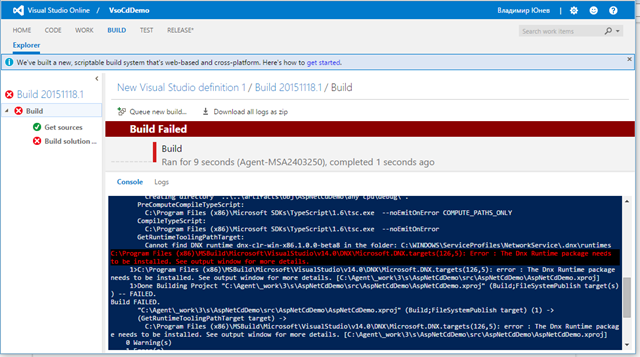
Fig. 11. - The result of the assembly with errors The
error we encountered is the need to configure the DNX environment before building the project. To do this, we need more fine-tuning the assembly.
To build an ASP.NET 5 project, you must first configure the DNX environment and perform some other steps, for example, download the necessary Nuget packages. In this regard, we need to fine-tune the assembly process of the project. These steps can be described in the following PowerShell script (note the name of your project):
To use this script, we need to add a new Prebuild.ps1 file to the Solution Items folder in the solution in Visual Studio 2015, copy the text of the script to this file.
Thanks to the flexible capabilities of the new Visual Studio Team Services build mechanism, we can add a variety of steps to the order of the collector, including calling the necessary PowerShell scripts. Return to the assembly definition (Figure 12)
Fig. 12. - Editing the description of the assembly steps
And add a new step for the collector by calling the add window with the “Add build step” button. Just go through the list and see how many built-in capabilities exist to define an assembly in Visual Studio Team Services (Figure 13).
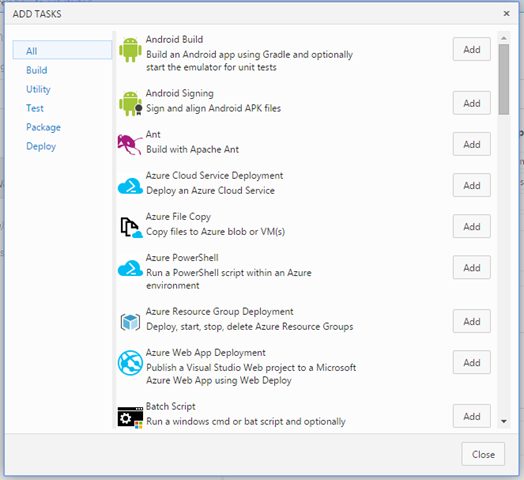
Fig. 13. - Gallery of possible build steps
Select the PowerShell step and add it to the build process. Drag the PowerShell step up to make it the very first to set the order of execution (Figure 14). In the PowerShell step settings, specify the path to the script: in my case, this is AspNetCdDemo / Prebuild.ps1.
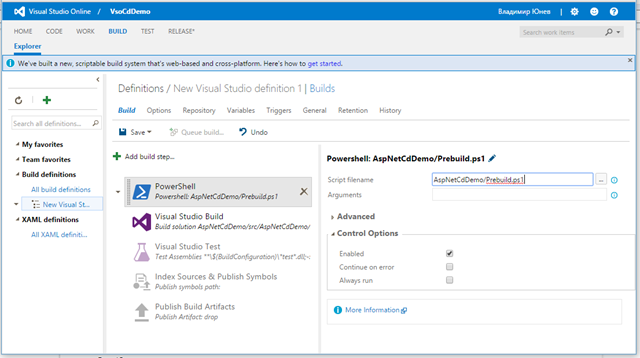
Fig. 14. - Editing the PowerShell build step
Since we configure DNX ourselves and restore the packages ourselves, in the Visual Studio Build step, uncheck “Restore NuGet Packages”.
Save the assembly definition.
From Visual Studio 2015 send the added Prebuild.ps1 script by committing and pushing it to the repository. A couple of minutes will pass and we will see how, thanks to our steps, it automatically deploys DNX and all the dependencies, how NuGet packages are downloaded and installed.
However, the assembly still failed (Figure 15).
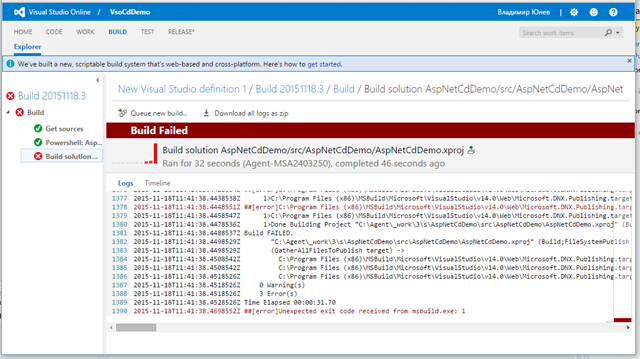
Fig. 15. - The assembly failed.
This is because the ASP.NET assembly contains Gulp tasks that have just been installed and cannot be used yet. Just run the assembly again, which will be faster and without errors!

Fig. 16. - Build without errors
So we organized the automatic assembly of the project on ASP.NET 5 in Visual Studio Team Services. Now let's enable continuous publishing on Azure.
To publish an ASP.NET5 project in Azure, we need to create an empty instance of the Azure Web App service. I named it AzureCdDemo , you will have to name it differently, the name must be unique. Use the new Azure portal to create your instance of Azure Web App (Figure 17).
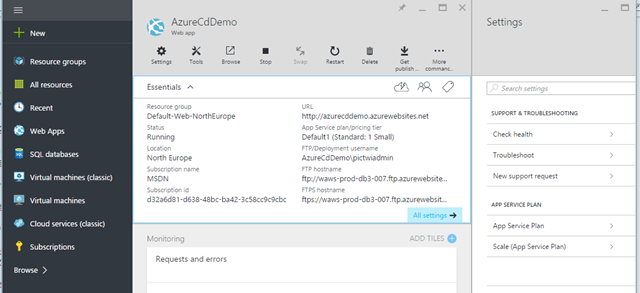
Fig. 17. - Creating Azure Web App in the new portal
To continuously publish the ASP.NET 5 application in Azure, we will write another PowerShell script.
In Visual Studio 2015, add the new PublishAspNet5Website.ps1 file to your Project Items folder in your project and copy the contents of the script into it.
In the list of build steps, add another step, this time Azure PowerShell Script. You will need to configure your Azure subscription settings for this, follow the Manage link and add a new service through the New Service Endpoint (Figure 18).
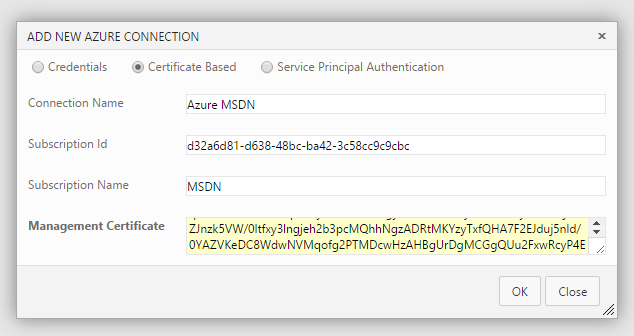
Fig. 18. - Entering Azure subscription parameters
To fill in the parameters above, you will need information about your subscriptions, which can be obtained from the file downloaded at https://manage.windowsazure.com/publishsettings/index .
Returning to the step settings for the Azure PowerShell script, select the subscription you added and specify the parameters (Figure 19):
- script path: AspNetCdDemo / PublishAspNet5Website.ps1
- script arguments (note the name of the Web App in Azure and the name of your project):
-websiteName AzureCdDemo -packOutput $ (Build.SourcesDirectory) \ AspNetCdDemo \ artifacts \ bin \ $ (BuildConfiguration) \ Publish
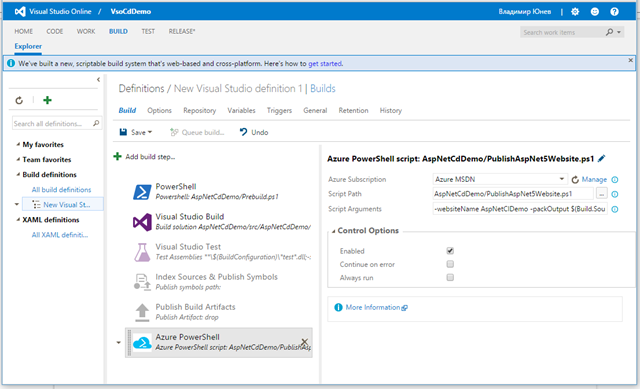
Fig. 19. - Setting up the Azure PowerShell build step
From Visual Studio 2015, commit and push your new script.
The next build process will start, which this time will end with the publication of the project in Azure Web App (Figure 20).
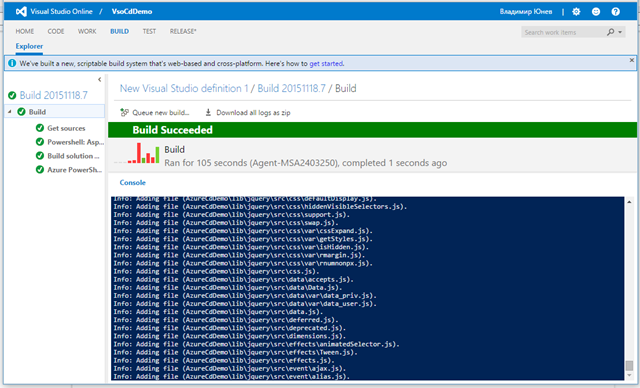
Fig. 20. - The assembly and publication was successful.
If we go to the address of our Azure Web App (in my case http://azurecddemo.azurewebsites.net/ ), we can verify that it works (Figure 21).
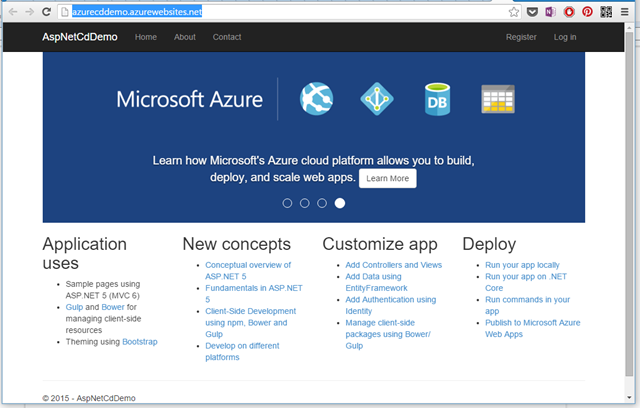
Fig. 21. - Website powered by Azure
Go to Visual Studio 2015 and make any changes. for example, in the file Views / Shared / _Layout.cshtml, change the text and layout. Commit and push this file to the repository. Track the automatic build and publishing process in Visual Studio Team Services. Refresh the site and make sure that your changes are automatically published (Figure 22).

Fig. 22. - Website in Azure with changes from the ongoing build and publishing process
We thoroughly and from scratch examined the organization of the process of continuous assembly and publication of a web application based on ASP.NET 5 using Visual Studio Team Services. In the process of our continuous assembly, we publish code in Git, deploy the DNX environment, download the necessary assemblies and npm, execute Gulp scripts, publish the site in Azure Web App. And all this is automatic.
In conclusion, I want to say that the new build functionality of Visual Studio Team Services allows you to assemble projects of any type with configuration of any complexity, connecting to a large number of third-party applications, servers and frameworks with pre-configured templates.
We recently talked about implementing continuous development and testing processes using Visual Studio Team Services (formerly Visual Studio Online). The article describes in detail how to organize the development process based on Scrum based on Git repositories in Visual Studio Team Services and, through integration with Visual Studio, provide a continuous process of testing and code development (Continuous Integration & Testing).
В этой статье мы рассмотрим следующий шаг в построении полного цикла DevOps – обеспечение непрерывного развертывания (Continuous Deployment) с помощью новых возможностей настраиваемых шаблонов сборки и публикации проектов в Visual Studio Team Services. Мы будем использовать проект на базе ASP.NET 5 и увидим как для таких проектов обеспечить полный цикл от редактирования кода до автоматической сборки и развертывания в облаке Azure (может быть любым местом).
Совет! Вы можете попробовать все самостоятельно или загрузив исходный код из GitHub https://github.com/vyunev/VsoCdDemo.
Предварительная настройка
It is assumed that you have already created a Visual Studio Team Services account. If this is not the case, refer to the online registration guide .
To begin with, from the download page of the new collector component, install the Windows agent, which will allow you to collect Windows, Azure and other Visual Studio projects, as well as Java and Android projects. To install, you need to go to the address:
https: // {your_account} .visualstudio.com / _admin / _AgentPool
and download the agent locally. After installation (say, in the C: \ Agent folder), you must run C: \ Agent \ ConfigureAgent.cmd as administrator. Read the other steps and details here .
Creating a Visual Studio Team Services Project
In Visual Studio Team Services, create a team project, in my case, VsoCdDemo (Figure 1).
Fig. 1. - Creating a team project in Visual Studio Team Services
Connecting Visual Studio Team Services in Visual Studio 2015
In Visual Studio 2015, in the Team Explorer panel, connect to your team project (Figure 2)
Fig. 2. - Choosing a team project
After connecting, you will be prompted to clone the still empty repository of the team project (Figure 3).
Fig. 3. - Team Explorer panel in Visual Studio 2015
Creating a project in Visual Studio 2015
In Visual Studio 2015, create an ASP.NET 5 Web Application project, when creating, uncheck “Host in the cloud” (Figure 4).
Fig. 4. - Creating an ASP.NET 5 Web Application project in Visual Studio 2015
The project will be created and in the background the recovery process of the assemblies on which it depends will automatically start. Run the project locally to make sure the build is working fine. You can make the first commit and send the code to the server. To do this, right-click on the solution in the Solution Explorer panel and select Commit. Enter the description of the commit (Figure 5) and click the Commit and Push action in the drop-down menu,
Fig. 5. - Perform commit and push to the repository
after the commit to the action of a push you can see your code in the repository Visual Studio Team Services by clicking on the Code tab (see Figure 6).
Fig. 6. - The contents of the repository in Visual Studio Team Services
It's time to set up the process of continuous assembly and publication in Azure (or any other place).
Build process setup
In Visual Studio Team Services, go to the Build tab and click the Actions button (green plus). In the window, select Visual Studio as the assembly definition template (Figure 7).
Fig. 7. - Assembly definition templates
In the next window (Figure 8), make sure that the correct repository type is selected, the repository itself, and by clicking on the Manage link, make sure that you have the correct Assembly Agent configured. Important! Point out the need to enable continuous integration - then after each check-in code our assembly and publication process will start.
Fig. 8 - Configuring the assembly template
As a result, you will receive the following customized assembly order of your project (Figure 9). The following steps are predefined in it: Visual Studio Build to build the solution, the testing step to run the tests, the step of publishing symbol files and the step of publishing the assembly results.
Fig. 9. - Working with the steps of the assembly and publishing process
For us, the value is only the first step - Visual Studio Build, we will configure the remaining three steps in our own way, so that you can delete or turn them off.
Let's try to assemble our project, for this select the first step and fill in the assembly parameters (Figure 10):
- select your project file as the solution for the assembly;
- specify additional assembly arguments (consider the name of your project):
/ t: Build, FileSystemPublish / p: PublishConfiguration = $ (BuildConfiguration) / p: PublishOutputPathNoTrailingSlash = $ (Build.SourcesDirectory) \ AspNetCdDemo \ artifacts \ bin \ $ (BuildConfiguration Publish
Fig. 10. - Setting the build step
Click on Save and then on Queue Build to start the build. You will get access to the collector execution command console, in which the assembly will take place. Alas, our decision will not be able to get together and you will see the following error (Figure 11).
Fig. 11. - The result of the assembly with errors The
error we encountered is the need to configure the DNX environment before building the project. To do this, we need more fine-tuning the assembly.
Build ASP.NET 5
To build an ASP.NET 5 project, you must first configure the DNX environment and perform some other steps, for example, download the necessary Nuget packages. In this regard, we need to fine-tune the assembly process of the project. These steps can be described in the following PowerShell script (note the name of your project):
# bootstrap DNVM into this session.
&{$Branch='dev';iex ((new-object net.webclient).DownloadString('https://raw.githubusercontent.com/aspnet/Home/dev/dnvminstall.ps1'))}
# load up the global.json so we can find the DNX version
$globalJson = Get-Content -Path $PSScriptRoot\global.json -Raw -ErrorAction Ignore | ConvertFrom-Json -ErrorAction Ignore
if($globalJson)
{
    $dnxVersion = $globalJson.sdk.version
}
else
{
    Write-Warning "Unable to locate global.json to determine using 'latest'"
    $dnxVersion = "latest"
}
# install DNX
& $env:USERPROFILE\.dnx\bin\dnvm install $dnxVersion -Persistent
# run DNU restore on all project.json files
& dnu restore $PSScriptRoot\src\AspNetCdDemo\project.json 2>1
To use this script, we need to add a new Prebuild.ps1 file to the Solution Items folder in the solution in Visual Studio 2015, copy the text of the script to this file.
Thanks to the flexible capabilities of the new Visual Studio Team Services build mechanism, we can add a variety of steps to the order of the collector, including calling the necessary PowerShell scripts. Return to the assembly definition (Figure 12)
Fig. 12. - Editing the description of the assembly steps
And add a new step for the collector by calling the add window with the “Add build step” button. Just go through the list and see how many built-in capabilities exist to define an assembly in Visual Studio Team Services (Figure 13).
Fig. 13. - Gallery of possible build steps
Select the PowerShell step and add it to the build process. Drag the PowerShell step up to make it the very first to set the order of execution (Figure 14). In the PowerShell step settings, specify the path to the script: in my case, this is AspNetCdDemo / Prebuild.ps1.
Fig. 14. - Editing the PowerShell build step
Since we configure DNX ourselves and restore the packages ourselves, in the Visual Studio Build step, uncheck “Restore NuGet Packages”.
Save the assembly definition.
From Visual Studio 2015 send the added Prebuild.ps1 script by committing and pushing it to the repository. A couple of minutes will pass and we will see how, thanks to our steps, it automatically deploys DNX and all the dependencies, how NuGet packages are downloaded and installed.
However, the assembly still failed (Figure 15).
Fig. 15. - The assembly failed.
This is because the ASP.NET assembly contains Gulp tasks that have just been installed and cannot be used yet. Just run the assembly again, which will be faster and without errors!
Fig. 16. - Build without errors
So we organized the automatic assembly of the project on ASP.NET 5 in Visual Studio Team Services. Now let's enable continuous publishing on Azure.
Continuous Publish to Azure Web App
To publish an ASP.NET5 project in Azure, we need to create an empty instance of the Azure Web App service. I named it AzureCdDemo , you will have to name it differently, the name must be unique. Use the new Azure portal to create your instance of Azure Web App (Figure 17).
Fig. 17. - Creating Azure Web App in the new portal
To continuously publish the ASP.NET 5 application in Azure, we will write another PowerShell script.
param($websiteName, $packOutput)
$website = Get-AzureWebsite -Name $websiteName
# get the scm url to use with MSDeploy.  By default this will be the second in the array
$msdeployurl = $website.EnabledHostNames[1]
$publishProperties = @{'WebPublishMethod'='MSDeploy';
                        'MSDeployServiceUrl'=$msdeployurl;
                        'DeployIisAppPath'=$website.Name;
                        'Username'=$website.PublishingUsername;
                        'Password'=$website.PublishingPassword}
$publishScript = "${env:ProgramFiles(x86)}\Microsoft Visual Studio 14.0\Common7\IDE\Extensions\Microsoft\Web Tools\Publish\Scripts\default-publish.ps1"
. $publishScript -publishProperties $publishProperties  -packOutput $packOutput
In Visual Studio 2015, add the new PublishAspNet5Website.ps1 file to your Project Items folder in your project and copy the contents of the script into it.
In the list of build steps, add another step, this time Azure PowerShell Script. You will need to configure your Azure subscription settings for this, follow the Manage link and add a new service through the New Service Endpoint (Figure 18).
Fig. 18. - Entering Azure subscription parameters
To fill in the parameters above, you will need information about your subscriptions, which can be obtained from the file downloaded at https://manage.windowsazure.com/publishsettings/index .
Returning to the step settings for the Azure PowerShell script, select the subscription you added and specify the parameters (Figure 19):
- script path: AspNetCdDemo / PublishAspNet5Website.ps1
- script arguments (note the name of the Web App in Azure and the name of your project):
-websiteName AzureCdDemo -packOutput $ (Build.SourcesDirectory) \ AspNetCdDemo \ artifacts \ bin \ $ (BuildConfiguration) \ Publish
Fig. 19. - Setting up the Azure PowerShell build step
From Visual Studio 2015, commit and push your new script.
The next build process will start, which this time will end with the publication of the project in Azure Web App (Figure 20).
Fig. 20. - The assembly and publication was successful.
If we go to the address of our Azure Web App (in my case http://azurecddemo.azurewebsites.net/ ), we can verify that it works (Figure 21).
Fig. 21. - Website powered by Azure
Final test
Go to Visual Studio 2015 and make any changes. for example, in the file Views / Shared / _Layout.cshtml, change the text and layout. Commit and push this file to the repository. Track the automatic build and publishing process in Visual Studio Team Services. Refresh the site and make sure that your changes are automatically published (Figure 22).
Fig. 22. - Website in Azure with changes from the ongoing build and publishing process
Conclusion
We thoroughly and from scratch examined the organization of the process of continuous assembly and publication of a web application based on ASP.NET 5 using Visual Studio Team Services. In the process of our continuous assembly, we publish code in Git, deploy the DNX environment, download the necessary assemblies and npm, execute Gulp scripts, publish the site in Azure Web App. And all this is automatic.
In conclusion, I want to say that the new build functionality of Visual Studio Team Services allows you to assemble projects of any type with configuration of any complexity, connecting to a large number of third-party applications, servers and frameworks with pre-configured templates.
Only registered users can participate in the survey. Please come in.
Have you already started using the new build of Visual Studio Team Services?
- 19.5% Yes, we use for projects 8
- 0% Yes, we started testing, we will use 0
- 34.1% are considered to be very interesting to 14
- 46.3% Interested, until they decide 19