 November 13, 2015 at 11:08
Cocos2d-x - developing a simple game
- Tutorial
1. Introduction
This article will focus on developing a prototype game for Android / Linux using Cocos2d-x . Cocos2d-x is a cross-platform framework for creating two-dimensional games and other graphical applications. It is based on cocos2d-iphone , but Cocos2d-x uses C ++ instead of Objective-C. Applications can be launched on platforms: iOS, Android, Windows Phone, OS X, Windows, Linux.
This article is about developing an application for Android / Linux, the development platform is Ubuntu.
Unfortunately, the Cocos IDE exists only for Window and Mac, and for Linux there is no expected version, but since I really like Ubuntu and this is the platform I work with every day, I use Clion for development .
Some parts of this article are translations of the relevant parts of the documentation ( http://www.cocos2d-x.org/wiki ).
The article is aimed at those who begin their acquaintance with Cocos2d-x. In it, I will talk about how to create the simplest application with sprites, scenes and how to work with the accelerometer. This may be some kind of start to go further in the future, delving into the Cocos2d-x API.
2. Requirements
We define the necessary set of tools that we need.
Ubuntu 14.04 -
Cocos2d-x v3.8.1 development platform - https://cocos2d-x.org/download
CMake 2.8+
JDK 1.6+
Android SDK
Android NDK r9d +
Apache Ant - for building the Android build
Python 2.7.5
Clion 1.1 - www .jetbrains.com / clion
3. Cocos2d-x
Cocos2d-x appeared in 2010, it is an open source project, distributed under the MIT license . Cocos2d-x allows you to write in languages such as C ++, Lua and Javascript. Cocos2d-x is fast, simple, and powerful. Currently, many games written using this framework are in the top of the AppStore and Google Play.
Big guys like Zynga , Wooga , Glu , Big Fish Games , Konami use Cocos2d-x to develop games.
Here I have to make a small digression. The fact is that Cocos2d-x allows you to use C ++ to write code, and all this will be built under Android and Linux. If you use Cocos2d-JS, you can write in Javascript. Then, in the case of assembly for Linux / Ubuntu, the code will be translated into C ++ and then compiled. This entails many different problems (complicates the work with third-party libraries, for example). In the case of the web, java-script will be executed (by the way, the build time in this case is zero, which is not bad).
If you use Cocos2d-x, then it does not work under the web, but under Linux and Android the code is compiled directly. For Android, of course, Android NDK is used.
Key Features:
- Opengl
- Scene management
- Scene change effects
- Sprites
- Visual effects
- Various actions, such as movement, scaling, turns and so on
- Action combinations
- Menus and Buttons
- Touch Processing on Mobile Devices
- Sound support
- Layouts
- ListView, PageView, ScrollView
- Button, CheckBox, LoadingBar, Slider, TextField
Links:
http://www.cocos2d-x.org/wiki/Cocos2d-x
http://www.cocos2d-x.org/wiki/About_Cocos2d-x
4. Install and launch the application
This part of the article shows how to create and run the first application.
To get started, we need to download and unzip Cocos2d-x . Or you can use the latest version from the repository:
git clone https://github.com/cocos2d/cocos2d-x.git
After everything has been successfully downloaded, you need, you need to install all the dependencies. To do this, you can run the script *:
~/work/cocos/cocos2d-x-3.8.1/build/install-deps-linux.sh
* Hereinafter, it is assumed that cocos2d-x-3.8.1 is unpacked into the ~ / work / cocos / cocos2d-x-3.8.1 directory.
Or install them manually:
list
libx11-dev
libxmu-dev
libglu1-mesa-dev
libgl2ps-dev
libxi-dev
g + ± 4.9
libzip-dev
libpng12-dev
libcurl4-gnutls-dev
libfontconfig1-dev
libsqlite3-dev
libglew-dev
libssl-dev
glfw3
libxmu-dev
libglu1-mesa-dev
libgl2ps-dev
libxi-dev
g + ± 4.9
libzip-dev
libpng12-dev
libcurl4-gnutls-dev
libfontconfig1-dev
libsqlite3-dev
libglew-dev
libssl-dev
glfw3
To install glfw3, you need to run another script.
~/work/cocos/cocos2d-x-3.8.1$ tools/travis-scripts/install_glfw.sh
After that, run the installation:
~/work/cocos/cocos2d-x-3.8.1$ ./setup.py
Run cmake to create a makefile:
cd ~/work/cocos/cocos2d-x-3.8.1/build
mkdir linux-build
cd linux-build
cmake ../..
Now it remains to run the test application:
make
cd bin/cpp-tests/
./cpp-tests
All. If everything went well, you should see a test application, something like a demo version. If everything worked out, then you can go further. We need to create a project.
To create an application, run:
cocos new MyGame -p com.your_company.mygame -l cpp -d NEW_PROJECTS_DIR
where MyGame is the name, cpp is the language. You can specify js or lua. But we specify cpp.
Now the project has been created, we will continue to work with it. An empty project contains a label and a picture. You can immediately look at it:
cocos run -s ~/work/cocos/MyCompany/MyGame/ -p android
or
cd ~/work/cocos/MyCompany/MyGame
cocos run -p linux
That, in fact, can begin to work.
5. Clion
As I already wrote, Cocos IDE is not for Ubuntu, but we don’t feel like writing code in notepad? Fortunately, there is a Clion from Jetbrains.

Clion supports cmake, which means that just importing the MyGame project is enough, and you can write code. And not just write, but debug it! True, all this runs under Linux. But, I think that for a start this is quite enough. After debugging, the Android application can always be built through the console.
More about Clion: http://habrahabr.ru/company/JetBrains/blog/255723/
6. The basics
So, we downloaded Cocos2d-x, installed all the tools, imported the project into Clion, launched it and ... and now it's time to figure out what's what. Let's get started.
Cocos2d-x is a cross-platform game engine. But what is a game engine? The game engine provides the general functionality that all games should have. It includes components that together make development faster. For example, renderer (I don’t translate part of the terms in the article, as they are generally accepted. I will not use the word “Activity” either), graphics, collision detection, physics, sound, animation. Cocos2d-x provides a simple API for developing cross-platform applications (or rather, allows you to build an application for different platforms).
Cocos2d-x provides such objects as Scene, Transition, Sprite, Menu, Sprite3D, Audio and others.
Main components
It may not seem like that at the beginning, but actually getting started with Cocos2d-x is very simple. The core of Cocos2d-x is Scene, Node, Sprite, and Action. Let's see what their what.
Most games look something like this:

Here are all of these components:
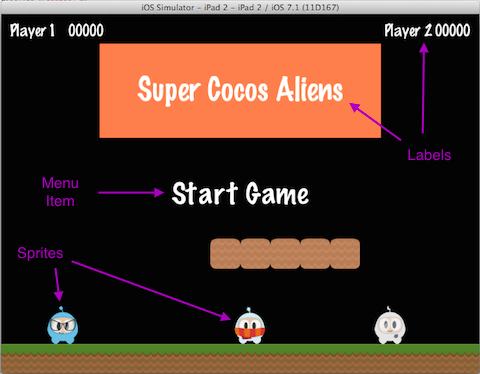
Director
Director in Cocos2d-x is like a director on the set. He controls all the objects and tells them what they should do. Director controls the change of scenes and transition effects, he is a singleton and is available everywhere (although in the movie, probably not so).
Scene
Your game will most likely have a menu, several levels, and a few more screens (“You lost!”). Each such screen is a scene (Scene). Again, like in a movie. Each movie is divided into scenes - separate parts of one story. The scene is drawn by the Renderer object. Renderer is responsible for rendering sprites and other objects in the scene. For a better understanding of this process, let's talk about Scene Graph.
Scene graph
Scene Graph is a data structure that is used in Scene. Scene Graph contains nodes (Node). Incidentally, the Scene Graph is called the Scene Graph, but it is actually a tree.
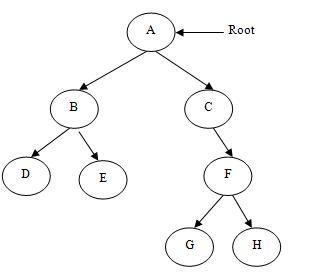
It already looks a little complicated. You have to ask, what the hell do I need to know about how Scene is arranged inside, if I just need a moving person? This is important for understanding how the scene is rendered. When adding sprites and animations to your games, you must be sure that you get the result you want.
Cocos2d-x performs a symmetric tree traversal (in which the left subtree is visited first, then the node, then the right subtree). This means that the right side of the tree will be rendered last, and that means it will be visible "from above" (that is, visually the rest are under it).
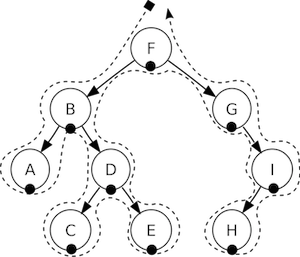
It is very easy to illustrate this, let's just take a look at this scene:
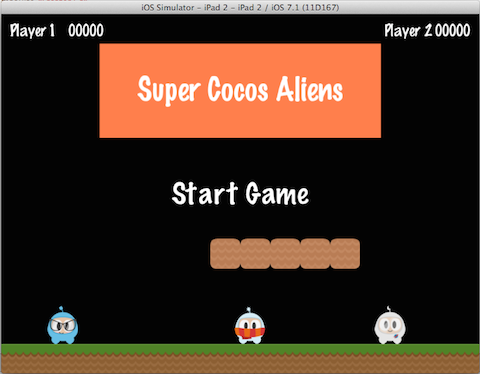
Which is simplified (some of the objects are not sheets, but branches) can be represented in the form of a tree:
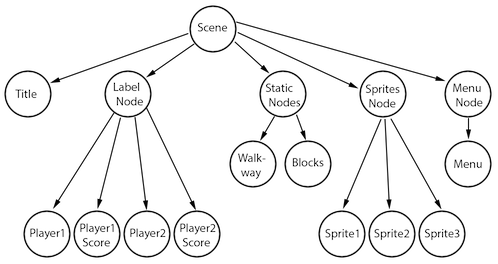
The attribute associated with the order is z-order. The left side of the tree has a negative z-order, while the right side is positive. You can keep this in mind to avoid mistakes. Plus, you can add elements in any order with the specified z-order, then the elements will be sorted automatically.
You can consider Scene as a collection of objects (Node). Divide the scene shown above to view the scene graph:
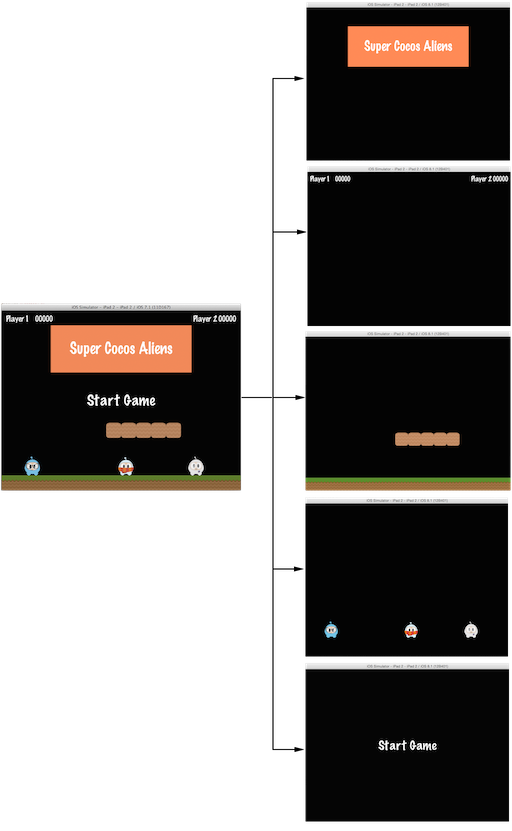
The scene on the left is the nodes (Node) stacked together that have different z-orders that determine the order in which they are drawn.
You can add an element to the scene by calling the API:
// Добавляем элемент с z-order −2,
// он будет в левой части дерева
scene->addChild(title_node, −2);
// Если не указать z-order явно, используется значение по умолчанию — 0
scene->addChild(label_node);
// Добавляем элемент с z-order 1,
// он будет в правой части дерева
scene->addChild(sprite_node, 1);
Sprites
All games use sprites. These are the things that move around the screen. You can manage them. The main character of the game, most likely, is a sprite. It is important to note: not every graphic element of the game is a sprite. If the item does not move around the screen, then it is just a Node.
Let's take another look at the scene from the game:
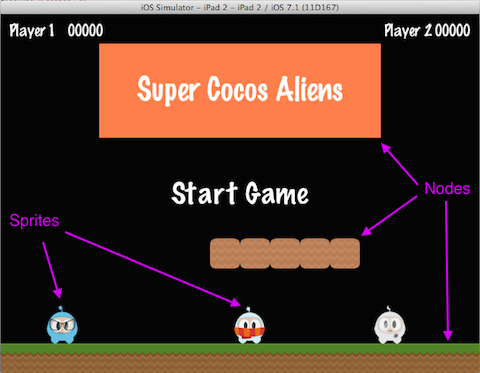
Sprites are the key elements of the game. Creating a sprite is very easy:
// Создаем спрайт
auto mySprite = Sprite::create("mysprite.png");
// Устанавливаем позицию на экране
mySprite->setPosition(Vec2(500, 0));
// Угол поворота
mySprite->setRotation(40);
mySprite->setScale(2.0); // Масштабирование
addChild(mySprite); // добавляем спрайт к сцене.
Actions
Creating a scene with adding sprites to the screen is only part of the task. After all, we still need all this to move. For this, there are actions (Actions). Movement, rotation, rotation - these are all action games. The actions are very similar to ValueAnimator in the Android API.
auto mySprite = Sprite::create("Blue_Front1.png«);
// Смещаем на 50 точек наверх и на 10 вправо, за две секунды:
auto moveBy = MoveBy::create(2, Vec2(50,10));
mySprite->runAction(moveBy);
// Перемещаем с конкретную точку:
auto moveTo = MoveTo::create(2, Vec2(50,10));
mySprite->runAction(moveTo);
Coordinate system
It should be noted that Cocos2d uses a Cartesian coordinate system. That is, the point (0, 0) is located at the bottom left. This distinguishes Cocos2d, say, from the same Android API.
7. The idea of the game
Next, we will create a prototype of the game to illustrate the work with Cocos2d. The idea of the game is very simple: objects, for example, emoticons (why not?) Randomly move around the screen, and there is someone who should eat them. And from the sad smiles, on the contrary, try to hide. Moreover, the management of the eater is due to the deviation of the phone in different directions. Thus, we use sprites, actions, scene change, work with the accelerometer.
It is clear that the idea is very simple and boring, but we do not set the task of making a million (but just for now, yes?), But we need to figure out what's what in Cocos2d, and this idea is quite suitable. Well, let's get started!
8. Adding sprites
We take the MyGame application, which we created at the beginning of the article, as the basis. Emoticons that can be easily found on the Internet, or they can be replaced with something else, are useful to us. Some balls.
All resources must be put in the Resources directory.
Add the following code to the init () method:
for (int i = 0; i < SMILES_COUNT; i++) {
std::string result = «emoji-» + itos(i);
Sprite *sprite = Sprite::create(result);
if (sprite != NULL) {
this->addChild(sprite);
listSprites.push_front(sprite);
}
}
listSprites is a list of all smiles, it is useful to us to add movement around the screen. Let's do it at the same time and so that they rotate a little, in the process of movement:
Point *sizeStart = randomEndPoint(); // точка старта
Point *sizeStop = randomEndPoint(); // точка финиша
auto rotateAction = RotateTo::create(2, 90); // на 90 градусов за две секунды.
auto moveAction = MoveTo::create(2, *sizeStop);
sprite->setPosition(*sizeStart);
auto mySpawn = Spawn::createWithTwoActions(rotateAction, moveAction);
auto seq = Sequence::create(mySpawn,
CallFunc::create(callback),
nullptr);
sprite->runAction(seq);
Here we create Spawn and Sequence to execute two actions at the same time, and plus to this, in Sequence we pass a callback - a link to the function that will be called when the action is executed. This will allow us to restart the action every time so that the sprites move endlessly. It is necessary to create such an action for each sprite.
The randomEndPoint method returns a randomly selected point on the screen border.
Now we have many moving sprites:
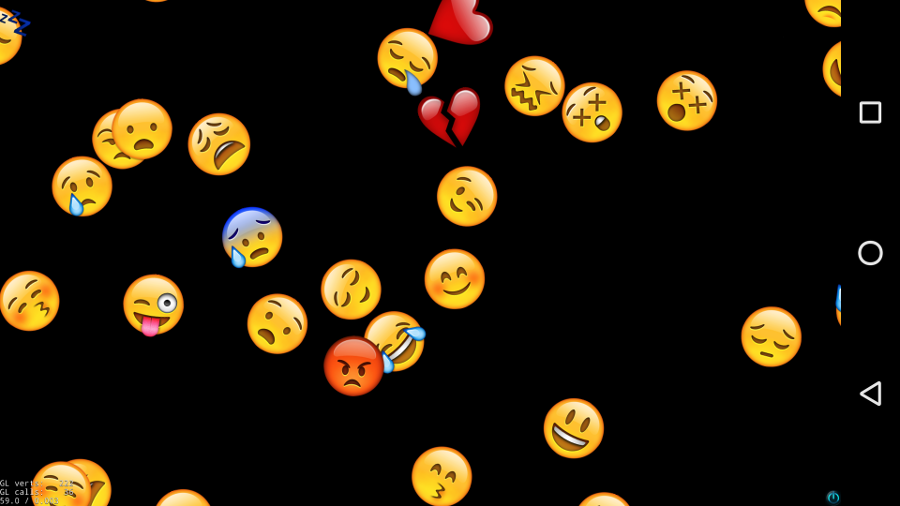
We also need to add a devourer, but this is done similarly, we will not dwell on this.
9. Collision Resolution
Now we need to write some code to resolve collisions. That is, to detect the moment when small emoticons will touch the devourer.
To do this, override the onUpdate method:
void HelloWorld::update(float dt)
{
...
}
To call this method when updating the screen, call scheduleUpdate () :
void HelloWorld::init(float dt)
{
this->scheduleUpdate();
...
}
Now, each time the screen is updated (and the sprite positions are changed, respectively), the update method will be called . For simplicity, you can write something like this:
void HelloWorld::init(float dt)
{
if(spriteSmile->getPosition().distance(eaterSprite->getPosition()) <
spriteSmile->getBoundingBox().size.width/2 +
eaterSprite->getBoundingBox().size.width/2){}
}
When a collision is found, you can count points and restart the Action:
void HelloWorld::init(float dt)
{
if(spriteSmile->getPosition().distance(eaterSprite->getPosition()) <
spriteSmile->getBoundingBox().size.width/2 +
eaterSprite->getBoundingBox().size.width/2){
score—;
spriteSmile->stopAllActions();
spriteSmile->setPosition(0, 0);
runActionForSmile(spriteSmile);
}
}
10. Accelerometer
Working with the accelerometer is as simple as resolving collisions, even easier.
To get started, subscribe to the desired event:
void HelloWorld::init(float dt)
{
...
this->setAccelerometerEnabled(true);
...
}
To get the accelerometer values, redefine the onAcceleration method :
void HelloWorld::init(float dt)
{
void GameScene::onAcceleration(cocos2d::Acceleration *acc, cocos2d::Event *unused_event) {
Director *director = Director::getInstance();
auto viewSize = director->getWinSize();
float minSize = MIN(viewSize.width, viewSize.height);
double targetSpeedY = acc->y * minSize*2;
double targetSpeedX = acc->x * minSize*2;
eaterPointsPerSecY = (eaterPointsPerSecY * .8f) + (targetSpeedY * .2f);
eaterPointsPerSecX = (eaterPointsPerSecX * .8f) + (targetSpeedX * .2f);
}
}
After calculating eaterPointsPerSecX and eaterPointsPerSecY in the update method, call setPosition () :
float diffY = (eaterPointsPerSecY * dt)*1.3f;
float diffX = (eaterPointsPerSecX * dt)*1.3f;
float newY = eaterSprite->getPosition().y + diffY;
float newX = eaterSprite->getPosition().x + diffX;
eaterSprite->setPosition(newX, newY);
Of course, in a real game, you still need to make sure that our eater does not go beyond the boundaries of the screen. But for now, let's dwell on this.
So, we created flying emoticons, added a eater, controlled it with the help of an accelerometer ... it remains, add the “Game Over!” Screen.
11. Game Over!
Here we need a new scene. You can spy on HelloWorld and create it according to the model. So we will do:
// GameOverScene.h
#include «cocos2d.h»
class GameOverScene : public cocos2d::Layer {
public:
virtual bool init();
static cocos2d::Scene *createScene();
void startAgainCallback(cocos2d::Ref *pSender);
CREATE_FUNC(GameOverScene);
};
// GameOverScene.cpp
#include
#include «GameOverScene.h»
#include «GameScene/GameScene.h»
using namespace std;
using namespace cocos2d;
using namespace cocos2d::ui;
Scene *GameOverScene::createScene() {
auto scene = Scene::create();
GameOverScene* layer = GameOverScene::create();
scene->addChild(layer);
return scene;
}
bool GameOverScene::init() {
//////////////////////////////
// 1. super init first
if (!Layer::init()) {
return false;
}
Size visibleSize = Director::getInstance()->getVisibleSize();
Vec2 origin = Director::getInstance()->getVisibleOrigin();
auto gameOVerLabel = Label::createWithTTF("Game over!«, «fonts/Comfortaa-Bold.ttf», 24);
gameOVerLabel->setTextColor(Color4B::WHITE);
auto startAgainLabel = Label::createWithTTF("Play again«, «fonts/Comfortaa-Bold.ttf», 30);
startAgainLabel->setTextColor(Color4B::ORANGE);
auto playAgainItem = MenuItemLabel::create(startAgainLabel,
CC_CALLBACK_1(GameOverScene::startAgaingCallback, this));
auto menu = Menu::create(playAgainItem, NULL);
gameOVerLabel->setPosition(visibleSize.width/2, visibleSize.height/2 + gameOVerLabel->getContentSize().height * 3);
menu->setPosition(visibleSize.width/2, gameOVerLabel->getPosition().y — gameOVerLabel->getContentSize().height);
this->addChild(gameOVerLabel);
this->addChild(menu);
}
void GameOverScene::startAgaingCallback(Ref *pSender) {
Director::getInstance()->replaceScene(
TransitionFade::create(0.5, HelloWorld::createScene(), Color3B(255, 255, 255)));
}
#endif //MYGAME_GAMEOVERSCENE_H
Almost everything that is written here is already known to us.
Here, by analogy with HelloWorld, we create a label that is a menu item, that is, we can handle the onClick event. Creating MenuItemLabel, we pass one of the parameters a link to the startAgaingCallback function, in which we change the scene. Note that we also change the scene using the TransitionFade effect.
In the same way, we can change the game scene to GameOverScene:
void HelloWorld::update(float dt) {
if(score <= 0){
Director::getInstance()->replaceScene(TransitionFade::create(0.5, GameOverScene::createScene(score), Color3B(255,0,0)));
}}
GameOver!
Links
www.cocos2d-x.org
www.jetbrains.com/clion
habrahabr.ru/post/126582
www.cocos2d-x.org/programmersguide
www.raywenderlich.com/33752/cocos2d-x-tutorial-for-ios-and -android-space-game









