Data ONTAP 8.3 ADP: Root-Data Partitioning
Data ONTAP 8.3 cDOT is one of NetApp's largest releases. One of the key features of the release is Advanced Drive Partitioning (ADP) technology. More about what 's new in cDOT 8.3 here.
ADP technology has two main applications:
This article will talk about Root-Data Partitioning.
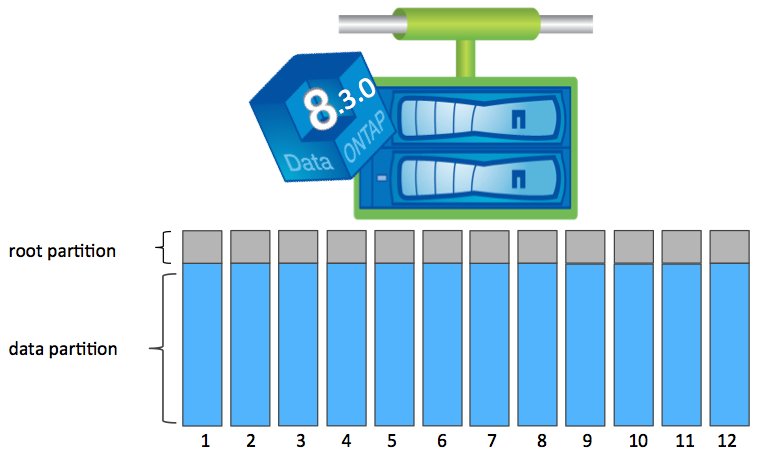
Root-Data Partitioning is used to split each disk into two partitions, one large (usually the first, let's call it a data-partition) and the other much smaller (usually the second, let's call it the root-partition). Further, each partition is considered as a separate disk and may independently have the first from its second owner (controller). On small partitions, root aggregates are created for both controllers, and on large partitions, Data Aggregates are created. This allows you to use only a small partition under the root aggregate instead of dedicated drives. It is important to note that this technology is available on FAS22XX / FAS25XX and AFF8XXXX systems. Root-Data Partitioning is enabled only on disks that are in the first shelf connected to the system (for FAS2XXX, disks from the first shelf are considered to be those that are in the same chassis as the controllers).
On FAS8XXX, you still need to have dedicated drives under root aggregates. Why, you ask? Because the FAS8000 is architecturally designed for a very large number of disks and against this background 4-6 disks do not play a role. For small systems, these 4-6 disks can save a significant amount of space, the same applies to expensive AFF systems, where it is not rational to spend expensive and high-performance disks for system needs.
Root-Data Partitioning is a technology that does not configure and does not turn off. It is on all new systems that come with 8.3. If the old system (FAS22XX / FAS25XX and AFF8XXXX) is updated to 8.3 and reformatted again, it will automatically enable Root-Data Partitioning and will split the disks into two partitions. Nowhere you will not be asked and warned.
The presence of at least 4 disks per controller (minimum 8 for two controllers).
If you have a new system with 8.3 or newer, you already have Root-Data Partitioning there, relax, do nothing.
If you want to use Root-Data Partitioning on your existing system, you need to transfer it to cDOT (7-Mode does not support 8.3 and ADP) and all disks will need to be formatted (all data will be destroyed! There is no other way to enable Root-Data Partitioning) .
It depends on the number of disks in the system, their type and the number of controllers (1 or 2). As a rule, you must have a minimum of 4p drives per controller. The size of the partition is selected so that as a result you get a sufficient amount of usable space for the root volume, which will occupy all the space on the root aggregate, consisting of root partitions. All possible combinations are pre-calculated and sewn into the system, this is not configurable. More accurate information on all possible combinations can be found on the website hwu.netapp.com , in the Advanced Drive Partitioning section.
Here I give a couple of examples:
What do we gain with Root-Data Partitioning and what are the benefits of this technology?
When adding new discs, we have several options:

Let's compare in which cases it makes sense to use Active-Passive, and in which it is worth using Active-Active. If you have a system of 24 or fewer disks, sharing them between controllers makes little sense only for reasons of some additional performance, which could theoretically be higher due to the fact that the data will be served by two controllers at once. The fact is that each FAS2XXX controller is designed to be able to service 144 disks (even in the case when the partner dies). You need to understand that, as a rule, the system bandwidth does not rest on the controller, but on the disk subsystem on the back end. Thus, in configurations with 24 disks and less, as a rule, no additional performance can be obtained if you simply use two controllers instead of one.
In the Active-Active configuration, you only lose 3 extra disks (2 parity + 1 Spare), which could give you more performance on the backend and more capacity.
Summary. For FAS2XXX systems with less than 24 disks, it often makes sense to make Active-Passive configurations, since front-end performance and fault tolerance do not deteriorate, performance on the backend of the disk subsystem improves and the usable space increases. For all other cases, use the Active-Active configuration.
After the initialization and initial setup of the system is completed, it will be in the Active-Active configuration by default, you need to "select" partitions intended for data (at the end of the disk name there is the end of P1 or P2) from one controller and give to the second. If you already have a data aggregate on the selected partitions, you will have to remove it, otherwise you will not pick up disks from the aggregate. This is done from the 7-Mode shell'a ( system node run -node local ). Before changing, make sure which partition is the root partition and which data partition ( aggr status -r ) You can change the disk’s upner-drive from the controller that owns it ( disk assign -s ) Each partition “works” as a separate disk: it has its own overship, which may differ from the overship of a physical disk and other partitions on the same physical disk, changing the overship of a partition is performed using the same command as for changing the overship of a physical disk.
Example:
Here P1 is the data partition of disk 0a.10.14 , the sys-01 controller still owns the partition (the command is executed from it), the partition will be reassigned to the sys-02 neighbor controller (whose Serial Number is 536880408), instead of the -s flag, you can use -o <neighborname> .
Root-Data Partitioning technology, which is hidden under the hood of the system, administrators may not even be aware of the scheme of its work. If you use the “as-is” system, there are no difficulties with its maintenance, we can say that this is a “thing in itself” that simply exists and simply works, does not cause any problems during operation. In general, the technology improves the ratio of usable space to raw , and also indirectly improves backend performance (especially when it comes to AFF, because every SSD saved can add thousands of IOPS, and we can save up to 6 thanks to Root-Data Partitioning). If you know the intricacies of Root-Data Partitioning, then at the installation stage you can gain even more in the usable space, not yielding to fault tolerance and performance.
The ADP FAQ is available at Fieldportal.
Please send messages about errors in the text to the LAN .
Comments, additions and questions on the opposite article, please comment .
ADP technology has two main applications:
- Root-data partitioning
- FlashPool Partitioning (Storage Pools)
This article will talk about Root-Data Partitioning.
Root-data partitioning
Root-Data Partitioning is used to split each disk into two partitions, one large (usually the first, let's call it a data-partition) and the other much smaller (usually the second, let's call it the root-partition). Further, each partition is considered as a separate disk and may independently have the first from its second owner (controller). On small partitions, root aggregates are created for both controllers, and on large partitions, Data Aggregates are created. This allows you to use only a small partition under the root aggregate instead of dedicated drives. It is important to note that this technology is available on FAS22XX / FAS25XX and AFF8XXXX systems. Root-Data Partitioning is enabled only on disks that are in the first shelf connected to the system (for FAS2XXX, disks from the first shelf are considered to be those that are in the same chassis as the controllers).
On FAS8XXX, you still need to have dedicated drives under root aggregates. Why, you ask? Because the FAS8000 is architecturally designed for a very large number of disks and against this background 4-6 disks do not play a role. For small systems, these 4-6 disks can save a significant amount of space, the same applies to expensive AFF systems, where it is not rational to spend expensive and high-performance disks for system needs.
Root-Data Partitioning is a technology that does not configure and does not turn off. It is on all new systems that come with 8.3. If the old system (FAS22XX / FAS25XX and AFF8XXXX) is updated to 8.3 and reformatted again, it will automatically enable Root-Data Partitioning and will split the disks into two partitions. Nowhere you will not be asked and warned.
To work Root-Data Partitioning you need:
The presence of at least 4 disks per controller (minimum 8 for two controllers).
If you have a new system with 8.3 or newer, you already have Root-Data Partitioning there, relax, do nothing.
If you want to use Root-Data Partitioning on your existing system, you need to transfer it to cDOT (7-Mode does not support 8.3 and ADP) and all disks will need to be formatted (all data will be destroyed! There is no other way to enable Root-Data Partitioning) .
- We start both controllers, go to the meteitens mode on both of them (from the boot menu)
- On both, kill all the old aggregates (all data will be destroyed! Otherwise, do not enable Root-Data Partitioning)
- We remove the overship from all disks with the disk removeownership command , we are doing it. This is important for Root-Data Partitioning!
- We go into the boot menu, write wipeconfig (instead of numbers), confirm, expect, the system will reboot twice
- (to convert from 7-Mode to cDOT, we reboot and enter the loader, change the boot parameter in the loader so that the system loads cDOT)
- We enter the boot menu again, select item 4 ( initialize all disks ) on each controller and wait for disk zerroring to finish .
What is the size of each partition?
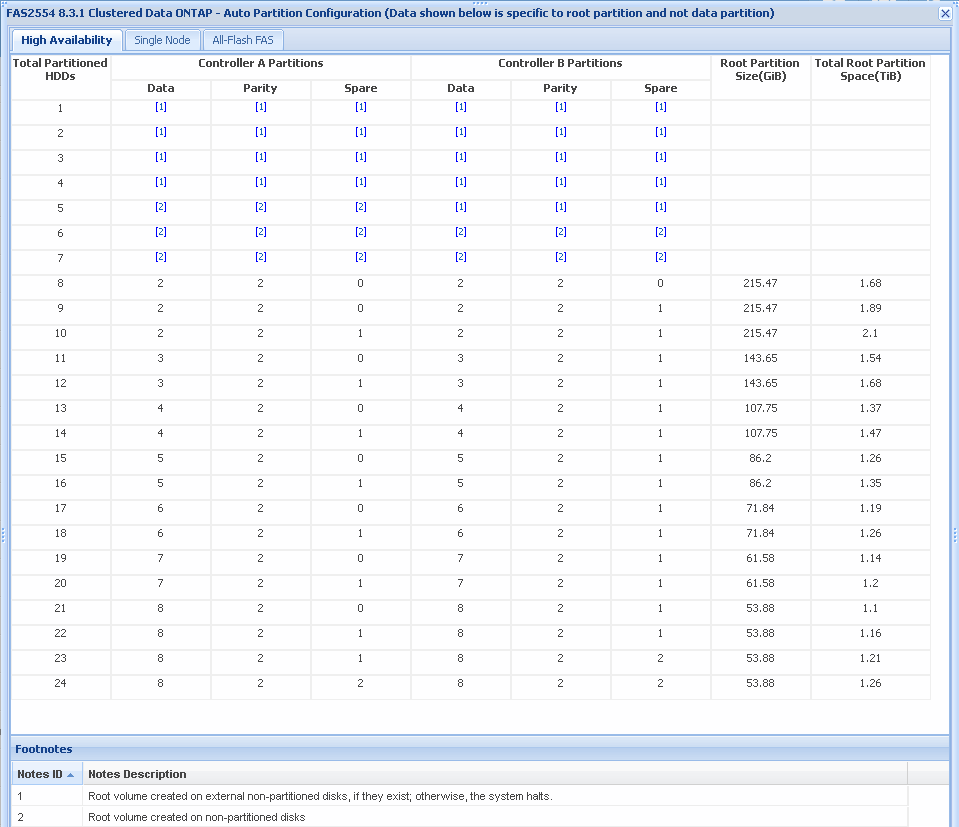
It depends on the number of disks in the system, their type and the number of controllers (1 or 2). As a rule, you must have a minimum of 4p drives per controller. The size of the partition is selected so that as a result you get a sufficient amount of usable space for the root volume, which will occupy all the space on the root aggregate, consisting of root partitions. All possible combinations are pre-calculated and sewn into the system, this is not configurable. More accurate information on all possible combinations can be found on the website hwu.netapp.com , in the Advanced Drive Partitioning section.
Here I give a couple of examples:
FAS2240-2 / FAS2552
- If the system has two controllers and 8 disks, the size of the root partition will be 110.82 GiB. So in this configuration, we get 4 root partitions per controller, one root unit per controller. Each unit will consist of 2 partitions for data and 2 partitions for parity, without a pair of partitions. The size of each root unit will be 2 * 110.82
- If there are 12 disks on the same system, then the root partition will occupy 73.89 GiB. And each root- unit will consist of the following combination of partitions: 3 data + 2 parties + 1 Spare. The size of each root unit will be 3 * 73.89
- On 24 disks, we will have a 27.72 GiB root partition and a combination of partitions for root- mounts : 8 data + 2 parties + 2 Spare. The size of each root unit will be 8 * 27.72
FAS2240-4 / FAS2554
- For HA systems FAS2240-4 and FAS2554 and 8 disks, the root partition is 215.47GiB, each aggregate t will consist of: 2 data +2 partitions, without partition spars. The size of each root unit will be 2 * 215.47
- If there are 12 disks on the same system, then the root partition will occupy 143.65 GiB, each unit will consist of: 3 data + 2 parity, 1 spart partition. The size of each root unit will be 3 * 143.65
- On 24 disks, the partition will be 53.88GiB, each unit is 8 date, 2 parity, 2 Spare. The size of each root unit will be 8 * 53.88
Usable space
What do we gain with Root-Data Partitioning and what are the benefits of this technology?
- Firstly, we win 4-6 discs that can be added to the data aggregate, even if each of them will be a little “shorter”.
- Secondly, we “remove” performance from these additional 4-6 Discs. since the Root unit is lightly loaded.
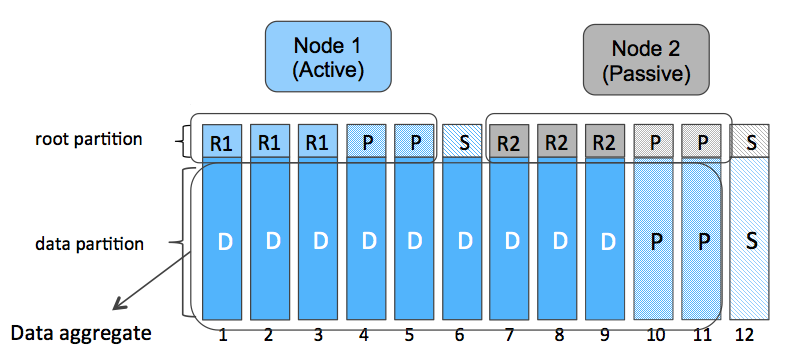
- Thirdly, we can have Active-Passive configurations, use Root-Partitioning for the operation of both controllers, but at the same time have one large unit living on one controller.
Upgrade and add new discs:
When adding new discs, we have several options:
- The easiest way is to create a new aggregate and not add new disks to existing Data aggregates that live on Data partitions.
- The second option is to add new disks to the existing raid group of the existing Data aggregate, which lives on the Data partition. In this case, the new disks will be truncated to the size of the Data partitions and will be added to this raid group. Since the size of the raid group is not infinite, it can be expanded up to 28/20 disks (SAS / SSD 26 + 2, SATA / NL-SAS 18 + 2). And if the maximum is reached, you need to go to the third option.
- The third option is when we add disks to a new raid group in an existing aggregate, which initially consists of a raid group that uses Data partitions. In this case, we will get the first group a little shorter than the second, but this is not a problem, since the latest versions of ONTAP specifically optimized the raid group operation mechanism for this purpose, now it is allowed to have a sufficiently large divergence of raid groups in one unit.
- When another shelf arrives to you, you can create a new unit on this shelf, migrate online from one of the old units built on shortened disks online. After that, change the released overship to the neighbor overship for the released shortened disks. Next, add the released shortened disks to the same shortened disks. Thus, bypassing the third option.
- When converting FAS2240 / FAS2552 / FAS2554 to a shelf and connecting them to older systems, for example to FAS8020, Root-Data Partitioning will work. This is the only way to get the FAS8XXX to work with Root-Data Partitioning.
disadvantages
- In case of failure of one or several disks, we can get degraded root and data aggregates at once simultaneously. The output of the root aggregate is not so scary because it is protected by a HA pair, and if the controller with the damaged root aggregate cannot service its disks, the HA partner will do this. If the system worked without Root-Data Partitioning, it would be possible to avoid switching units to a neighbor.
- Truncation of disks leads to the fact that part of the disk is not used.
Active-Pasive vs Active-Active
Let's compare in which cases it makes sense to use Active-Passive, and in which it is worth using Active-Active. If you have a system of 24 or fewer disks, sharing them between controllers makes little sense only for reasons of some additional performance, which could theoretically be higher due to the fact that the data will be served by two controllers at once. The fact is that each FAS2XXX controller is designed to be able to service 144 disks (even in the case when the partner dies). You need to understand that, as a rule, the system bandwidth does not rest on the controller, but on the disk subsystem on the back end. Thus, in configurations with 24 disks and less, as a rule, no additional performance can be obtained if you simply use two controllers instead of one.
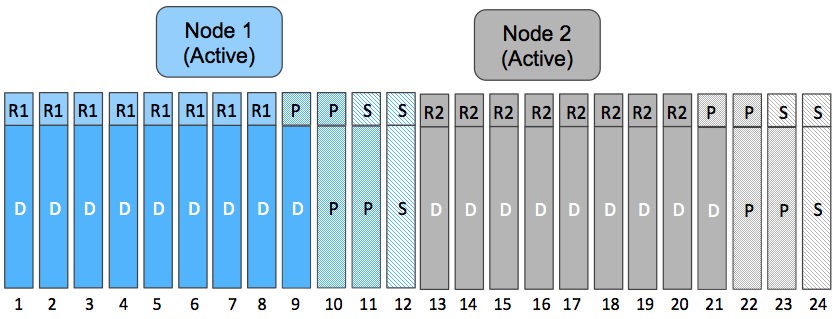
In the Active-Active configuration, you only lose 3 extra disks (2 parity + 1 Spare), which could give you more performance on the backend and more capacity.
Summary. For FAS2XXX systems with less than 24 disks, it often makes sense to make Active-Passive configurations, since front-end performance and fault tolerance do not deteriorate, performance on the backend of the disk subsystem improves and the usable space increases. For all other cases, use the Active-Active configuration.
How to set up Active-Passive
After the initialization and initial setup of the system is completed, it will be in the Active-Active configuration by default, you need to "select" partitions intended for data (at the end of the disk name there is the end of P1 or P2) from one controller and give to the second. If you already have a data aggregate on the selected partitions, you will have to remove it, otherwise you will not pick up disks from the aggregate. This is done from the 7-Mode shell'a ( system node run -node local ). Before changing, make sure which partition is the root partition and which data partition ( aggr status
Example:
sys::> system node run -node local
sys-01> aggr status rootA -r
sys-01> disk show
sys-01> disk assign 0a.10.14P1 -f -s 536880408
Here P1 is the data partition of disk 0a.10.14 , the sys-01 controller still owns the partition (the command is executed from it), the partition will be reassigned to the sys-02 neighbor controller (whose Serial Number is 536880408), instead of the -s flag, you can use -o <neighborname> .
Conclusions:
Root-Data Partitioning technology, which is hidden under the hood of the system, administrators may not even be aware of the scheme of its work. If you use the “as-is” system, there are no difficulties with its maintenance, we can say that this is a “thing in itself” that simply exists and simply works, does not cause any problems during operation. In general, the technology improves the ratio of usable space to raw , and also indirectly improves backend performance (especially when it comes to AFF, because every SSD saved can add thousands of IOPS, and we can save up to 6 thanks to Root-Data Partitioning). If you know the intricacies of Root-Data Partitioning, then at the installation stage you can gain even more in the usable space, not yielding to fault tolerance and performance.
The ADP FAQ is available at Fieldportal.
Please send messages about errors in the text to the LAN .
Comments, additions and questions on the opposite article, please comment .