3 Ways to Set Markup for Various Devices in C # / XAML Windows UWP Applications

To begin with, I would like to recall how it was possible to create universal applications in Windows 8.1. A solution was created with three projects: for the phone, for Windows 8.1 and a project with a common code. What about now in Windows 10? I'll tell you now.
This is what the universal application in Windows 8.1 looked like.

But then Windows 10 appeared and immediately a reasonable question arose:
What is it now to learn all over again?

Partly small changes really are. But if you had a good understanding of universal Windows 8.1 projects, then everything will be familiar to you. Moreover, a certain flexibility was added.
Let's first consider what devices on the Windows UWP platform currently exist (for sale, in plans or in a prototype):

Devices are united in separate families:

The ellipsis stands on the diagram, as the platform grows and the types of devices can become larger with time.
Now, instead of getting a solution with several projects for each device family, just create a folder by specifying the name of the family in its name. For example, this:
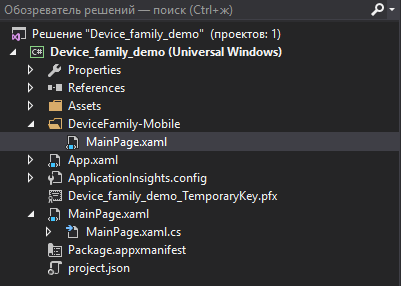
In this case, if the application is launched on a mobile device, the MainPage page from the DeviceFamily-Mobile folder will be displayed.
Moreover, note that if you create a page inside a folder called MainPage, then it will be created without the MainPage.xaml.cs code file.
This was the first way.
The second method is similar to the first, but instead of creating a folder, .DeviceFamily-Type is added to the file name.

The third method is from codebehind.
If you compile the project and consider the MainPage.gics file, you can find the overload of the InitializeComponent method, which takes System.Uri resourceLocator as a parameter
publicvoidInitializeComponent(global::System.Uri resourceLocator)
        {
            if (_contentLoaded)
                return;
            _contentLoaded = true;
            if (resourceLocator == null)
            {
                resourceLocator = newglobal::System.Uri("ms-appx:///MainPage.xaml");
            }
            global::Windows.UI.Xaml.Application.LoadComponent(this, resourceLocator, global::Windows.UI.Xaml.Controls.Primitives.ComponentResourceLocation.Application);
        }
So in order to load the desired page, we can do this:
publicMainPage()
{
if (Windows.System.Profile.AnalyticsInfo.VersionInfo.DeviceFamily=="Windows.Mobile")
            {
              InitializeComponent(new Uri("ms-appx:///MobileMainPage.xaml", UriKind.Absolute));
            }
            else
            {
                InitializeComponent();
            }
}
In this case, if the application is launched on a mobile device, the MobileMainPage.xaml page will be loaded.
Now, a little bit about how to determine in C # code which device family is currently being used. To do this is very simple with the following code:
if (String.Equals(Windows.System.Profile.AnalyticsInfo.VersionInfo.DeviceFamily, "Windows.Desktop"))
            {
// значит семейство Desktop и можно что-то нужное сделать
               }
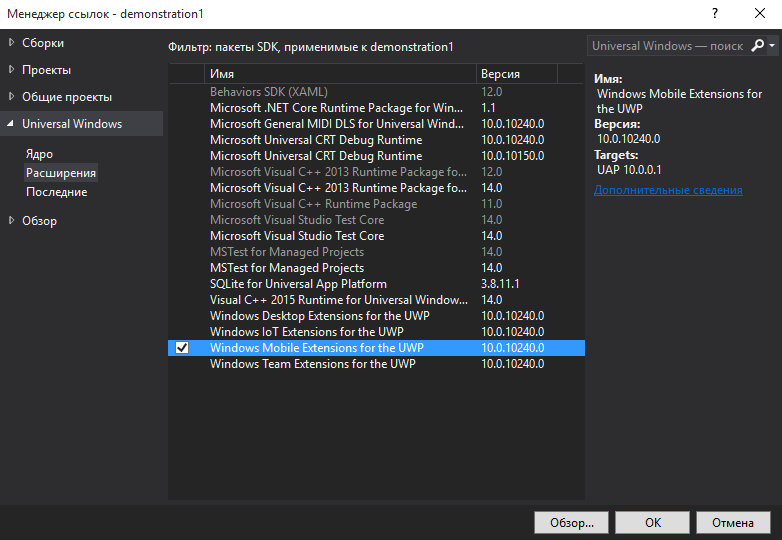
If you want to use the API of a specific device family in your application, you can add a link to any of the extensions of the UWP platform. A
hackneyed example of using the device family API is checking for the presence of a hardware Back button on the phone.
bool isHardwareButtonsAPIPresent =
Windows.Foundation.Metadata.ApiInformation.IsTypePresent("Windows.Phone.UI.Input.HardwareButtons");
            if (isHardwareButtonsAPIPresent)
            {
                Windows.Phone.UI.Input.HardwareButtons.CameraPressed += HardwareButtons_CameraPressed;
            }
        privatevoidHardwareButtons_CameraPressed(object sender, Windows.Phone.UI.Input.CameraEventArgs e)
        {
            // здесь своя реализация события нажатия «Назад»
        }
For verification, the isTypePresent method is used, which is contained in the Windows.Foundation.Metadata.ApiInformation class . This class also has other methods for checking for the availability of API capabilities (events, properties ...)
Or here’s a slightly less beaten example, which, if the device has a status bar, changes its color to chocolate:
if (Windows.Foundation.Metadata.ApiInformation.IsTypePresent("Windows.UI.ViewManagement.StatusBar"))
            {
                var statusBar = Windows.UI.ViewManagement.StatusBar.GetForCurrentView();
                statusBar.BackgroundColor = Windows.UI.Colors.Chocolate;
                statusBar.BackgroundOpacity = 1;
            }

An example can be found on GitHub